![How to Dictate on Mac [Speech to Text]](https://www.notta.ai/pictures/how-to-dictate-on-mac-cover.jpg)
How to Dictate on Mac [Speech to Text]
Saving time and effort with Notta, starting from today!
Typing is among the most performed activities on Mac, just like other computers. From internet surfing to content creation and even fun activities, I tend to have a need to type something.
Fortunately, with the advancement in technology comes numerous improvements to help reduce the stress and time typing takes. One such improvement is dictation on Mac.
Sounds familiar? If not, I have detailed everything you need to know about this feature in this guide. If yes, I have added some tips to help you explore it better. Read on to find out more.
How to enable dictation on Mac?
Dictation is one of the free features on Mac. It allows you to dictate words anywhere you can type them on your device.
The feature is easy to use and does not require an internet connection, provided your Mac comes with an Apple Silicon chip and your request is within the supported language. However, you will need an internet connection on devices with Intel-based chips.
The process of enabling speech-to-text on Mac is straightforward, as shown below:
Click the Apple menu icon on your Mac and select ‘System Preferences’.
Select the ‘Keyboard’ option in the left pane.
Click the ‘Dictation’ tab at the top.
From here, tick the ‘On’ button before Dictation.
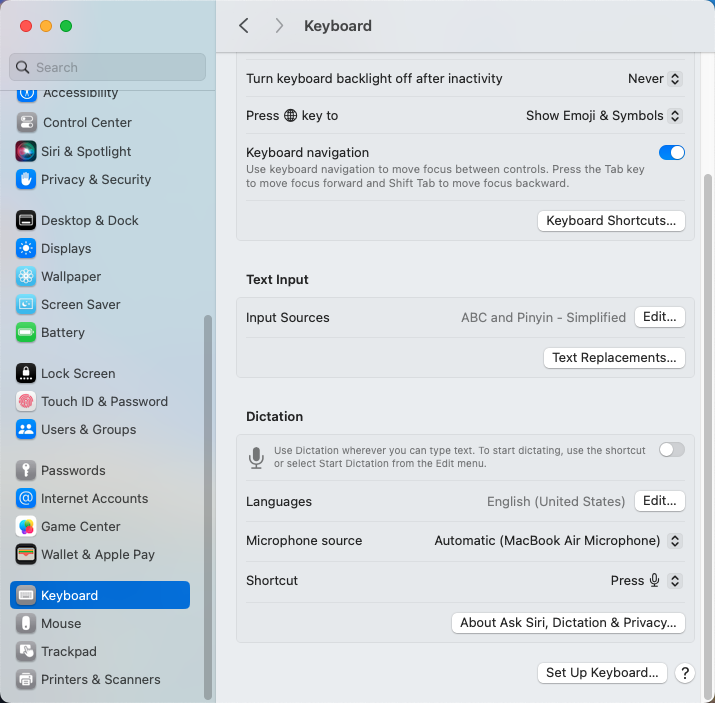
Finally, click ‘Enable Dictation’ If you get a privacy warning pop-up.
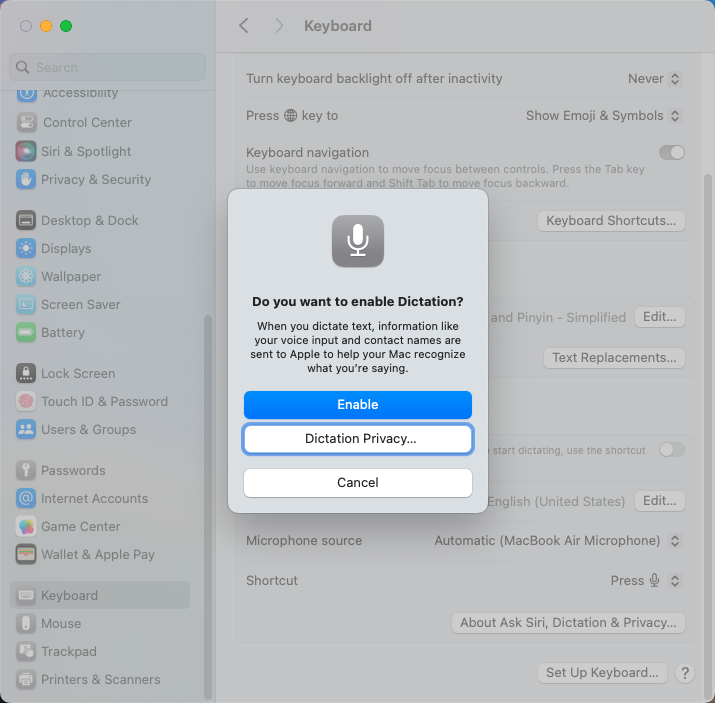
With this, the dictation feature should be active on most Mac computers. However, the steps differ slightly on the latest macOS Ventura and Sonoma. As shown below:
Click the Apple menu on your Mac and select System Settings.
Scroll down and select Keyboard in the left pane.
Now, toggle the switch before Dictation forward to enable it.
To disable dictation on Mac, repeat the steps above and select the Off option or toggle the switch off, as in the case of macOS Ventura and macOS Sonoma.
Setting the Dictation keyboard shortcut
To make using the Mac voice-to-text feature easier, you should create a keyboard shortcut for starting dictation quickly. Below are the steps to follow:
Click the Apple menu and select ‘System Settings’ or ‘System Preferences’, depending on your device.
Select the ‘Keyboard’ option in the left pane.
Click the ‘Dictation’ tab at the top if applicable on your device.
Now, click the dropdown menu before the Shortcut option.
Choose among the suggested options to create to set it as your keyboard shortcut.
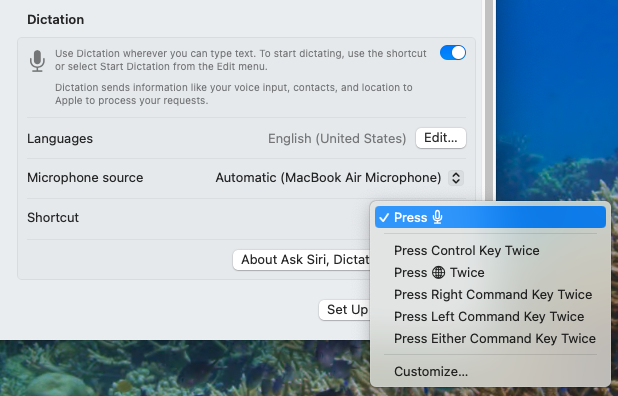
Finally, you can click the ‘Customise…’ option to set your preferred shortcut.
Notta can convert your spoken interviews and conversations into text with 98.86% accuracy in minutes. Focus on conversations, not manual note-taking.
How to dictate on a Mac computer?
After enabling the dictation feature, here's how to voice type on your Macbook:
Open the app or document you want to type on and place your cursor where you want to add your text.
Use the dictation keyboard shortcut you selected in the section above or press the key with a Microphone icon if it is available among the function keys. You can also select ‘Edit’ on the page and choose ‘Start Dictation’.
You can start dictating your text when you hear a tone to show that the Mac is ready for dictation or you see a microphone icon above or below the highlighted cursor.
Finally, press the Escape button or your dictation keyboard shortcut when you're done. It is also important to note that the speech-to-text feature stops automatically if you do not say anything for 30 seconds.
That’s how to use dictation on Mac easily. Additionally, to maximize the dictation feature and capture your voice better, apply the tips below:
Make sure you speak clearly and directly into your microphone.
To use an emoji, you only need to say its name. E.g. “Smile emoji”.
Saying the name of a punctuation mark will insert it into your text. The exception here is period, comma, and question marks that are inserted as you dictate.
Click the web sign or the language option next to the microphone icon to change languages as you dictate.
To add a new line or paragraph, you only need to say “new line” or “new paragraph,” respectively.
The best alternative to Mac dictation
While the free Mac voice-to-text feature is impressive, it might get tiring. This is because you have to take it slowly with it, with some users suggesting that you should not go beyond 40 seconds without a pause.
Also, there are times when the feature just stops working altogether, as reported by many users. These and other limitations are reasons you should consider an even better alternative in Notta.
Notta is an AI transcription tool that uses cutting-edge technology to convert your speech to text in minutes or seconds. This tool boasts high accuracy and supports up to 58 languages.
What's more, you can convert audio to text from multiple sources. You can use the Record an audio feature to dictate and get the transcription in real-time. There is also the option of uploading videos from YouTube, audio files from Google Drive, or transcribing your live meetings and interviews.
So, you are never short of options on Notta when you want to convert your speech to text.
Below are the steps to follow to dictate with Notta on Mac:
Login to Notta to enter your dashboard.
Click the dropdown under the Transcription Language section and select your language.
Now, click the ‘Record an audio’ button.
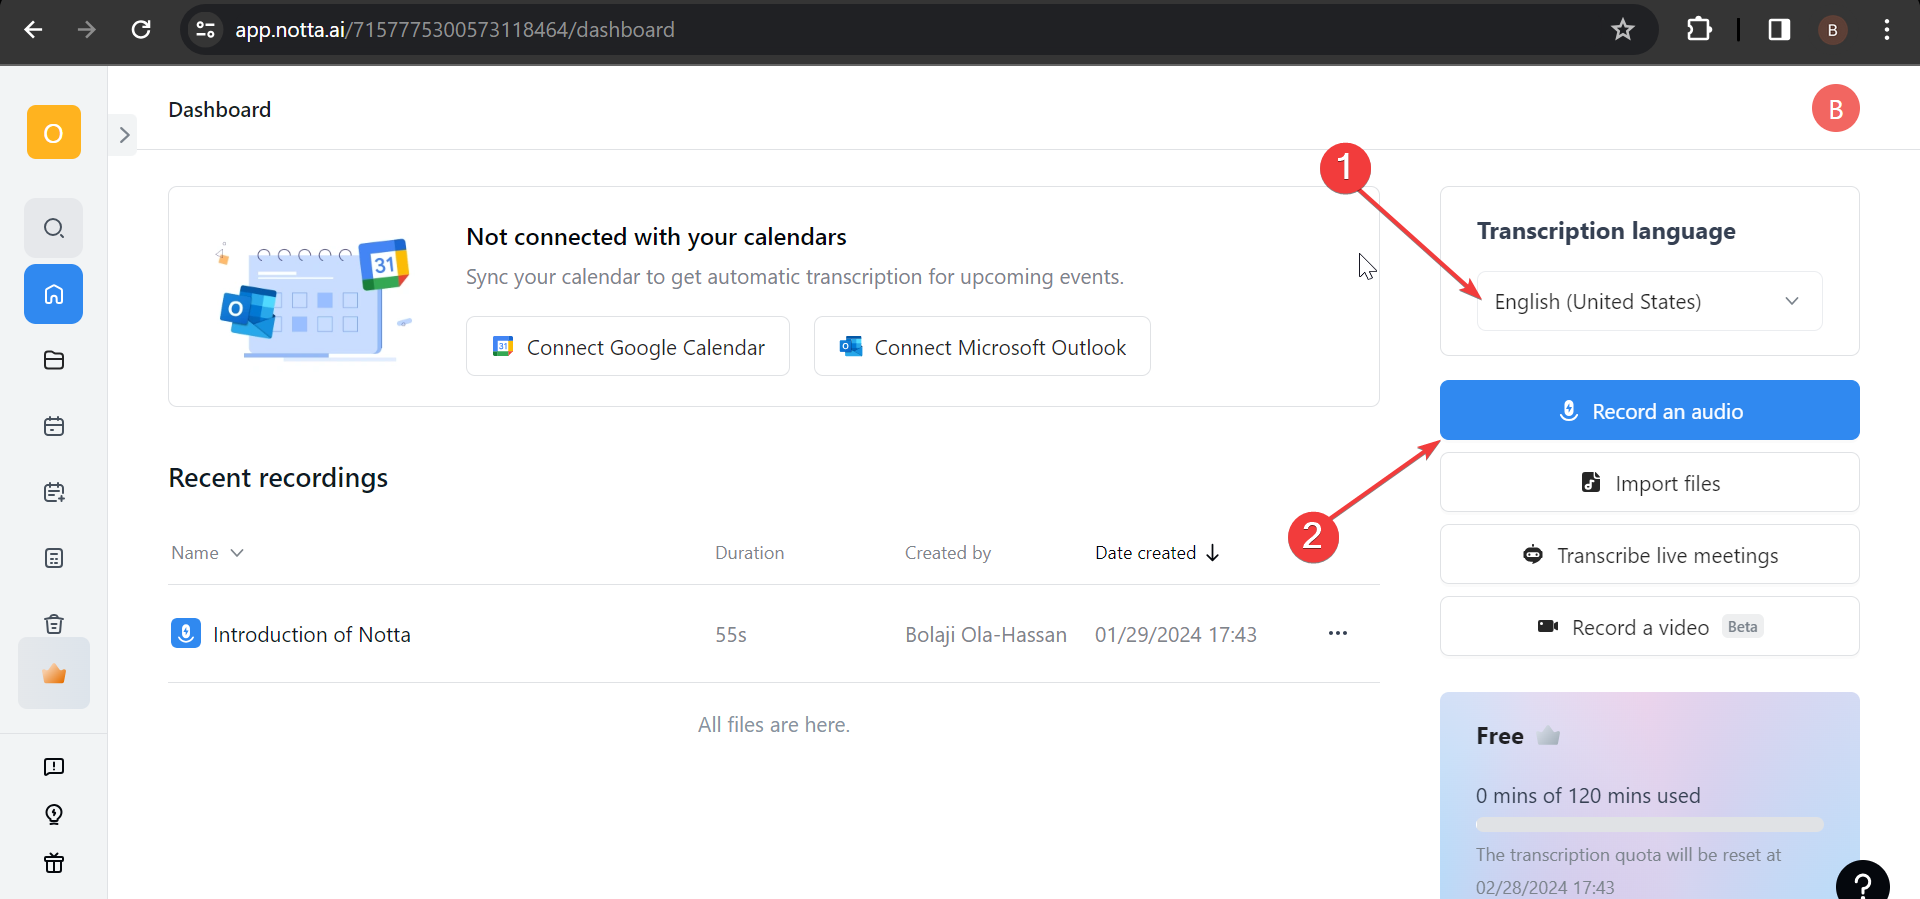
Click 'Allow' if you get a notification that Notta wants to use your microphone.
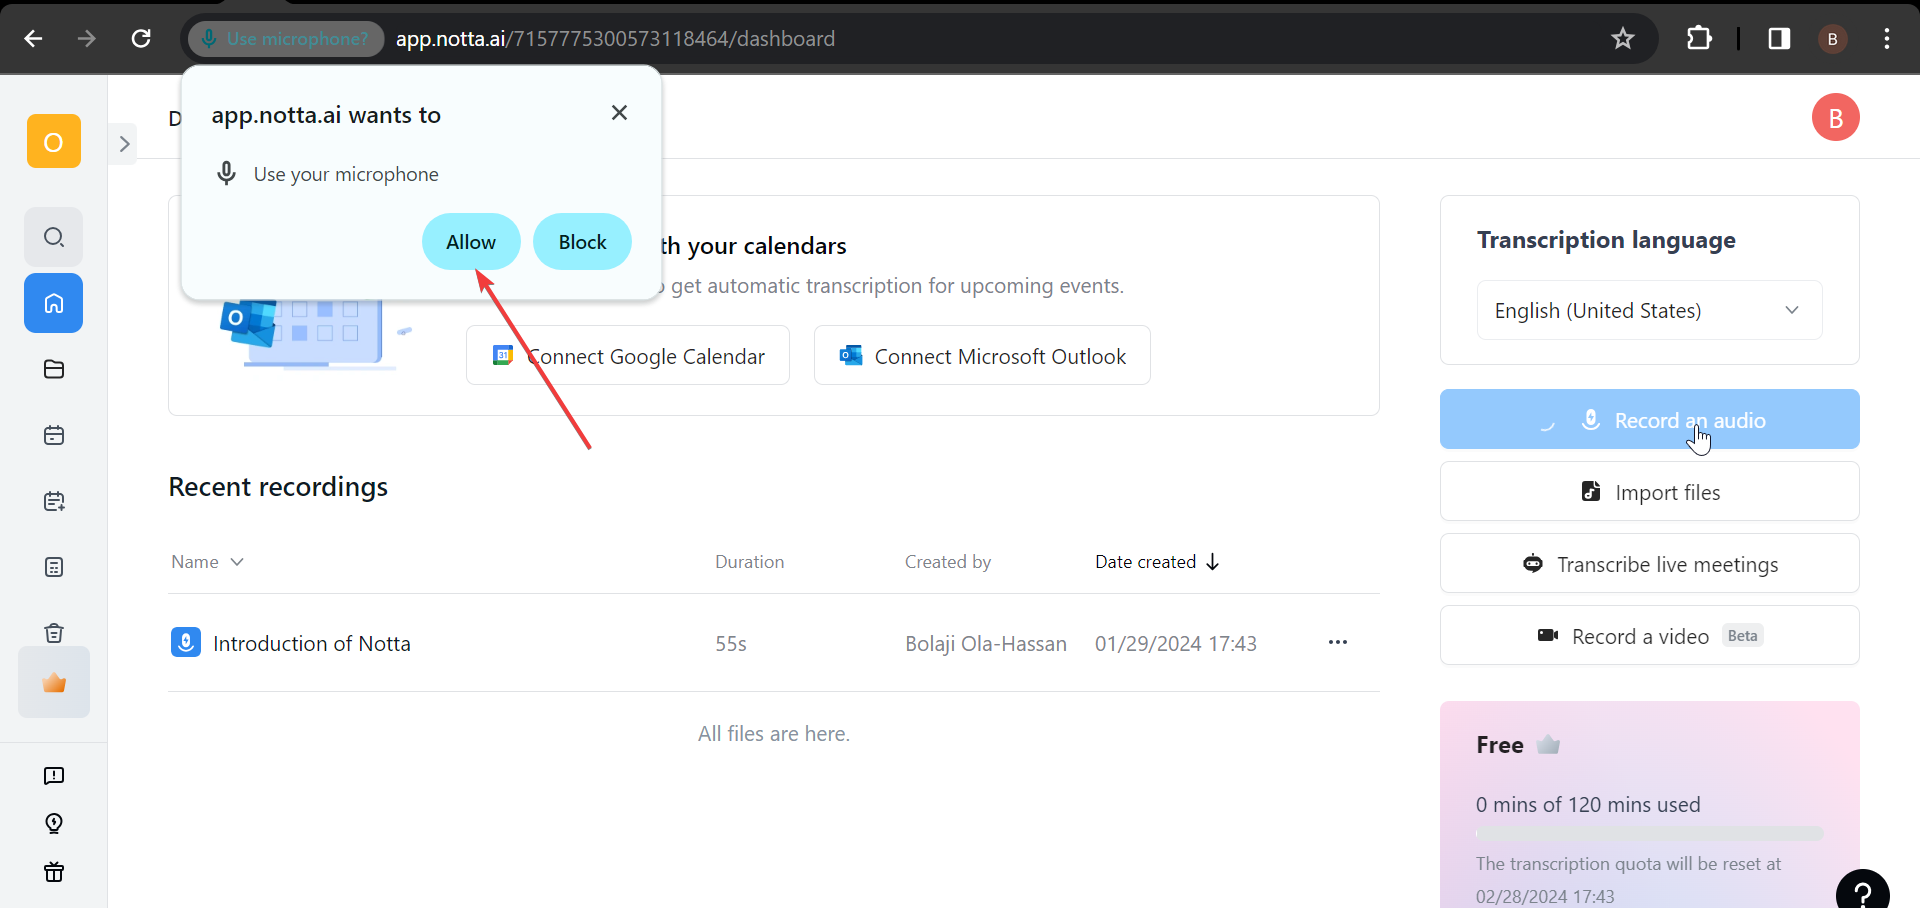
Finally, speak clearly, and Notta will convert your speech to text in real-time.
Use Notta's AI transcription tool to quickly and easily transcribe audio and videos. We guarantee accuracy and ease of use.
What to do when dictation is not working
Some users have been complaining that dictation on Mac is not working for some reason. I will show you how to fix this problem in this section.
But before proceeding to the sophisticated solutions, try the following troubleshooting steps:
Restart your computer.
Check your internet connection.
Ensure you have enabled Dictation, as shown earlier.
Ensure the dictation keyboard shortcut you are using is correct.
Disconnect Bluetooth devices.
If you still can't solve this problem, you can try the fixes below:
Delete preference files
Open ‘Finder’ and select the ‘Go’ option.
Click the ‘Go To Folder option and type the path below:~/Library/Preferences/com.apple.assistant.plist
Finally, drag the file to ‘Trash’ and restart your computer.
Disable Voice Control
Click the Apple menu and select ‘System Settings’.
Choose ‘Accessibility’.
Now, select ‘Voice Control’ under the Motor section.
Finally, toggle the switch backward to disable it.
Update your computer
Press the Command key + Spacebar to open Search.
Type Check For Software Updates in the box and press the Return key.
Finally, download any available updates and restart your Mac.
Use voice to text to save time
Typing can be tedious and time-consuming, depending on the number of words. But with the dictation on Mac feature, you can save time and stress by just talking to your computer.
With the tips mentioned in this guide, you can explore talk-to-text on Mac extensively. However, as good as the feature is, it has downsides and limitations.
This is why we recommend using an advanced dictation tool in Notta that takes the whole speech-to-text on Mac to another level of efficiency and accuracy.