How to Do a Voice Over Like a Pro: The Comprehensive Guide
98% accurate, real-time transcription in just a few clicks. 58 languages and multiple platforms supported.
Voice-overs are almost a prerequisite for anyone making videos to share with an audience. When the voice is good, it draws interest to the video, emotionally connecting with the audience and establishing trust.
Unfortunately, not many people are comfortable with their voice and find sharing it embarrassing. While you can pay professional voice actors for this service, it is costly, especially if you need a regular supply of voice-overs for your videos.
But what if you don't have to rely on others for your voice-overs? You too can make your recording to save on cost, gain creative control over the entire process, and work at your own pace and schedule.
Join us as we cover everything you should know about voice-overs and teach you how to record one yourself.
What is a voice-over?
A voice-over recording is a video production technique that involves making an audio recording and adding it to a video to describe, highlight, explain, and provide additional context to the visuals. If you are a nature enthusiast like me, you may be familiar with ‘David Attenborough’s’ voice, which is common in many nature documentaries. Such a soothing voice behind the camera, where you can’t see the person narrating it, is what we call a voice-over.
While you can also refer to this as narration, it is not entirely the same. Narration involves telling a story through recorded voice to provide commentary or bring your screen characters to life. However, the use of voice-overs extends to more than storytelling. It’s also common in commercials, instructional content, radio, audiobooks, podcasts, and presentations.
How to record a voice-over
Recording a voice-over is as simple as it sounds: using a microphone to record your voice and adding it to a video. Everything starts by ensuring you can record a good-quality voice-over. This means that you need to:
1. Choose a good microphone
When using a laptop/desktop to record your voice-over audio, your initial thought process might be to use your device's built-in microphone; this may save you a lot of trouble, and time. Unfortunately, the audio quality from these mics can be moderate or even poor.
Therefore, the wise decision is to invest in a good microphone to achieve the desired results. The most suitable mics for voice-overs fall under two categories, depending on your recording environment and budget. These are:
(1) A condenser mic: These mics have a high sensitivity to audio vibrations in a room making them the best for voice-overs.
(2) A dynamic mic: Unlike condensers, dynamic mics use an electromagnet to convert sound to electrical signals. As a result, they are not as sensitive as condensers. These mics are effective in areas with extra background noise.
You can also break down the different microphones suitable for voice-overs depending on how they connect to your device. You can choose between USB and XLR. USB mics connect straight to your computer through a USB cable.
They are much more affordable and convenient since no external interface is needed. XLR mics, on the other hand, require an audio interface to help convert analog recordings into a digital format that the computer can read. The interface reduces interference and noise, ensuring the audio output is clean. Moreover, it allows you to connect multiple microphones at the same time without affecting the quality of the recording.
Some really good voice-over mic examples include:
Audio-Technica AT2020: Ideal for beginners
Category: Condenser
Connection type: XLR
Blue Snowball iCE: Best budget mic
Category: Condenser
Connection type: USB
Shure SM7B: Best Mid-range option
Category: Dynamic
Connection type: XLR
Heil PR-40: Best for Pro VO’s
Category: Dynamic
Connection type: XLR
Choosing a good microphone for your voice-over is more complex than just analyzing their price -tags. You need to find one that can complement your voice, allowing you to convey your emotions to your audience. Consider attributes such as the deepness of your voice; use mics with low frequencies for a deeper voice. If your work involves making narration voice-overs, consider using mics with a high dynamic range. Remember, clarity is what you are aiming for. Therefore, go for a mic with a low signal-to-voice ratio.
2. Choose your audio software
Next, you must find an audio recording software to help you record and process your voice-over recording. When looking through the available options, Notta stood out as the best voice-over recording software because:
It is simple enough to use, even for people who aren't professional voice actors.
It delivers an output compatible with most video editing tools. You can export the audio as an MP3 and the transcript as a srt file.
It is cost-friendly to the user.
It provides the user with an accurate AI-generated transcript of the audio file. You don't have to manually transcribe or spend more on getting a transcription service.
You can also use the tool to create screen-recording voice-overs
Notta can record and convert your spoken interviews and conversations into text with 98.86% accuracy in minutes. Focus on conversations, not manual note-taking.
3. Write a script
Now that you have identified all the tools necessary to record your voice-over, all that is left is recording. But before you can do so, prepare a script to guide you in bringing your story to life. Ideally, this may be the most important part when creating a voice-over.
A voice-over script is just like a painter's canvas. This is where you set the artistic direction you want to take by highlighting specific details such as:
The voice of the artist: Who is the speaker? Is it a child or an adult?
The accent in use: British, Aussie or American?
The tone and mood: Are you looking for a sobre, upbeat, or cheerful mood?
Intonations and transitions: Which areas do you want to emphasize and draw attention to?
The creative concept: What big idea will you tell your audience? Is there a unifying theme or an emotional response you want to elicit?
Conclusion: the conclusion must be memorable with a clear call to action.
Simply put, your voice-over script intends to help you craft a believable and convincing story for your audience to meet your vision or expectations.
There are two types of scripts that you can write:
Commercial voice-over scripts: These are scripts created to persuade an audience to purchase a product or service. They are often timed, use persuasive language, and use a standard format consisting of a headline, tagline, and critical message. Examples include TV/radio commercials, promotional videos, Public service announcements (PSAs), and Event Announcements.
Non-commercial voice-over scripts: These are the more diverse voice-overs that help convey information to entertain or educate the listeners. They are driven primarily by research or personal interest. Examples include documentary narration, podcast intros and transitions, character voice-overs, voicemail, and narrative-based videos.
Before writing any script, be clear about:
What you want to say.
Who you are speaking to (the audience).
And who is your persona: the voice narrating the message?
Once you are clear on these three things, you will know how to tone, pace, and deliver your message effectively.
4. Do a test recording
Now that you have the script, the next step is conducting a test recording before the final professional voice recording. This test recording plays two critical roles:
It allows you to assess all the hardware components to ensure they work seamlessly. Establish a routine of constantly testing your recording kit before starting any recording session. This will save you from wasting time by re-recording your voice-over due to your negligence of not setting up your equipment correctly.
It enables you to practice making voice-over narrations and then playing back to listen and make critiques. When practicing, you want to pay close attention to:
Your recording's background noise: Does the microphone sive out the noise in the background? If not, consider moving your recording to a more quiet environment.
Your breathing: During your voice-over test recording, you can learn to time your breathing with the script to make a smooth and natural delivery. Work on your nerves, as they can affect your breath. Ensure that your lungs are full of air throughout the narration. It may be challenging to start, but with enough practice, you will get more comfortable with the recorded results.
Your recording's pace, projection, and pitch: You will naturally know if your pacing, pitch, and voice projections are correct as you practice your recording. Only start recording if you are comfortable with the results of your last test.
5. Record your voice-over
To record your voice-over with Notta, follow the steps below:
Step 1: Connect your microphone to your device.
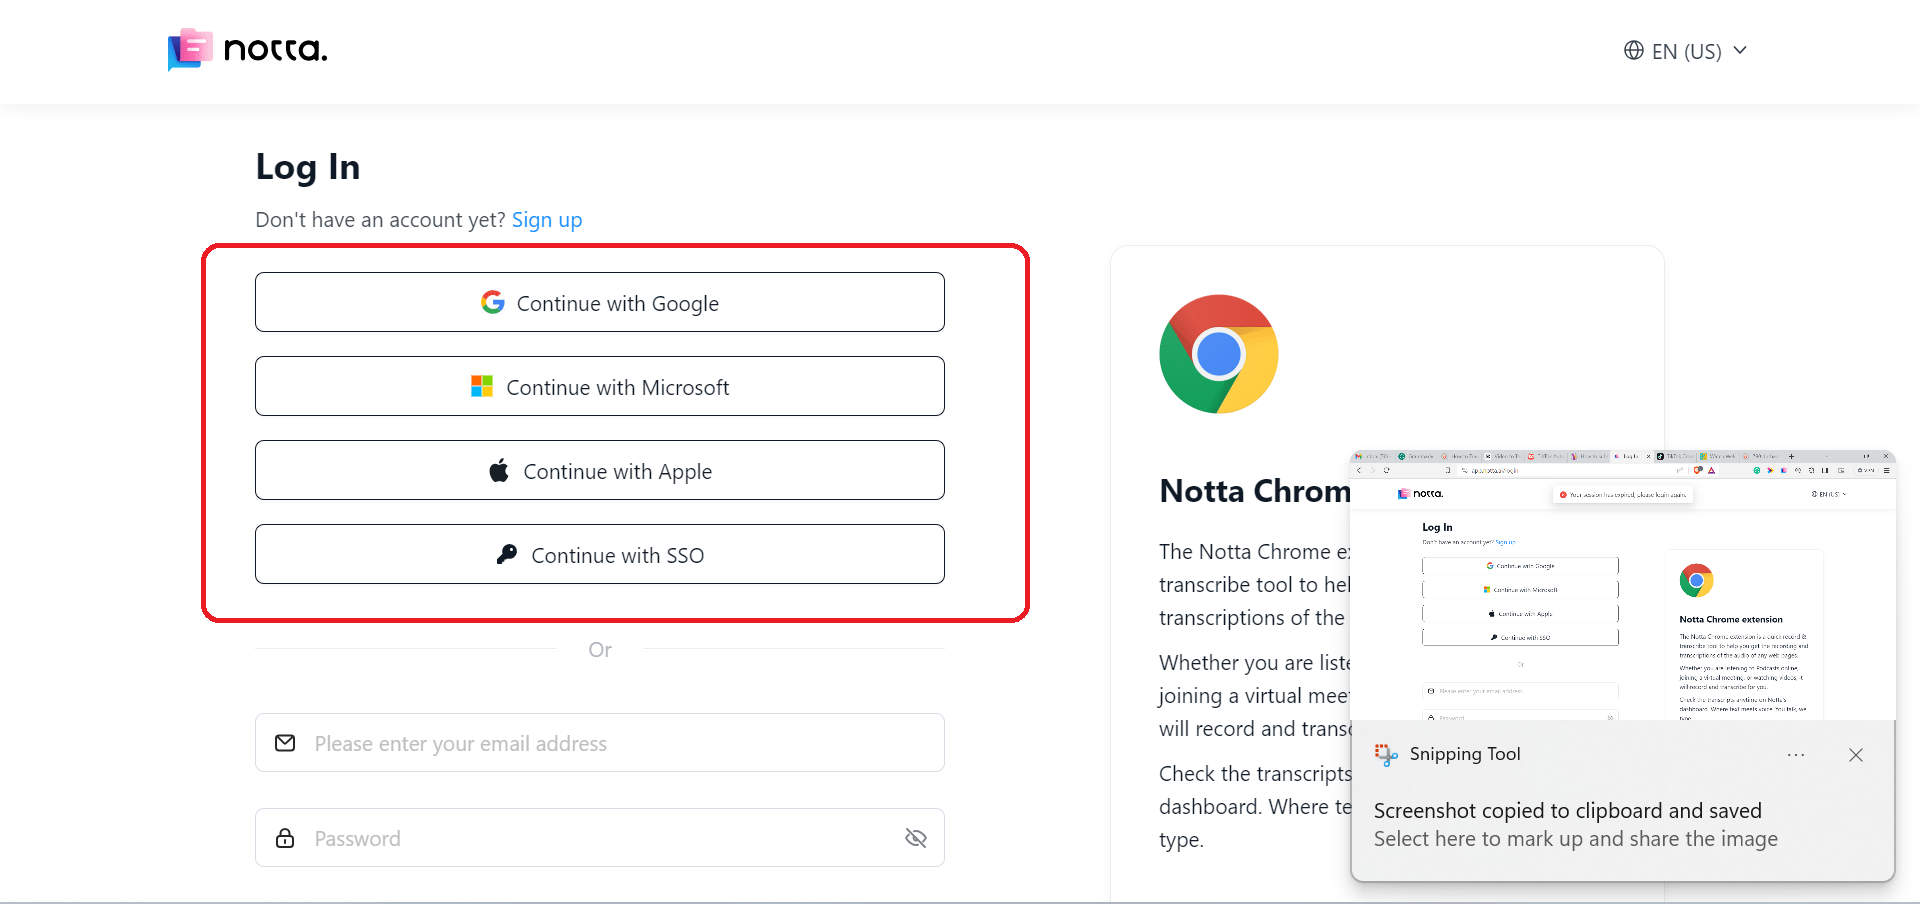
Step 2: Log in to your Notta account to access the dashboard.
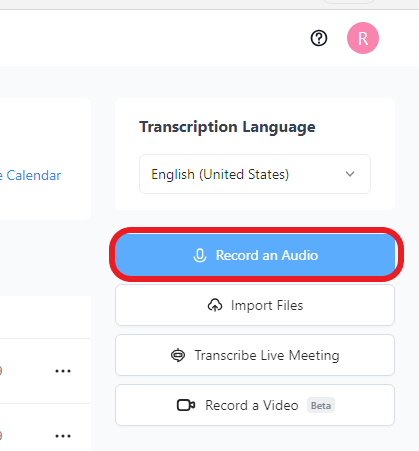
Step 3: Click on record audio on the right hand of the screen.
Step 4: Allow the browser to enable microphone access and set the microphone you intend to use.
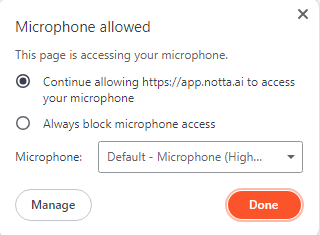
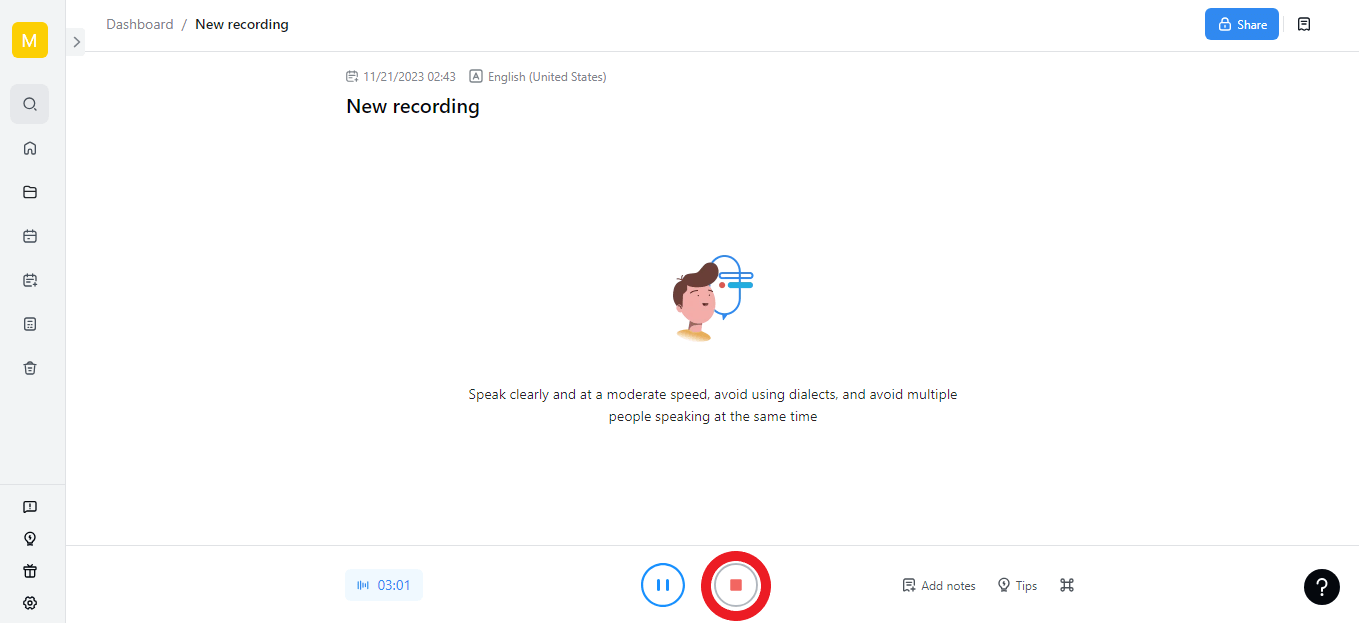
Step 5: Record your voice-over. Once done, click the 'red stop button' on the bottom center of the screen.
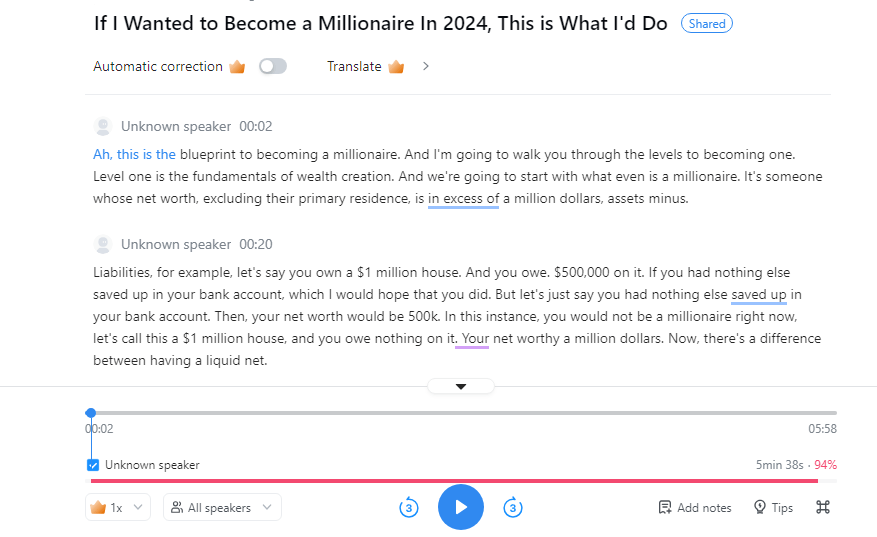
Step 6: Edit the generated transcript to eliminate grammatical errors.
Step 7: Click 'download' at the top right corner to export the high-quality audio (mp3) and transcript (Subs srt file).
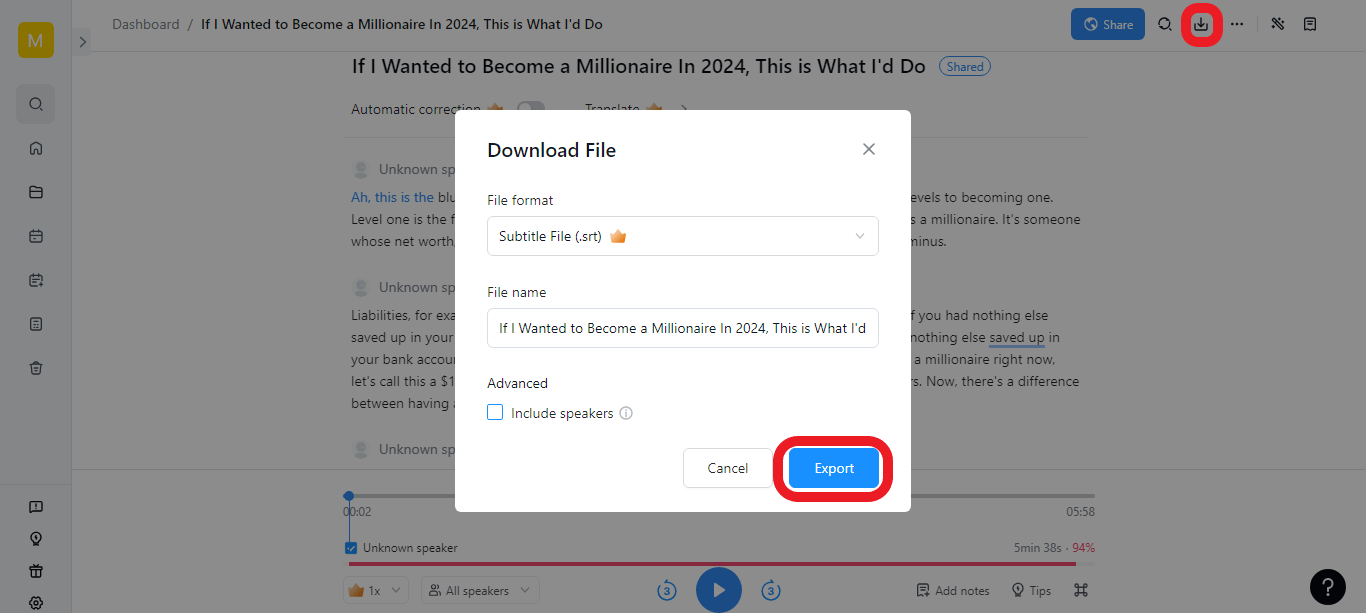
Notta provides automated transcripts with time stamps in minutes, meaning you can download them as captions. You only need to edit the voice-over, download it as an SRT, and import it to your video editing software.
6. Import your audio and captions to your video editor
You can work on this step independently if you have the technical skills to edit a video. After all, it only involves merging the subtitle file, voice-over, and visuals. While editing sounds easy, there are several things you need to remember to achieve the best result:
Match the video's audio rate to the voice-over's sample rate to avoid synchronization errors.
Ensure a consistent bit-depth between your video and audio file.
Streamline your workflow by organizing your tracks during editing. You can do this by separating your audio and visuals.
Ensure the captions, visuals, and voice-over sync for a smooth viewing experience.
Align the captions properly to avoid covering any essential visuals. Additionally, use the right font and color to enhance readability.
Before exporting the final draft, test the video's visibility on the various devices and screens your audience will use to view it.
N.B: If you don’t have the technical skills necessary to edit a video, consider hiring a professional to do this for you. A poor edit will waste all the hard effort you put into recording the voice-over.
Why is a good voice over important for your video?
A good voice-over narration can make a powerful addition to your marketing strategy, especially when creating instructional or explainer videos. This is because:
It provides validity and authority to your videos: When you deliver your voice-over with clarity, authenticity, and confidence, you create a ripple effect of credibility where your audience will view your videos as reliable and trustworthy. Trust is what validates your content. If you are consistent enough, you will establish a brand authority in your industry allowing your audience to perceive you as an expert in a given field.
It enables your audience to connect emotionally to your message: Depending on your intended message and sentiment, a voiceover can help you resonate with your audience's emotions. This is especially important if you are creating a narrative-driven video. A good voice-over will help draw your audience into the story, making them more likely to take action. For example, when creating a voice-over for a charity organization that supports orphaned children in war-torn countries, you can use empathy and sincerity in the tone to connect emotionally to the audience. As a result, they are more likely to be driven towards taking action by sharing the information or contributing to the cause.
Gives your video a sense of direction: A good voice-over guides your narrative, bringing together the characters and the plot and outlining a clear direction for the audience. You can also use it to transition the audience between several topics to make the video seamless.
Fill up for the missing elements, shots, or footage: In areas where your visual content may not be enough to deliver a story, voice-overs can provide enough context to fill those gaps. For example, when explaining complex topics, you can use a voice-over to provide the needed explanation to allow your audience to understand the concepts thoroughly.
Do I need to hire a pro to do a voice-over?
Not really.
While a professional voice-over artist can deliver quality voice-overs, they are pretty expensive to hire and use. This expense is unnecessary, especially if you are new to the trade and lack enough resources.
One major misconception many people have is that you need a ‘Morgan Freeman’ kind of voice to get a good voice-over. While a striking voice has its charm, a good voice-over involves much more than that.
It's also about how to use your voice to tell a story. You must learn to embrace its natural qualities by playing around with the pitch, timbre, and tone to maintain attention. You should also learn how to use your recording and editing tools to deliver high-quality professional voice recordings. Once you master all these, you can create your voice-over without the help of an external party.
What is a good voice over?
There are four key elements that make up a good voice-over:
Audio clarity and volume
Your audio should have the right volume and clarity to be comfortable for listeners. Understandably, the main idea behind a voice-over is to convey a message to your audience.
A clear voice-over illustrates your professionalism, expresses your emotions, and captivates your audience. Contrary to this, your audience will lose interest in your video and switch to something else.
The loudness of your voice also plays an integral role in your video’s audibility. By varying the loudness and softness of your voice, you can strategically create a sense of urgency, emphasize particular areas, and make your voice-over more appealing to the listeners. In some instances, your volume can also give the perception of distance, e.g., in video games, to make the experience more immersive.
N.B: Strategically variating your volume is way better than using a consistent tone in a voice-over. A consistent voice volume becomes monotonous with time and may tire out your audience. When dynamic, your fans will likely stay with you throughout the session.
2. Pacing
While excitement can make you unconsciously rush your narration, it pays to learn how to pace yourself in a voice-over. You need to get your rhythm and pacing right to communicate effectively. Too fast, and you risk making your listeners struggle to remember the essential details. Too slow, and they may as well lose interest in your video.
Strive to achieve a natural but deliberate pace when creating your audio. This will ensure your story unfolds smoothly, allowing you to retain your audience's attention.
So, how do you do this? Always prepare and work with a script when making your voice-overs. Preparing a script early gives you time to go through your lines so that you can deliver them convincingly and authentically.
Pacing is about more than just speaking fast or slow. It's also about timing your audio and visuals right. Ensure your audio syncs with the accompanying visuals to make the overall message coherent.
3. Vocal tone and inflection
Did you know that your ear can distinguish up to 1378 tones? While the number may appear unimportant, it is significant to a professional voice actor. It means they have over 1000 ways to use their voice to stand out to their audience. This is possible through changes in vocal tone and inflection.
By changes in vocal tones, I mean variating between a high and low pitch. This makes your voice richer with more emotion. On the other hand, inflection refers to the rising and falling of your pitch at the end of a sentence. A rising inflection is common when asking a question or showing uncertainty, while a falling inflection is associated with declarations or commands.
N.B: While tone and inflation play an important role in the quality of your voice-over, do not overdo them. You don’t want to sound fake and off-putting to your audience.
4. Pronunciation
Your pronunciation can determine if your audience understands your voice-overs. To speak clearly and accurately:
Ease down on the technical terms your audience may find unfamiliar.
If you use words with challenging phonetics, practice their pronunciation thoroughly beforehand.
Pay special attention to regional accents. Using a few words to suit your target audience may work in your favor. However, strive to use a neutral accent for a much safer result.
Voice-over tips for beginners
Creating an incredible voice-over does not only hinge on having an incredible voice; you need to work hard to hone your skill and talent. Here are some tips to help you create stand-out voice-overs:
Start with the script:
Your script is your guide to delivering an effective voice-over. After creating one, take time to practice it by reading aloud. You want to master punctuation, intonation, timing, pacing, and breathing. You need to know when to create emphasis and when to use a soft tone. Therefore, take your time to learn how to interpret your writing and bring it to life with a voice-over.
2. Understand your audience:
‘Who are you speaking to?’
Knowing who your audience is and how they like being spoken to will help you tailor your speaking style, tone, and pace to their preferred style. For example, if you are making a voice-over for a children’s educational video, you may want to use a warm and friendly tone with a high, playful pitch and slow pacing to make it easier for children to follow through. However, if you create a voice-over for a business podcast, you may use a more serious tone with a moderate but mature pitch and a brisk pace with strategic pauses to raise interest in the overall show.
3. Use only top-quality equipment:
While you may not necessarily need the best equipment in the market, ensure that your equipment is top-quality. Start with a decent microphone that can record clear audio even in an environment with minimal noise. Use an audio software like Notta that can record and generate accurate transcripts in minutes, and finally, invest in good editing software like Premiere Pro to combine your video and audio voice-overs.
4. Warm up before recording:
Your voice needs to be at its utmost best before recording your voice-over. Therefore, performing simple vocal exercises to warm your voice is ideal to ease the muscles in your throat and make your voice clearer and crispier. Some warm-up exercises that may benefit you include jaw release, lip trills, lip buzzing, humming, breath control, and articulation exercises such as tongue twisters.
5. Listen to other voiceovers:
Listening to voice-overs by other creators is one of the best ways to learn what you must do when creating your own. You want to understand how they maintain rhythm and engagement and use their tone to deliver specific emotional impact. Pay close attention to what works well for them and their shortcomings, then plan to achieve even better results.
6. Ask for Feedback:
Feedback from other professionals is one of the best ways to get an honest opinion of your work. You can ask your mentor, industry professionals, or peers to rate your work and provide you with their insights. You can then use this information to grow and improve your skills.
FAQs
Do I need to hire a professional to get an excellent voice-over?
You don’t have to hire a professional to get a high-quality voice-over. You can create one yourself with the right tools, i.e., a top-quality microphone, good audio software like Notta, and video editing software like Premiere Pro. You must also invest time to learn how to record high-quality audio and edit the video. Creating your voiceovers is only feasible for personal projects or when handling a small-scale production. When running a large-scale project where quality and quantity are in question, you may consider hiring a voice-over artist to get the best results.
What software works best for voice-over recording?
Many software options can aid with professional voice-over recording. You can use a free tool like Audacity or GarageBand for Mac users. They are highly effective since they allow you to edit your audio by reducing the noise and adding any necessary effect. Unfortunately, these tools cannot provide you with the audio transcripts. My favorite voice-over recording tool is Notta because it can record high-quality audio and provide accurate real-time transcripts. You can edit the transcripts from the platform and download them as ready-to-use SRTs that you can attach to your video.
Can I record a voiceover on a laptop and iPhone?
Yes, recording a voice-over on a laptop and an iPhone is possible. Notta has a web app that is functional on all web browsers on your laptop, allowing you to record the audio seamlessly from any laptop or desktop. It also has a mobile app that you can use to record and transcribe your voice-over. All recordings are saved automatically into the platform, making it easy to access them from any device at any time. Moreover, you can share the recordings and transcripts with your friends by clicking a few buttons.
How to voice-over a screen recording?
Creating a voice-over for a screen recording means explaining an ongoing screen recording. To do this:
Log in to Notta on your laptop.
Access the dashboard and click ‘Record a video’ on the right side of the screen.
Choose whether to live-screen record the screen, camera+screen, or camera only.
Select your microphone and click ‘Start recording.’ The recording will start after a three-second countdown.
Click on the red stop button to end the recording.
Navigate back to the dashboard to find the saved screen recording.
Which type of microphone should be used for professional voice-over recording?
The microphone you use plays a vital role in determining the audio quality of your voice-over. Before choosing one, you need to consider your environment and budget. You can choose:
A condenser mic: This mic has a thin diaphragm that increases its sensitivity, allowing it to pick up even the slightest sound. It’s the best for recording voice-overs in studio set-ups.
A dynamic mic: This mic captures fewer details than condenser mics. Their ability to handle high sound pressure makes them suitable for recording voice-overs in venues with many background sounds.
USB microphones: These are the cheapest of the lot, making them more suitable for beginners. They are easier to use as they plug in directly to your device. However, to get the best result, consider using a pop filter and a shock mount to reduce any unwanted sounds.
Conclusion
Anyone can make a voice-over. The secret is not in having an out-of-this-world voice. It lies in profoundly understanding how to manipulate your own by adding inflections, variating your pitch, pacing your story, and strategically modulating the loudness and softness of your voice. It's also about knowing the right tools and how to use them.
Therefore, do not be driven by the fear and misconception that you need a slick or sassy voice to make it as a voice-over artist. Just follow the tips in this article and spare enough time for practice to refine your skills. Why not give it a try today?