How to Record YouTube Audio with Audacity
98% accurate, real-time transcription in just a few clicks. 58 languages and multiple platforms supported.
Finding a solid tool to record YouTube audio can be a bit tricky with the wide variety of software available nowadays, but many people have found recording YouTube audio with Audacity to be an effective solution. Although Audacity can be used to record YouTube efficiently, some people have a tough time working with different audio sources, playback devices, and interfaces, which can get in the way of the actual operation of the software.
I’ve built up experience using the software to record things like lectures and instrumental soundtracks from YouTube’s infinite selection (there are actually 3.7 million new videos per day), and as such I’m well familiarized with the tools. Today we’ll be taking a dive into how to record YouTube audio with Audacity, and the step-by-step method on how to use Audacity with Windows.
What is Audacity?
Audacity is a free audio software that allows you to record or import audio from multiple sources, edit that audio using multiple tracks, and export and save it in various forms. There are also a number of plugins and effects that can be applied to the audio while maintaining a high sound quality, which has made it a well-known software for simple tasks like recording desktop audio.
Another benefit that I especially enjoy is that Audacity is cross-platform, which means no matter what device I’m using I’ll still be able to use the same familiar interface and tools. While it may seem like simple software at first glance, there are actually a variety of different applications for it due to how many different audio sources you’re able to utilize and take clips from.
How to record YouTube audio with Audacity
Recording YouTube audio with Audacity is a simple task once you get the hang of it, and once you master this skill you’ll be able to edit and save any audio with ease (and still maintain high quality). Here’s the breakdown of each step:
Step 1: Install the software
If you haven’t already, head over to Audacity’s website and install the proper software for your device. You’ll want to make sure that you have the most up-to-date version of the application.
Step 2: Change your host to Windows WASAPI
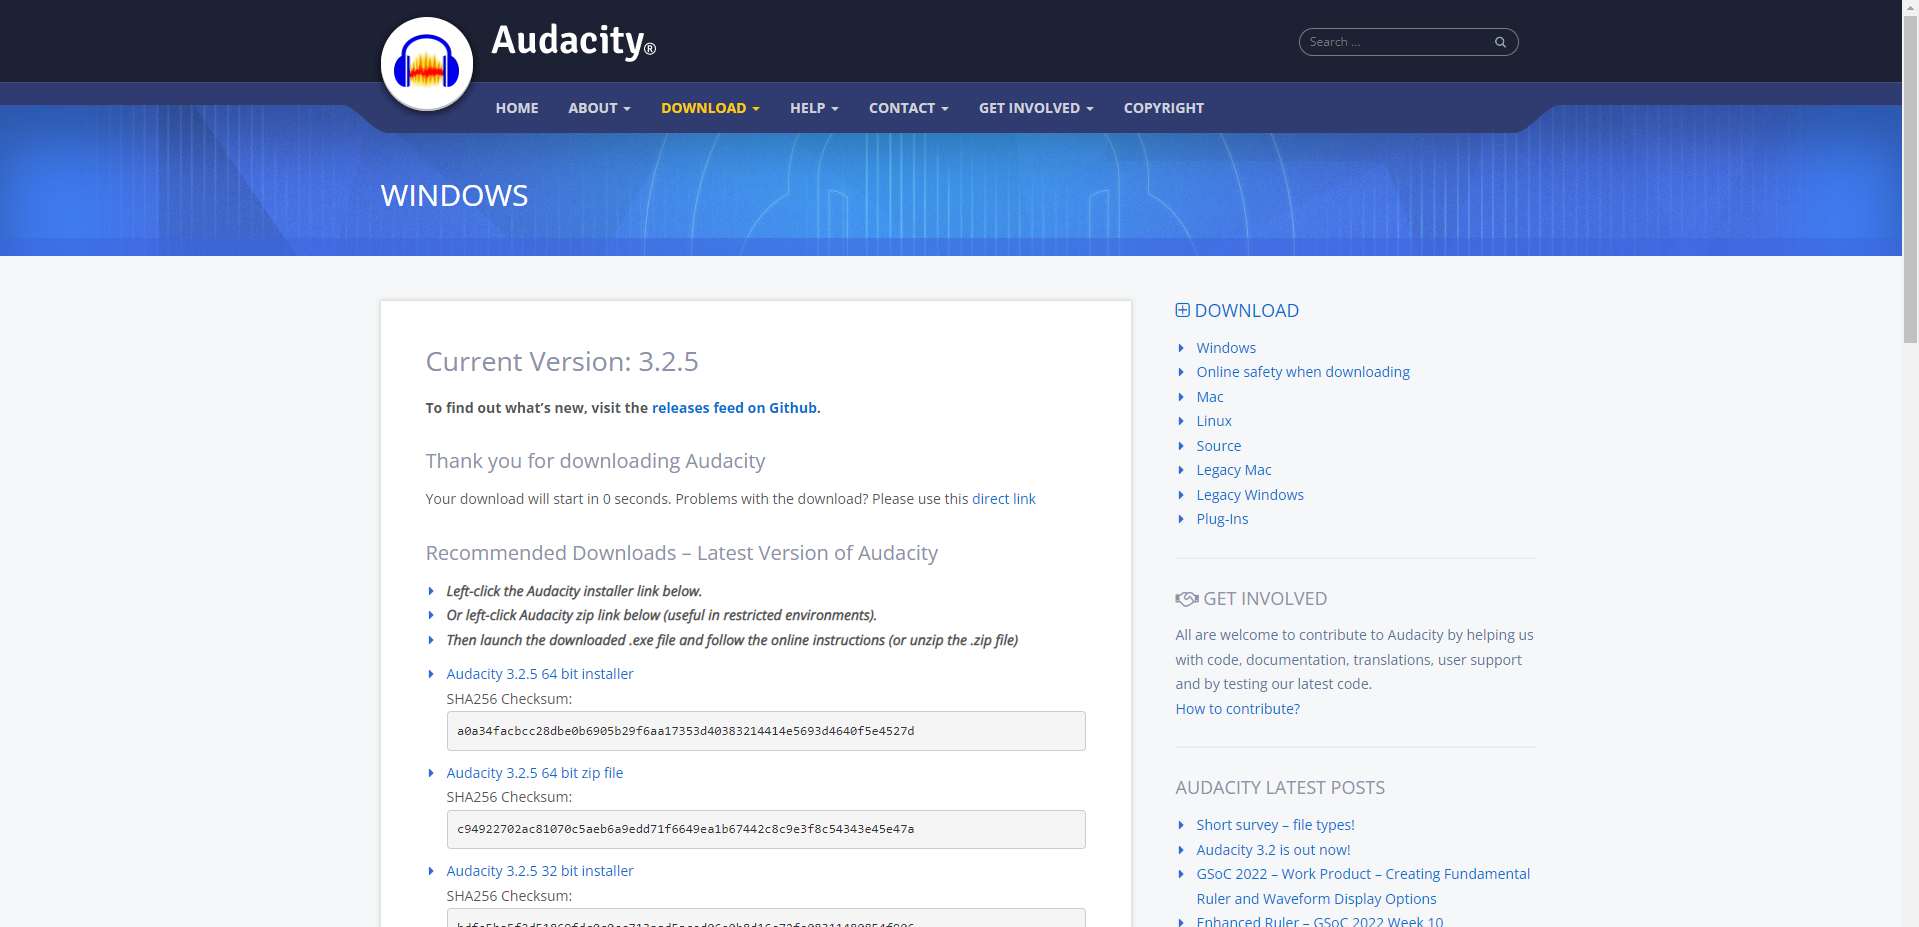
Click the Audio Setup dropdown menu and in the ‘Host’ section, change MME to Windows WASAPI. This allows the software to capture desktop audio in the clearest and highest quality.
Step 3: Change the recording device to your primary output device
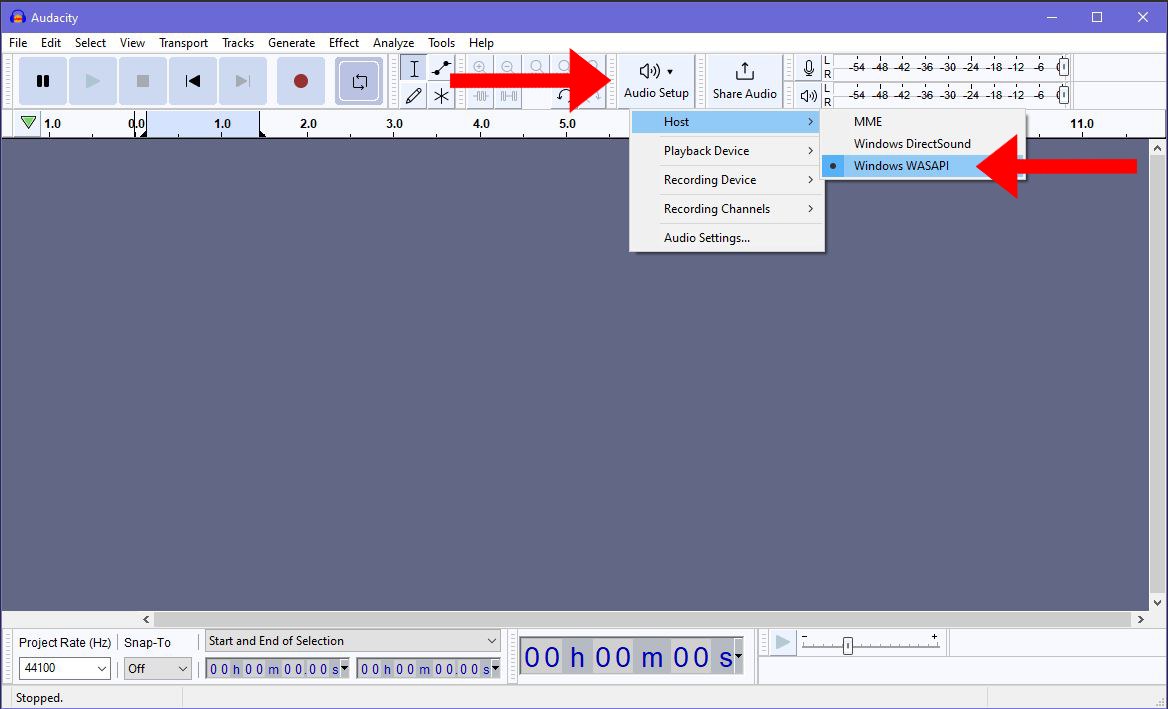
Back in the Audio Setup menu, you’ll want to hover over ‘Recording Device’ and select your computer’s primary output device (where you normally listen to audio).
Step 4: Play YouTube video and hit Record in Audacity
Open YouTube and locate the video you want to record. Once you find your video, hit play and start recording in Audacity. Audacity will begin to pick up the audio output (the YouTube video). You’ll know that it’s recording the audio properly if a matching waveform appears in the track.
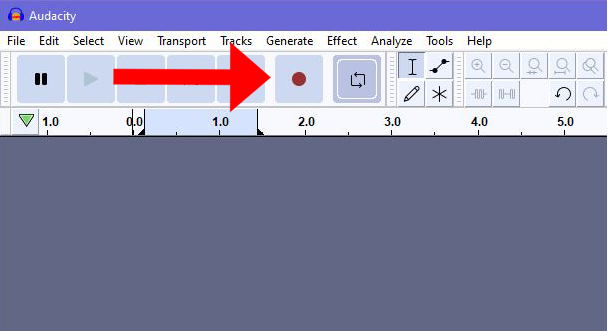
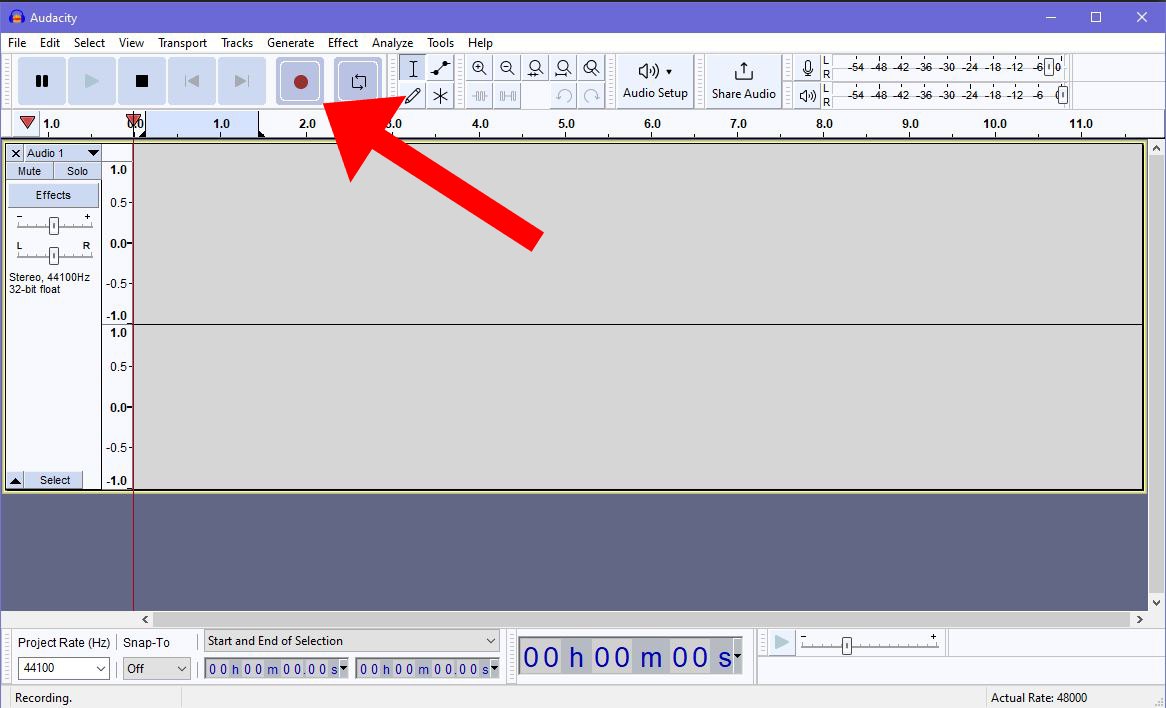
Step 5: Stop recording once complete
Hit the Stop button once the audio that you’re looking for has played through completely. To listen to the audio that was recorded, press Play. You’ll want to make sure that the application has recorded all parts of your desired audio.
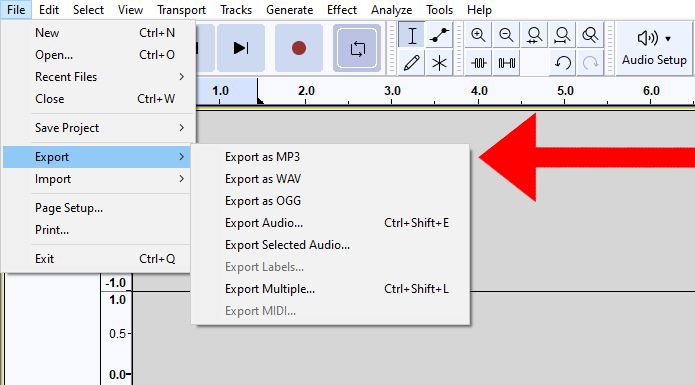
Step 6: Save/export audio in the file format of your choice
Click File and hover over Export to view the multiple different file formats that you are able to save your audio in (MP3, WAV, OGG). Click the format you desire and save it where you’ll find it on your device.
Ready to start recording YouTube audio? Whether you want to capture your favorite music or video content, try Notta to help improve your creativity.
How to record YouTube audio with Notta
Recording YouTube audio with Audacity can prove to be a convenient and effective ability for nabbing and saving any audio you’d like to your device, but the software does fall short in a few ways.
For one, the interface can appear to be a bit confusing for those who aren’t familiar with the software. The platform is slightly more technical than some simplified browser extensions and other software, which means there can be a bit of a challenge when learning how to record YouTube audio with Audacity.
Another issue is the complications with the different audio sources, and in my own experience, I’ve learned that it’s not entirely unlikely to encounter a few errors when attempting to select and record certain output devices.
If you’re looking for a more simplified and streamlined tool for recording YouTube audio, one choice that stands out is Notta.
Notta is a transcription tool that quickly and accurately records and transcribes audio (and from a number of different sources) and generates concise summaries from your YouTube videos. By using Notta’s Chrome Extension which is specifically designed for recording and transcribing sources like YouTube, you can easily record YouTube streaming audio.
Here’s a step-by-step on how to record YouTube audio with Notta YouTube Video Recorder:
Step 1: Download Notta from the Chrome web store
Navigate to Notta’s Chrome download page and add the extension to Chrome (allow extension when prompted).
Step 2: Open the YouTube video and select Notta extension
Navigate to the YouTube video you wish to record. Select the Notta icon in the extensions toolbar on Chrome, and sign up/log in.
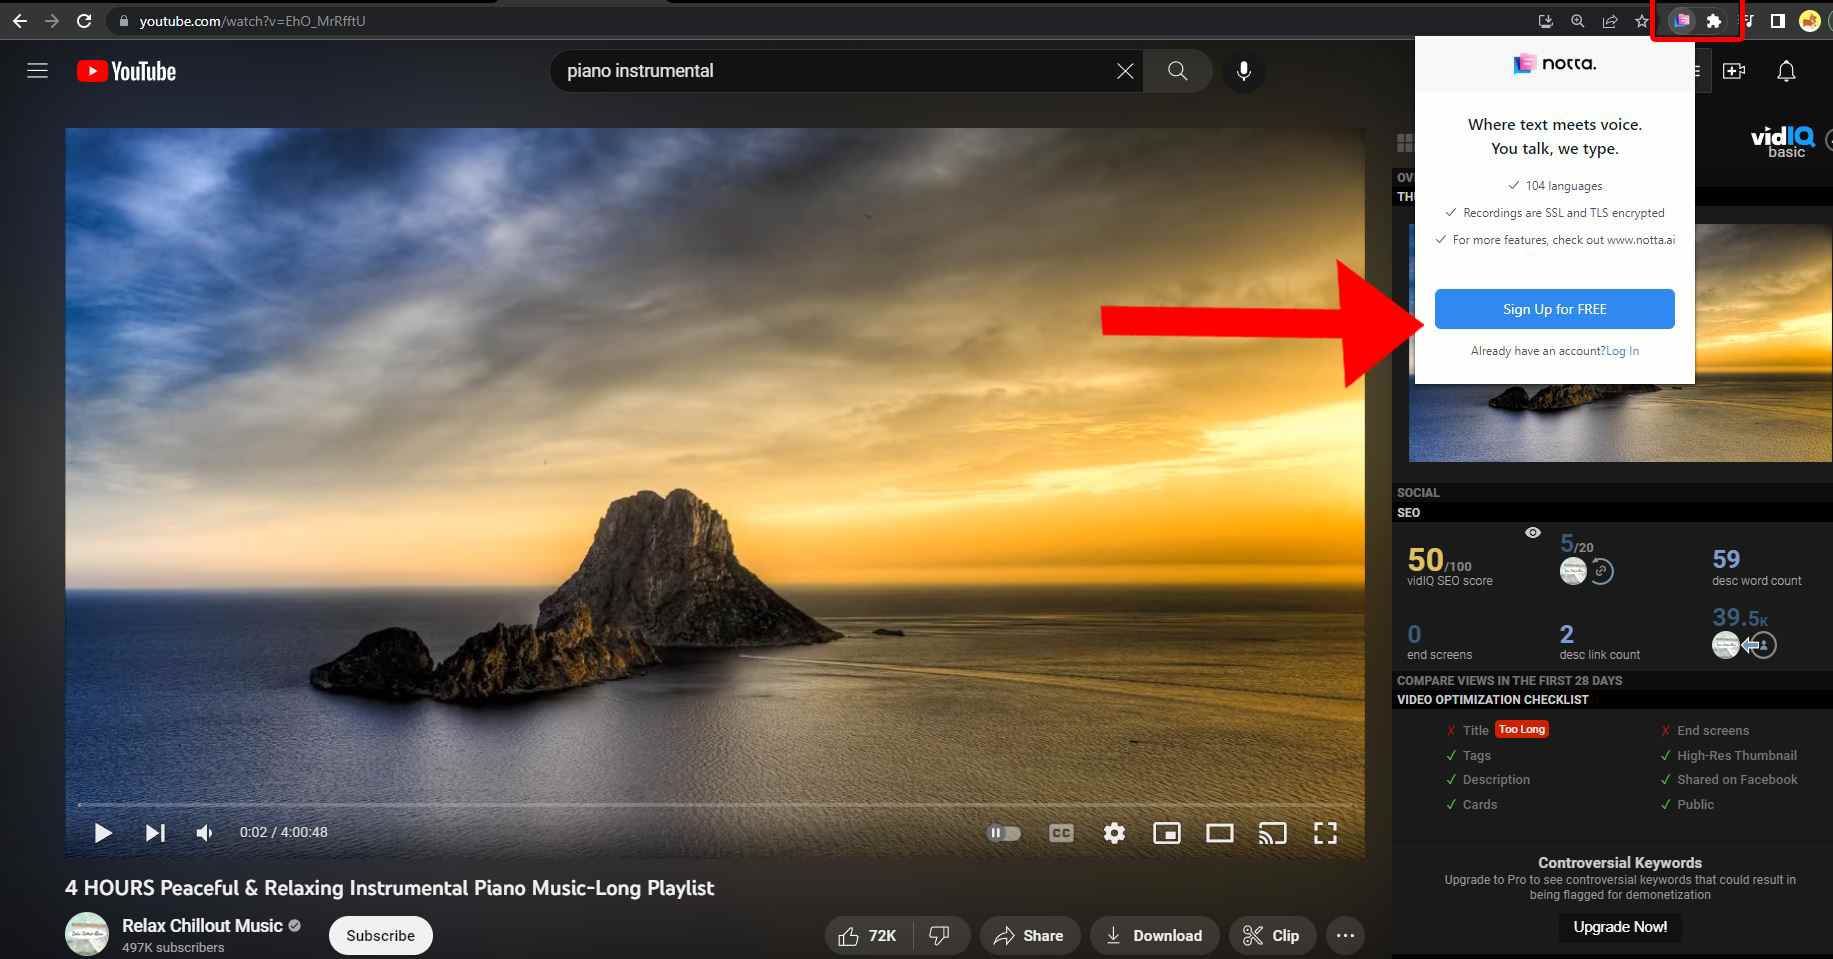
Step 3: Start recording YouTube audio
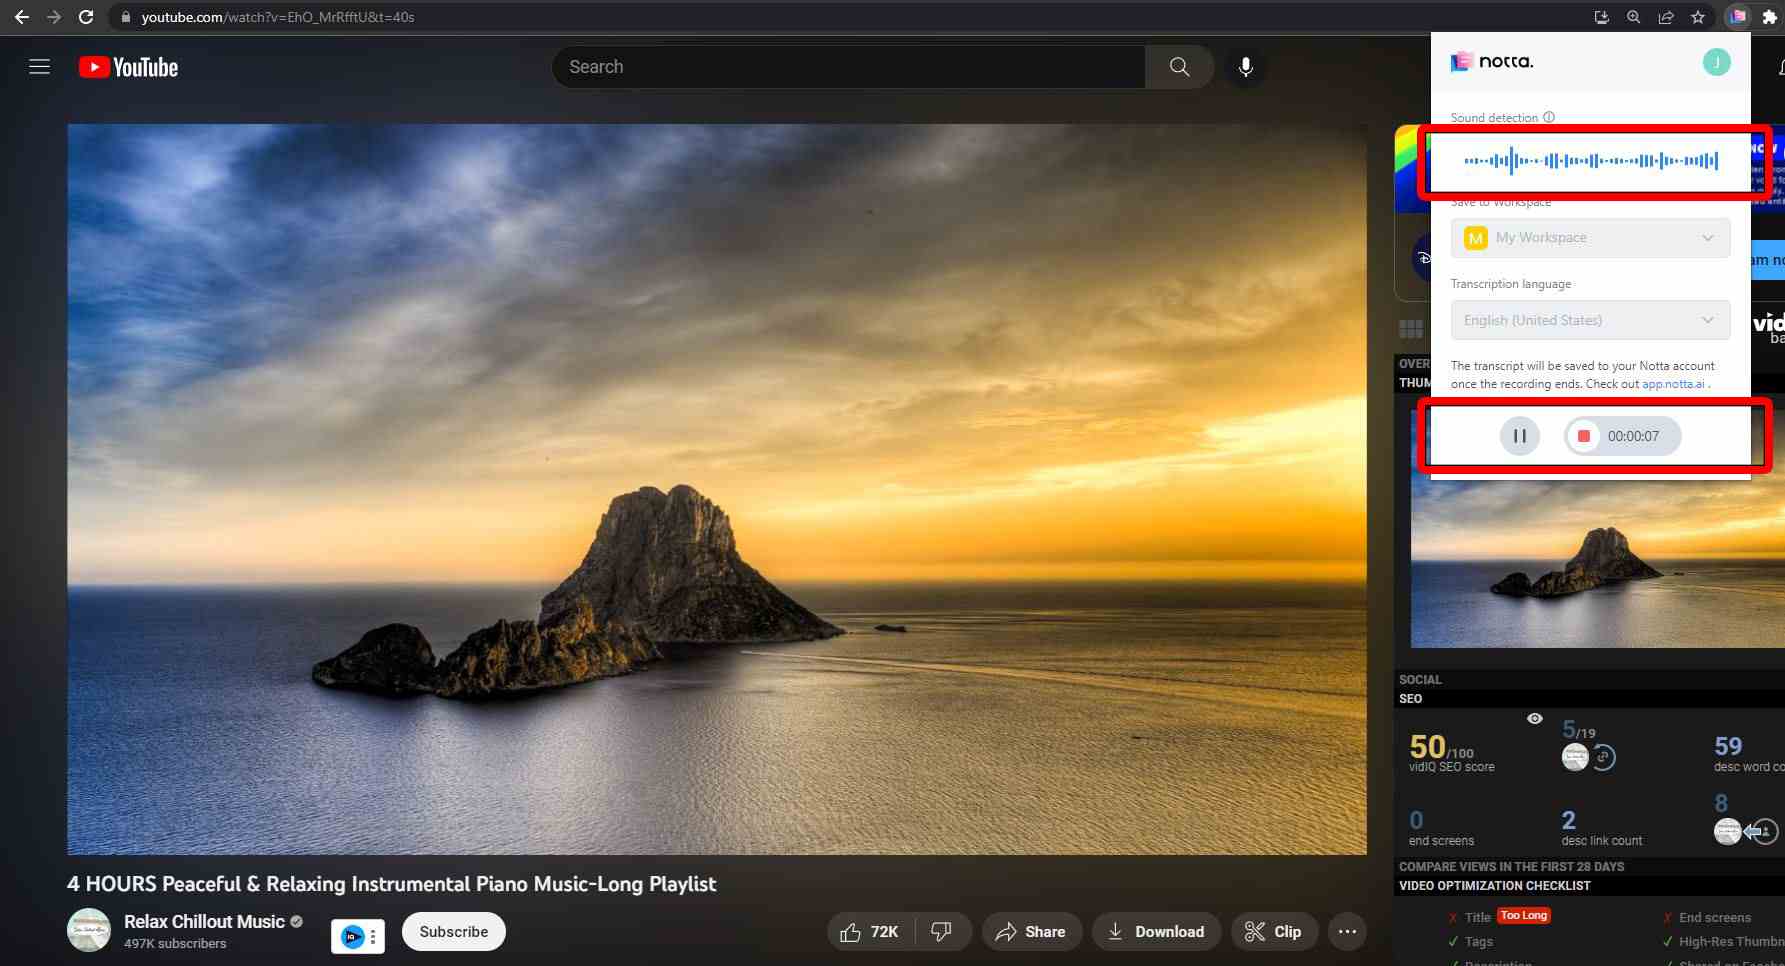
Press the Start Recording button on the Notta Extension and begin playing your YouTube audio.
You’ll notice that the soundbar will represent the detected audio, and you can also see the amount of time that it has been recording. Press the stop button once the audio has played through.
Step 4: Open recording on Notta dashboard
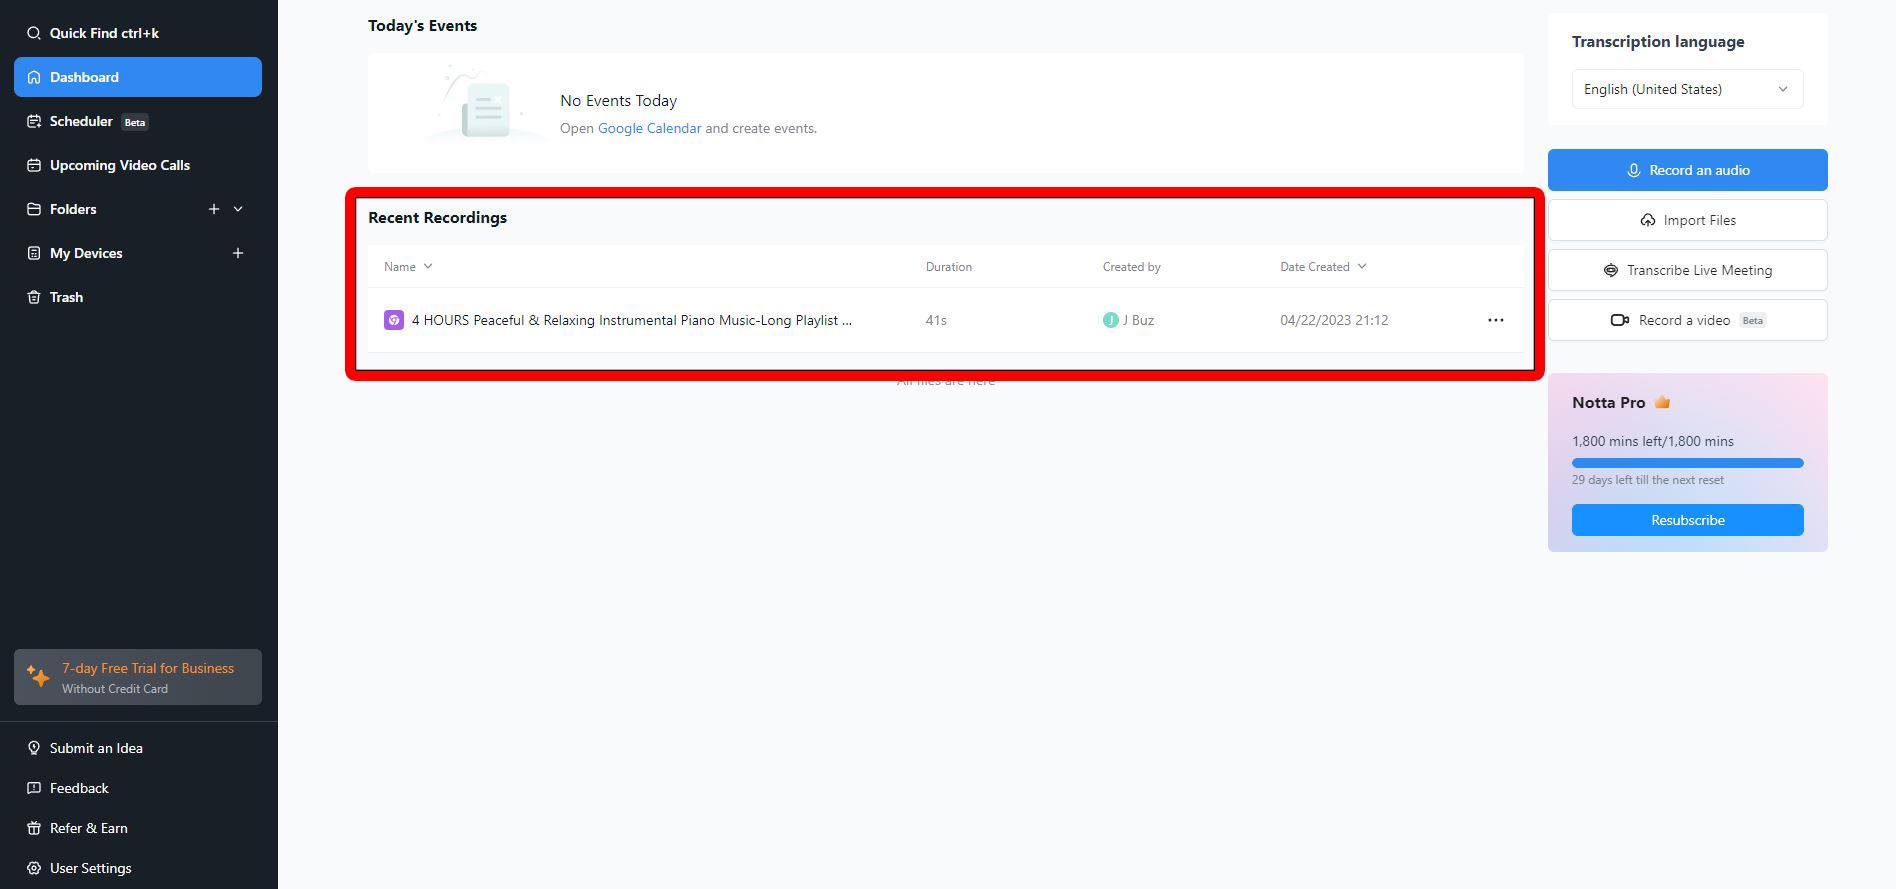
Once you’re done recording the audio from YouTube, you’ll want to navigate to the Notta Dashboard on Notta’s webpage and find the recent recordings section. Your YouTube recordings can be found here under the exact title of the video.
Step 5: Play, export, or share the recording
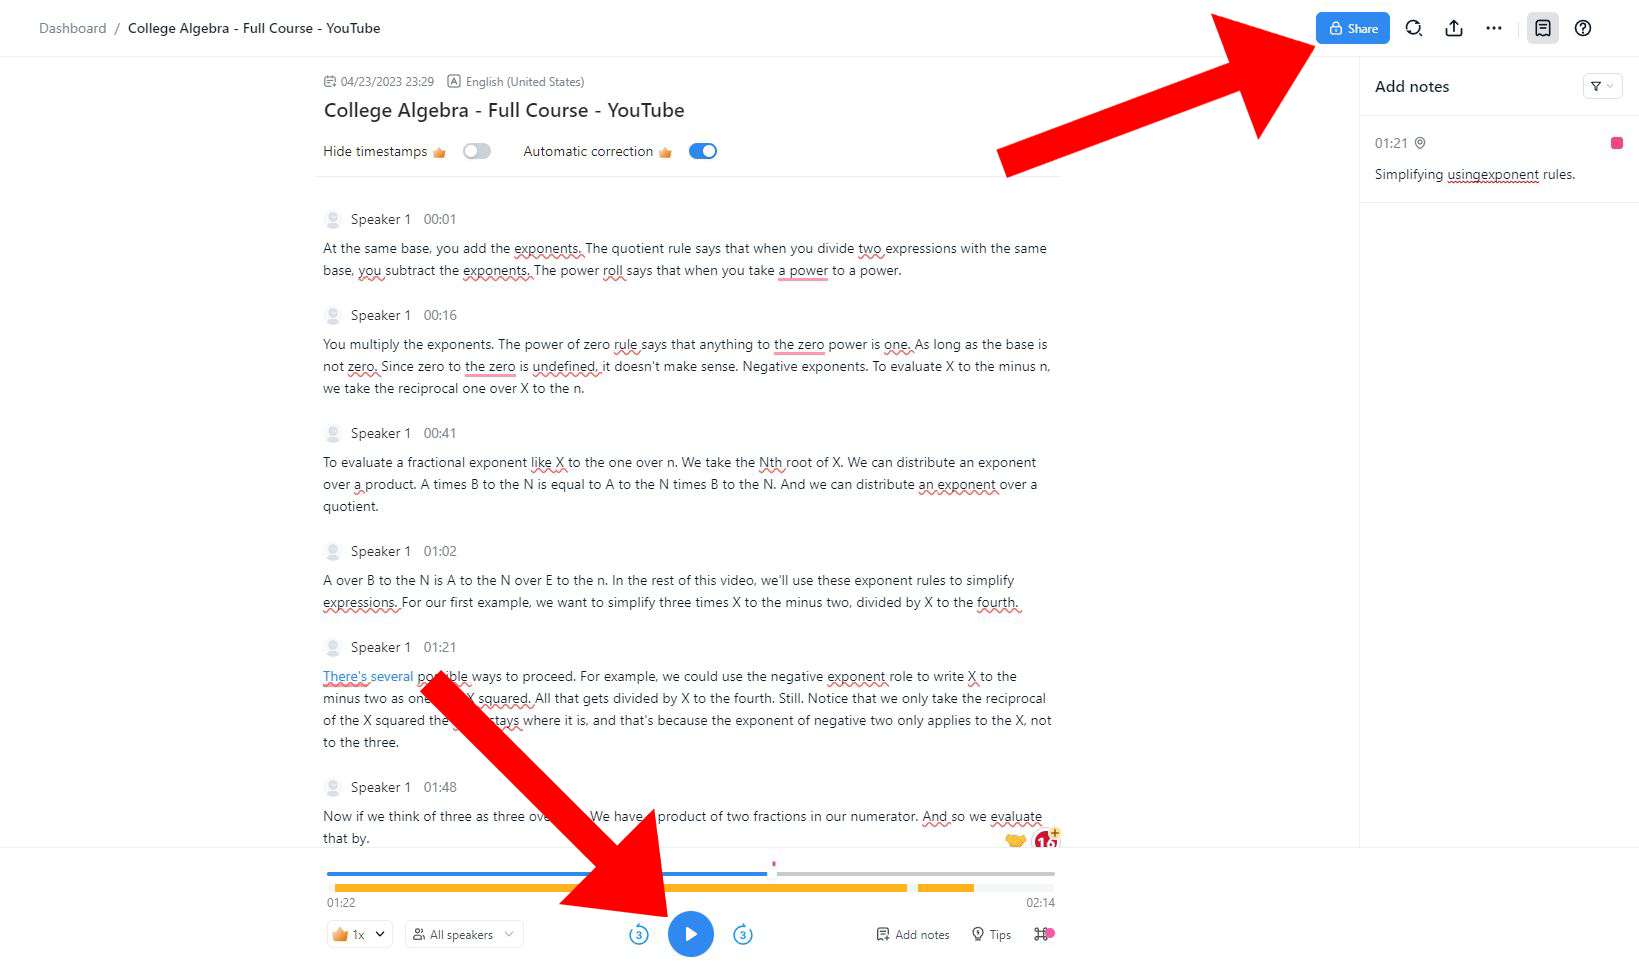
Click on your recording to open the audio. From this page, you’ll be able to listen to the recorded audio and use the toolbar to share or export the audio in your desired format. You can also move the recording to a folder for better organization.
Notta can convert your spoken interviews and conversations into text with 98.86% accuracy in minutes. We guarantee accuracy and ease of use.
How to edit recorded YouTube audio with Audacity
You might want to touch up some of the audio once you record your YouTube audio with Audacity. Audacity has a simple editing system that’s still very capable in my opinion, and once you become familiar with the tools you should be able to refine and edit your clip to your liking.
How to trim audio
Step 1: Record your audio from YouTube (you’ll want the audio in one segment to make things simple). Once you’re finished recording, you’ll see the audio appear as a track in Audacity.
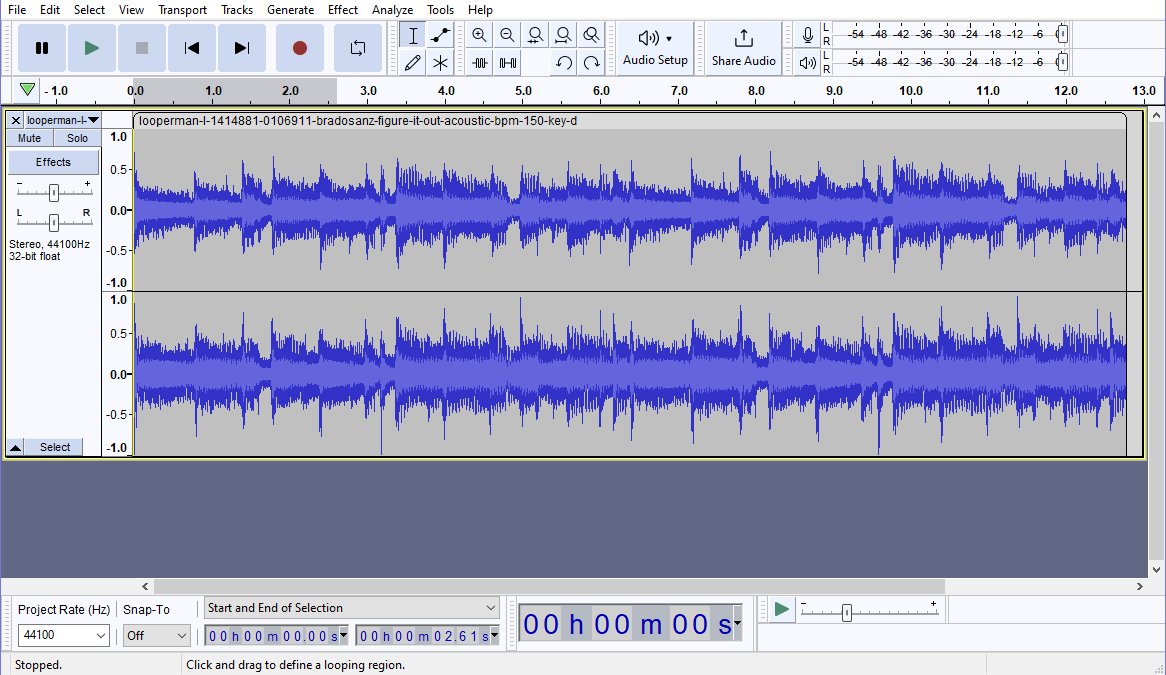
Step 2: Select the cursor icon and drag it on the track to highlight the area of the audio that you want to remove. Remember, to get the clearest and best quality, consider trimming areas such as the beginning and end of the clip (where there might not be audio), or long pauses in the audio (you’ll see gaps in the waveform).
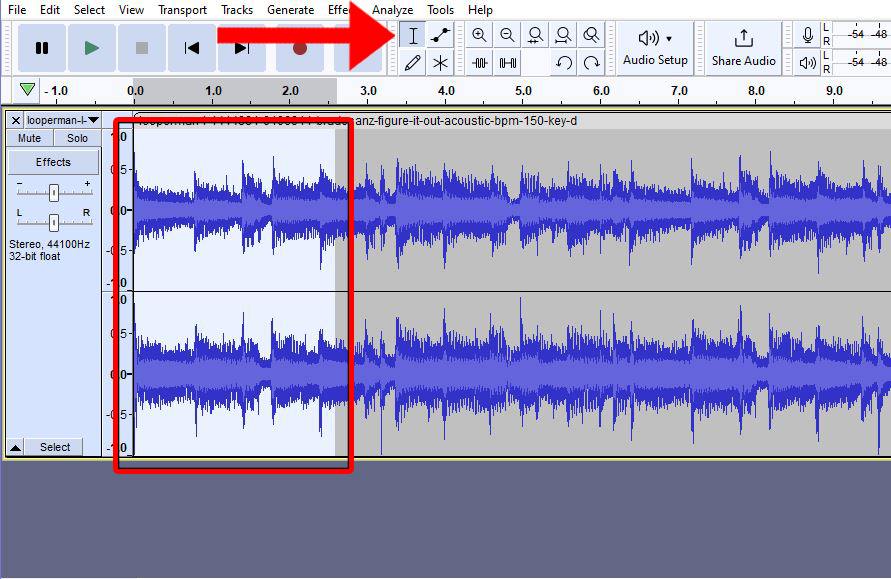
Step 3: Press Delete on your keyboard to remove the highlighted section. Repeat this process on any other parts of the clip that you wish to trim.
Step 4: Play the audio once finished to preview and ensure that everything sounds smooth. Once you confirm, you can then save and export the trimmed audio.
How to adjust audio volume
Step 1: Record your audio from YouTube (you’ll want the audio in one segment to make things simple). Once you’re finished recording, you’ll see the audio appear as a track in Audacity. Now select the Envelope Tool from the main toolbar.
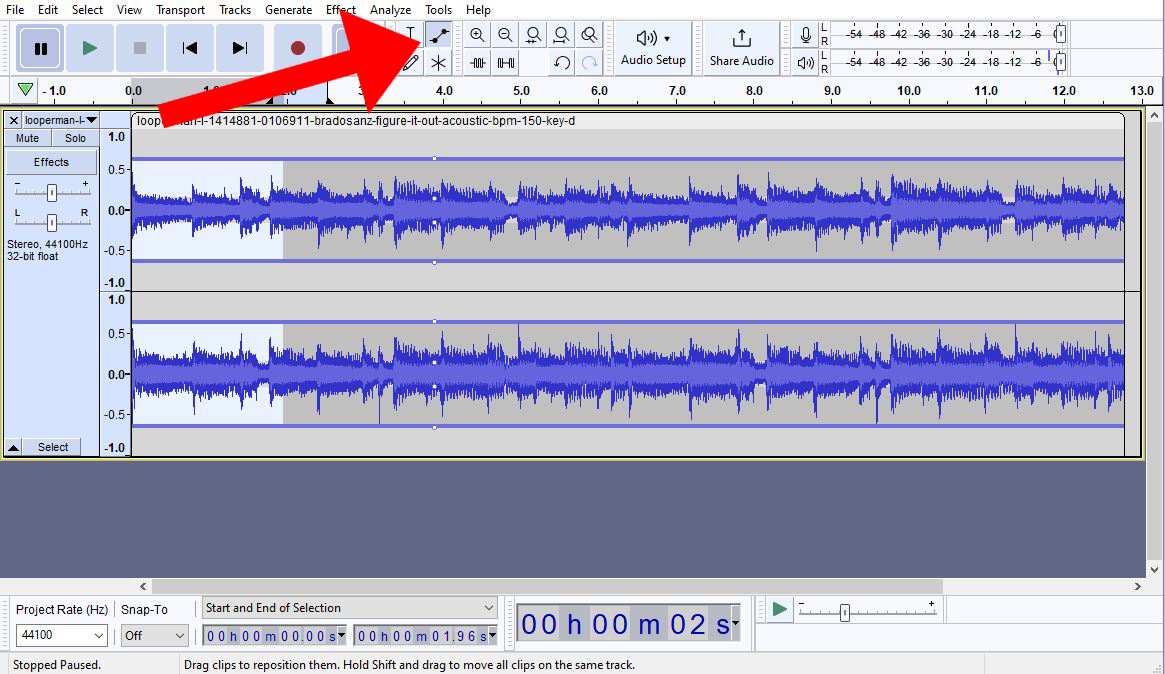
Step 2: Hover over the track with the envelope tool and drag upwards to increase the volume, and downwards to decrease it.
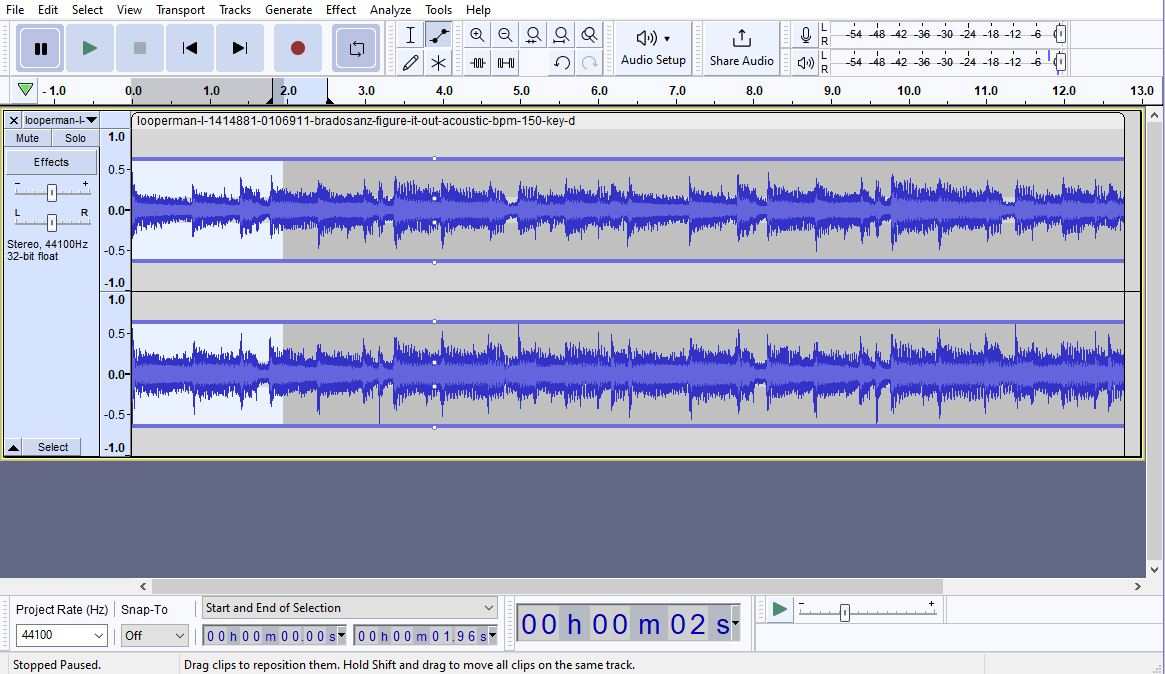
Step 3: You can also quickly apply a fade effect using the envelope tool, which can be done by dragging the tool left or right on the audio track. Remember to always give the track a listen-through before saving or exporting to ensure the quality is correct.
How to merge multiple audio tracks
Step 1: Record your YouTube audio or import whatever audio files you would like to merge. You’ll see them appear on two separate tracks in the software.
Step 2: Select each track using the select button, then navigate to the Tracks tab at the top, select Align, and choose Align End to End. This will line up your tracks in the mixer.
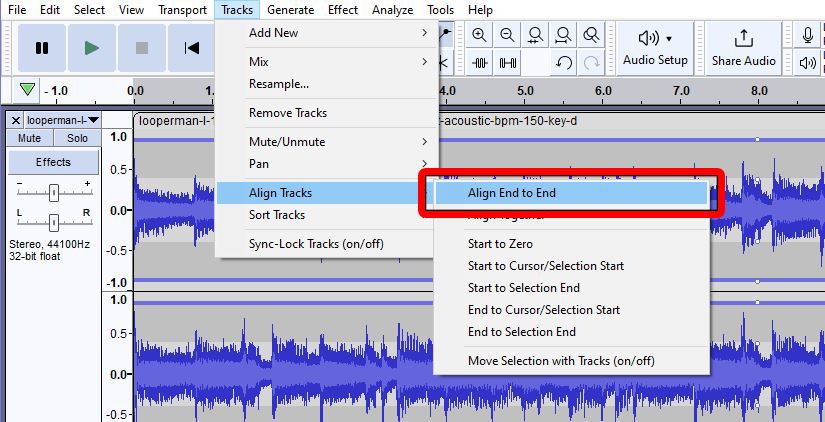
Step 3: To finish merging the audio, head back to Tracks, hover over Mix, and apply Mix and Render. This will leave you with the finished product, a cleanly merged audio consisting of your two sources.
Searching for a better note- taking tool? Gald youo find out! With Notta, you can transcribe and summarize your favourite Youtube video into editable text instantly.
FAQs
How do you record desktop audio with Audacity?
Recording desktop audio with Audacity can be done in just a few steps:
Select the Audio Setup menu from the main toolbar.
Hover over the Host option and select Windows WASAPI.
Change your Recording Device in Audio Setup menu to your standard output device.
This will allow Audacity to record whatever desktop audio that you are able to hear in your standard speaker device.
How do I record my voice & microphone with Audacity?
Audacity makes it easy to record your voice and microphone with a few steps:
Connect your microphone device to your computer via USB, XLR, or mic-in port.
In the Audio Setup menu, change your Recording Device to the microphone you are using.
You may want to change the recording channel to mono, as this is generally the best mix for most microphones.
You can now begin recording your voice to an audio track using your microphone.
What is the difference between Stereo Mix and Mono on the Audio Setup toolbar?
Mono will present the audio in a single track, which is usually most noticeable in headphones as the audio in each ear will sound the same. Stereo Mix means the audio is presented in two different tracks, which means the audio in each headphone might sound different (you might notice this with music).
How do you enable Stereo Mix in Audacity?
Enabling Stereo Mix in Audacity requires a few clicks:
Select the Audio Setup menu and navigate to Recording Channels.
In this menu, change the channel to Stereo Recording Channels. Your audio will now be recorded in two separate sources.
Stereo Mix will be most noticeable when recording YouTube audio that has a wide range of audio sources, such as music.
When should you use Stereo Mix with Audio?
Stereo Mix is most beneficial when listening to the audio on a set pair of speakers, such as car speakers or headphones. This is most noticeable with music, as taking advantage of a stereo mix will allow you to make the music more “three-dimensional”. The stereo mix does not work well with speakers where you can’t tell left from right, such as speakers in a restaurant.
Conclusion
Recording YouTube audio with Audacity can seem a bit complicated at first, but once you become familiar with the program it can prove to be a useful skill to know.
I’ve personally used the software to record some of the great information and instrumental content that is constantly being uploaded to YouTube, although I have found that some alternatives that are more integrated with YouTube can be more efficient.
Apps like Notta’s Chrome Extension can provide a much smoother experience for purposes like recording YouTube audio, as the software is more tailored for that use.
Learning any of these applications can allow you to take advantage of the wide variety of content that can be found on YouTube’s platform today.