
How to Use Whisper AI: The Only Guide You Need
98% accurate, real-time transcription in just a few clicks. 58 languages and multiple platforms supported.
From ChatGPT to Dalle, and now, Whisper, Open AI has set the stage for the revolution of AI with some of the most valuable and mindblowing tools you will ever find. Their youngest child, Whisper, is on a transcription tool that beats all the rest in time, cost, and accuracy.
While it has gained much praise for being the best, one concern remains: few people know how to use it. The fact that you can’t download it like any other software is a big letdown to likely users.
After conducting my research, some of the concerns I noted respondents raising were, “It's too technical to use!” and ‘You have to go through numerous developer notes that are tiresome to read!”
If this is a problem you have encountered, here is an easy step-by-step solution on how to use Whisper OpenAI.
What is OpenAI's Whisper?
Whisper is an automatic speech recognition system by Open AI, the makers of ChatGPT and Dalle. The project is open source, meaning it is free to use, distribute, and change.
Unlike other speech-to-text systems, Whisper does not have a download site. All its files are in a GitHub repository. You must download some developer tools and run some code to install it in your system.
Who can use OpenAI Whisper?
Anyone who needs to convert their speech to text can use Whisper AI. For example:
A student who wants to transcribe their class notes
A meeting head who wants to derive the context of a previously recorded Zoom meeting
A podcaster looking to repurpose their audio content into various formats
A video editor looking to add subtitles to a video and more.
Notta AI offers advanced features which can help you transcribe speech into searchable text. Experience seamless transcription today!
How to download and install Whisper
First, it's essential to understand that Whisper is unlike other transcription and translation tools in how it runs and operates. There is no download site with a ready file to download and install in your system. To install and use it, you need a basic understanding of the Windows, Linux, or Mac command line, depending on your device.
Our guide is a step-by-step process for installing Whisper in Windows for offline use. To get started, you need several prerequisites on your computer to ensure a smooth download and install.
Python
Git
Rust
NVIDIA CUDA (optional)
Pip (only for older versions of Python)
Pytorch
FFmpeg
Python
For this installation, we will use Python version 3.9.9, but its dependencies allow it to work with versions between 3.7 and 3.11.
Head to the Python website and click on the preferred Python, depending on the release date to download.
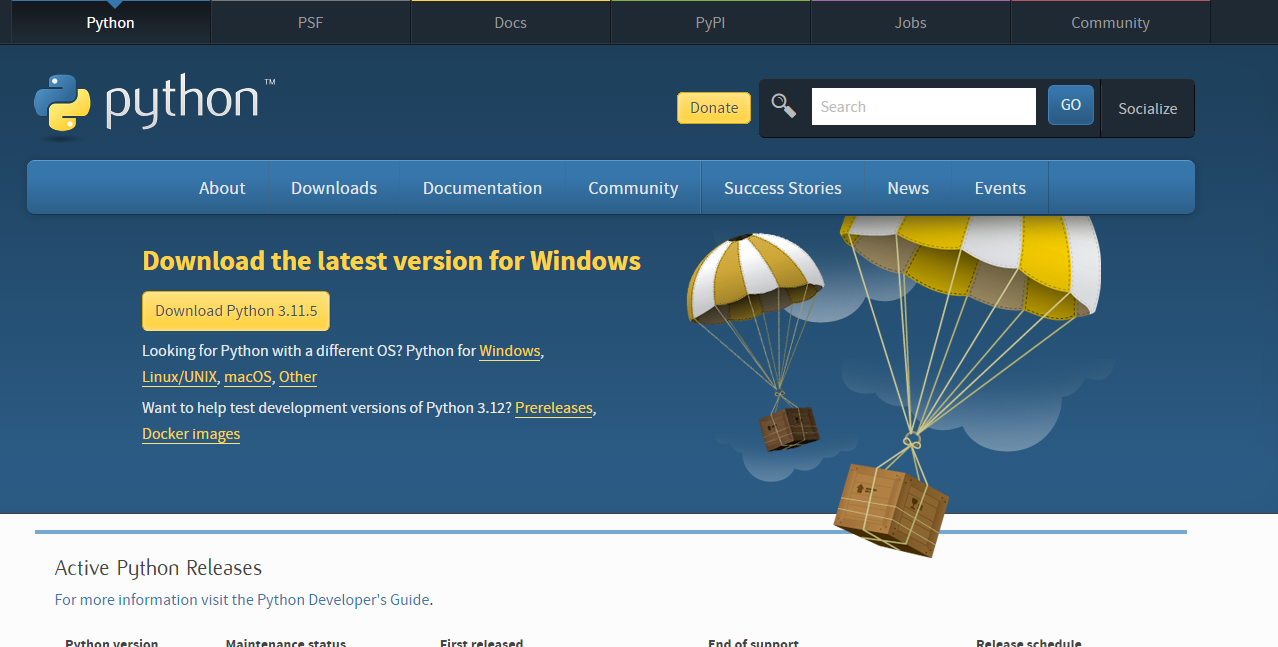
For this guide, I chose to use the Python 3.9.9. Click on it and scroll to the section with the installation files.
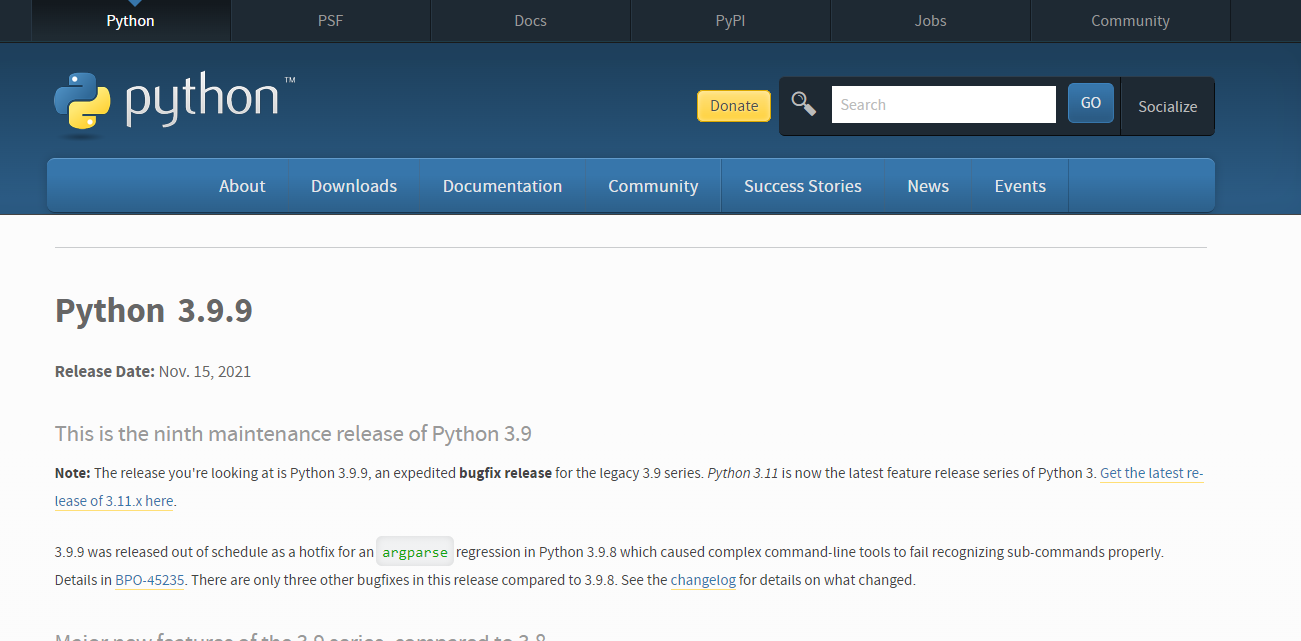
Click on the file best suited to your systems. The download will start immediately.
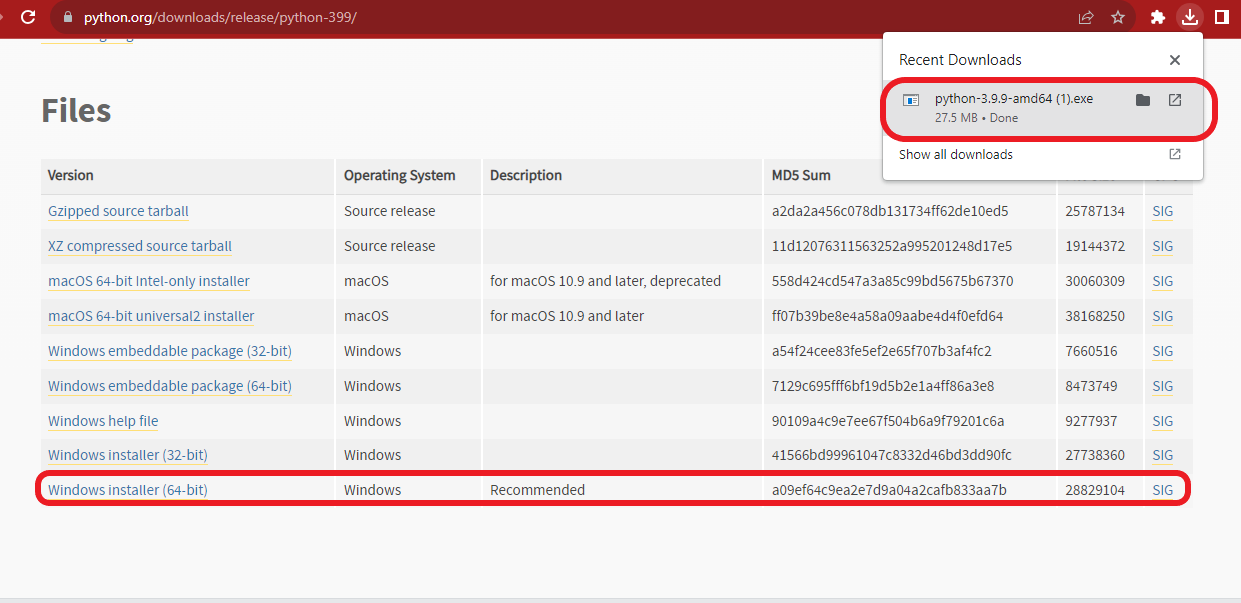
Once done, install the software into your system. When installing Pythion for the first time, remember to click "Add to path" at the bottom of the first page of the installer. This allows you to run Python from a terminal. Failure to check this box can cause the entire Whisper installation to fail.
Git
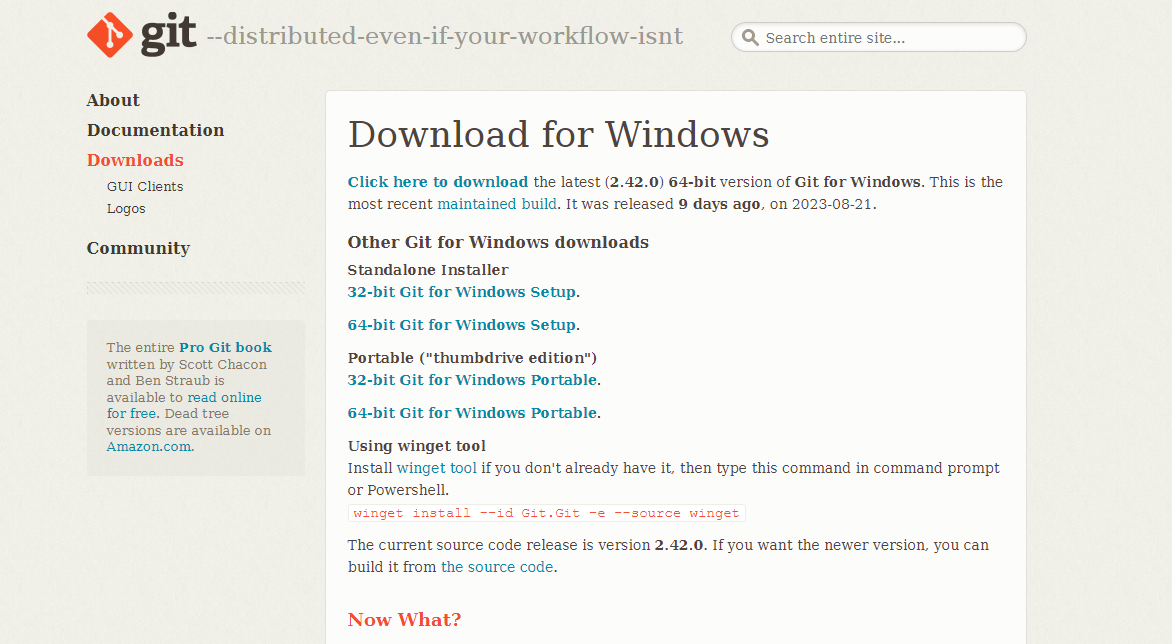
Since the Open AI Whisper files are on a GitHub repository, you need to download, configure, and install Git to your system to access these files.
Visit Git for Windows and choose an installer that suits your device.
Rust
Installing Rust in your system will help you avoid errors when building the wheels for tokenizers, a unique requirement when installing (Python) py-based projects.
There are two ways to install Rust into your system.
Head to Rust’s official site and choose an installer that best fits your computer system.
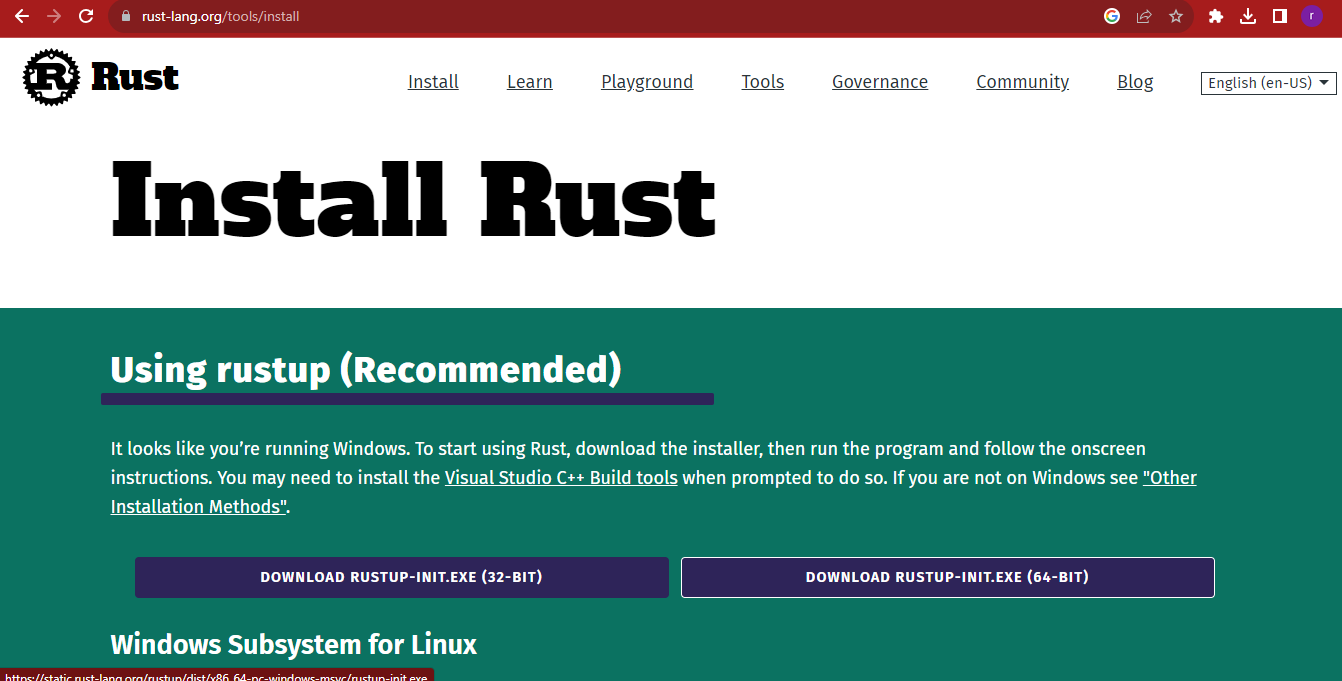
2.Open your command interface and run the following command line: pip install setuptools-rust

N.B: To open a CMD interface, Click ‘Windows+R’ to quick launch an app; type ‘cmd’ then click ‘run.’
NVIDIA CUDA
If you have used any AI tool before, you already know that a lot of computation power is needed to run these tools. Therefore, running the AI tools on devices that run using NVIDIA GPUs and have NVIDIA CUDA installed is highly favorable. CUDa improves the GPUs' processing power, allowing them to be more efficient in processing data than traditional GPUs.
Unfortunately, you can only install CUDA on devices that run on NVIDIA GPUs. However, this does not mean you cannot use Whisper on CPU devices. As you will see later, Whisper can run on various models from tiny, base, small, medium, and large. The higher the model, the more the computation power and vice versa. Therefore, all models, CPU or GPU users, can benefit.
If your device can support an NVIDIA CUDA, visit the NVIDIA website and download the latest CUDA compatible with PyTorch.
As of this post, PyTorch supports CUDA 11.7 and 11.8.
PIP
PIP is a package installer and management tool for Python applications and packages. It’s a necessity if you want to manage all your PyPL installations using the command line.
Newer versions of Python come with an already installed PIP. However, if you are running an older version, you must download it to your computer.
To check if there is an installed PIP on your device, access your cmd and run the command prompt:
Pip help
If there is a response, PIP is present in your Python.
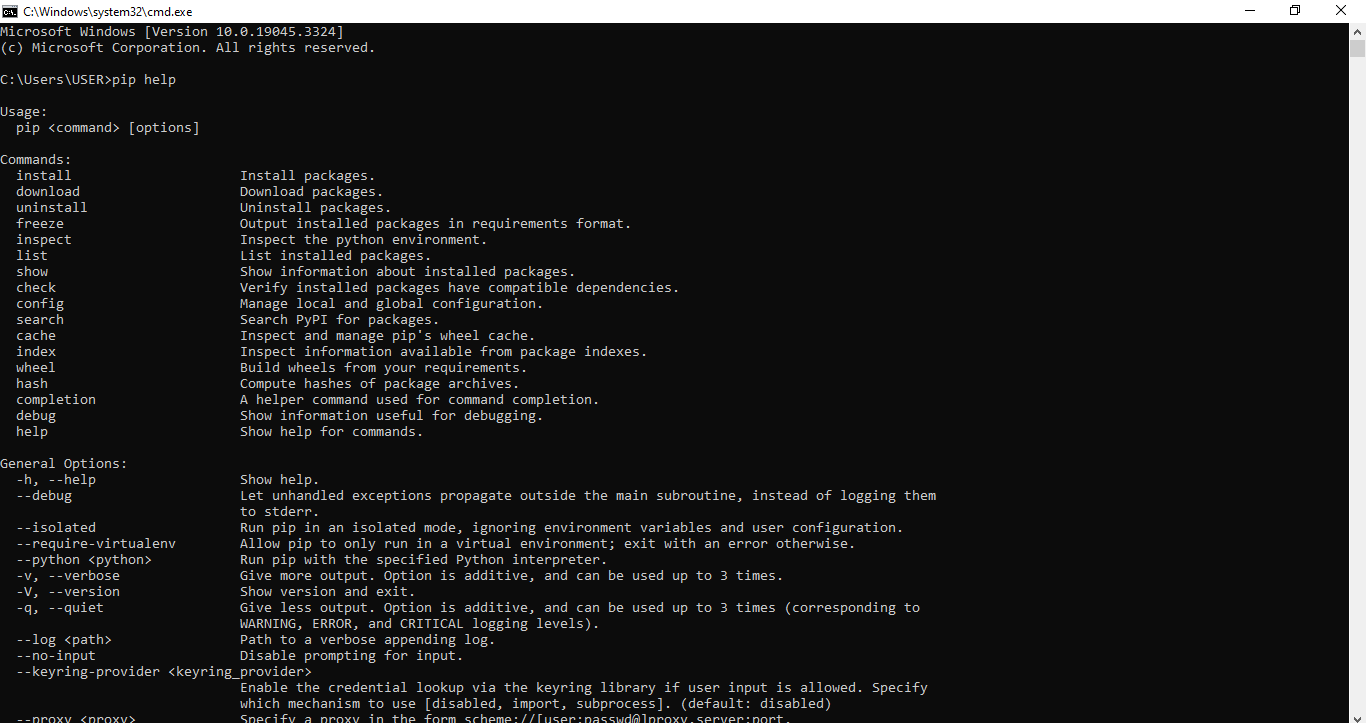
However, if you find an error response, you must install it on your device.

Visit https://pip.pypa.io/en/stable/installation/ for a step-by-step guide on downloading PIP into your system.
PyTorch
Pytorch is a deep-learning library mostly used when running applications that rely on GPUs and CPUs. Developers prefer it due to its speed and flexibility of implementation.
To install it, go to the PyTorch Website and choose your installation preferences based on what you will be using.
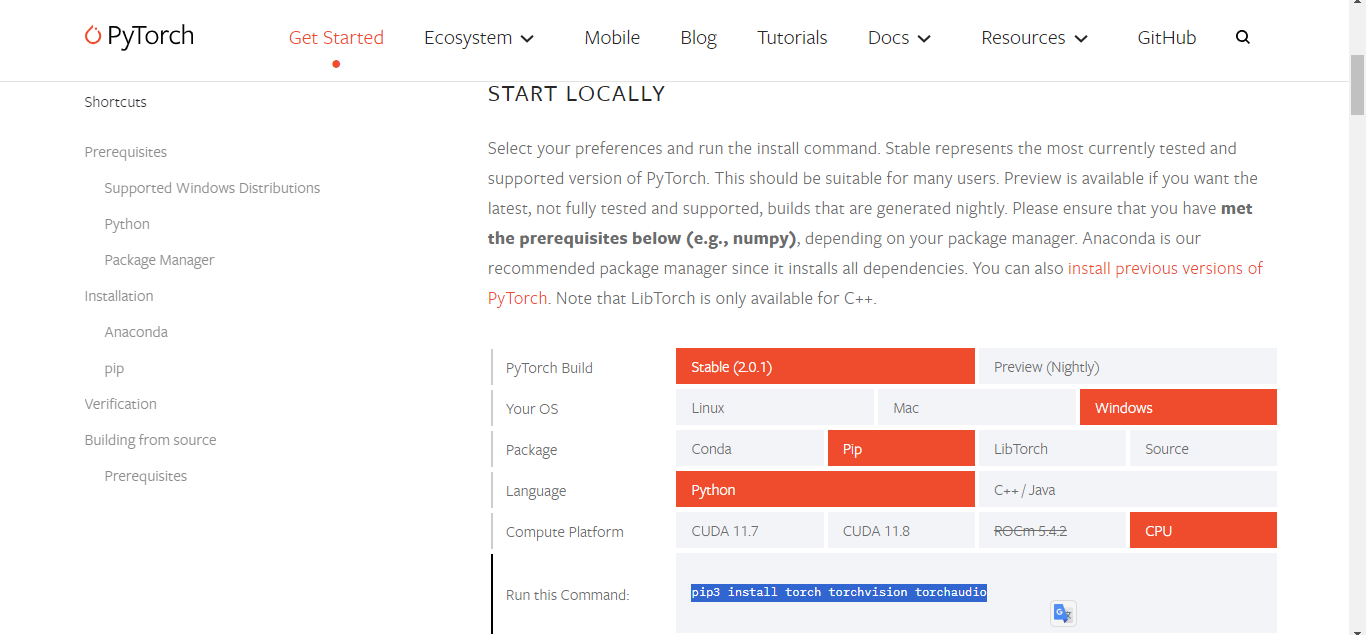
Once done, you will get a Command line.
Copy and run the command in your cmd interface to download PyTorch.
N.B: If you use a GPU, select CUDA 11.7 or 11.8. Select the CPU if your device does not have an NVIDIA graphics card.
FFmpeg
FFmpeg is one of the most critical tools in this list since it will help convert audio to the format Whisper can process. To download it:
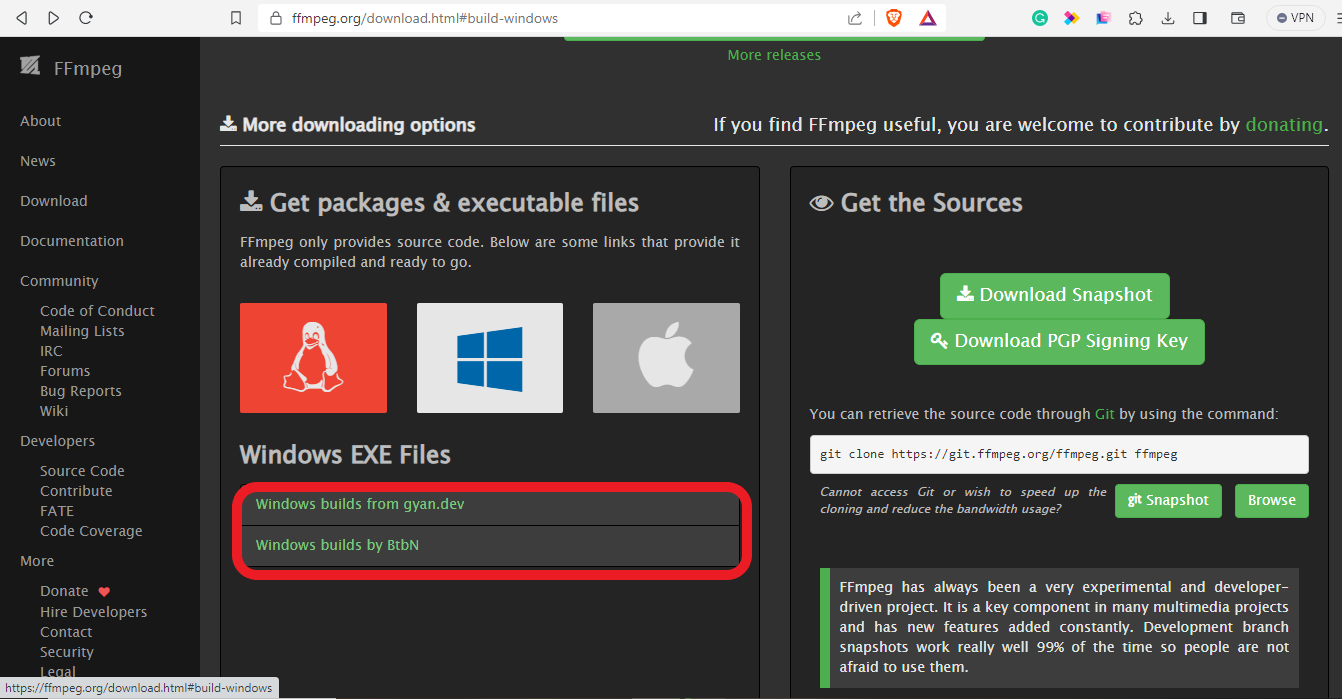
Visit the FFmpeg website to download the authentic file.
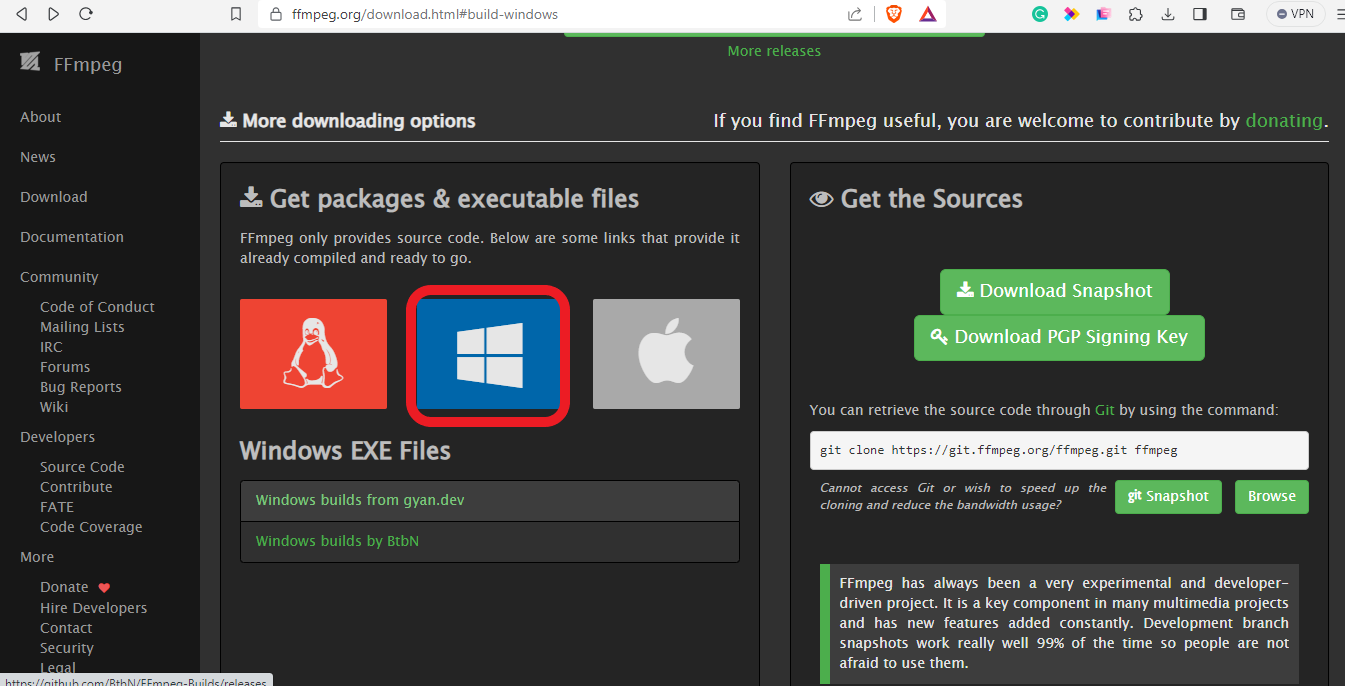
Scroll down to where the Windows Icon is and click on it. Click on one of the two files that appear below it. I have chosen the ‘Windows builds by BtbN.’This will open a new page where you will find various ffmpeg assets.
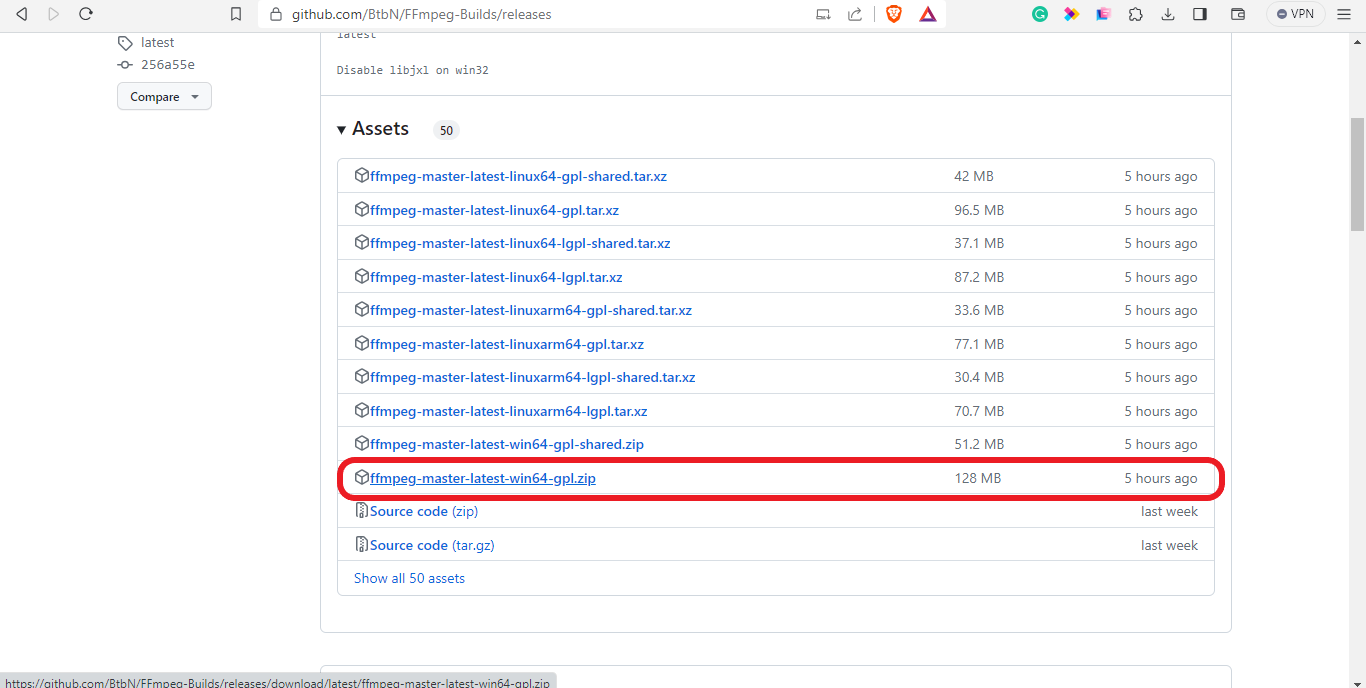
Scroll down and select the one that matches your system. For me, I'll choose the bigger ‘Win64’gpl. Click on it to download the zip folder containing the files.
Extract the files to a folder and open them. In the bin file, you will find three applications you must install on your system.
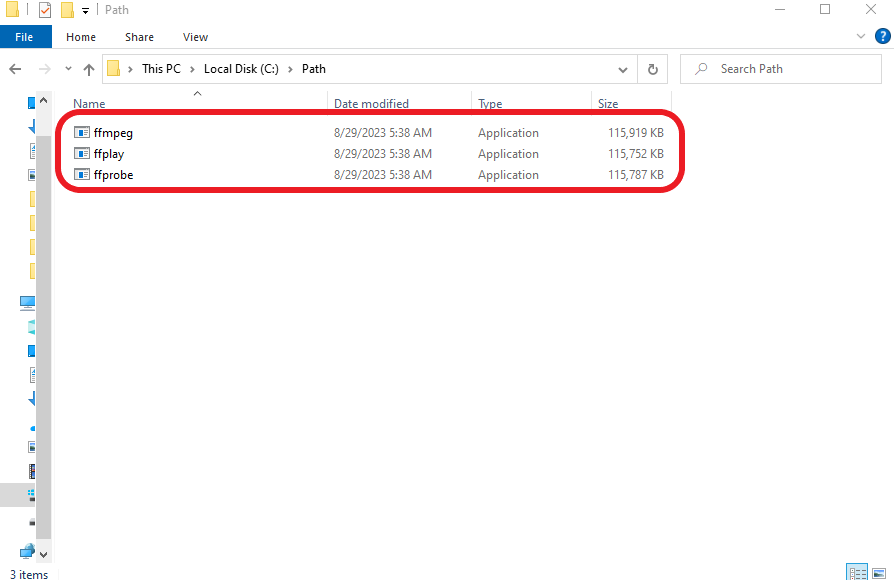
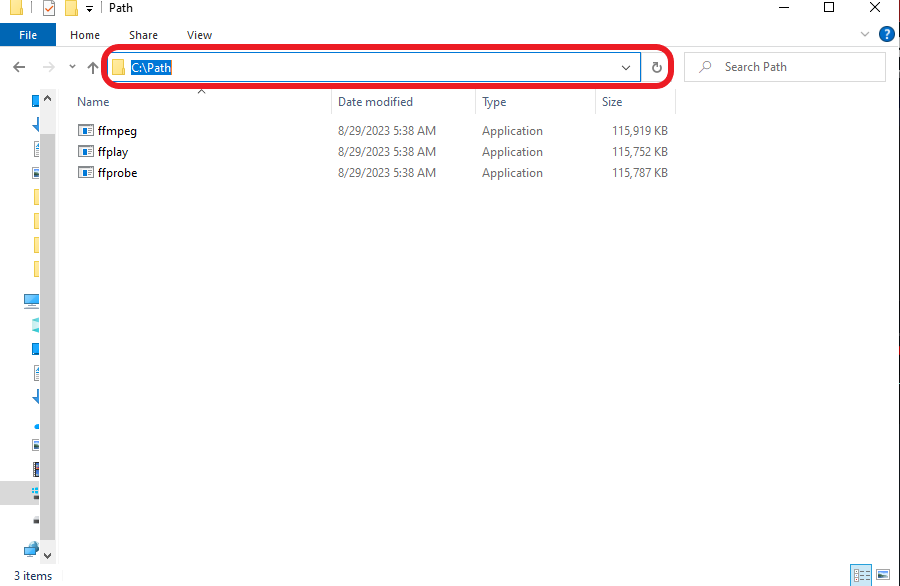
To do so, head to the local disk C and create a folder. Name this as ‘Path.’ Then, copy your three applications and paste them into the ‘Path file’ on the local disk.
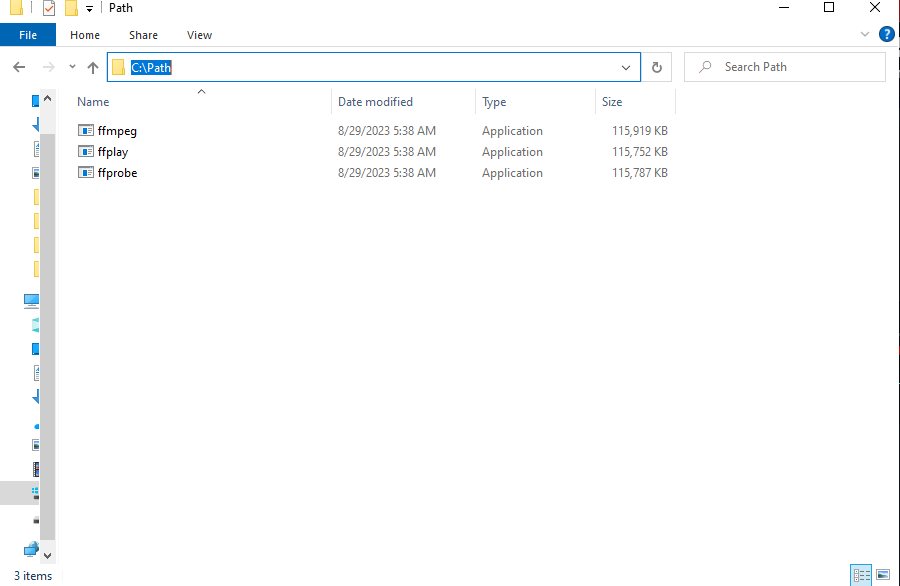
Click at the top of the drive to copy the file path ‘C:\Path’
Next, Click on the Start button and search for “Edit environment variables.” Open it.

Select ‘Path’ and click on the edit button
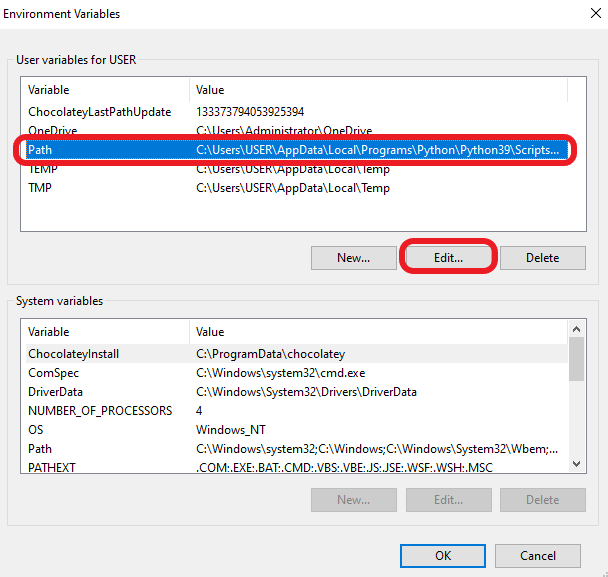
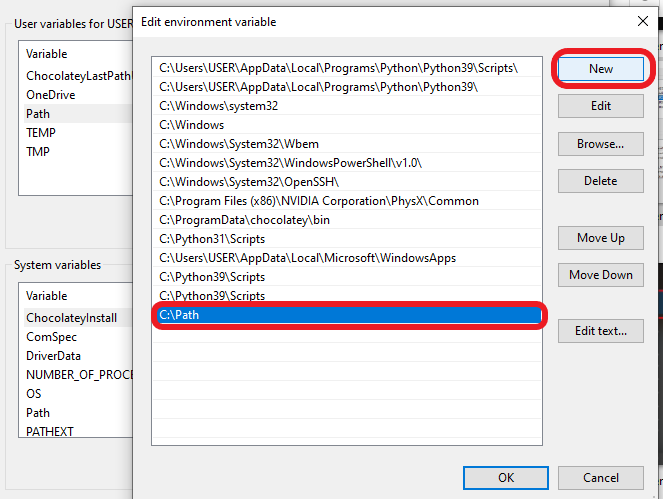
Click ‘New’ to add a path and paste the file path, C:\Path, at the end of the list. Then click ‘Okay’ to close the box.
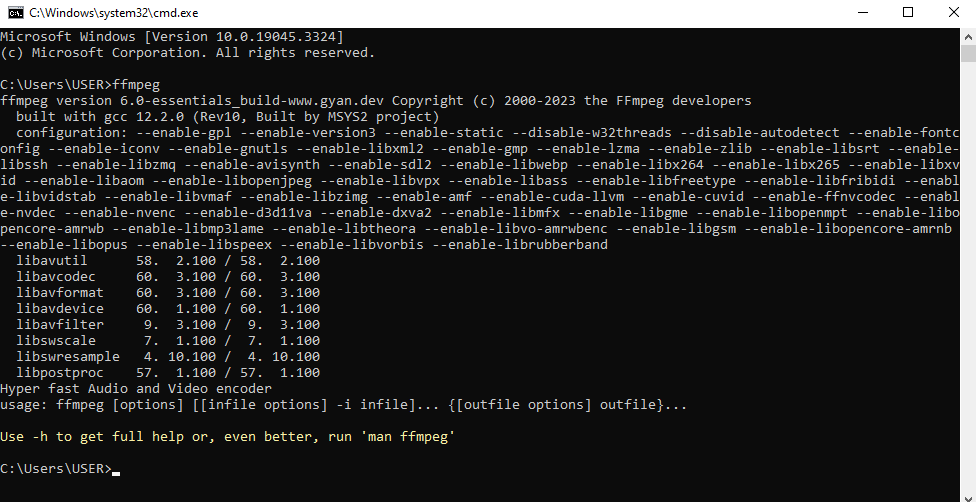
To confirm the installation is successful, open a new cmd prompt window and run ‘ffmpeg.” The installation succeeded if the code appears like that in the image below.
Install Whisper
Since everything is ready, you can now install Whisper. To do so:
Open your command console and run the command lines below:
pip install git+https://github.com/openai/whisper.git

Two possible scenarios may occur:
The installation will be successful, as in the image above.
You may encounter an error like “cannot find command git.”
This error means the pip command cannot locate git in your device. As a result, it cannot connect to the Whisper repository. To correct this problem, click here to download git for Windows, then run the pip install command again. During the git installation, click on the check box that auto-updates the path automatically. This will allow Pip to locate the git on your device.
2. Once the installation is complete, you only need to run Whisper in a command interface:
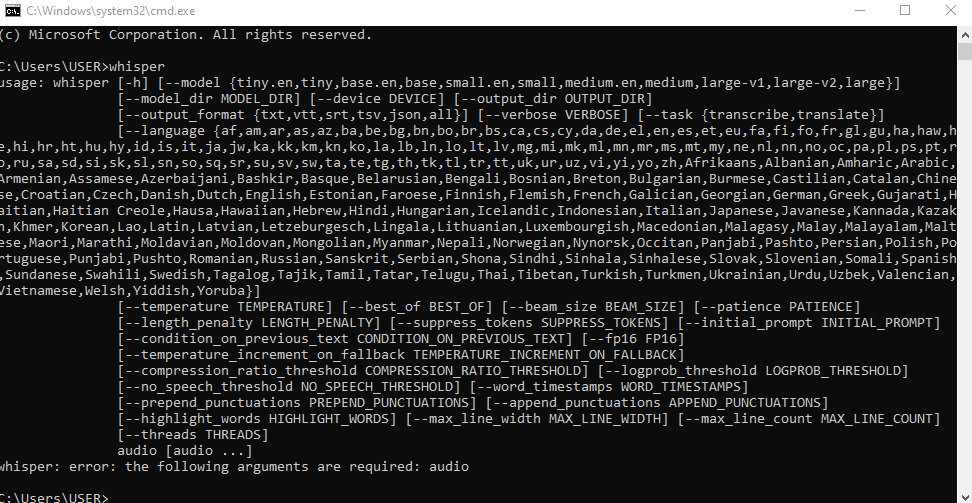
Here, you will see all the languages the tool can work with alongside other options that can help you run the tool, such as the Whisper model and output format. To get more information on the various commands you can run whisper on, use the command:
Whisper -h
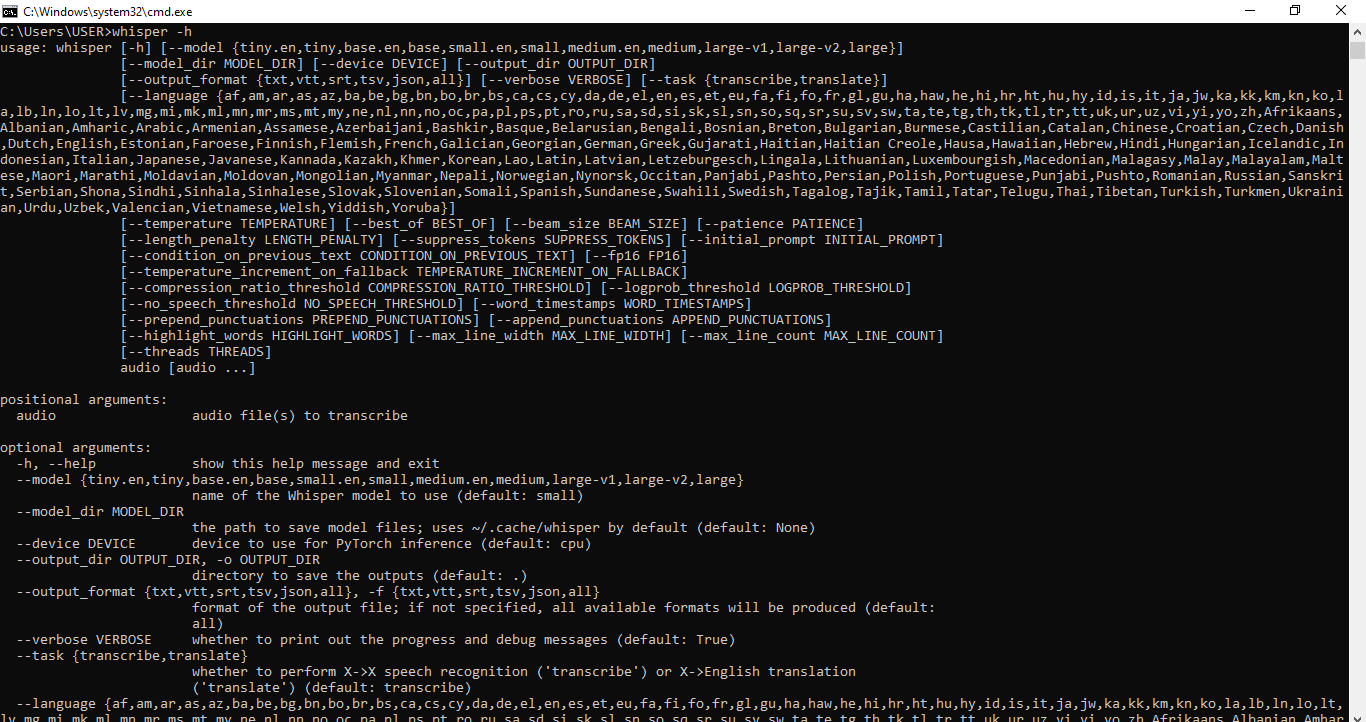
N.B: If you encounter an error that says “it’s not a recognized internal or external command,” add the Python script directory to the Path with your Python installation.
How to record your voice on Mac and Windows
We are done with the hard part: the installation. Everything else that follows from now will be a breeze. To record your voice on Mac or Windows, you need the help of a free tool such as Audacity. If you are not interested in downloading software, you can use a web-based platform like Notta.
Notta not only transcribes but also translates, annotates and collaborates and seamlessly integrates with your favorite tools like Notion and Salesforce. Let Notta improve your productivity today!
For the best results while recording, ensure that you:
Have a good microphone.
Record in a silent room without background noise.
When using Audacity:
Download the software from their main site.
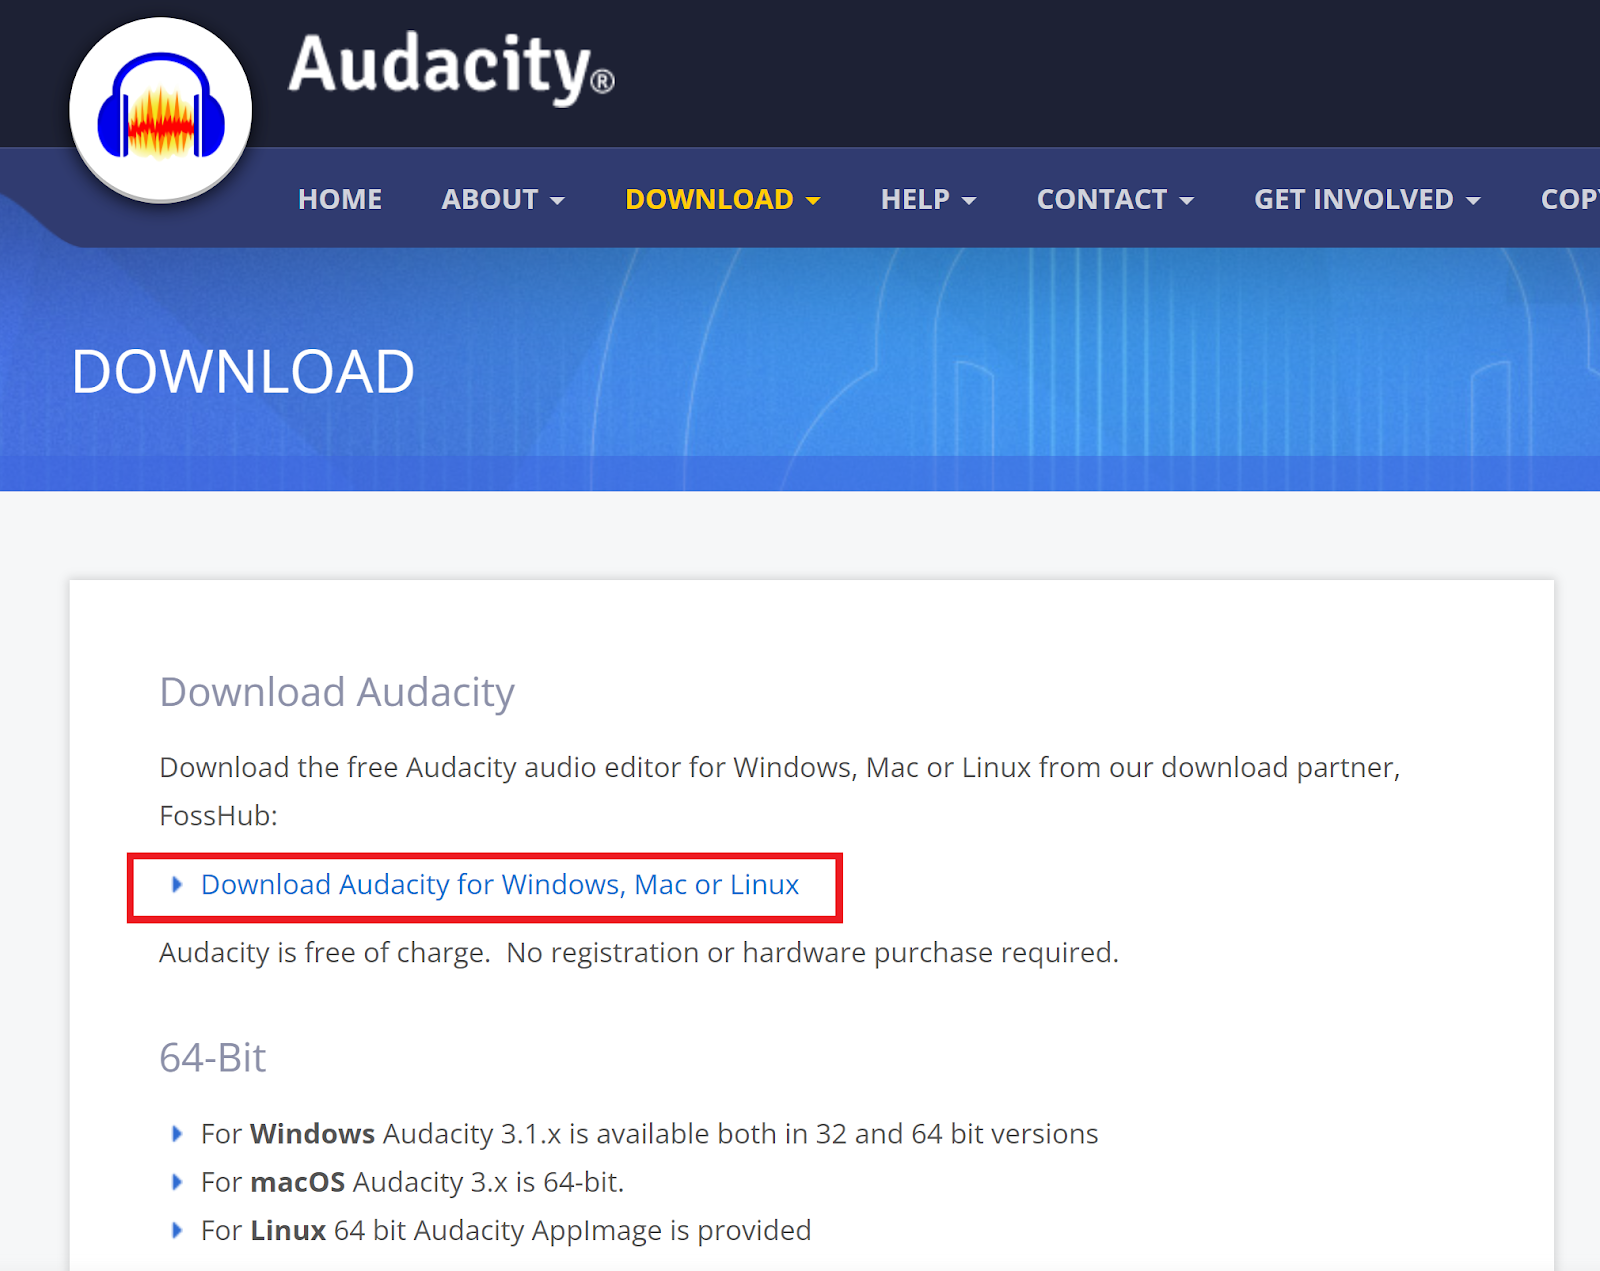
2.Open the software and connect your microphone.
3.Click on Audio Setup and set your microphone as the recording device for a crispier take.
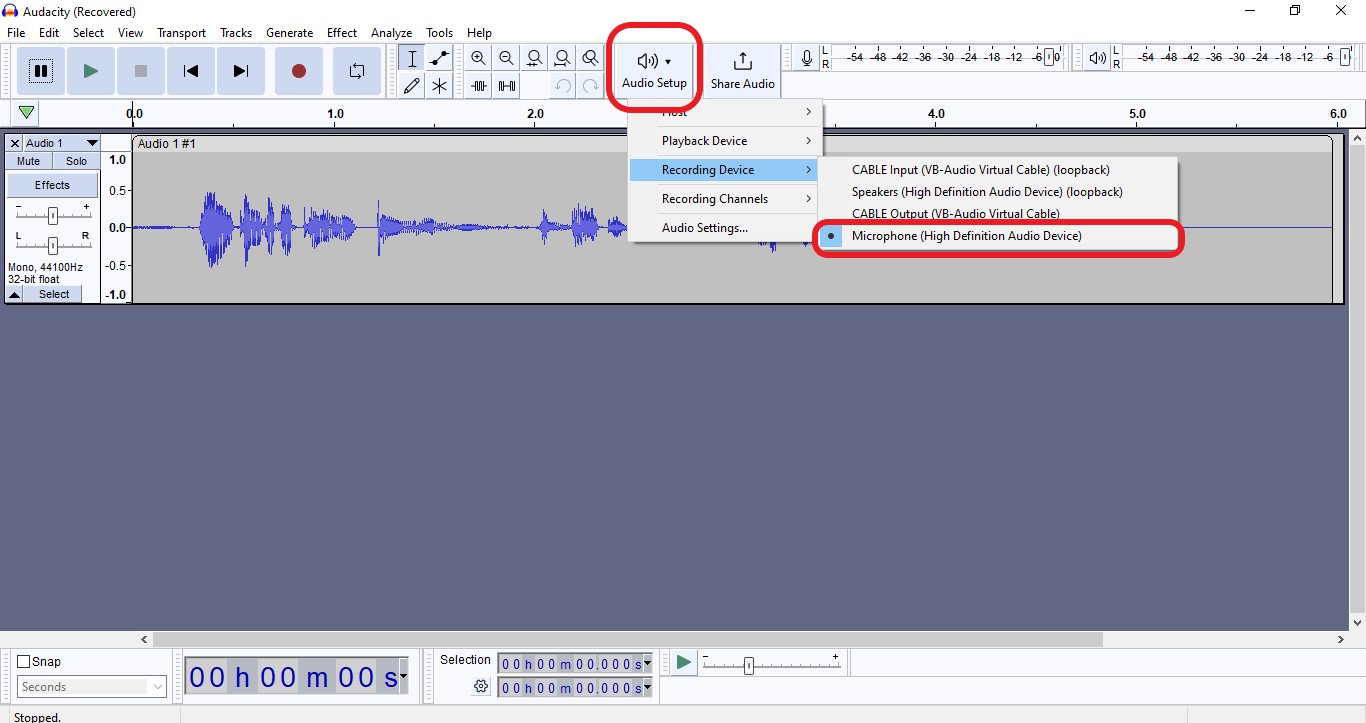
4.Click on the Record icon to start recording. Once done, Click the Stop Button to end the recording.
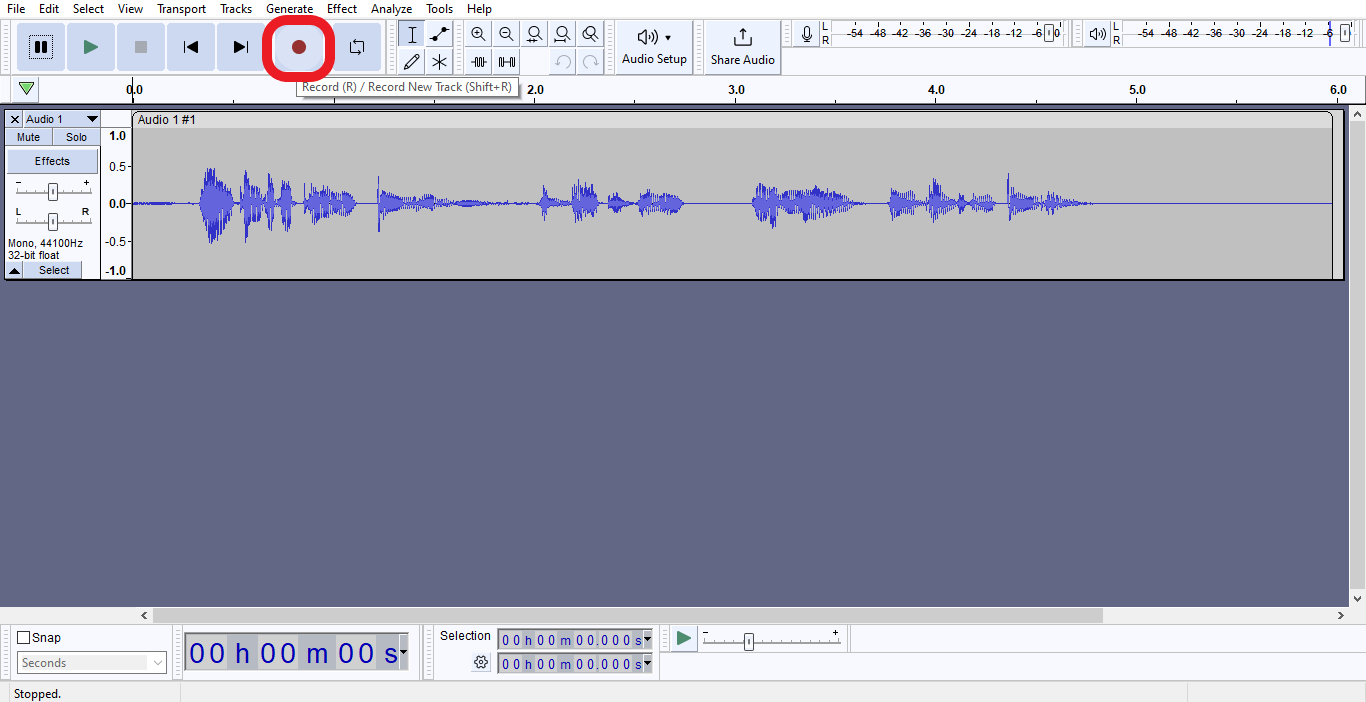
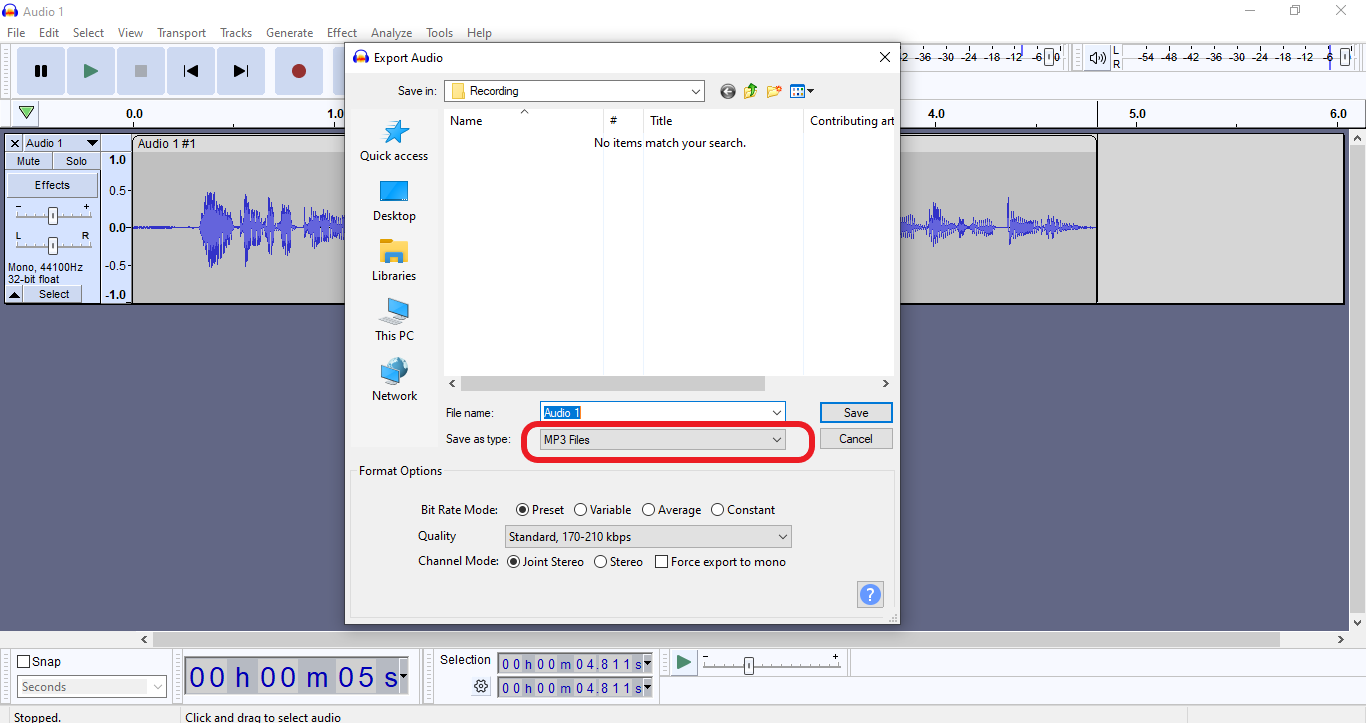
5.Head to ‘File’ and select ‘Export’ to save your recording as MP3, WAV, or OGG.
When using Notta:
Create a free account with Notta.
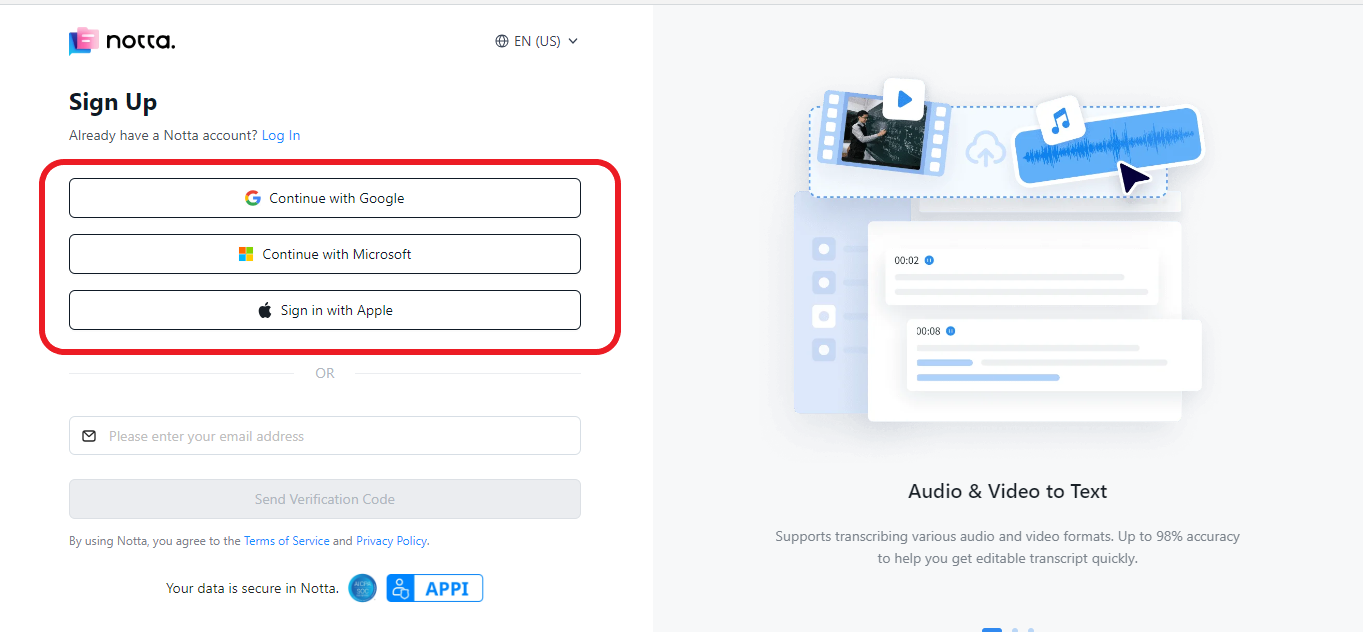
2. Click here to download the Chrome Extension

3.Login to your Notta account.
4.Connect your microphone and permit Notta to record.
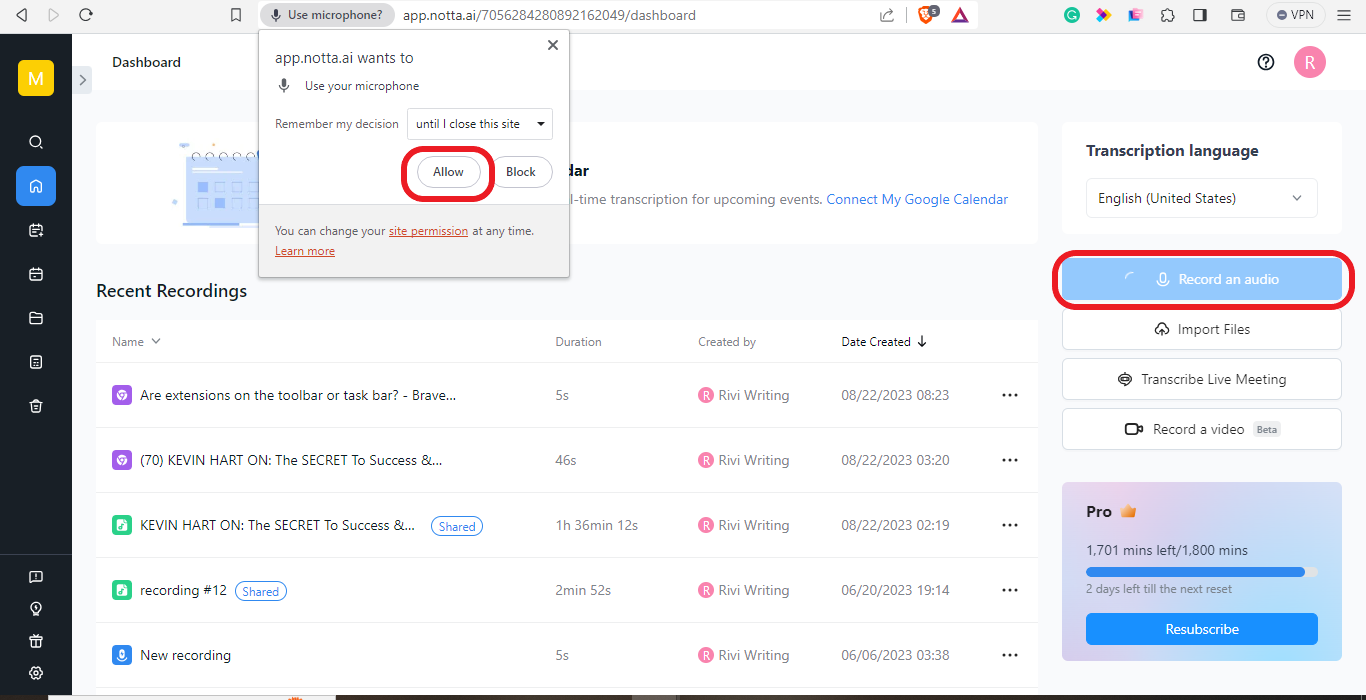
5.Click on ‘Record an Audio’ in the top right corner of your screen to record straight from your dashboard. To end the recording, click on the ‘Stop’ button.
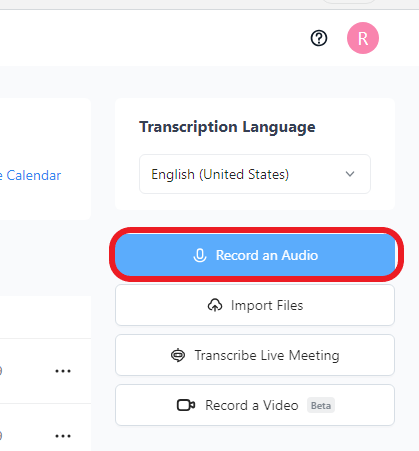
The Chrome Extension can allow you to capture audio from a source.
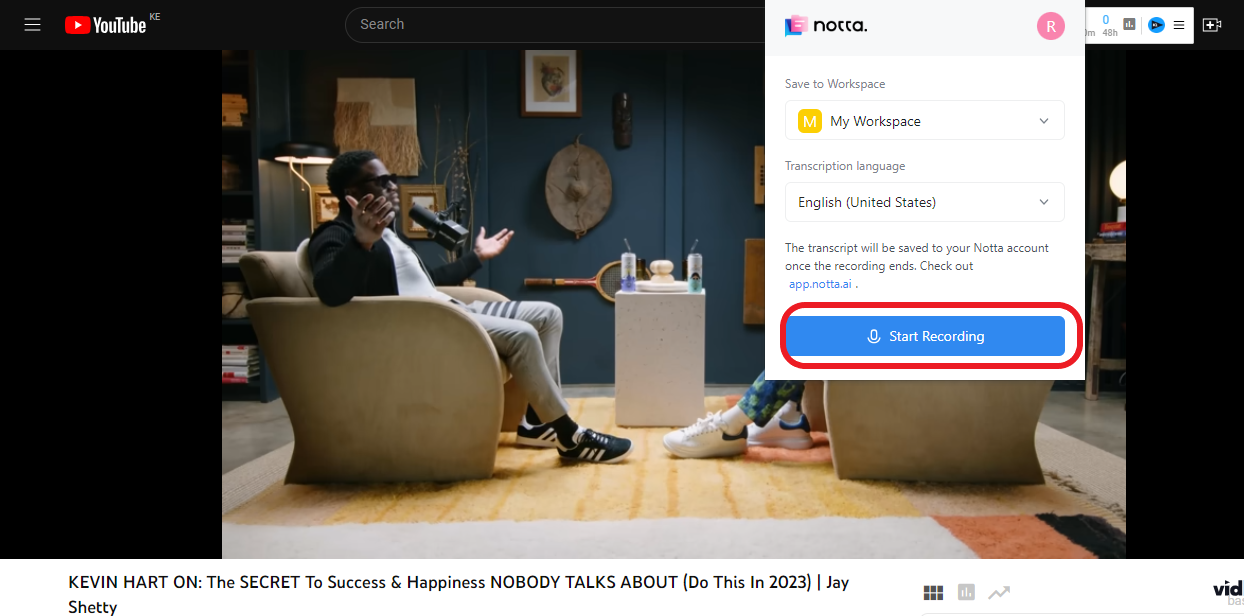
To use it:
Identify the Audio or video you want to record.
Click on the Notta extension icon on your browser toolbar.
Hit ‘Start Recording’ and Play the audio source. Click ‘Stop’ to complete the recording.
N.B: Notta automatically saves all the recordings in the dashboard. To access and export them, navigate to your account dashboard and find the recording you want to export. Notta allows you to export the audio as an MP3.
How to transcribe voice to text with Whisper
Now that we have the Audio, we can transcribe it using Whisper.
Save the audio file you want to transcribe in a new folder. I will call my folder ‘Transcribe.’
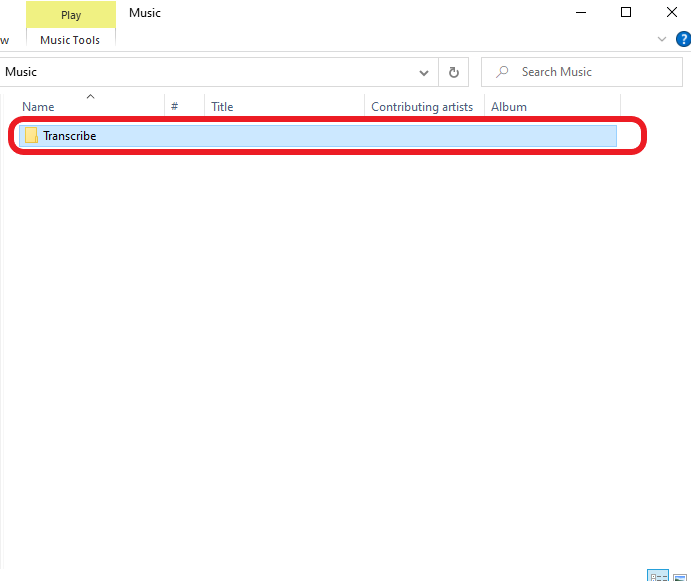
Open a new command prompt from the new folder. To do this, click on the file directory and type ‘cmd.’
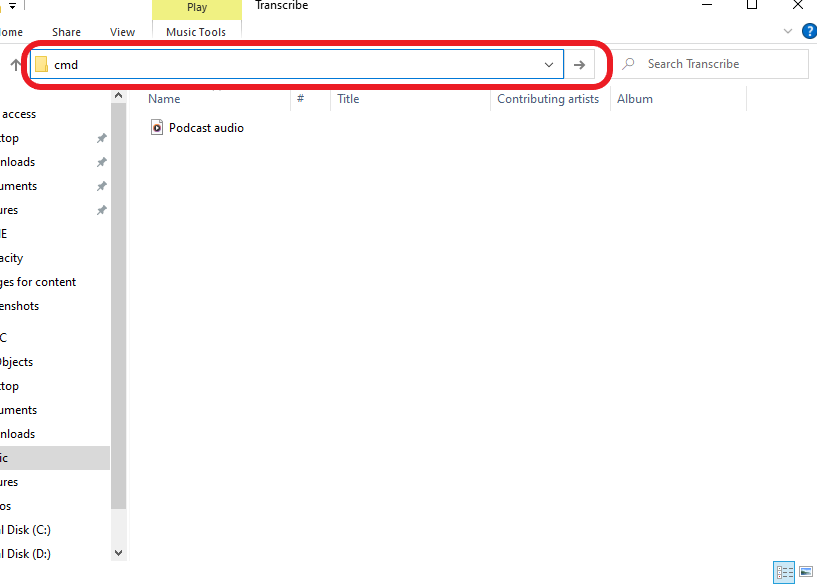
In the command prompt window, Type ‘Whisper followed by the file name you want to transcribe. If there are spaces in between the name of the file, remember to add apostrophe marks.
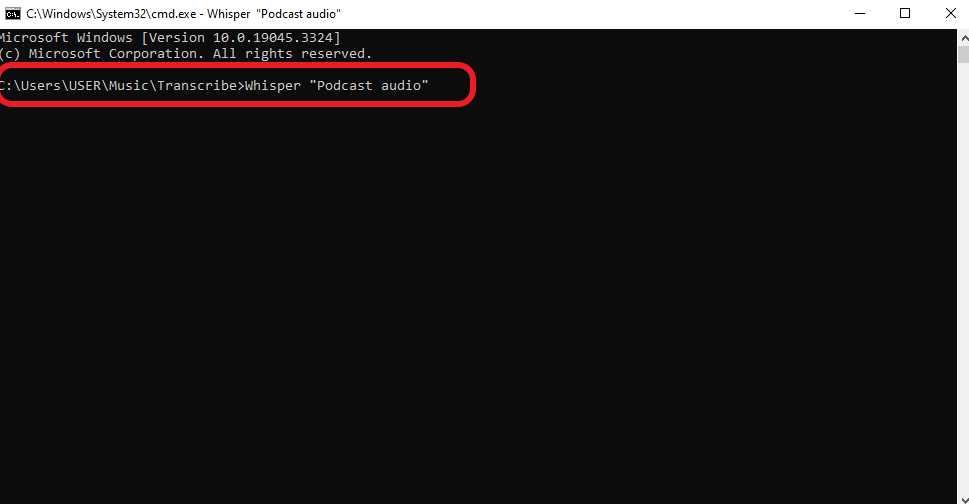
The transcription process will begin, and the time it takes to complete will depend on
The size of your file.
The speed of your GPU or CPU.
Whisper accuracy
Open AI’s Whisper is among the most accurate language models.
There are two ways to deduce the accuracy levels:
Analyzing the transcription quality
Whisper claims that the language model has gone through 680,000 hours of multilingual data training. As a result, it shows high levels of accuracy in transcription and translation. This intensive training has improved Whisper AI’s robustness and ability to detect accents and eliminate background and technical noise.
A look at the difference in WER
A research paper comparing the Word-Error-Rate (WER) between Whisper and six other current speech recognition models reveals that Whisper outperforms the best open-source model (NVIDIA STT) in every data set.
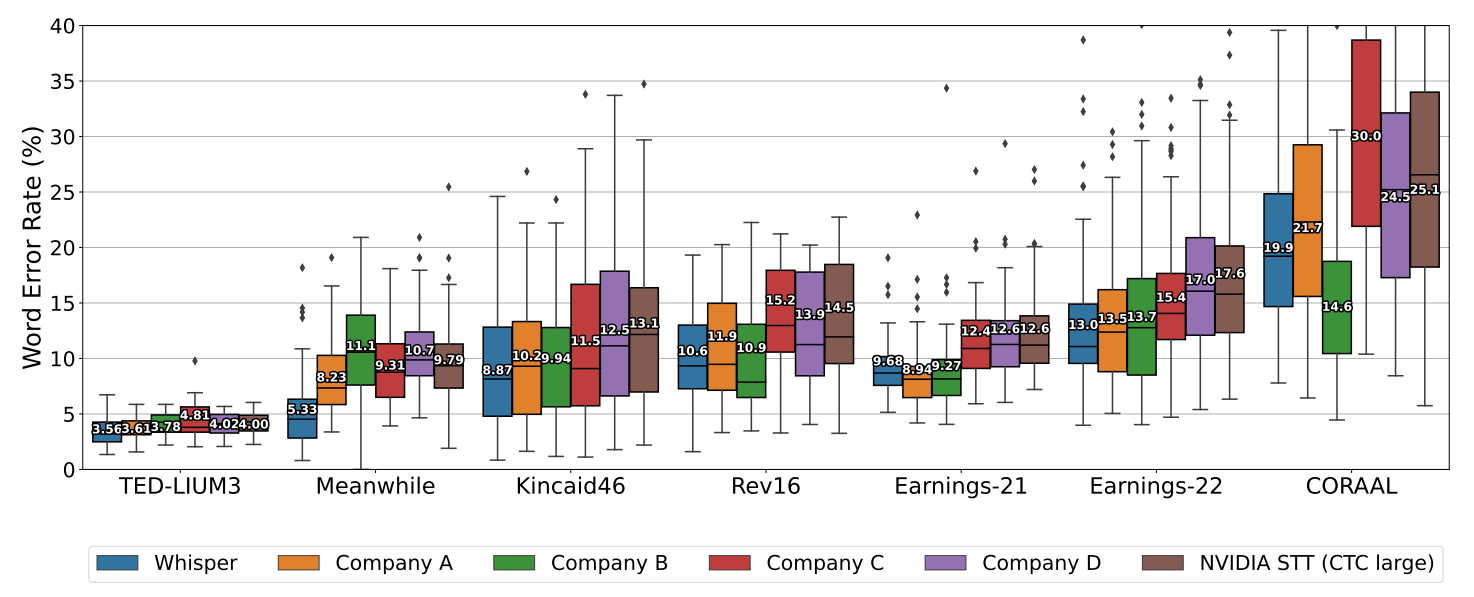
As you can tell from the table above, Whisper AI takes the crown of being the most accurate tool among all the other language models.
Still, it's essential to acknowledge that less than five languages have a word error rate lower than 5%, and more than 25 languages have a 50% and above word error rate. Still, it manages to make 50% fewer errors than language models.
N.B: AI speech technology is constantly improving, and Whisper AI is far from perfect. Some areas it may be lacking include:
It can occasionally leave out some punctuation
It can transcribe some words incorrectly or fail to transcribe some at all
It does not provide a distinction between the different speakers
Whisper cannot provide real-time transcription. Currently, it only focuses on zero-shot asynchronous transcription. To run Open AI Whisper online, you must use the Whisper API.
While it shines in performance, we still acknowledge that accuracy is still a concern to all language models, Whisper included, especially when dealing with non-English languages.
Whisper Speech Recognition Languages
Whisper can transcribe a total of 99 languages and translate them all into English. According to the AI, the most straightforward language to transcribe are Spanish, Italian, English, and Portuguese. All these have a word error rate of less than 5%.
Here is a distribution of how the languages compare in their word error rates:
| Number of Languages | Word Error Rate |
|---|---|
| 4 | <5% |
| 9 | 5 - 10 % |
| 19 | 10 - 20 % |
| 11 | 20 - 30 % |
| 4 | 30 - 40 % |
| 6 | 40 - 50 % |
| 11 | 50 - 90 % |
| 18 | 90 - 200% |
Cost to run Whisper
The most significant benefit that comes with using Whisper is that it is free to use! You can run Whisper locally without registering and paying any subscription fees.
But there is a catch. It will cost you time and resources to install and use the software. Considering Open AI does not provide ongoing support and integration assistance, encountering errors will create operational setbacks.
At the same time, to get the best out of the tool, you need to use a device with a good GPU. How so?
Whisper provides five language models that you can use for transcription. These include
Tiny
Base
Small
Medium
Large.
Each model requires a certain amount of processing power to operate. For example, tiny and base needs a VRAM of about 1 GB each, small 2GB, medium 5GB, and large 10 GB. The higher the processing power, the faster the result.
Ideally, an Nvidia GPU (GTX970 or any newer version) can serve you well.
Do not confuse speed with accuracy. While the larger models use less time and more GPU resources, they are not necessarily the most accurate.
Whisper free alternative - Notta
As seen above, Whisper AI is a winner in transcription accuracy. Unfortunately, it lags behind due to its limited features, numerous failure modes, and a lack of assistance. Also, it eliminates users with CPU devices as they cannot maximize the use of the tool.
As such, one tool that may interest the average user that boasts high accuracy and everything else Whisper lacks is Notta.
Notta is a transcription and translation software that can record, transcribe, and translate both audio and video. It is among the best tools for podcasters, students, and marketing teams. Notta is a web app, Chrome extension, and mobile app that allows seamless access across devices. Some of its most notable features include:
Highly accurate - Notta delivers an accuracy of 99.98%, making it better than most tools in the market.
AI summary - Notta leverages GPT-4 to derive a highly accurate and concise summary from the generated transcription to give you an overview of the whole conversation.
Extensive language support - It can transcribe 58 languages and translate 42 more than any other AI tool.
Fast turnaround time - The transcription process is very fast. You can get a 2-hour audio in just 5 minutes. Moreover, you don't need an expensive GPU to improve the speed!
Real-time meeting transcriptions and note-taking - Notta supports real-time transcription of ongoing meetings. You only need to connect the app to your online meeting, and the AI assistant will take care of everything.
To transcribe an audio file with Notta:
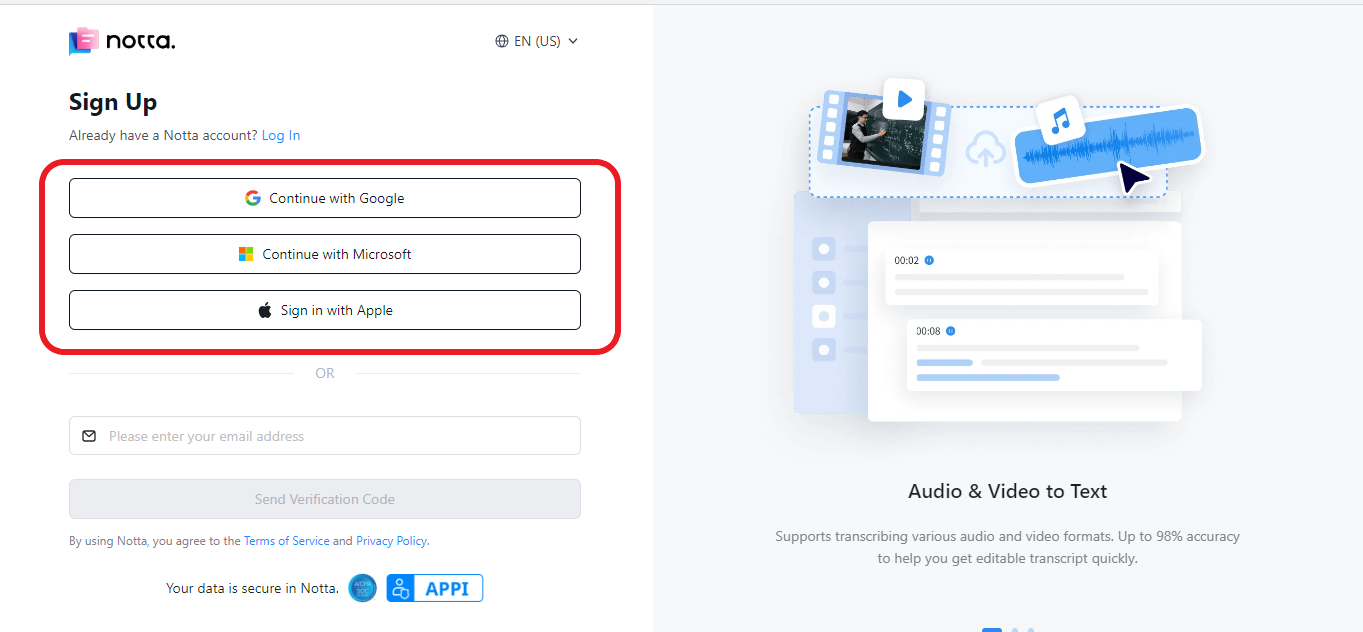
Sign up or log in to your Notta account.
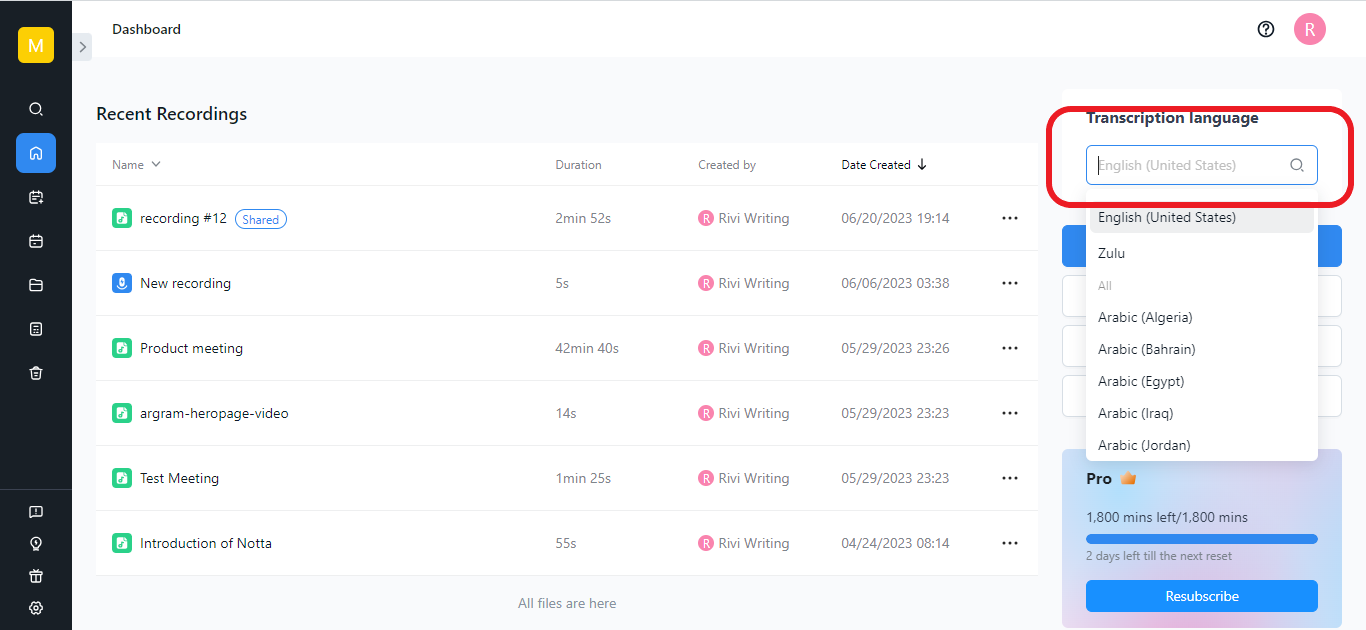
2.At the top right corner, set the transcription language.
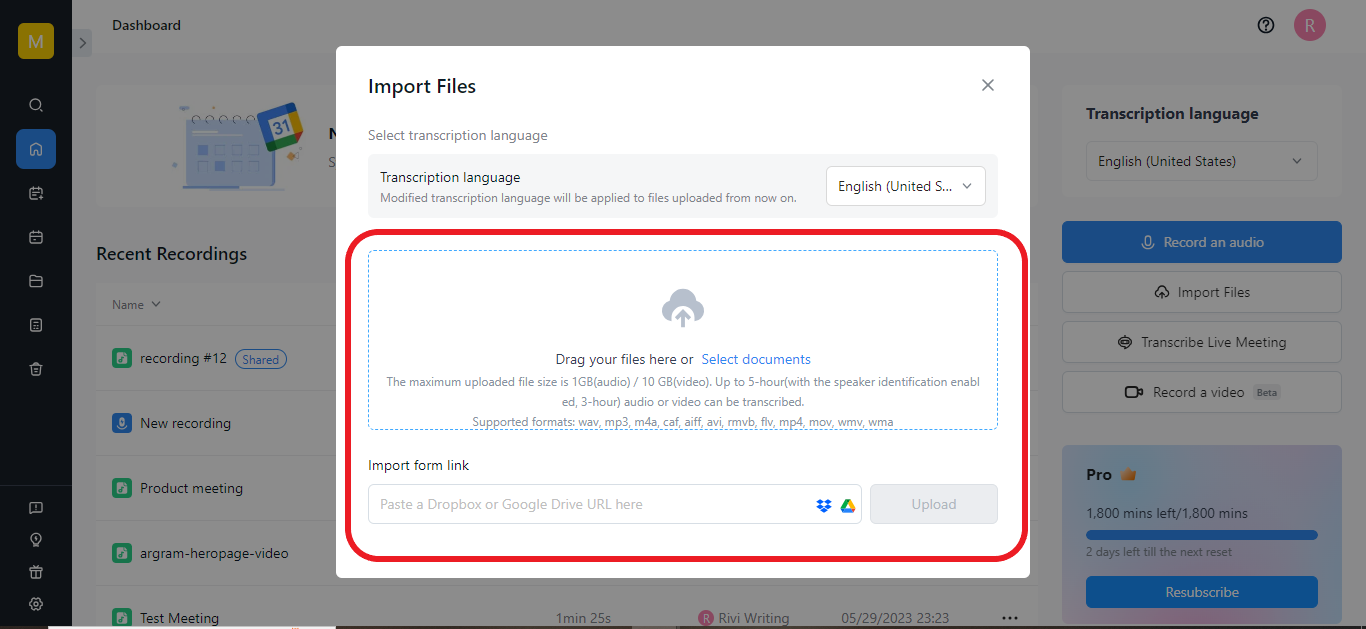
3.Click on ‘Import Audio’ to upload your audio file. You can drag and drop the file from your local files or share a public URL from YouTube, Dropbox, or Google Drive. The transcription will happen immediately after upload.
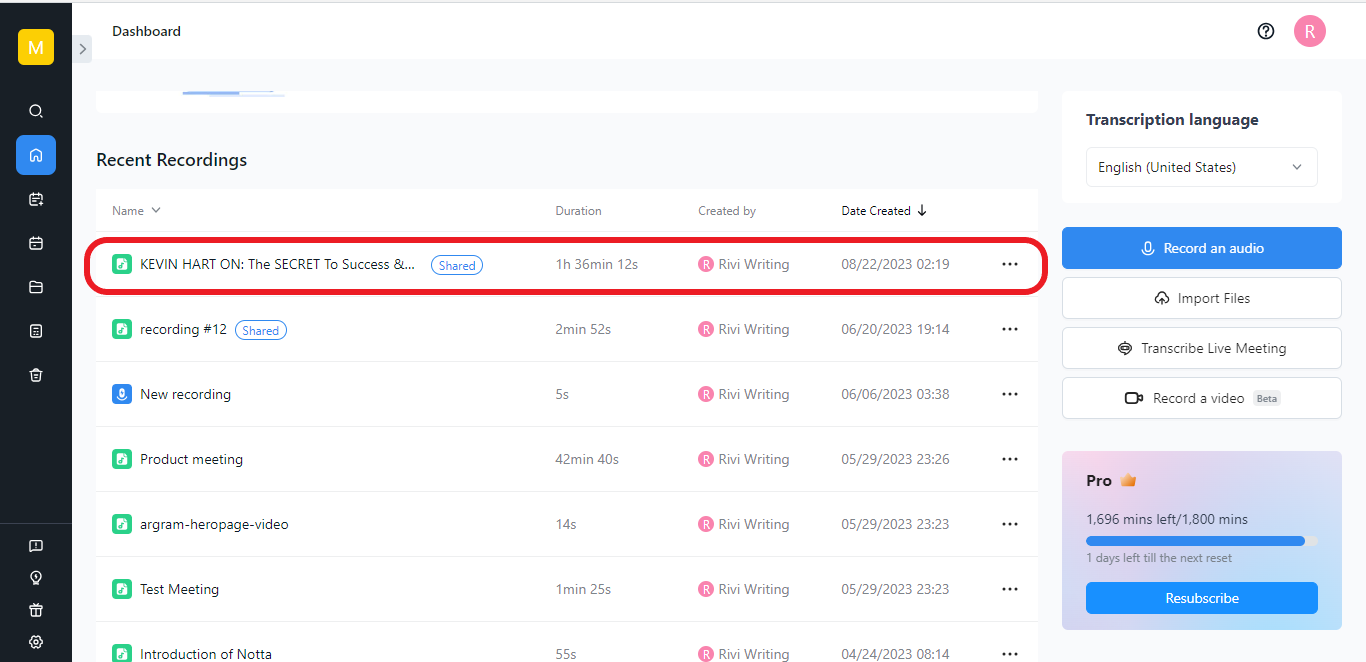
4. Navigate to the dashboard, click on the transcribed file, and make any necessary edits using the built-in editor.
5. When ready to export, click the ‘Download’ icon at the top right corner.
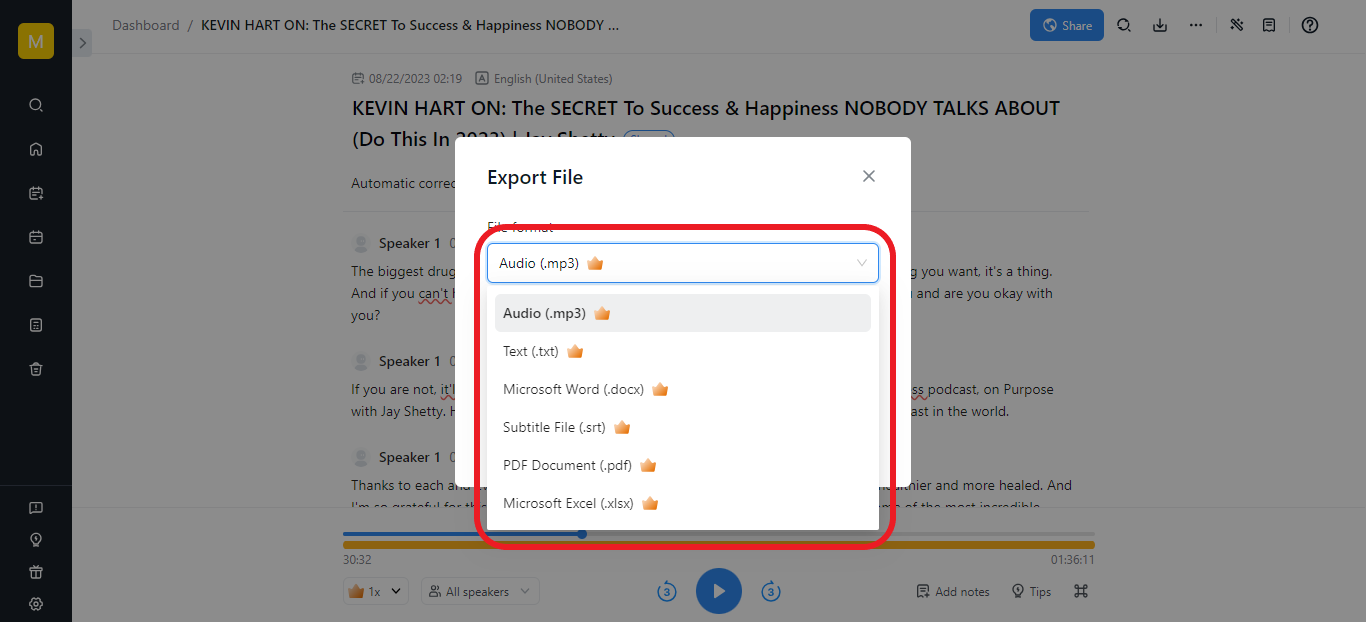
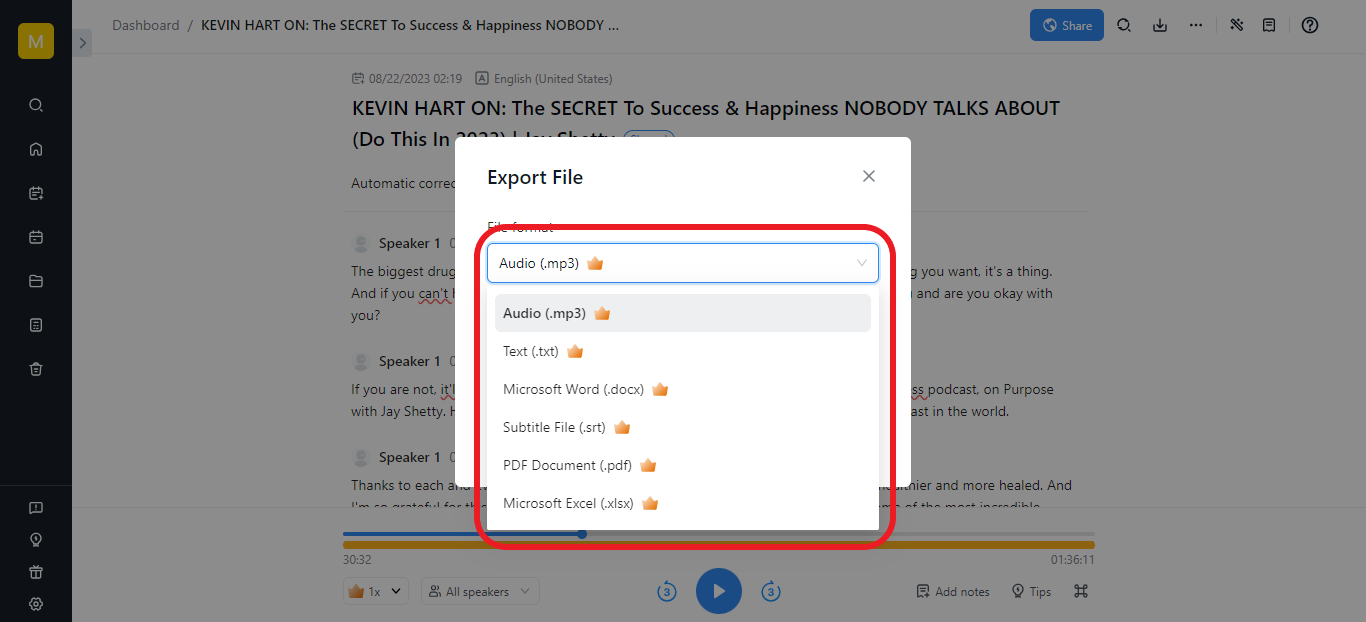
6.Choose the format you want to export and save your transcript.
Conclusion
From afar, Whisper AI may seem like a tool only for tech-literate individuals, but it is, in fact, easy to use. The only challenge you may encounter is during the set-up. While the steps may seem technical, follow this guide to the letter, and nothing will stand in your way.
Please note that you can only access Whisper AI on the device that you install it. If you want a tool compatible with various devices but still delivers the same level of accuracy as OpenAI’s Whisper model, give Notta a try today.