How to Record Audio on MacBook & MacBook Pro
98% accurate, real-time transcription in just a few clicks. 58 languages and multiple platforms supported.
Have you ever been in a situation when you needed to record audio on your MacBook but didn't know how? Maybe you were trying to create a podcast or capture an interview, and it just didn’t come out sounding right.
Well, worry no more! Recording clear, high-quality audio on a MacBook or MacBook Pro is easy with the right software and a few simple tips.
In this article, we'll show you:
How to record audio on your MacBook using Voice Memos.
How to record audio using QuickTime.
How to use Notta as a digital recorder for high-quality transcriptions.
How to record audio on your Mac from a YouTube video.
How to record using Audacity.
As a bonus, we’ll add in some quality tips and tricks along the way and answer some FAQs about recording audio on a Mac.
Let’s get started!
How to record audio on Mac with Voice Memos
Voice Memos is a built-in app on iOS devices that’s also available as a free download on the Mac. It's designed for high-quality audio recording and is straightforward to use.
To record with Voice Memos:
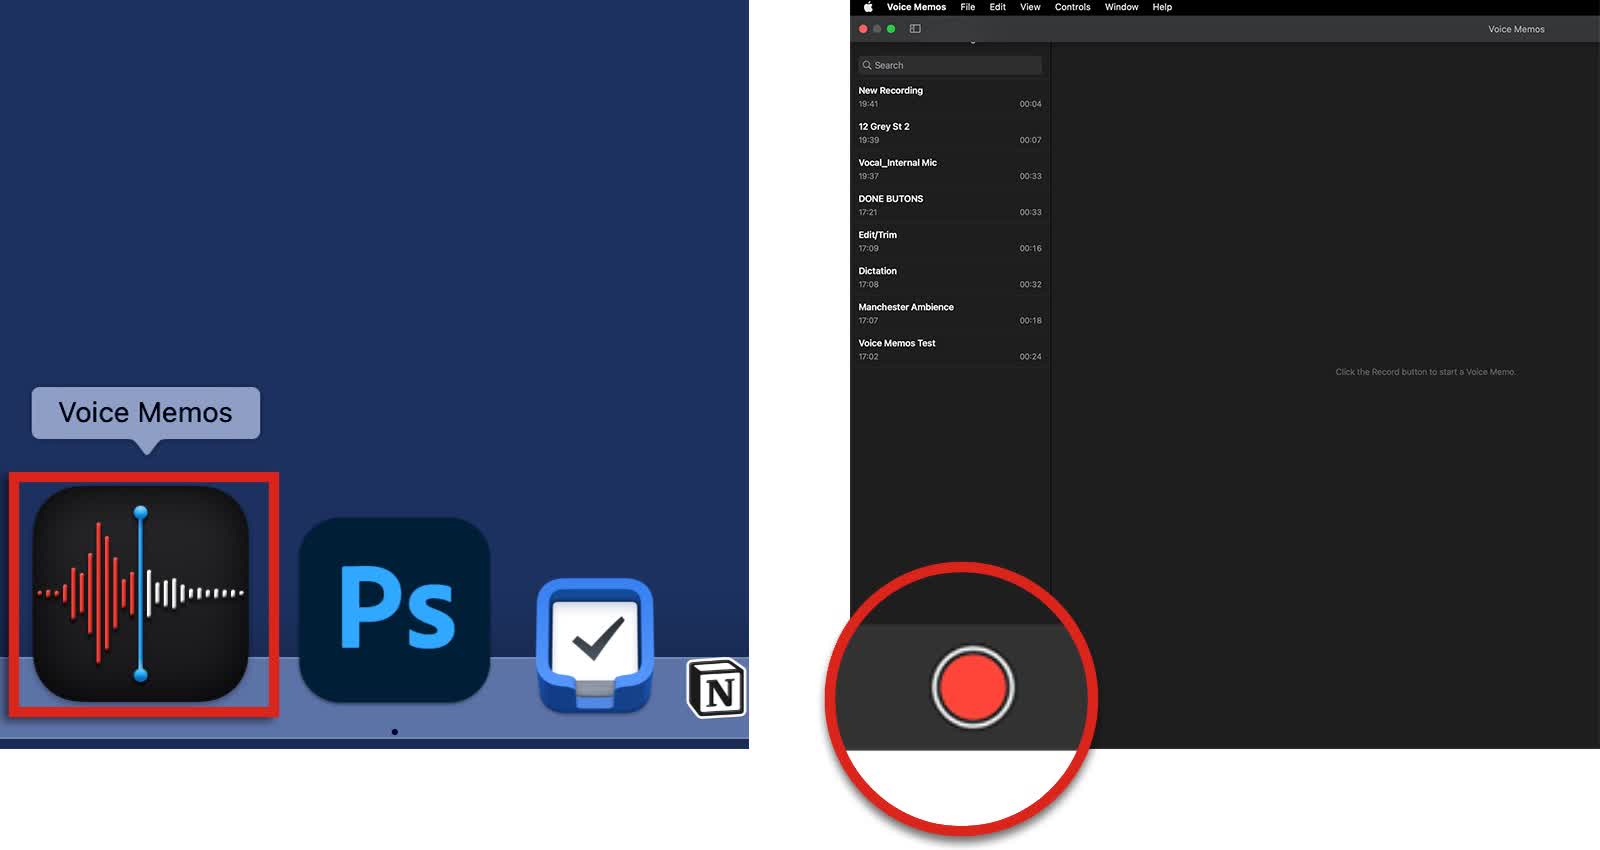
Open Voice Memos from the Dock or the Applications folder.
Use ⌘ Command-Space to open Launchpad and type Voice Memos in the search bar.
Click the ‘Record’ button (it looks like a red circle in the left-hand corner).
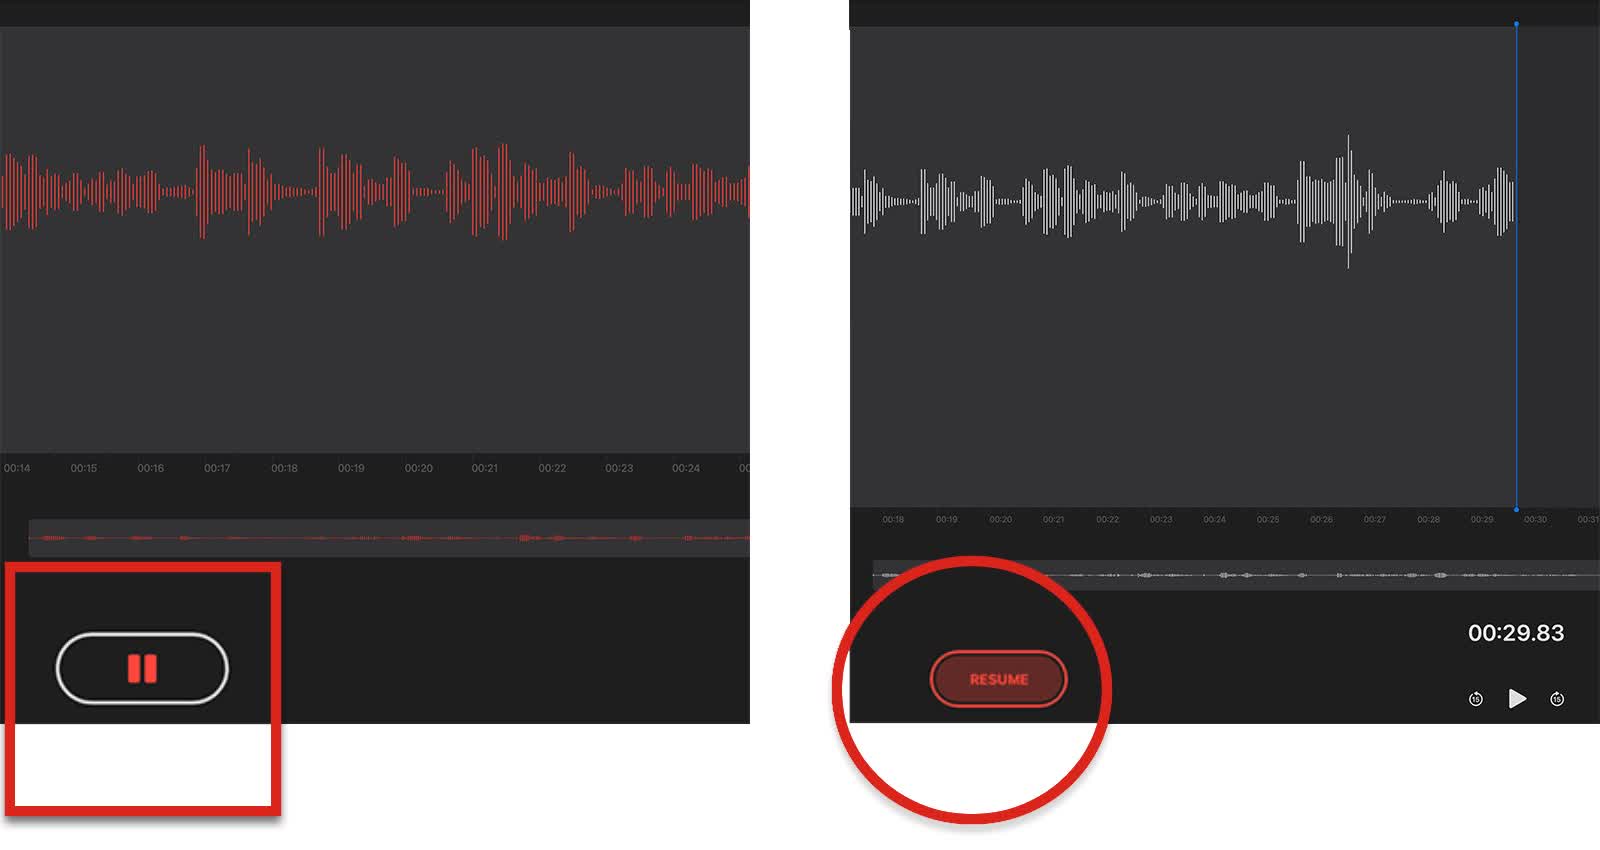
Click the ‘Pause’ button (bottom right ) to pause the recording.
Click the ‘Resume’ button to resume recording from the last paused position.
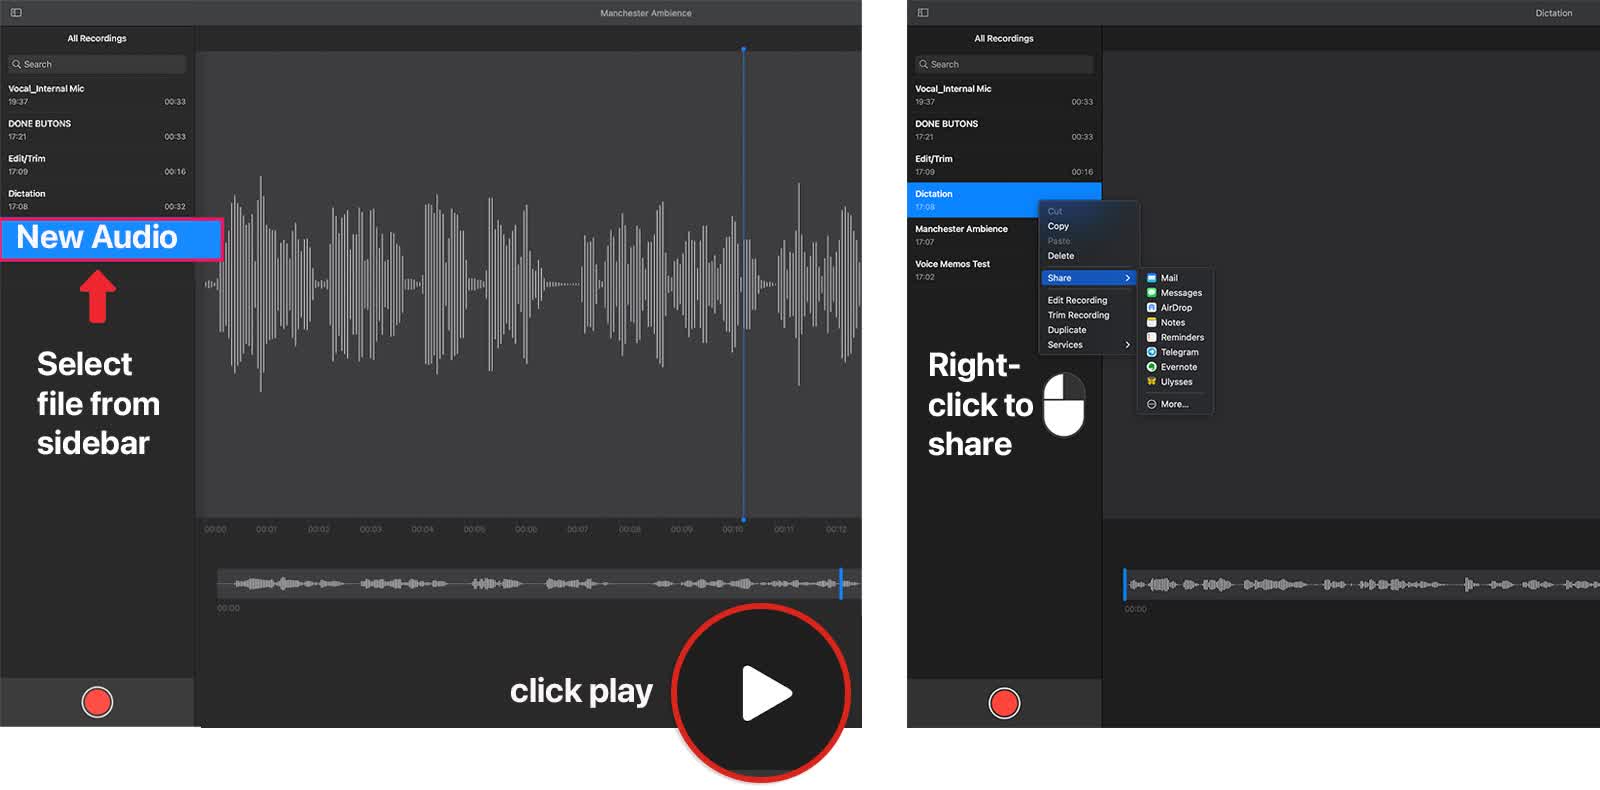
To ‘Play’ the audio, click the triangular play button.
Right-click on the file in the sidebar to access the ‘Share’ options. (Also available from the icon on the top right of the screen).
Trim off the edges!
It’s easy to perform simple edits in Voice Memos:
Select the Voice Memo you want to trim in the sidebar.
Click the ‘Edit’ button in the top right corner.
Select the ‘Trim Tool’ (square with two small circles) on the next window to open the Trim editor.
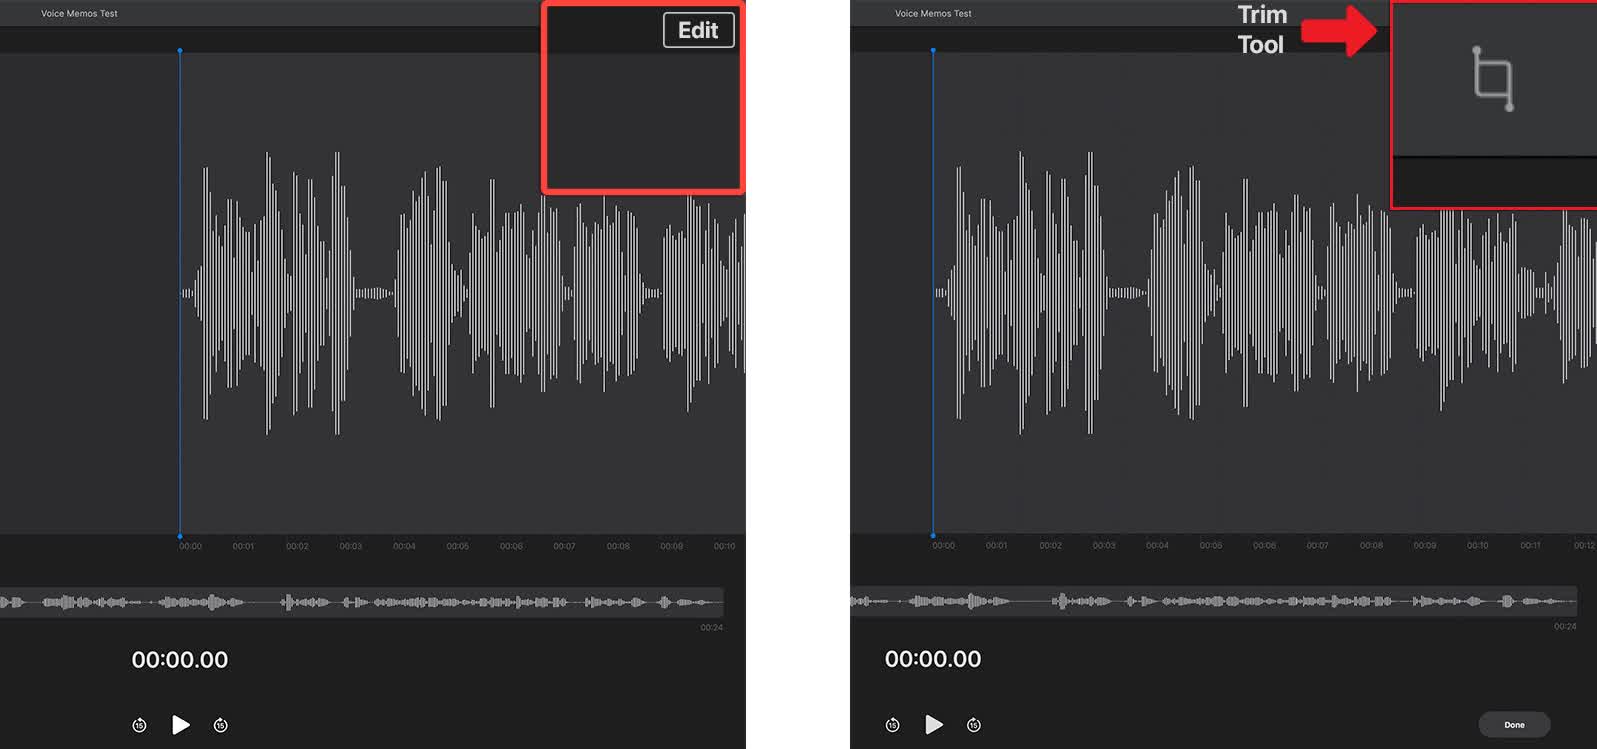
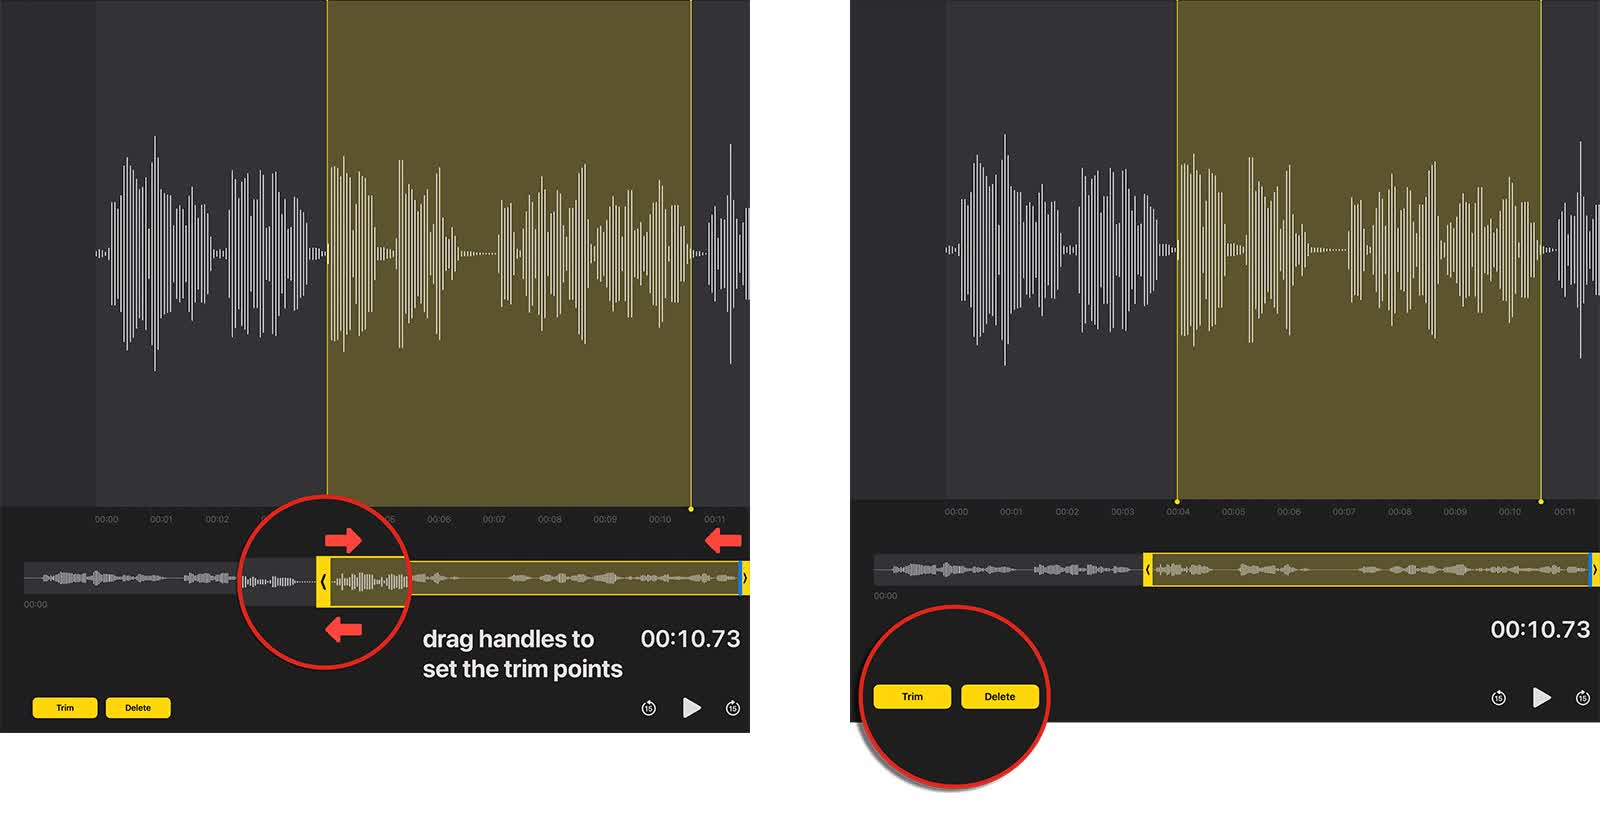
Hold and drag on the trim sliders to shorten the audio clip at the beginning and end.
When you have selected the audio you wish to keep, click ‘Trim.’ Any audio outside the yellow highlighted area is deleted.
To delete audio inside the yellow highlighted area, click ‘Delete’.
Adjust the playback speed
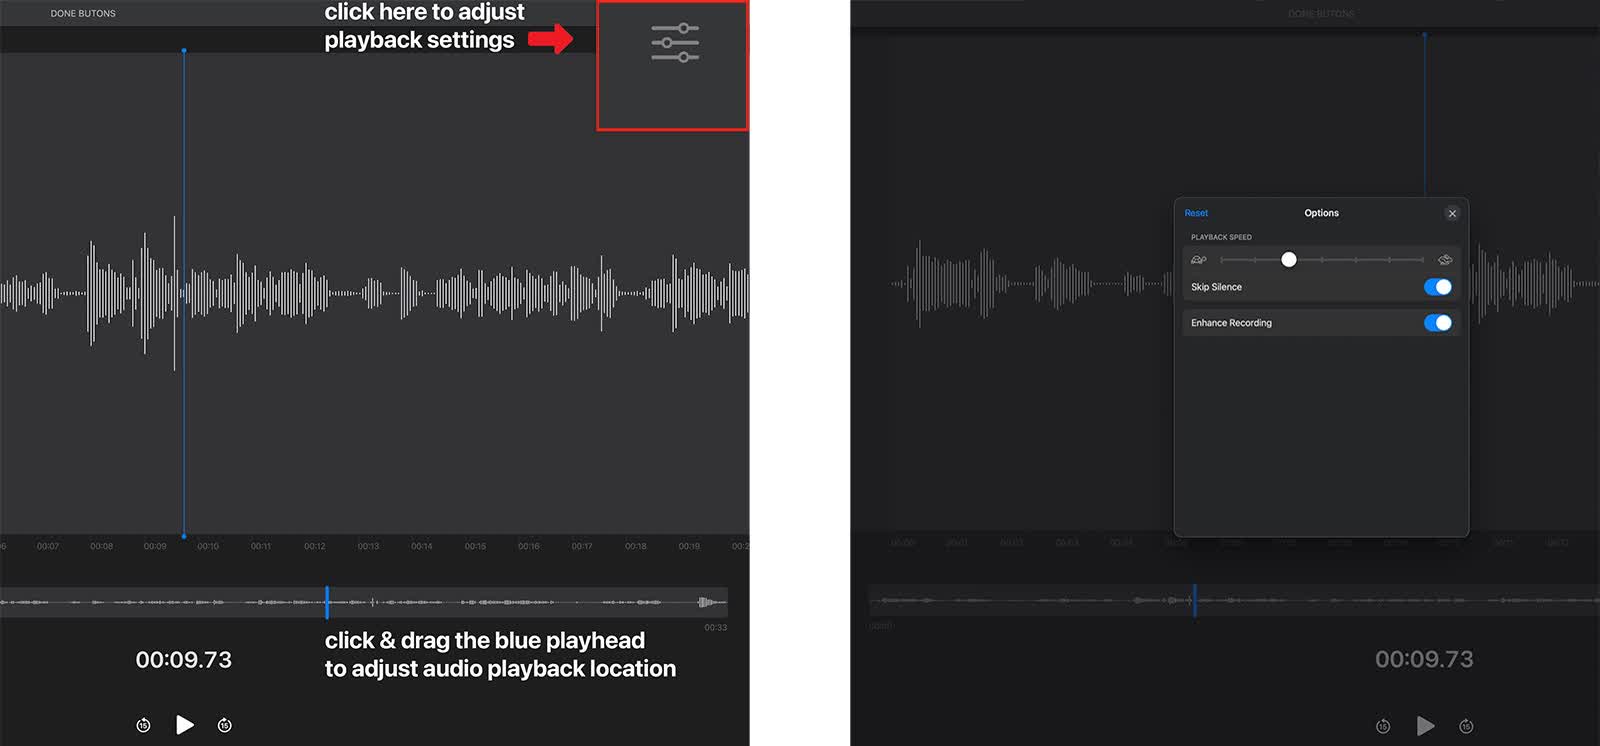
Adjust the playback speed by dragging the slider between the hare and the tortoise.
‘Skip Silence’ to omit pauses and silences from your recording.
Use ‘Enhance Recording’ to brighten and boost your vocals and diminish any background hum.
Manage your files & folders
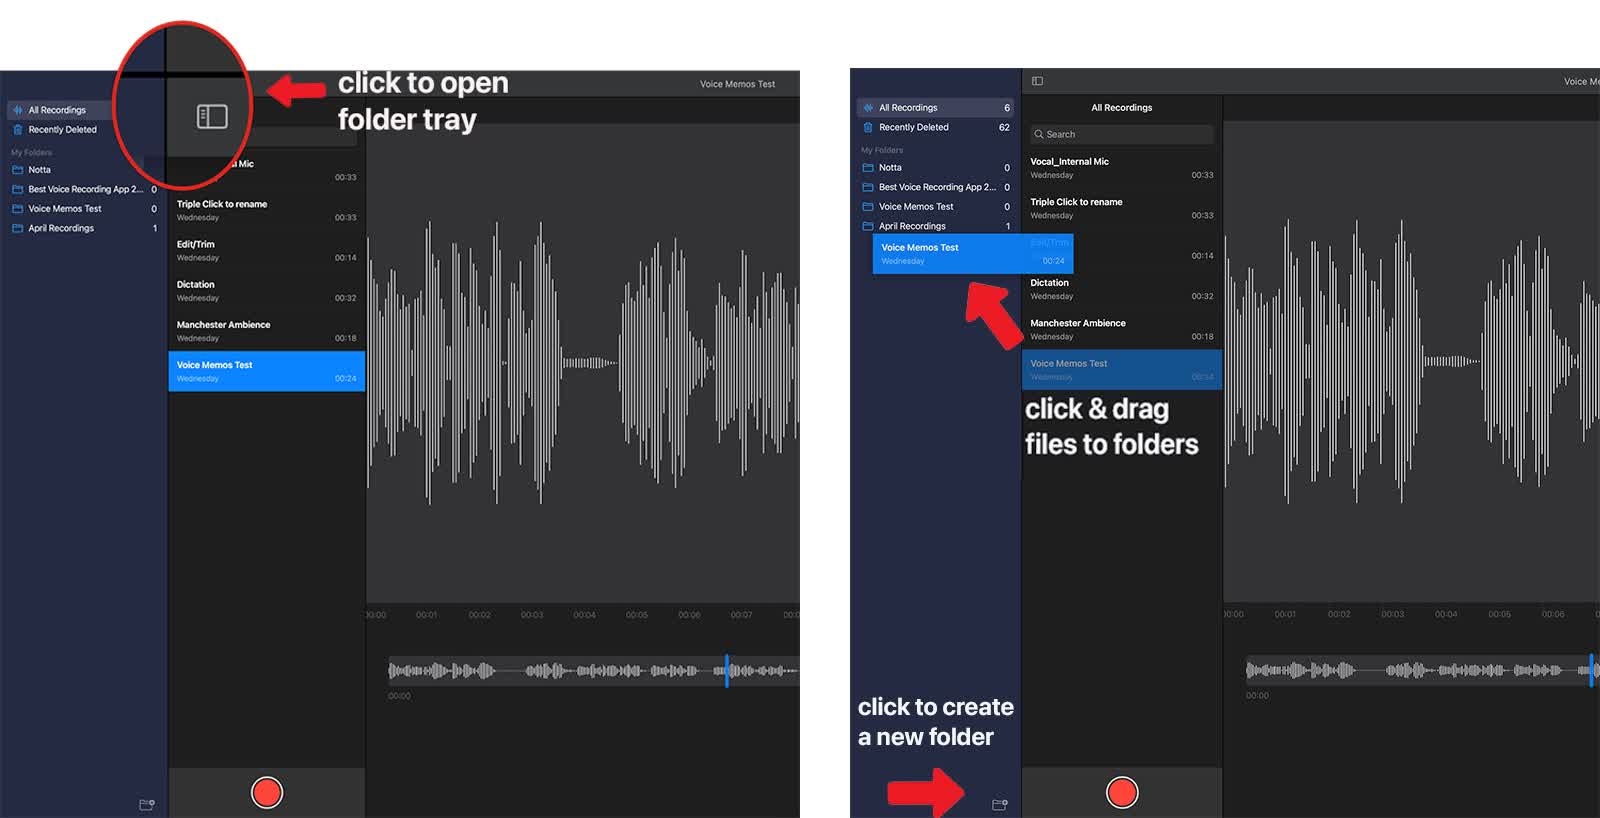
Open the ‘Folder tray’ to reveal the ‘Folders’ window
Click and drag an audio file to a folder to organise them.
Create new folders by clicking the icon in the bottom left and naming the new folder.
A few final tips
Select ‘Lossless’ as the recording format to ensure you’re recording at the highest possible quality. Find it in the ‘Voice Memo’ menu under ‘Preferences’->’Audio Quality.’
Triple-click on the file name in the main menu to rename the file.
If you plan to do a lot of recording, consider investing in an external microphone.
Notta can convert your spoken interviews and conversations into text with 98.86% accuracy in minutes. Focus on conversations, not manual note-taking.
How to record audio on Mac with Quicktime
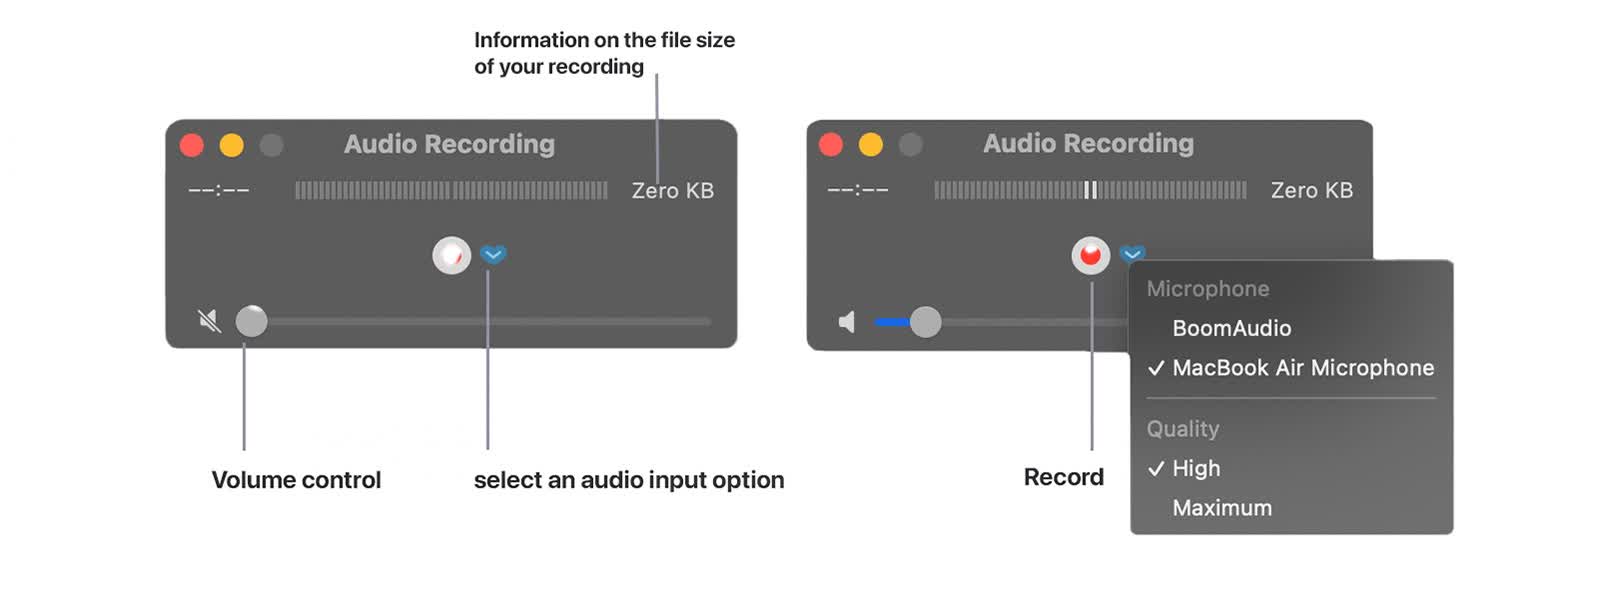
QuickTime is another piece of free Apple software installed on all Macs. It's often used for video or screen recording but can also be used to record first-class audio.
To record audio on your Macbook with QuickTime:
Open QuickTime from the Applications folder or Launchpad.
Click ‘File’ > ‘New Audio Recording.’
A new window will open with recording options. To choose the audio input, click the drop-down menu next to ‘Microphone.’
To start recording, click the ‘Record’ button (it looks like a circle with a red dot in the middle).
Click the ‘Stop’ button (it looks like a square).
Click the ‘Play’ button (it looks like a triangle).
To save your recording, click ‘File’ > ‘Save’ and give your untitled recording a name.
How to record audio on Mac with Notta
Using Notta as a digital recorder
Notta is an excellent voice recorder for your MacBook. It’s easy to use, and setup takes minutes. As a bonus, your audio comes with a complete real-time transcription.
It’s also available on iOS as a free download so that you can work across your Apple devices with zero friction.
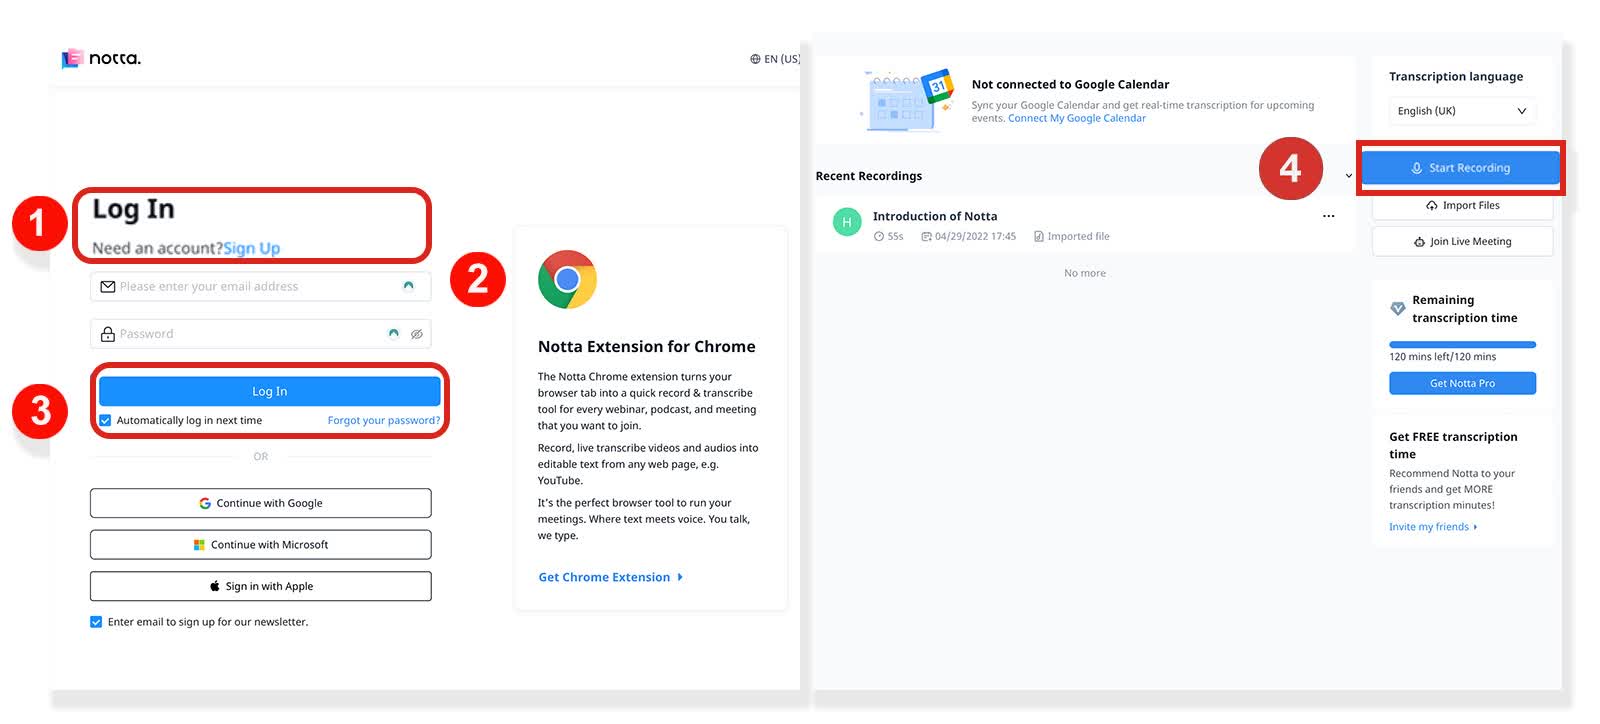
Visit Notta to sign up for a free account here.
Download your Chrome extension here.
Log in to your Notta account.
Click the blue ‘Start Recording’ button to begin recording.
Editing your audio transcript
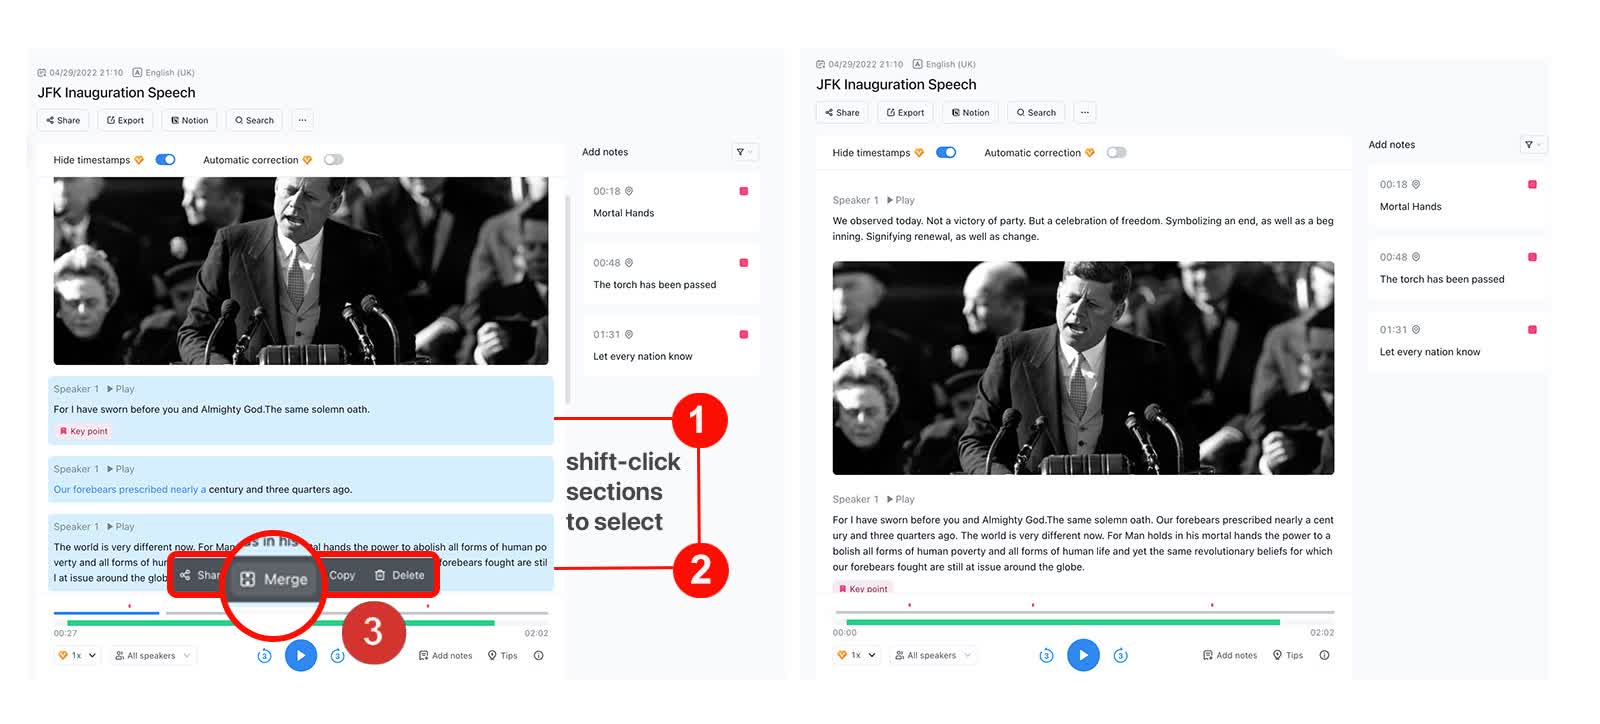
Once you have recorded your first transcript, you can edit it by clicking and typing directly in the text window. You can also merge sections into longer passages.
To merge transcript sections:
Shift-click to highlight a text passage you wish to ‘Merge.’
The selection will turn blue to indicate that it is selected. Shift-click to select more.
Click ‘Merge,’ and the selected texts will form a continuous passage.
Marking passages & exporting audio transcripts
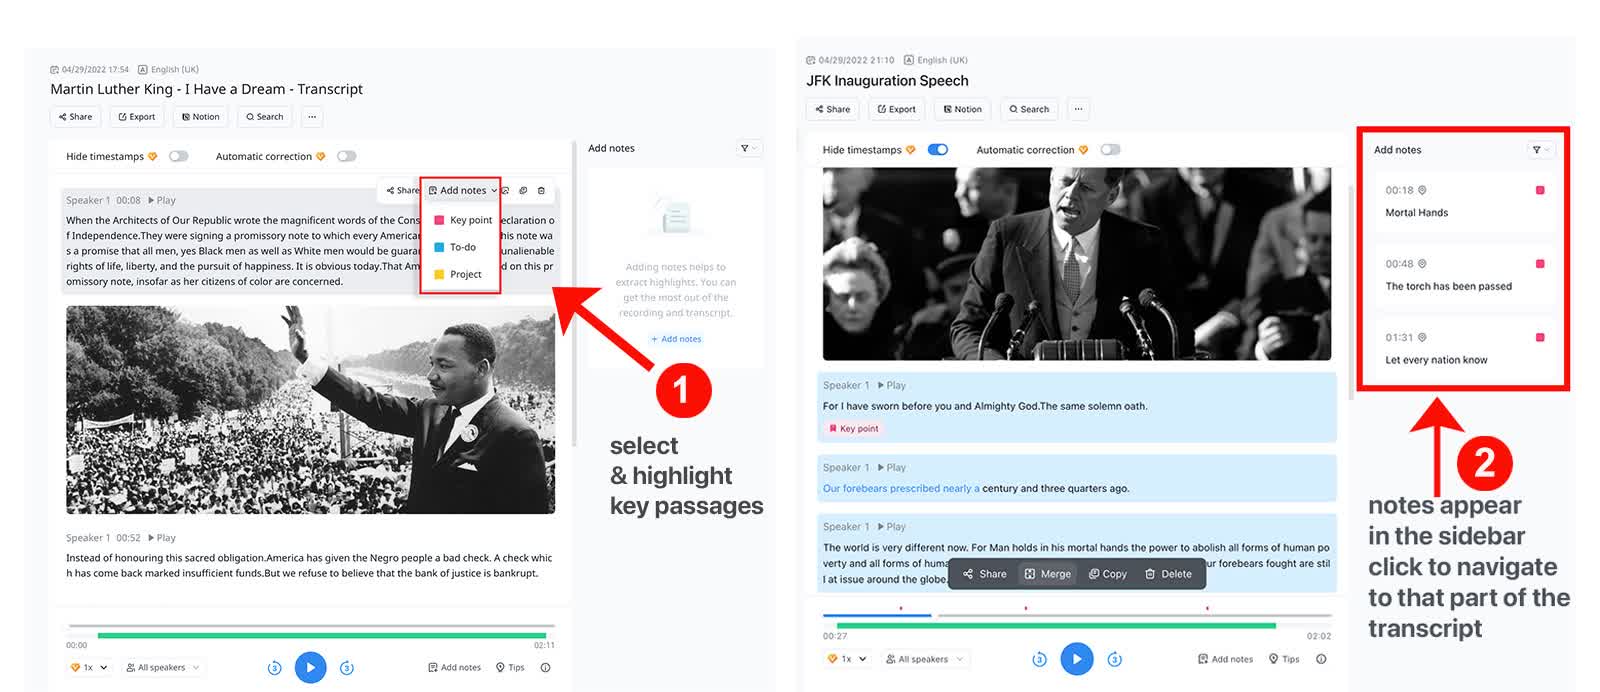
Notta allows you to add notes to important audio sections and access them instantly by clicking it in the sidebar.
To add a note:
Select ‘Add Note’ from the drop-down menu of the selected text.
Navigate to the note by using the sidebar.
Notta on the web: Chrome extension
Notta’s Chrome extension allows you to capture online audio from the web seamlessly. You can record YouTube videos, online courses, and much more. The Chrome extension also generates transcripts to listen to later and share.
Use Notta's AI transcription tool to quickly and easily transcribe audio and videos. We guarantee accuracy and ease of use.
Recording browser streaming audio with Notta Chrome Extension
First, download the free Notta Chrome extension and follow the prompts.
Navigate to an audio source you’d like to capture and transcribe.
Click on the Chrome extensions tray to open the menu.
Enable the plug-in by clicking the ‘Pin’ icon to show it on your browser toolbar.
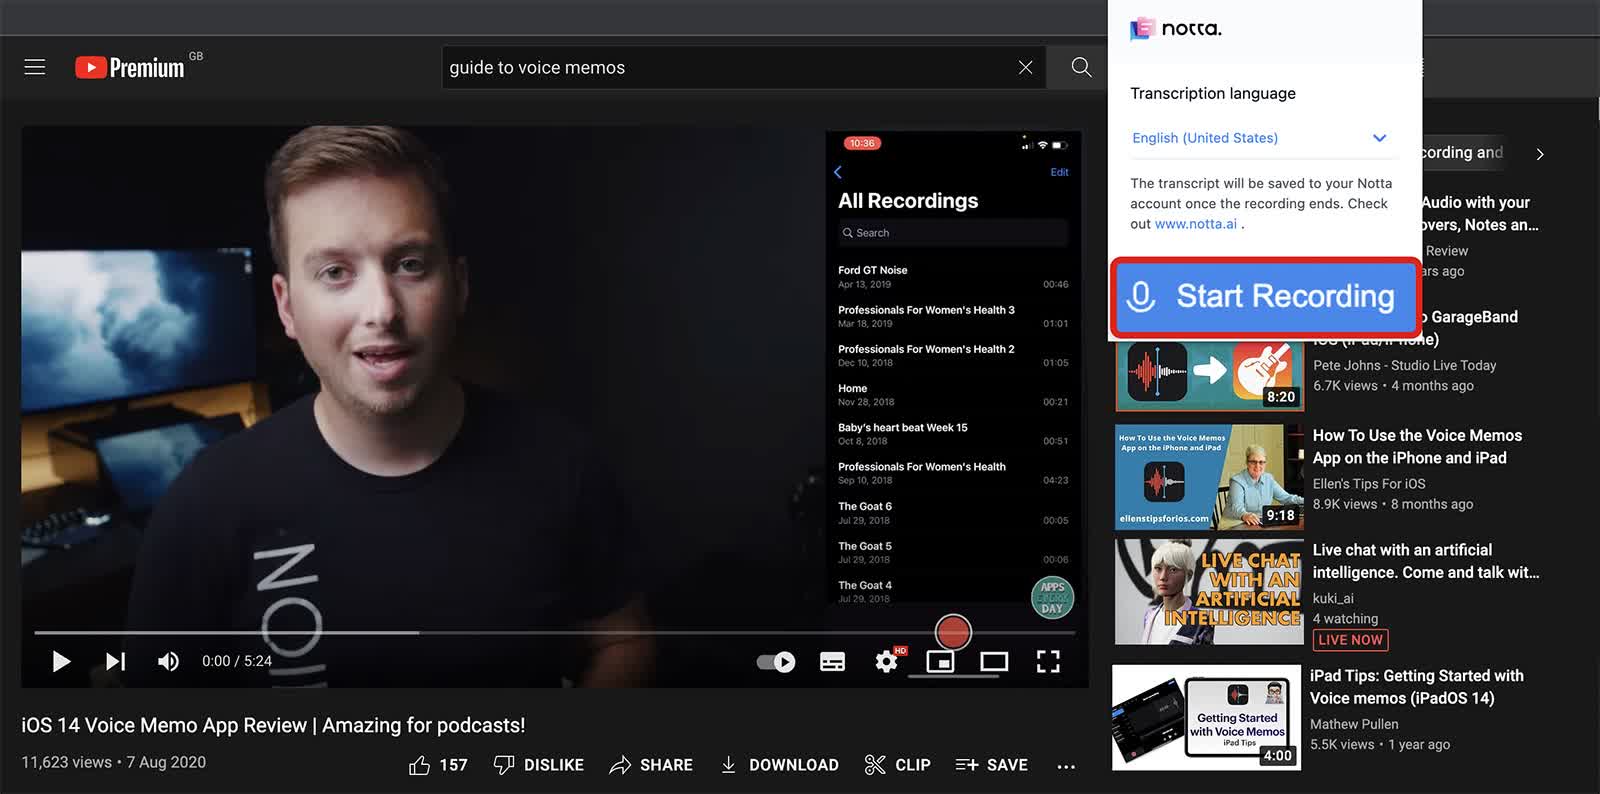
You’re ready to start recording. Click the blue ‘Start Recording’ button and begin playing the audio source.
Click the ’Pause’ and the ‘Stop’ button to pause or complete your recording. Your transcribed audio is automatically saved to your Notta account.
How to record audio on Mac with Audacity
Another excellent option for recording on the Mac is Audacity; it’s a robust professional voice recording system and, once again, a free download!
After you’ve mastered the basics, there’s a bit more of a learning curve, but if you’re looking for something with more features than Voice Memos, Audacity can provide them!
Open up Audacity and create a new project. Click on the ‘File’ menu and select ‘New’ to create a new project.
Next, select the audio input device you want to use. To do this, select ‘Preferences’ and click on the ‘Devices’ tab.
Or, select it from the list of devices on the drop-down tab at the top of the screen.
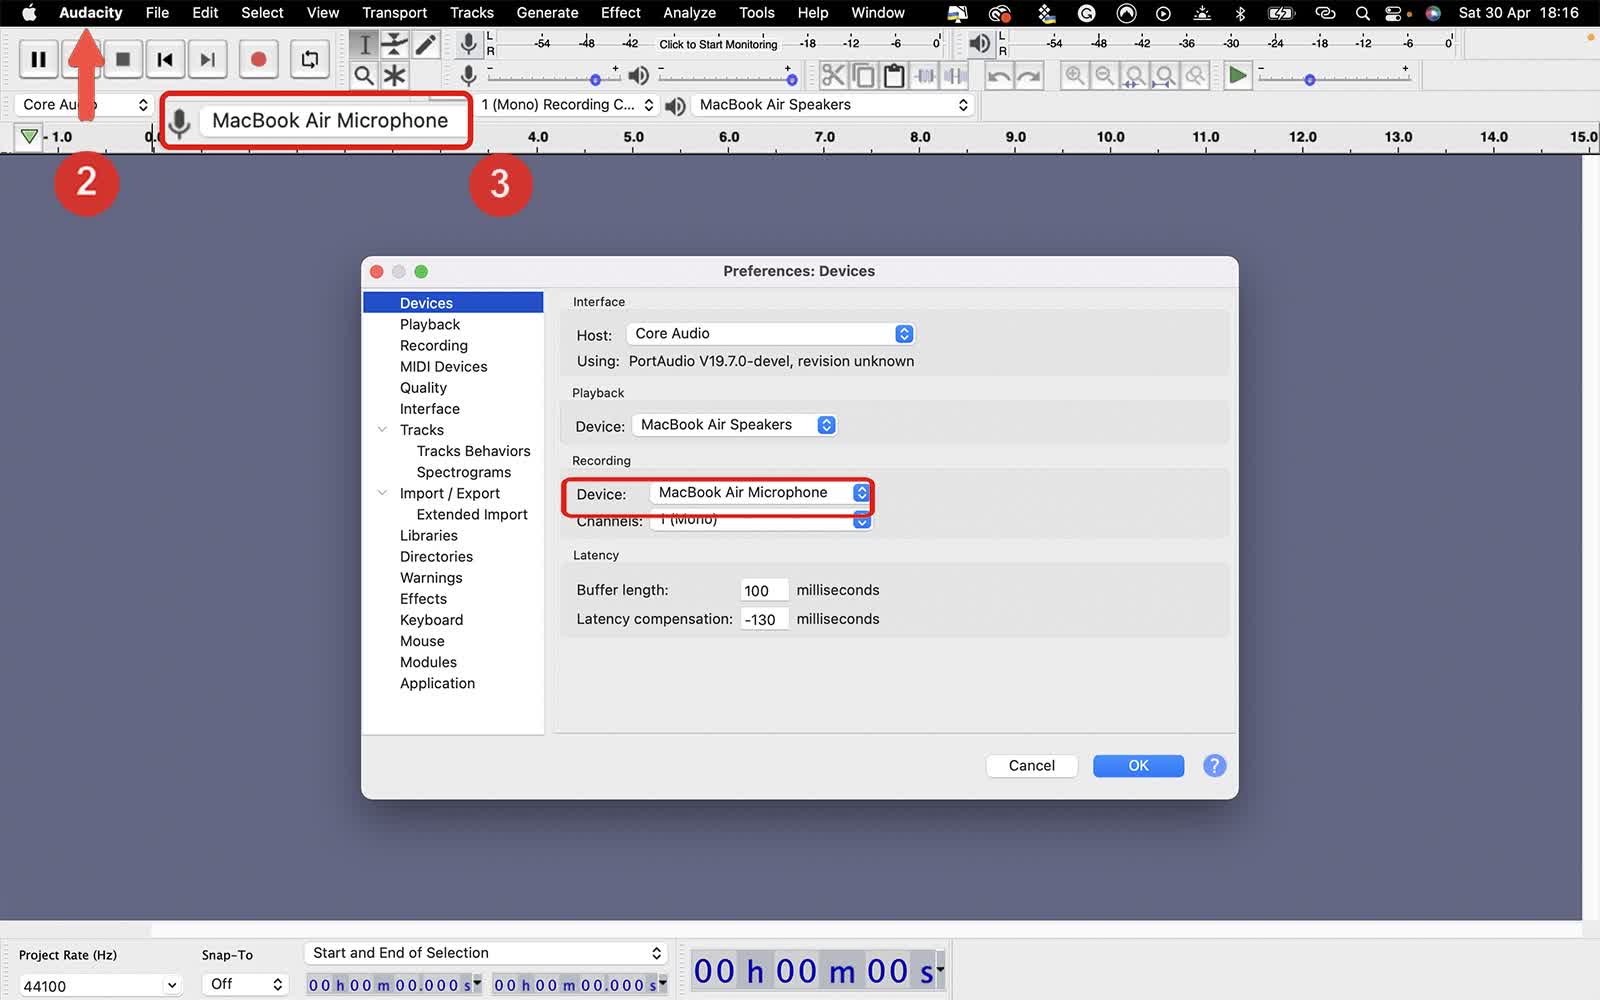
To record your audio, click the red ‘Record’ button.

Stop recording by clicking on the "Stop" button.
Once you're finished recording, you can listen to your track by clicking the ‘Play’ button.
You can also export your track as an MP3 file by clicking on the ‘Audacity’ menu and selecting ‘Export.’ Then, choose the MP3 format and choose a location to save your file.
Audacity’s audio recording process is simple and is made easier with its straightforward interface.
Of course, many more features are available with a program as fully featured as Audacity. I’ve provided some additional links in the reference section at the end of this article.
FAQs
Where are Voice Memos stored on my Mac?
On macOS Catalina, Big Sur, or newer:
Open the Finder and click on Go > Go to Folder.
Paste the following text into the Go to Folder search window: ~/Library/Application Support/com.apple.voicememos/Recordings.
A new window will pop up with all of your Voice Memos stored in an m4a format.
On older versions of macOS, Voice Memo’s are synced with iTunes.
What is the best free audio recording software for Mac?
This is a subjective question, but for simple recording with zero hassle, we recommend Voice Memos, especially for its integration across Apple devices. For more complex tasks that require mixing or multi-track, Audacity is a great place to start.
How do I record audio on my Mac from YouTube?
The easiest way to record audio from YouTube is to use Notta’s free Chrome extension to get clean, high-quality audio and a full video transcript!
Conclusion
Hopefully, you now feel more confident about recording audio on your Mac. The basics are easy to grasp, and once you’ve made a start, you can build from there. If you have a PC, you can find the detailed guide here to record audio on a PC.
Don’t forget to check out Notta’s free Chrome extension. It’s a great way to record audio on the web, and having transcripts of all the tips and tricks you learn along the way is a super helpful way to remember!