

Voice Memo App on iPhone: How to Make Full Use of It
Saving time and effort with Notta, starting from today!
The Voice Memos app is a free, built-in iOS recording tool that captures audio, edits recordings, and syncs files across Apple devices through iCloud. It requires no download, no account setup, and no subscription. Open the app, tap ‘Record,’ and your memo saves automatically.
In this guide, I'll walk you through the step-by-step process of using the Voice Memos app (iPhone only), including how to make the most of it and when third-party tools like Notta are a better choice.
What Features are Available in the Voice Memo App?
Voice Memos includes six tools: quick audio recording, trim and replace editing, native transcription, playback enhancements, iCloud sync, and adjustable audio quality.
Here are the main features you can use on iPhone:
Quick audio recording using your iPhone’s built-in microphone, Bluetooth headset, or compatible external microphone, which also works well for recording music.
Editing tools like trim and replace to fine-tune your recordings without losing the original.
Transcription that converts speech into text so you can search and reference recordings.
Playback enhancements such as skip silence and enhanced audio.
iCloud sync to access recordings across iPhone, iPad, Mac, Apple Watch, and other Apple devices.
Flexible audio options, including compressed or lossless recording quality.
What are the Best Voice Recording Apps on iPhone?
| Best for | Price | Languages | Transcription | Editing tools | Unique strength | |
|---|---|---|---|---|---|---|
| Voice Memo | Quick voice notes | Free (built into iPhone) | 10 | Yes (Apple transcription) | Trim, replace sections | Native iPhone simplicity |
| Cocoon Weaver | Voice journaling & reflection | Free; $7.99/month | 14 | Yes | Minimal | Structured audio journaling experience |
| Dolby On | High-quality audio recording | Free | No language system | No | Audio enhancement | Studio-like sound automatically |
| Just Press Record | Fast idea capture | $6.99 (one-time purchase) | 30 | Yes | Trim & rename | One-tap recording from widgets and Apple Watch |
| Notta | Productivity & transcription | Free; Paid plans starting at $8.17/month | 58 | Yes (real-time + file transcription) | Speed adjustments, noise cancellation, silence skip | AINotta Brainthat extracts key insights |
Apple Voice Memos stands out from other apps because it’s preinstalled on the iPhone and designed for simplicity. There’s nothing extra to download, no account to set up, and no subscription or payment details to enter. You can open the app, tap record, and your recordings automatically sync through iCloud across your Apple devices.
It includes editing tools for trimming recordings, replacing sections, and reducing background noise.
How Do You Record a Voice Memo on iPhone?
Recording a voice memo on iPhone takes three taps. Open the ‘Voice Memos’ app, tap the red ‘Record ‘button to start, and tap ‘Apply’ (blue checkmark) to save. Recordings save automatically to your library and sync to iCloud if enabled.
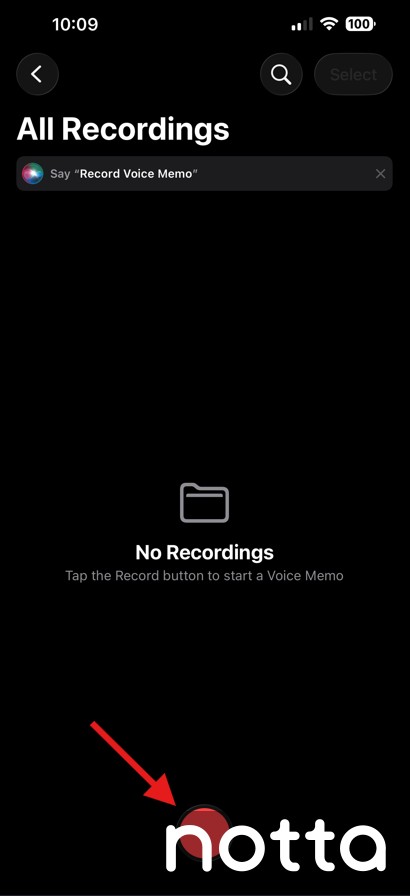
Step 1: Open the ‘Voice Memos’ app (it’s in the ‘Utilities’ folder, but you can move it to the ‘Home Screen’).
Step 2: Tap the ‘Record’ button (red circle) to start recording.
Step 3: Tap the ‘waveform’ to expand the full recording view.
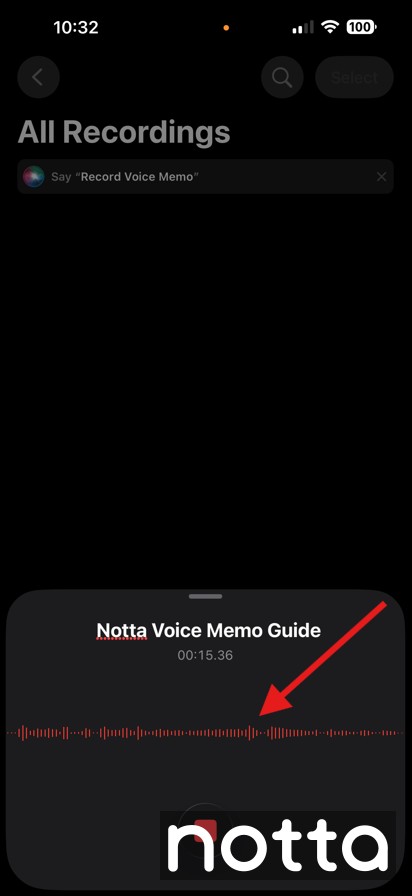
Step 4: Tap ‘Pause’ if you want to temporarily stop recording.
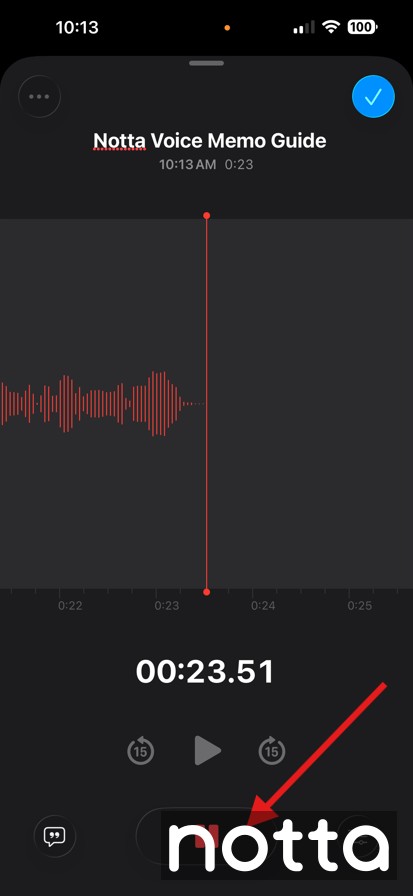
Step 5: Tap the blue 'Checkmark’ button in the top-right corner to stop and save the recording.
How Do You Delete a Voice Memo?
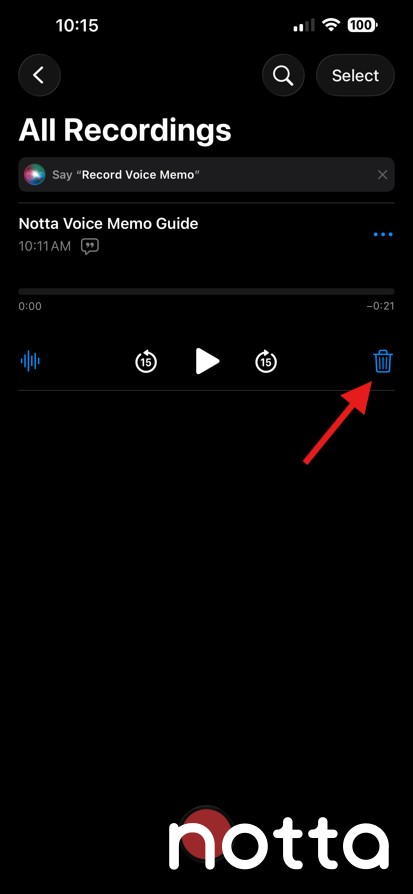
To delete a voice memo on iPhone, open the recording and tap the ‘Trash’ icon. Your recording moves to the ‘Recently Deleted’ folder, where iPhone keeps it for 30 days by default before removing it permanently. You can restore any deleted memo during that time if you change your mind.
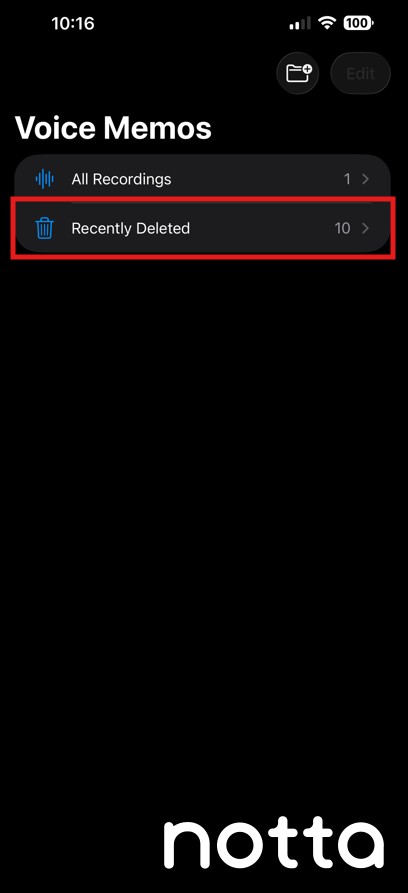
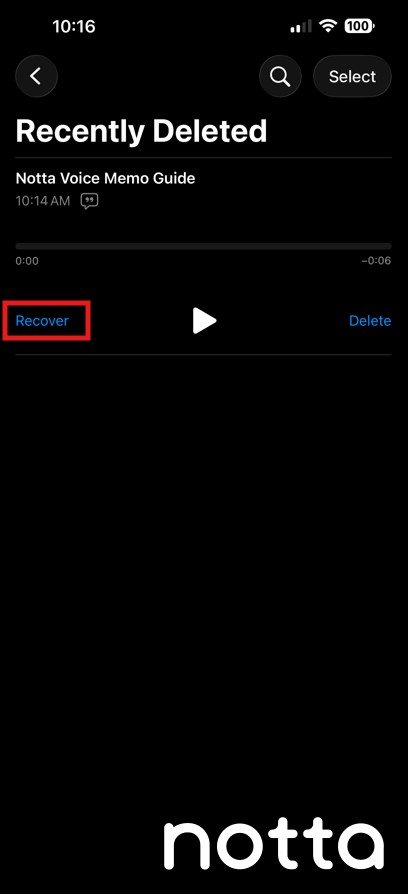
How Do You Recover a Deleted Voice Memo?
Step 1: Tap the ‘<’ (back button) at the top left of the screen.
Step 2: Tap ‘Recently Deleted.’
Step 3: Tap the recording you want to restore, then ‘Recover.’ Tap ‘Recover Recording’ to confirm.
How Do You Save a Voice Memo?
Voice Memos saves recordings automatically to the app library after every session. To store a copy elsewhere, save to the ‘Files’ app for local access or to iCloud Drive to sync across all Apple devices. Both options use the ‘Share’ menu inside any recording.
How Do You Save a Voice Memo in the App?
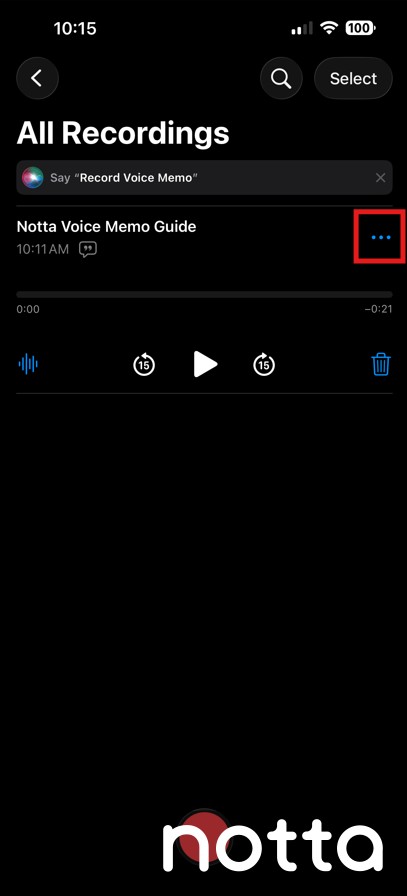
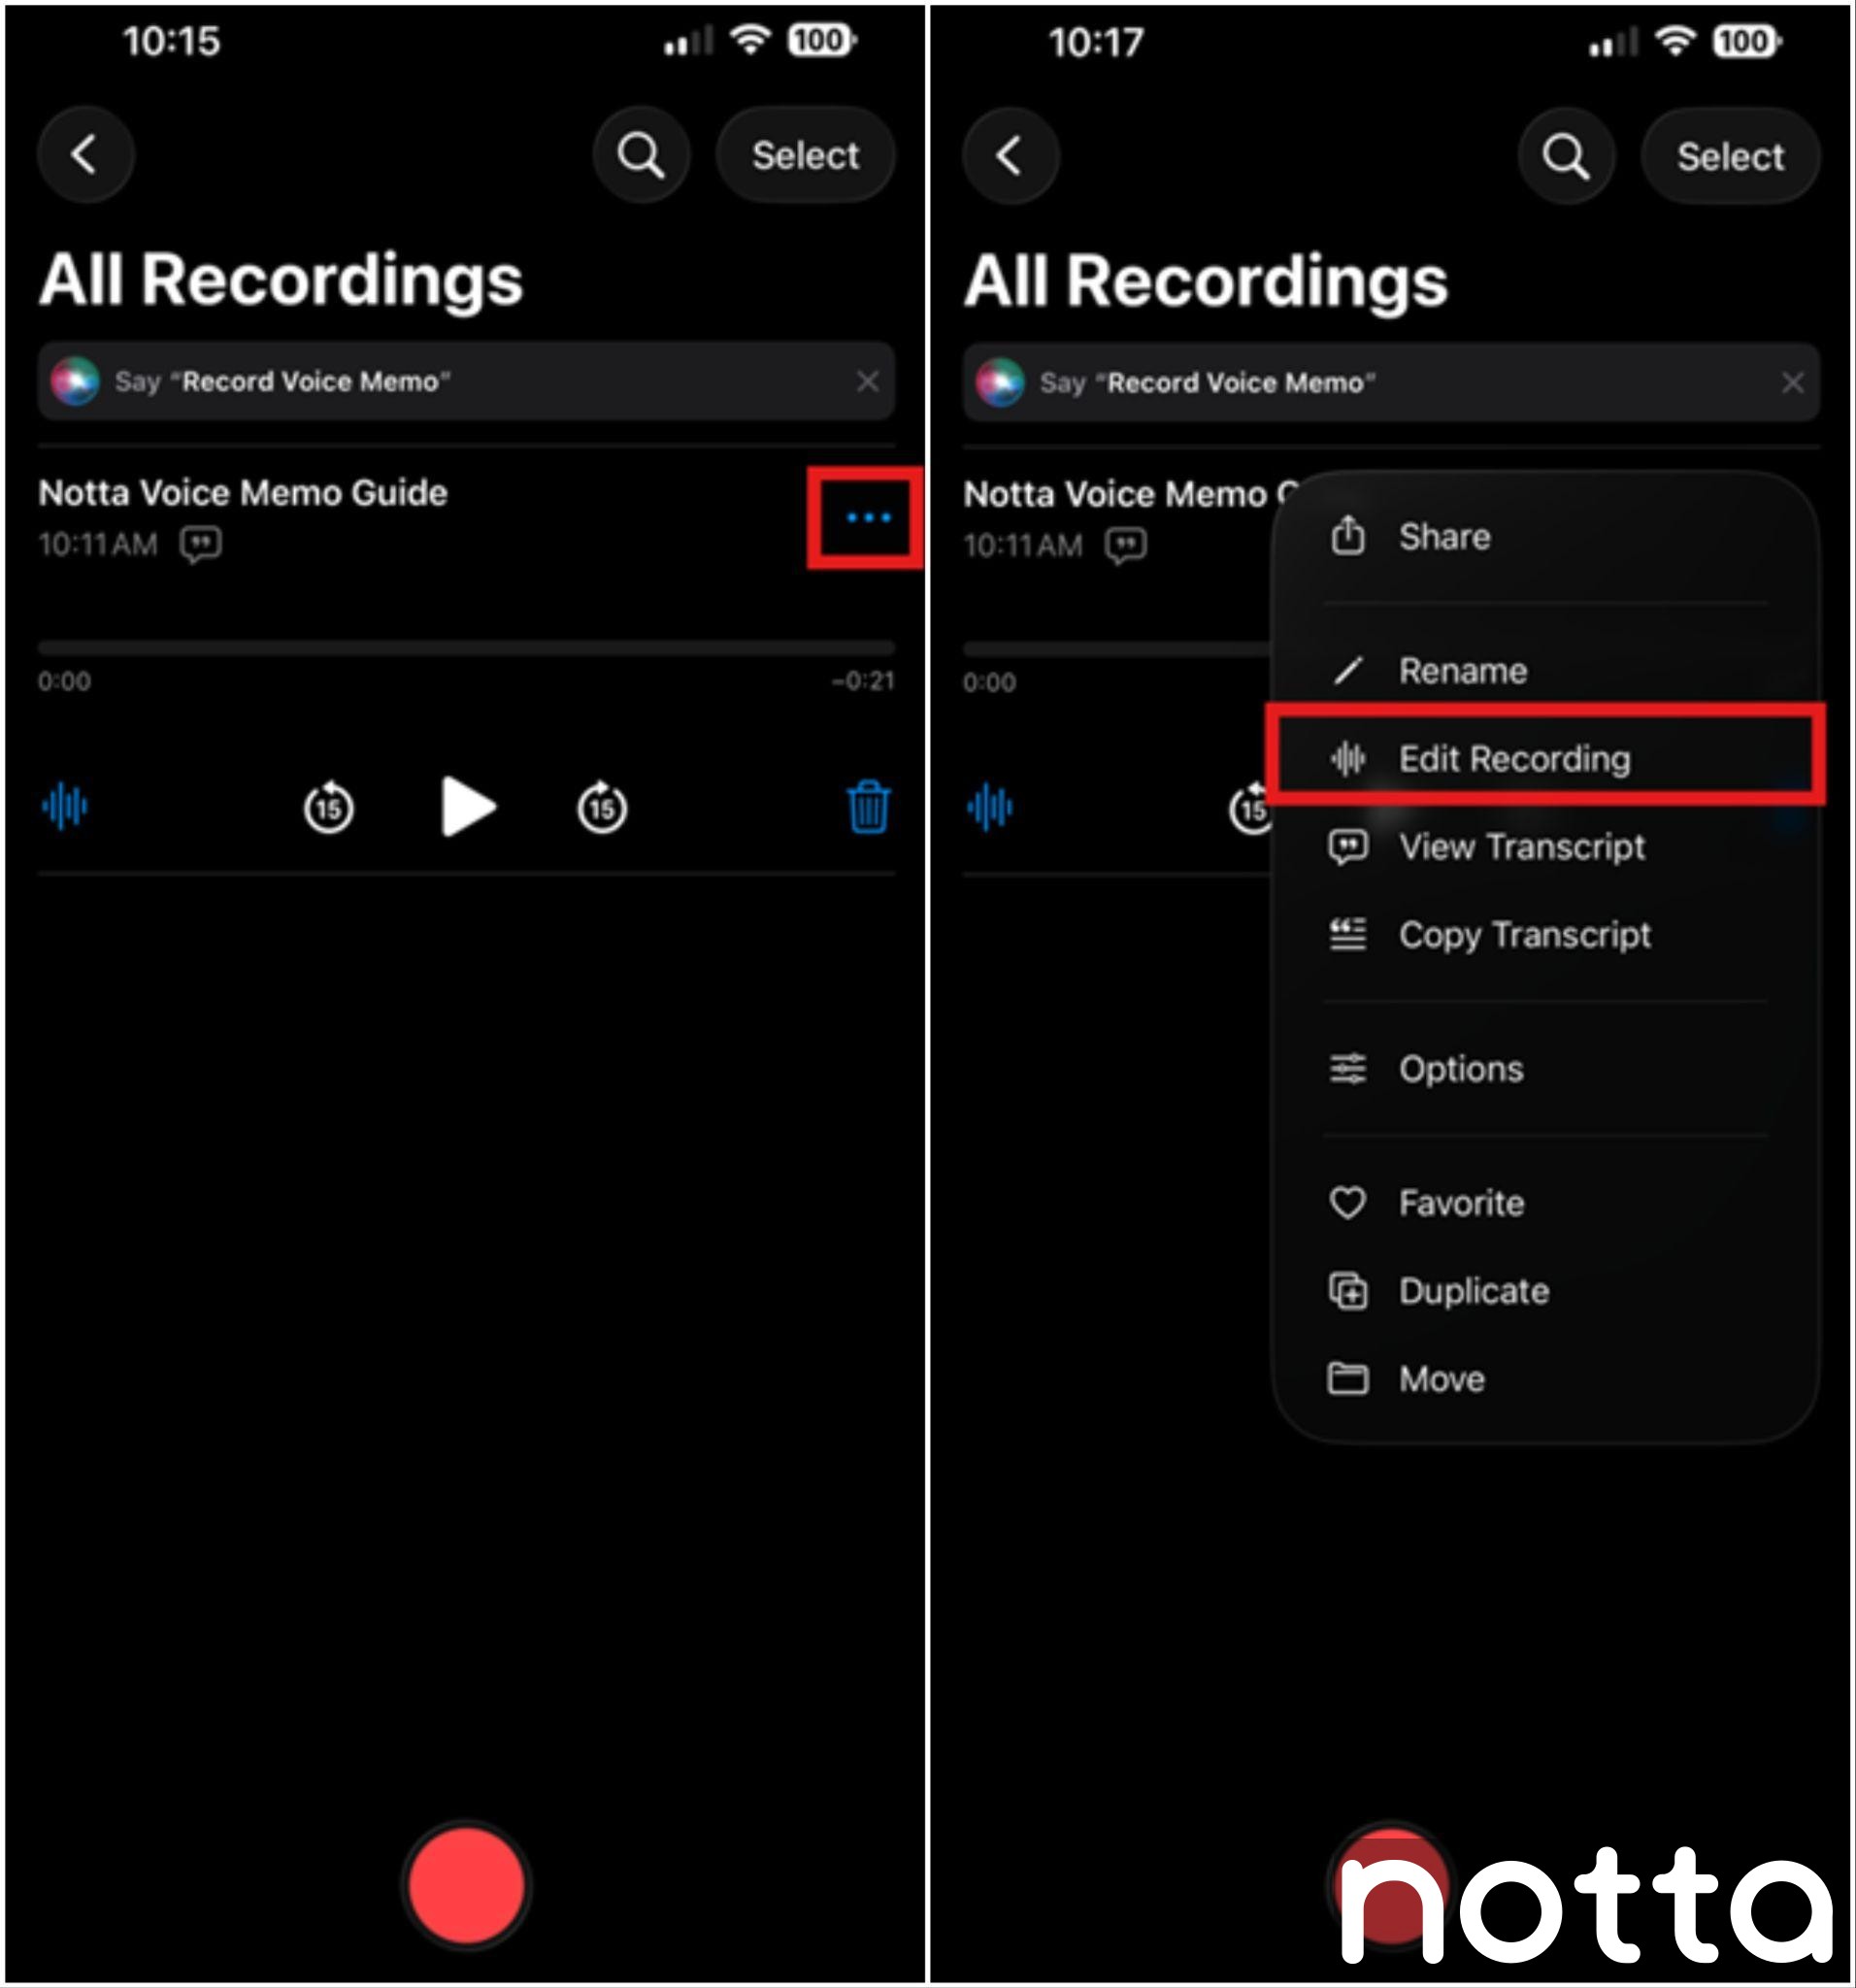
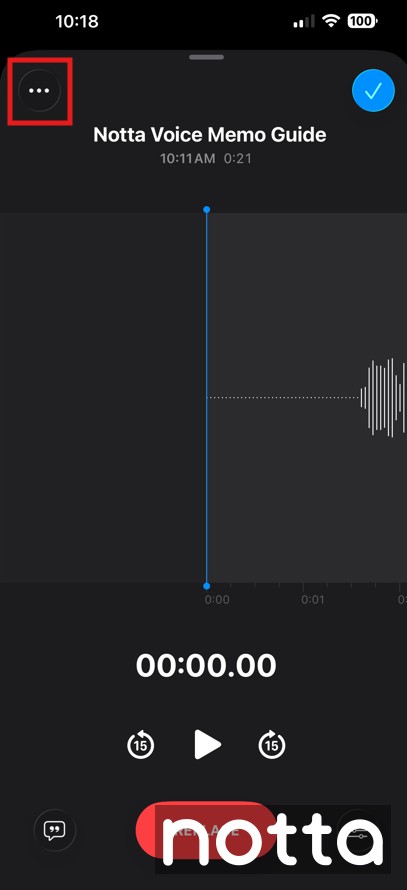
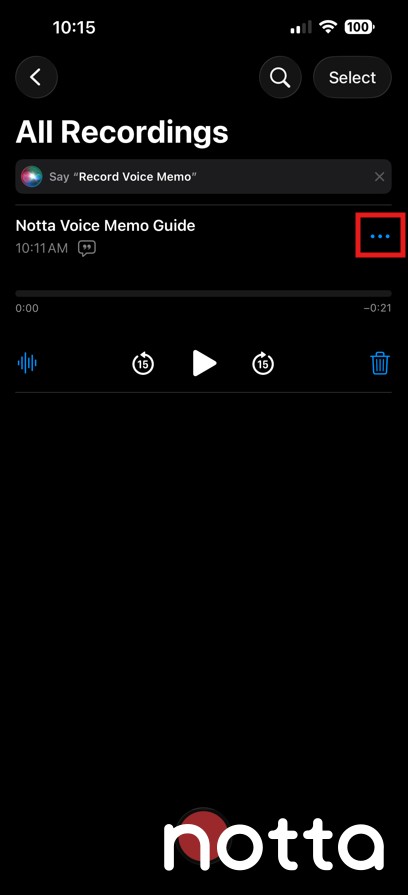
Step 1: Tap on ‘More’ (the three-dot menu) at the top right of your recording.
Step 2: Tap ‘Share.’
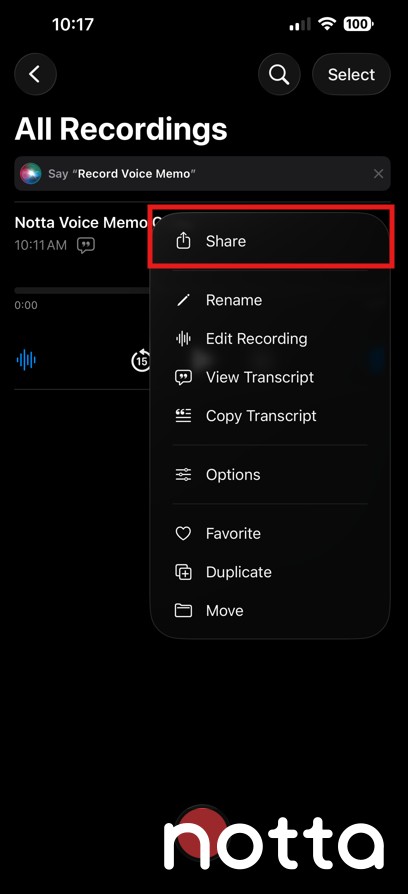
Step 3: Tap ‘Save to Files.’

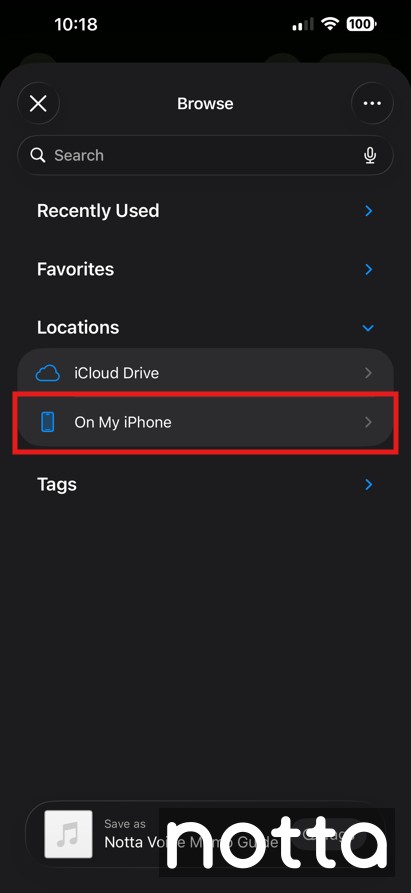
Step 4: Choose ‘On My iPhone’ then tap ‘Save.’
How Do You Save a Voice Memo to iCloud?
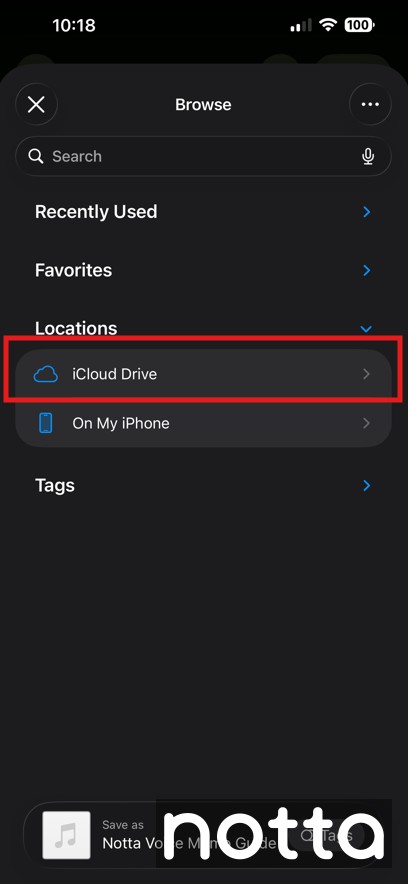
To save a voice memo to iCloud, open your recording, tap the ‘More’ button (the three-dot menu), and select ‘Share.’ From the share menu, tap ‘Save to Files,’ then choose ‘iCloud Drive’ as the destination. Select the folder where you want to store the recording, then tap ‘Save’ to upload it to iCloud.
How Do You Edit a Voice Memo?
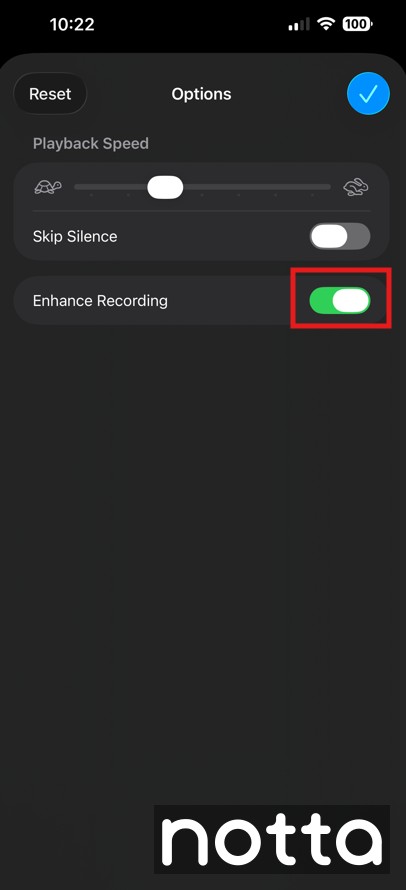
Voice Memos includes four editing tools. Trim removes unwanted sections from the start or end of a recording. Replace re-records a specific segment without affecting the rest. Playback speed adjusts listening pace between 0.5x and 2x. Enhance Recording reduces background noise and echo.
How Do You Crop a Voice Memo?
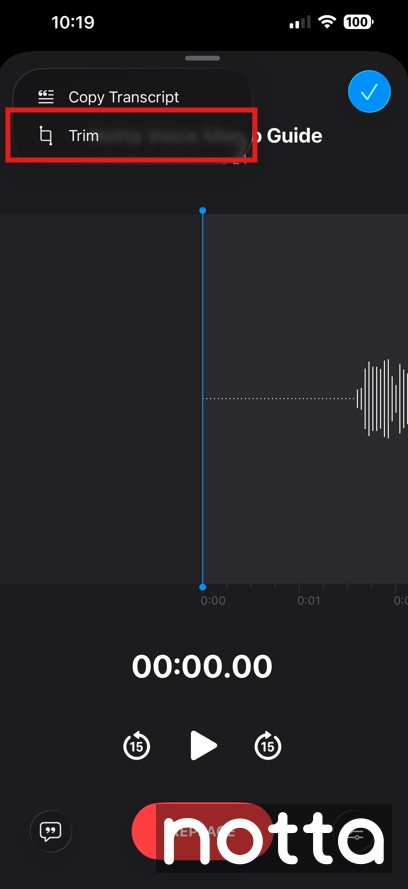
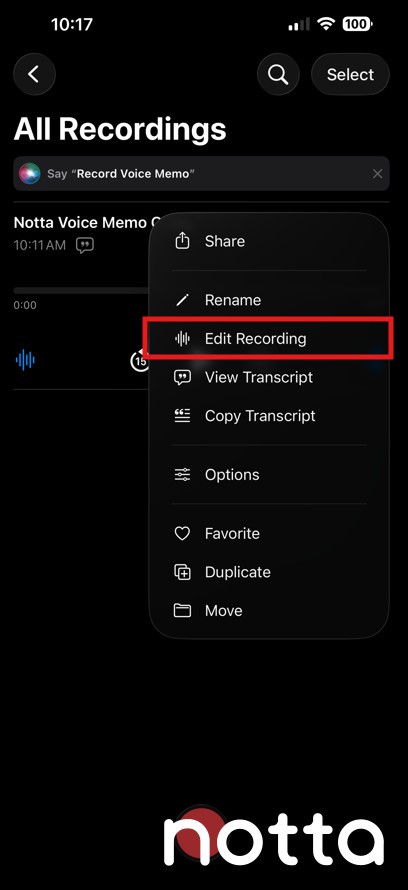
Step 1: Tap ‘More’ (the three-dot menu) on your recording, then select ‘Edit Recording.’
Step 2: Open ‘More’ (the three-dot menu in the top left corner).
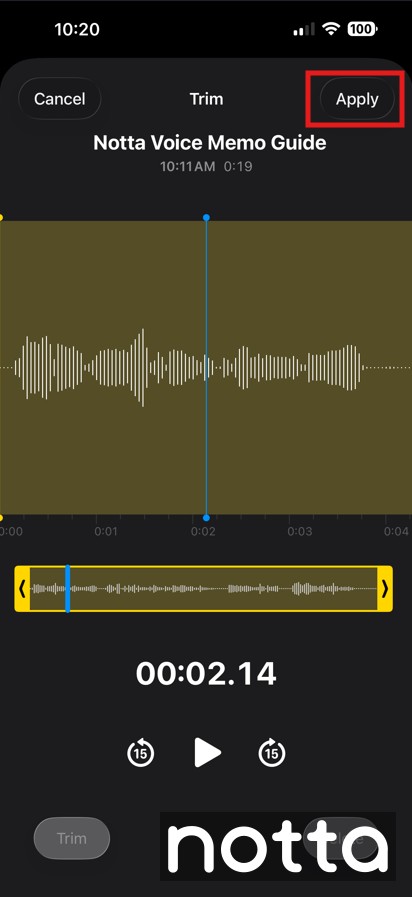
Step 3: Tap ‘Trim’ to open the crop editor.
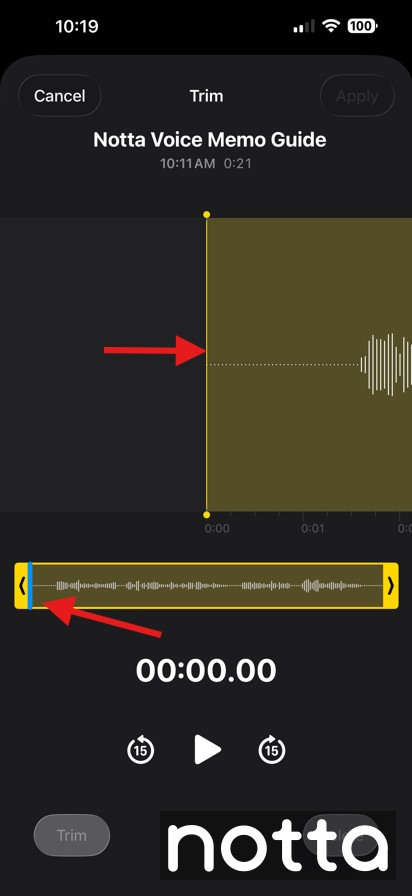
Step 4: Move the ‘Slider’ (yellow handles) to adjust the start and end. Use the top slider to select the general section you want to keep, then adjust the bottom yellow handles for more precise start and end points.
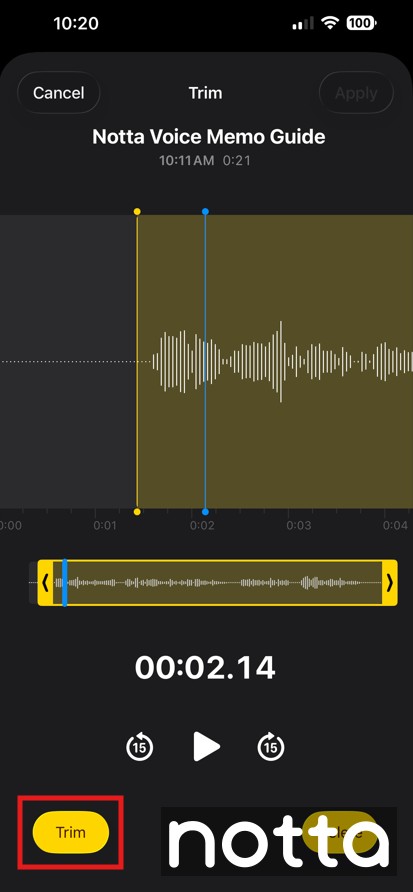
Step 5: Tap ‘Trim’ to keep the part you selected (or ‘Delete’ to remove it).
Step 6: Apply your changes.
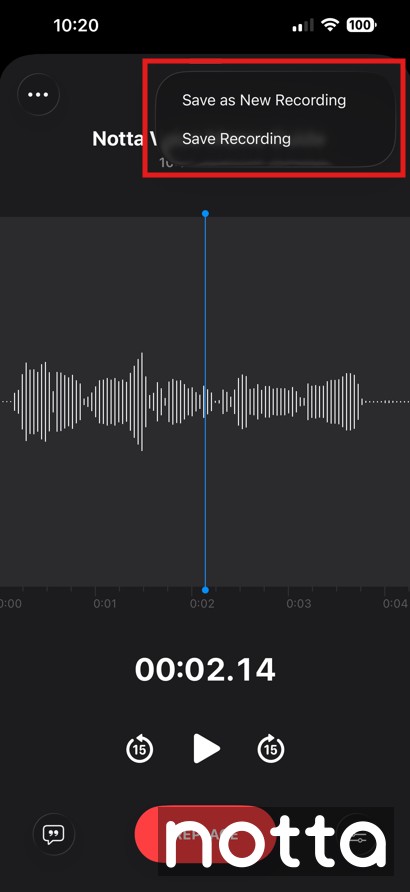
Step 7: Choose ‘Save Recording’ to replace the original fileor ‘Save as New Recording’ to create a separate copy.
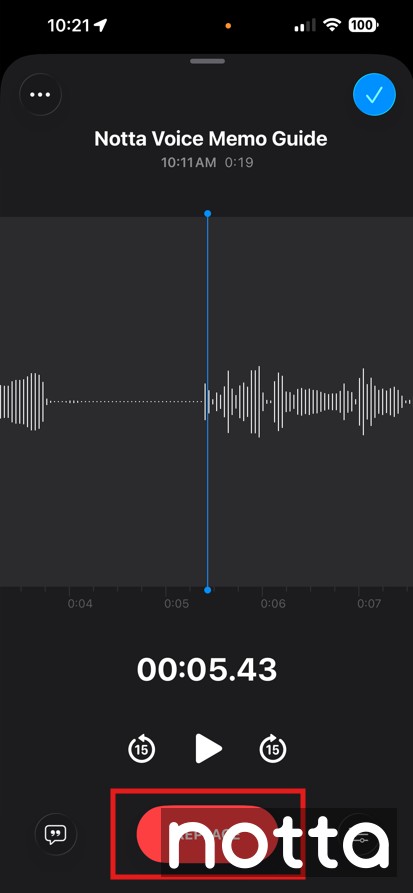
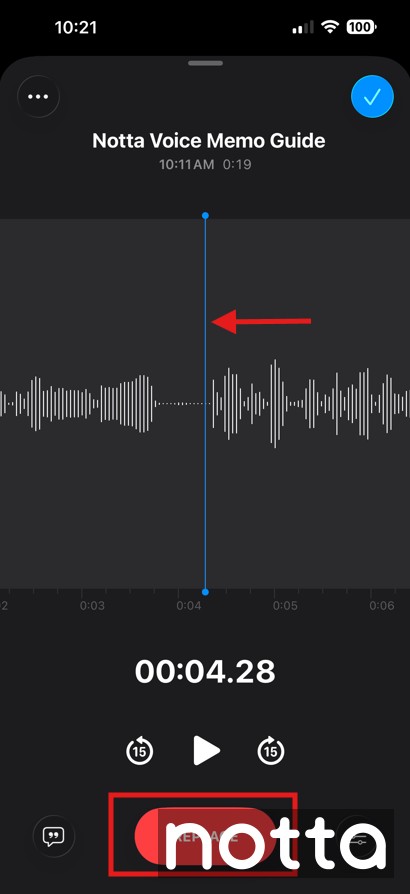
How Do You Replace Sections in a Voice Memo?
Voice Memos lets you replace a specific section of a voice memo without re-recording the full recording.
Step 1: Tap ‘More,’ then ‘Edit Recording.’
Step 2: Drag the ‘waveform’ over to the part you want to re-record.
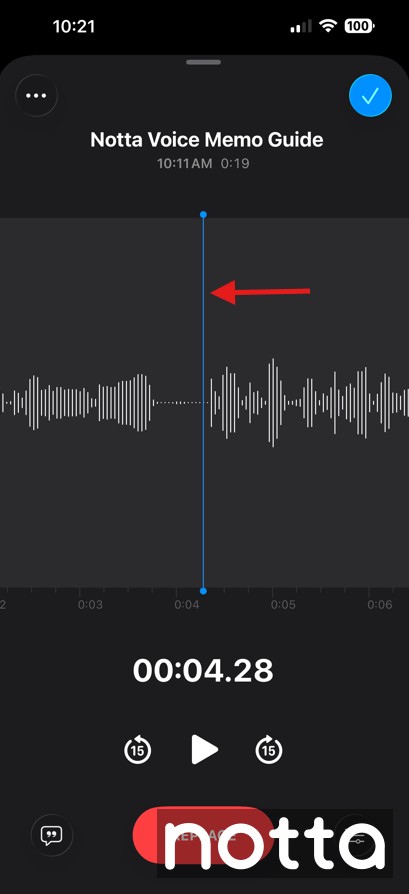
Step 3: Tap ‘REPLACE’ and the app starts recording from the position of the blue line. Tap ‘Pause’ when you’ve finished recording the new section.
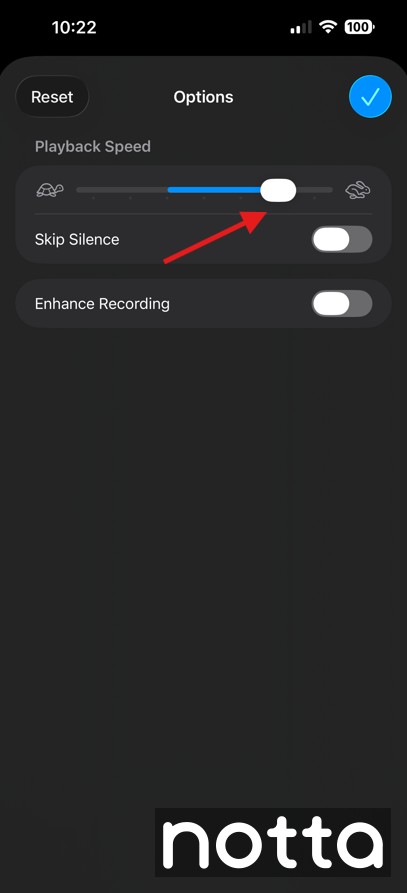
How Do You Change Playback Speed of a Voice Memo?
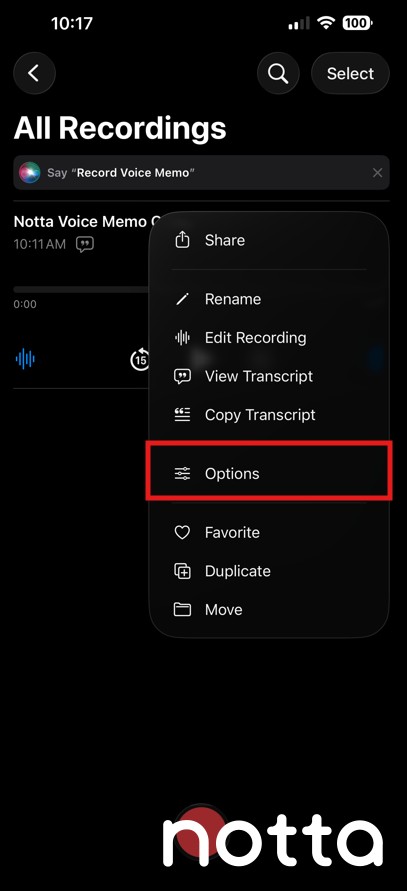
Step 1: Open ‘More’ (the three-dot menu) and tap ‘Options.’

Step 2: Move the speed slider:
Toward the ‘Tortoise’ to slow down the audio.
Toward the ‘Hare’ to speed it up.
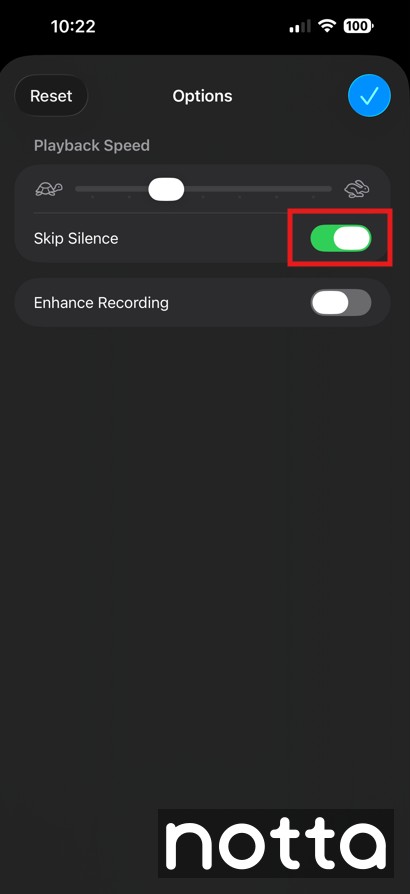
How Do You Automatically Skip Silence Sections in a Voice Memo?
Step 1: Tap ‘More’ (the three-dot menu) then ‘Options.’

Step 2: Turn on ‘Skip Silence.’
How Do You Enhance the Audio of a Voice Memo?
Step 1:Tap ‘More’ (the three-dot menu), then ‘Options.’
Step 2: Turn on ‘Enhance Recording’ to reduce background noise and echo.
How Do You Rename a Voice Memo?
Step 1: Tap the title of the recording.
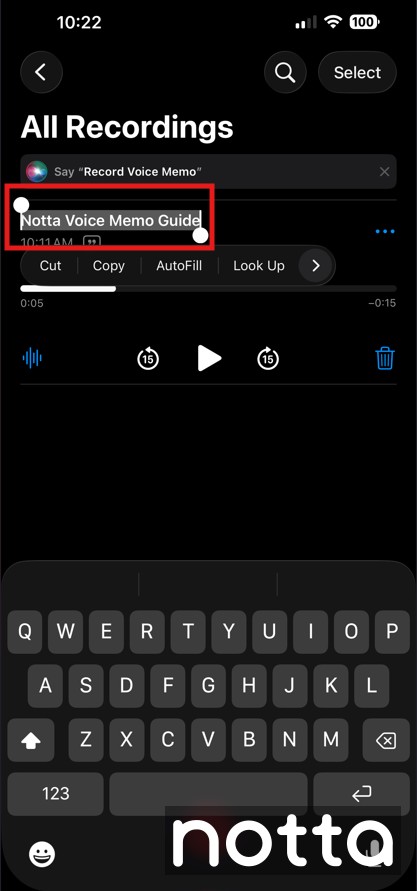
Step 2: Type the new name, then ‘Return’ <( icon).
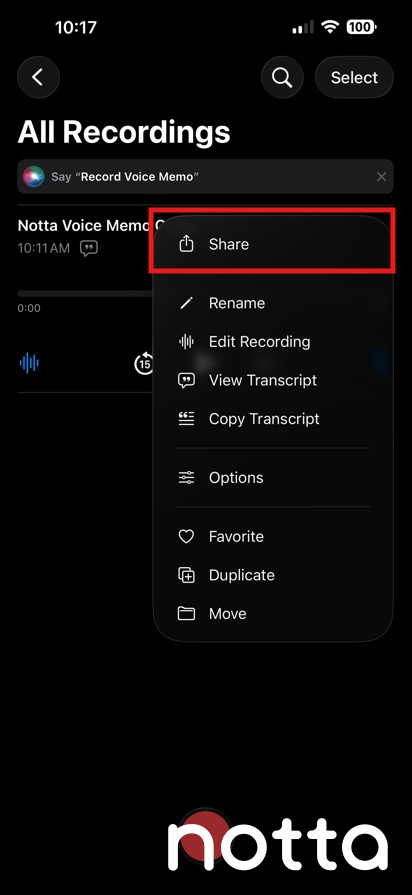
How Do You Share a Voice Memo?
Voice Memos supports multiple sharing methods, including copy, duplicate, share via Messages, Mail, or AirDrop.
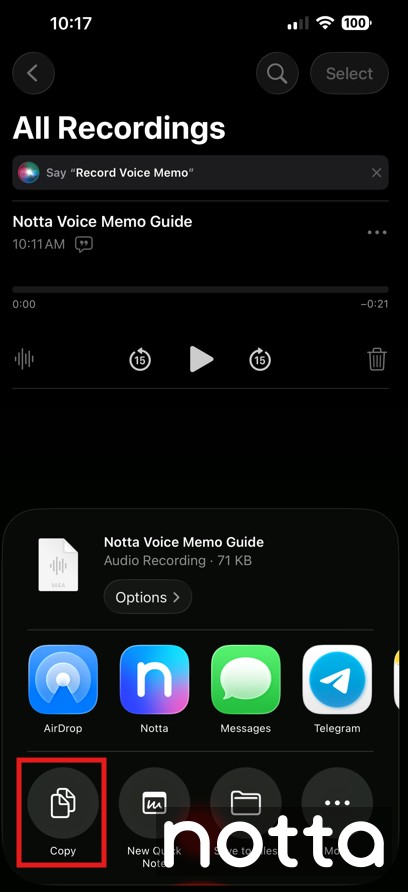
How Do You Copy a Voice Memo File?
Step 1: Open ‘More’ (the three-dot menu).

Step 2: Tap ‘Share.’
Step 3: Choose ‘Copy’ in the bottom left corner.
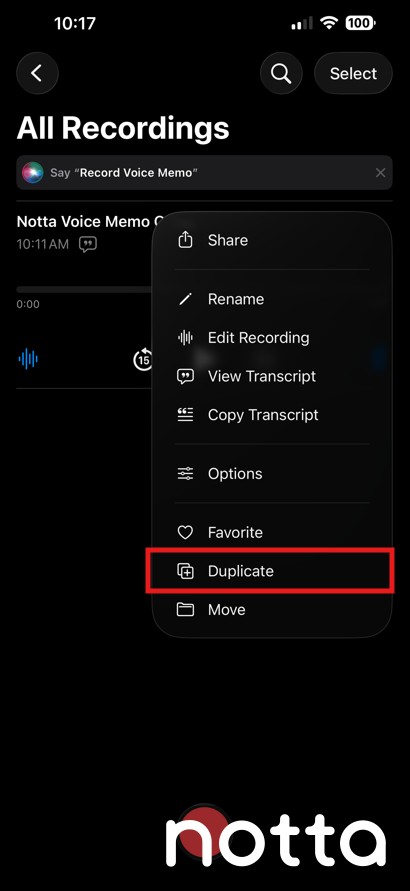
How Do You Duplicate a Voice Memo?
Step 1: Tap ‘More’ (the three-dot menu).
Step 2: Tap ‘Duplicate’ to create a copy directly below the original.
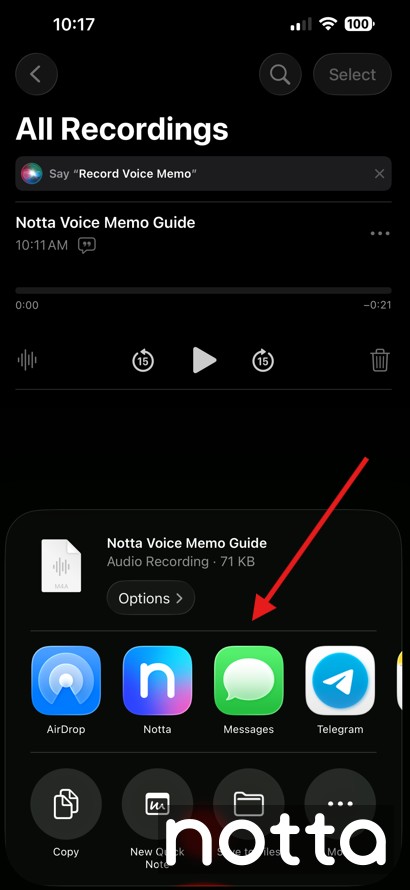
How Do You Share a Voice Memo?
Step 1: Open ‘More’ (the three-dot menu).

Step 2: Tap ‘Share.’

Step 3: Choose how you want to send your memo (Messages, Mail, AirDrop, apps, etc.).
How Do You Transcribe Voice Memos to Text?
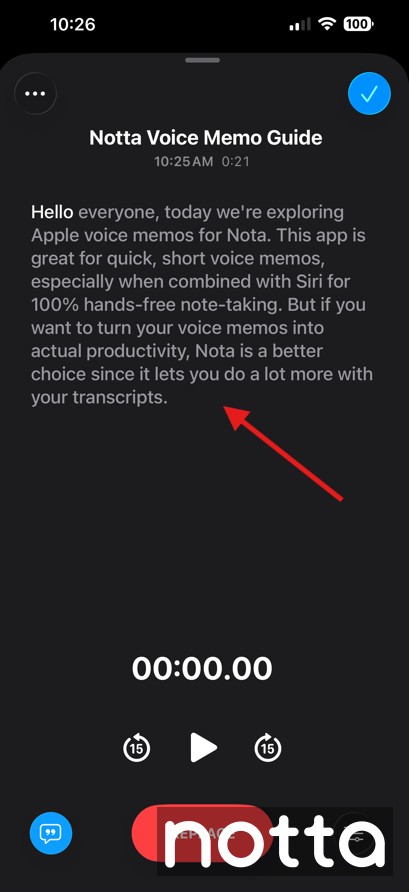
Apple includes built-in voice memo transcription starting with iOS 18, so you can turn recordings into text immediately. You can open a recording, view the transcript, and copy the text whenever you need it.
Step 1: Open ‘More’ (the three-dot menu).

Step 2: Tap ‘View transcript.’
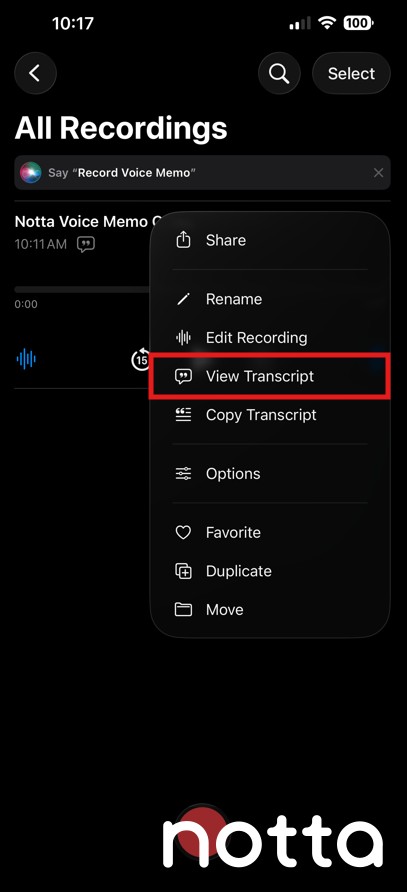
Step 3: Read or copy the transcription.
How Do You Transcribe Apple Voice Memos with Notta?
Voice Memos records ideas on the go, while Notta turns raw audio into polished notes, transcripts, and action items. After importing a voice memo into Notta, you can generate AI summaries and use Notta Brain to organize recordings, retrieve key details, and create structured reports from your content.
The app integrates with everyday productivity tools, including communication apps like Slack, meeting tools such as Zoom and Google Calendar, and documentation platforms like Notion. As a result, Notta keeps everything organized from the moment you press ‘Record.’
Use Voice Memos and Notta together for the most effective setup. Record quickly in Voice Memos, then import the file into Notta to turn it into structured, searchable notes you can edit and share.
Pro tip: If you record frequently, the Notta Memo sound recorder features 4 MEMS mics + 1 bone conduction mic, up to 30 hours of continuous recording, and 32GB of internal storage, so you can record meetings, long interviews, or lectures and sync them directly to Notta.
Step 1: Open the Notta app and log in to the account.
Step 2: Open the ‘Voice Memos’ app and find the recording you want to transcribe.Tap ‘More’ at the top right of your recording.

Step 3: Tap ‘Share.’

Step 4: Tap ‘Notta’ and you’ll see a message that the voice memo is transcribing.
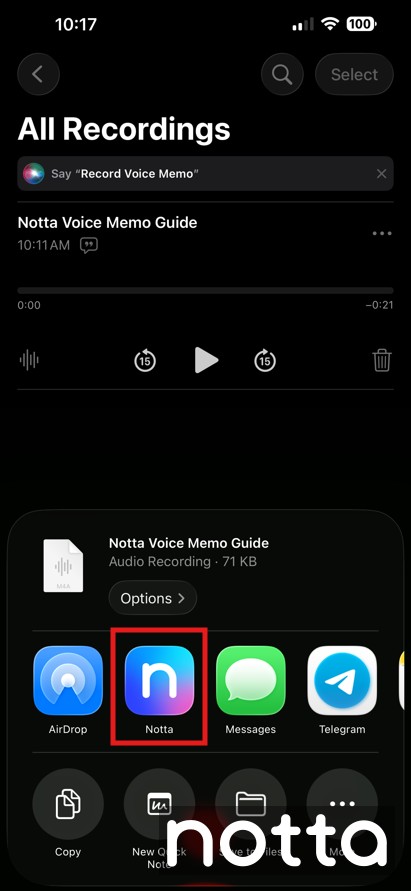
Step 5: Tap ‘OK’, then tap on the name of your recording to view your transcript.
Apple Voice Memos vs. Notta: Which App is Best?
Voice Memos is the fastest option for no-setup recording when you want to capture ideas and reminders. Notta is better for serious productivity, with advanced features like AI transcription, speaker identification, multilingual support, and meeting summaries.
| Feature | Apple Voice Memo | Notta |
|---|---|---|
| Cost | Free | Free; from $8.17/month |
| Transcription | Basic | AI-powered, real-time transcription with up to 98.86% accuracy |
| Languages | 10 | 58 |
| Speaker labels | No | Yes |
| Meeting summaries | No | Yes |
| Platforms | Apple only | iOS, Android, Web, Windows, Chrome extension |
| Best for | Quick voice notes | Productivity & documentation |
Together, they create a simple but powerful workflow: record in Voice Memos, then use Notta to convert your voice into editable text you can organize, search, and reuse in other apps.
Sign up for a free Notta trial today to explore it for yourself.
FAQs
Why can't I find the Voice Memo app on my iPhone?
You can’t find the Voice Memos app on your iPhone if you deleted it by accident. Check your ‘Utilities’ folder or swipe down on your ‘Home Screen’ and search for it using ‘Spotlight Search.’ If it doesn’t appear, reinstall it from the ‘App Store.’
How long can a voice memo record?
Voice Memos can record for as long as your iPhone has available storage.The Voice Memos app itself doesn’t have a built-in time limit, so recordings can last for hours if you have enough space. However, your phone will notify you if your storage space is low.
Can I use the Voice Memo app to record my phone calls on iPhone?
No, you can’t use the Voice Memos app to record your phone calls on iPhone. You can use Apple’s built-in ‘Call Recording’ feature (available on iOS 18.1 or later) to record a phone call on your iPhone, which saves the recording and transcript in the ‘Notes’ app.
Do Android devices have a voice memo app?
Yes, Android devices have a voice memo app, but different brands use different names for the app. For example, Samsung calls its app ‘Voice Recorder,’ while brands like Google Pixel, Xiaomi, and Huawei use the name ‘Recorder.’ If your phone doesn’t include a recording app, you can download one from the Google Play Store.
Is Voice Memo a free app?
Voice Memos is a free app that comes with all iOS devices. It allows you to record audio, save it to your device, and share it with others. If you want more advanced features, you can also explore third-party recording apps as alternatives.

