
How to Add Zoom Meetings to Your Outlook Calendar
Unlock the power of AI — Notta's meeting assistant records, transcribes and summarizes meeting minutes with one click.
If you use Zoom for your online meetings, you know how frustrating it can be to manually add Zoom meeting invitations to your Outlook calendar. Not only is this time-consuming, but it's also error-prone.
As a Zoom user who used to manually add Zoom meeting invitations to the Outlook calendar, I know how frustrating it can be to do this. But not more! Zoom add-in and Zoom Outlook Plugin allow you to streamline meeting management. This integration will save you time, reduce errors, and make it easier to join meetings.
But how to add Zoom to Outlook or how to schedule Zoom meetings in Outlook? In this article, I'll show you a step-by-step process for how to add Zoom to Outlook on Mac and Windows and use Zoom add-in for Outlook.
Zoom Outlook Plugin and Zoom Add-in
Zoom, one of the most popular virtual video conferencing platforms, offers two variations of an Outlook integration: Zoom Outlook Plugin and Zoom add-in.
The Zoom Outlook Plugin is an installable file package that lets you use Outlook on your desktop. On the contrary, the Zoom add-in is a native integration in Microsoft Office AppSource. It is built using the Microsoft API and can be quickly used from Outlook on the web or desktop.
These Zoom integrations help users integrate Zoom with their Microsoft Outlook account. Although both integrations enable you to instantly schedule or add a Zoom meeting to your Outlook calendar event, they differ in a few aspects. Let's compare them below!
Comparison based on scheduling rights
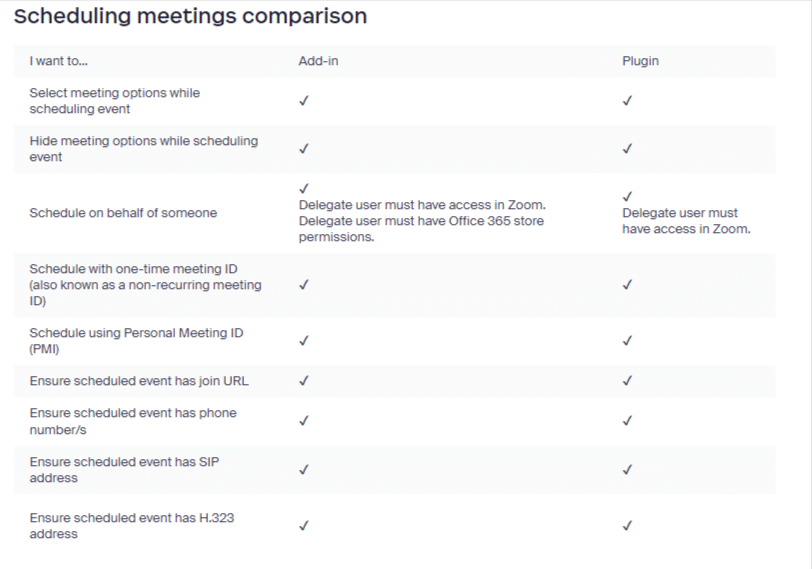
Source: Outlook plugin and add-in comparison – Zoom Support
Comparison based on joining meeting rights
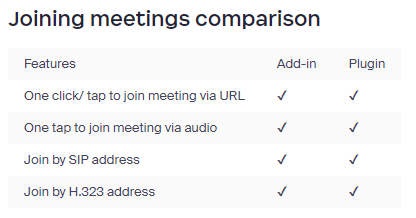
Source: Outlook plugin and add-in comparison – Zoom Support
Comparison based on managing apps
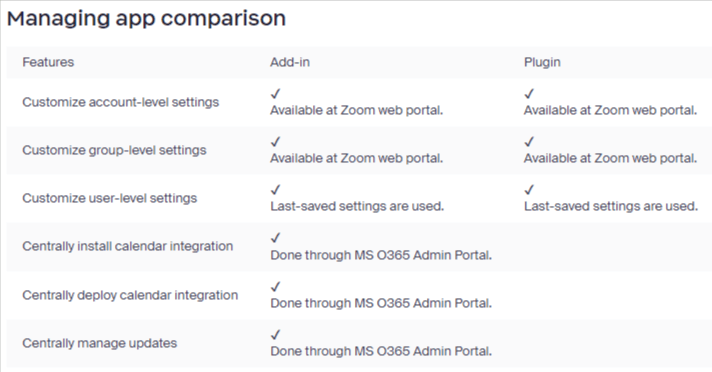
Source: Outlook plugin and add-in comparison – Zoom Support
Zoom recommends users migrate to Zoom's Outlook add-in, all thanks to its easier deployment and more robust admin management solutions. Additionally, it is actively being supported by Microsoft and can better meet the security requirements of vendors like Apple.
How to install Zoom for Outlook Add-in?
Zoom for Outlook add-in streamlines managing and scheduling meetings within the Outlook web or desktop app. It is a powerful tool that helps you join Zoom meetings directly from your Outlook calendar, meaning you don't have to open the Zoom app separately.
Prerequisites for installing the Zoom Add-in
Every user must meet some minimum prerequisites before installing the Zoom add-in. Let's talk about them below.
You must have a Microsoft Exchange account added to Outlook.
The add-in requires a basic or pro version of your Zoom account.
The architecture of the Outlook app and the Zoom desktop client must match each other. For instance, if you use the 64-bit version of the Outlook app, you must install the 64-bit version of the Zoom desktop client.
How to install and uninstall the Zoom Add-in?
Zoom add-in for Microsoft Outlook is a valuable tool that can maximize your productivity and streamline meetings. Here are the steps to download and install the Zoom add-in for Microsoft Outlook web.
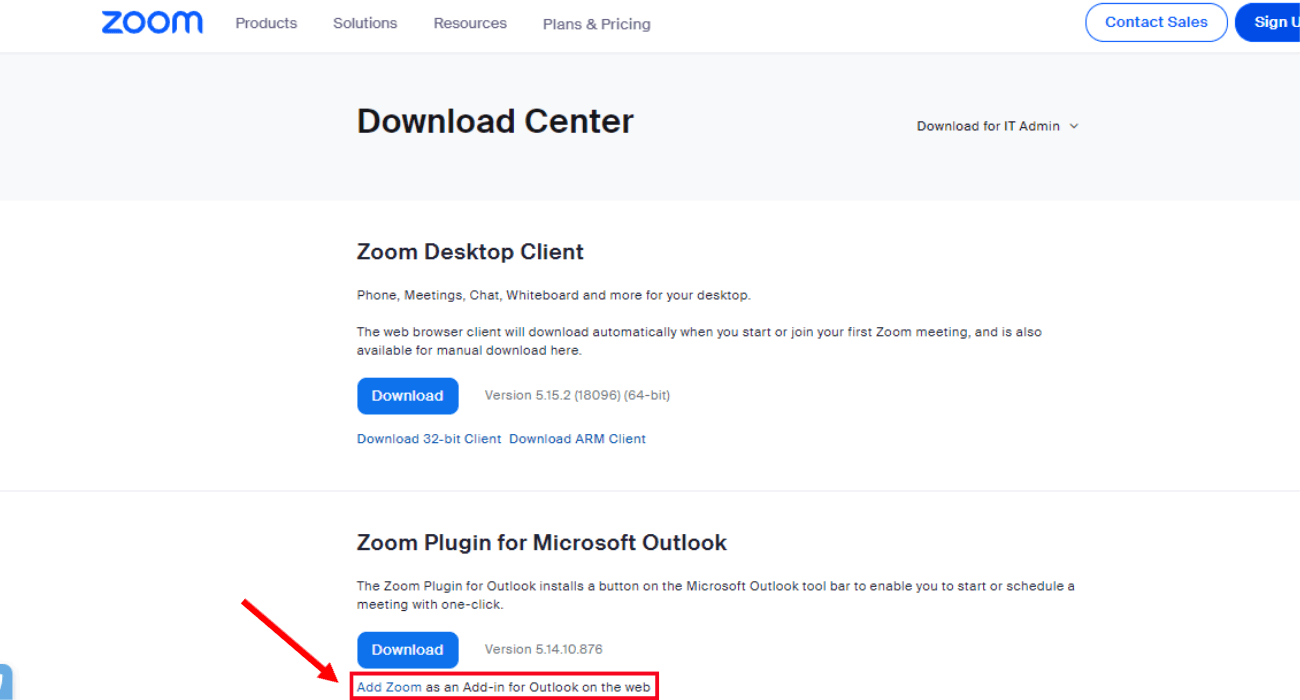
Step 1: Navigate to the Zoom Download Center and locate Zoom Plugin for Microsoft Outlook.
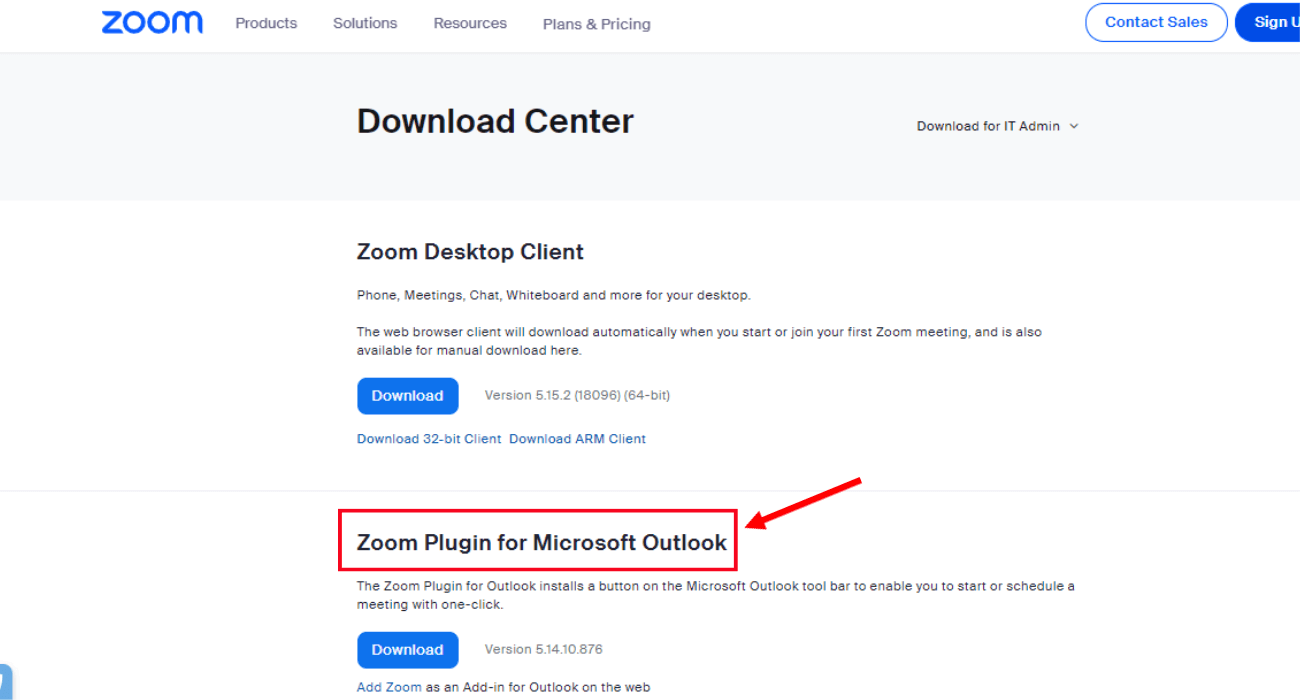
Note: If you are a macOS user and cannot see the Zoom Plugin for Microsoft Outlook option, consider using Zoom for Outlook add-in. Only a few versions of macOS 10.14.1 and above support the Outlook plugin. Additionally, macOS 10.15 Catalina users cannot use the plugin as the version does not support plugins, including the Microsoft Outlook Plugin for Zoom.
Step 2: Below the download button, click the 'Add Zoom' link to install an add-in for Outlook on the web.
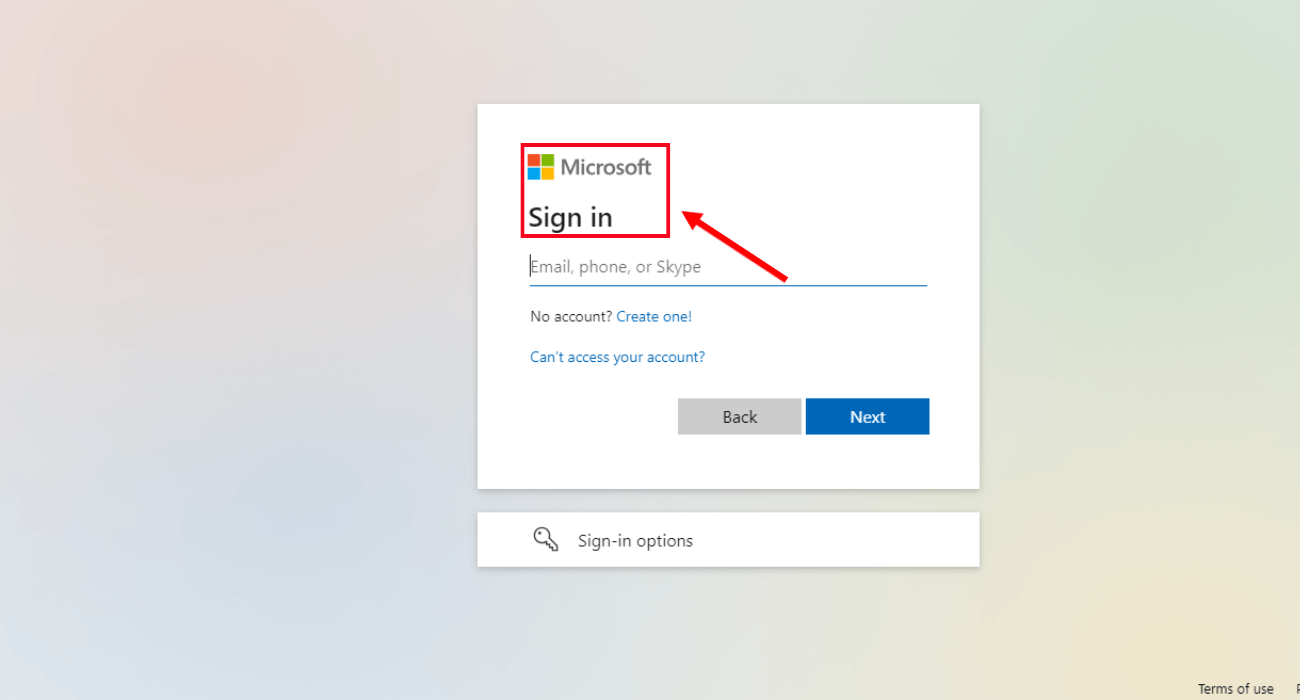
Step 3: Once you click the Zoom link, you will be directly redirected to the Microsoft AppSource page to download the add-in. Click 'Get it now' and enter the sign-in details of your Microsoft account.
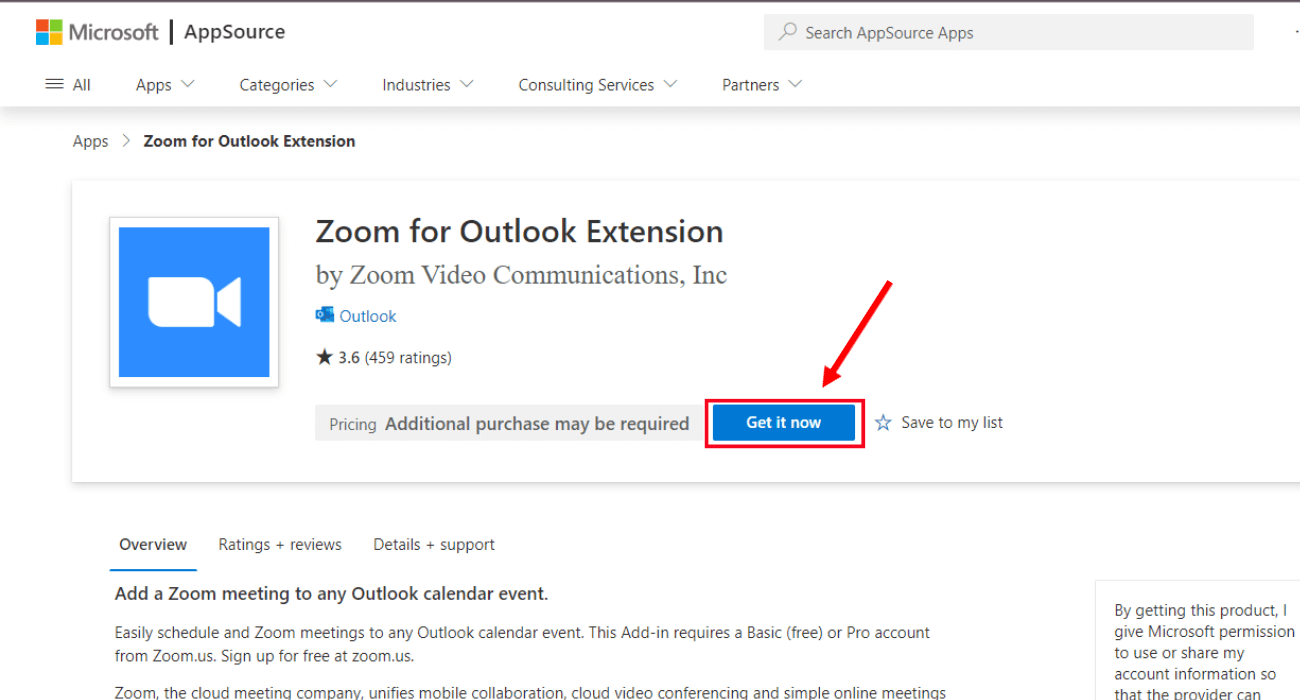
Step 4: Sometimes, a pop-up menu will appear when you click 'Get it now.' Select 'Continue' and follow the on-screen steps to complete the installation process.
Similar to installing, the Zoom add-in for the Outlook uninstallation process is pretty straightforward. Let's check out the steps to quickly remove the installed Zoom add-in.
Step 1: Navigate to the Outlook desktop app, and go to Outlook Calendar.
Step 2: Select or start a new Zoom meeting and click 'Get Add-ins.' Now locate and open Zoom for Outlook.
Step 3: Once the Zoom for Outlook page appears, you can select 'Remove' to complete the uninstallation process.
Notta AI meeting assistant records, transcribes, and summarizes meetings so everyone can stay engaged without missing important details.
How to schedule meetings with Zoom for Outlook Add-in?
Zoom for Outlook add-in helps you manage and view meeting details in your Outlook calendar. As a result, you never have to worry about missing important meetings or sessions with teams or clients.
How to schedule a meeting?
Scheduling a meeting may seem more complex at first glance. However, once you understand the process, you can easily schedule meetings similar to Zoom calls.
Once you have installed the Zoom add-in for Outlook, follow the below steps to schedule a meeting.
Step 1: Navigate to your Microsoft Outlook Calendar and click on the desired date and time for the meeting.
Step 2: Double-click the date, and a side window will appear. Select 'More Options.'
Step 3: Here, you can edit or add the meeting details, including title, attendee names, date, location, and description. On the top of the window, click three dots (...) to view a drop-down menu.
Step 4: Hover over the Zoom icon and click 'Add a Zoom Meeting.' All the meeting details will be automatically added to the email body.
Step 5: Now, you can set the meeting time and invite participants. Once done, click the 'Save' option located at the top of the screen.
How to view, edit, and remove meetings?
Zoom add-in for Outlook allows you to easily view, edit, remove, or cancel meetings in Outlook. Check out the simple steps to do so.
Step 1: Open the Outlook desktop app and switch to Microsoft Outlook Calendar view.
Step 2: Double-click the Zoom meeting you want to view, edit, or remove.
Step 3: In the top toolbar, select the three dots (...).
Step 4: Click Zoom and then select 'Settings' from the drop-down menu.
Step 5: The Zoom sidebar will appear where you can edit or remove the meeting details. Once you have made the changes, click 'Update.'
How to automatically add a Zoom meeting to each calendar event?
Adding Zoom meetings to each calendar event can be time-consuming and prone to errors. Therefore, automating the process is the best way to keep track of your Zoom sessions. Here is how to add Zoom meetings to Outlook automatically.
Step 1: Go to your Outlook web calendar and select the 'Settings' option.
Step 2: Select the 'Events and Invitations' tab. Here you must check the box indicating the 'Add an online meeting to all meetings' option.
Step 3: Select 'Zoom' from the meeting providers list and click 'Save.'
That's it! Once the feature is enabled, Zoom meeting details will be automatically added after a few seconds whenever you schedule an Outlook meeting.
If you are a macOS user and have installed Outlook desktop client, follow the below steps to automatically add meeting details to new calendar events.
Step 1: Navigate to the Outlook desktop tab. In the top toolbar, select 'Outlook.'
Step 2: Move to 'Preferences' and select 'Calendar.'
Step 3: Under 'Add online meeting to all events,' click 'Configure.'
Step 4: Select Zoom among all meeting providers listed and click 'Save.'
How to use the Zoom Outlook Plugin?
The Zoom Outlook Plugin is a handy tool that integrates Zoom with Microsoft Outlook, making it easy to schedule and manage Zoom meetings from within Outlook. In this section, we will dive deep into the prerequisites required for using the Outlook plugin, how to install it, and how to schedule sessions via Zoom Plugin for Outlook.
Prerequisites for using the Outlook Plugin
Similar to the Zoom add-in for Outlook, you need to fulfill a few conditions before using Zoom Outlook Plugin.
Windows users must have Microsoft Outlook 2010 or higher versions.
If you use macOS, you must install Microsoft Outlook 2011 or higher.
You must install the Zoom client and log in to your account.
How to install the Outlook Plugin?
Follow the below steps to install Zoom Plugin for the Microsoft Outlook desktop application.
Step 1: Open the Zoom Download Center and find the 'Zoom Plugin for Microsoft Outlook.' Click the blue-button indicating 'Download.'
Step 2: A file will be downloaded on your device. Select the file and follow the on-screen prompts to install the plugin.
Step 3: You will see a pop-up welcoming to the Zoom Outlook Plugin Setup Wizard. Click 'Next.'
Step 4: Select the installation folder and select 'Next.'
That's it! The Outlook Plugin has been successfully installed on your device.
How to schedule a meeting with the Zoom Outlook Plugin?
Similar to the Zoom add-in, scheduling meetings via the Zoom Outlook Plugin is straightforward. Follow the below steps to understand how to schedule Zoom meetings in Outlook.
Step 1: Navigate to the Microsoft Outlook. In the top toolbar, locate and select 'Schedule a Meeting.'
Step 2: A new window and a pop-up will appear, allowing you to configure your desired meeting options and settings. Here you can modify settings, add an alternative host, etc., to improve the virtual meeting experience.
Note: If you want to save these meeting settings as your default, check 'Do not show this again' and select 'Save' to confirm.
Step 3: The email body will now have all the necessary Zoom meeting details. Next, set the desired date/time, add participants, etc., similar to your regular meetings.
You can use options like 'Remove' and 'Cancel' to modify or altogether remove or cancel the meeting information. Alternatively, if everything looks perfect, click 'Send.'
Check out the Zoom video to learn how to install and schedule a meeting with Zoom for Outlook add-in and Zoom Outlook Plugin.
FAQs
How do I sync Zoom with Outlook?
If you want to sync Zoom with Outlook, you must modify the settings in your Outlook web calendar. Download the Zoom Outlook Plugin and follow the steps:
Step 1: Open Microsoft Outlook. In the top ribbon, click 'File' and then select 'Options.'
Step 2: An 'Outlook Options' window will appear where you can select the 'Add-ins' tab.
Step 3: Navigate to the 'Manage' section and select 'Disabled Items.' Click 'Go.'
Step 4: Select Zoom Outlook Plugin and click the 'Enable' option. Tap 'Ok.'
Step 5: Go to Outlook and click the 'Home' tab. Navigate to 'Schedule a Meeting,' and a meeting invitation window will appear.
Step 6: Select the meeting provider, and a drop-down list will appear. Click 'Zoom.'
Step 7: Enter the meeting details and click 'Send.'
The Zoom meeting details will be automatically synced with your Outlook calendar. If you want to view the meeting information, select the 'Calendar' tab.
Why is Zoom not showing up in Outlook?
If you cannot see the Zoom add-in in Microsoft Outlook, it might be due to a disabled plugin option in your Outlook settings. Therefore, it is vital to double-check your settings and ensure you have turned the Zoom add-in on in Outlook.
If you still cannot see the Zoom option in the Outlook ribbon, adjust the privacy settings by following these steps.
Step 1: Open the Microsoft Outlook app. On your macOS toolbar, select Outlook > Preferences.
Step 2: Click the 'Privacy' option and check the box indicating 'Turn on the optional connected experiences.'
Step 3: Restart Outlook, and you will see the Zoom add-in.
How to transcribe your Zoom live meetings?
From Zoom meetings to webinars and beyond, the feature-rich Notta recording and transcribing tool help you generate transcripts in real time. It has an extremely high accuracy of 98.86%, which ensures no valuable information slips through the cracks.
Notta offers an advanced AI-enabled Notta bot that can help you record and generate meeting transcripts for later review. Here's a step-by-step process to use the Notta bot to transcribe your Zoom live meetings.
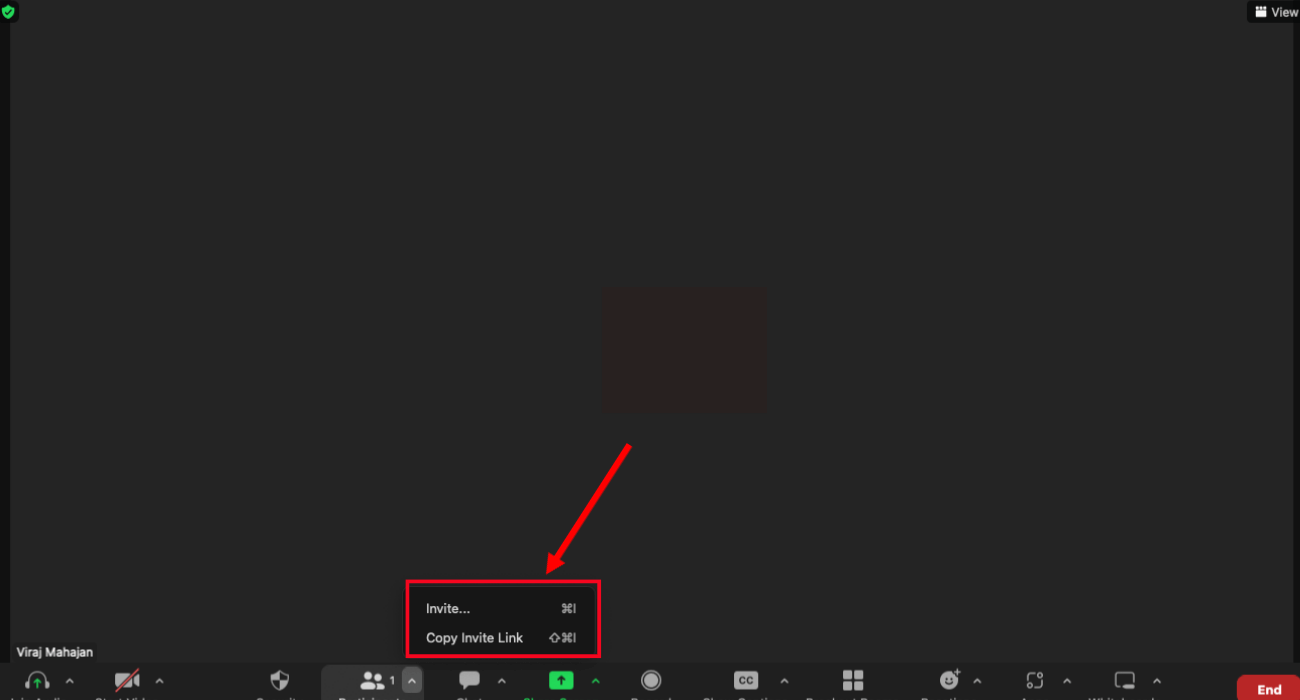
Step 1: Join the scheduled Zoom meeting or start a new one. Once you have entered the Zoom session, click the arrow next to 'Participants.'
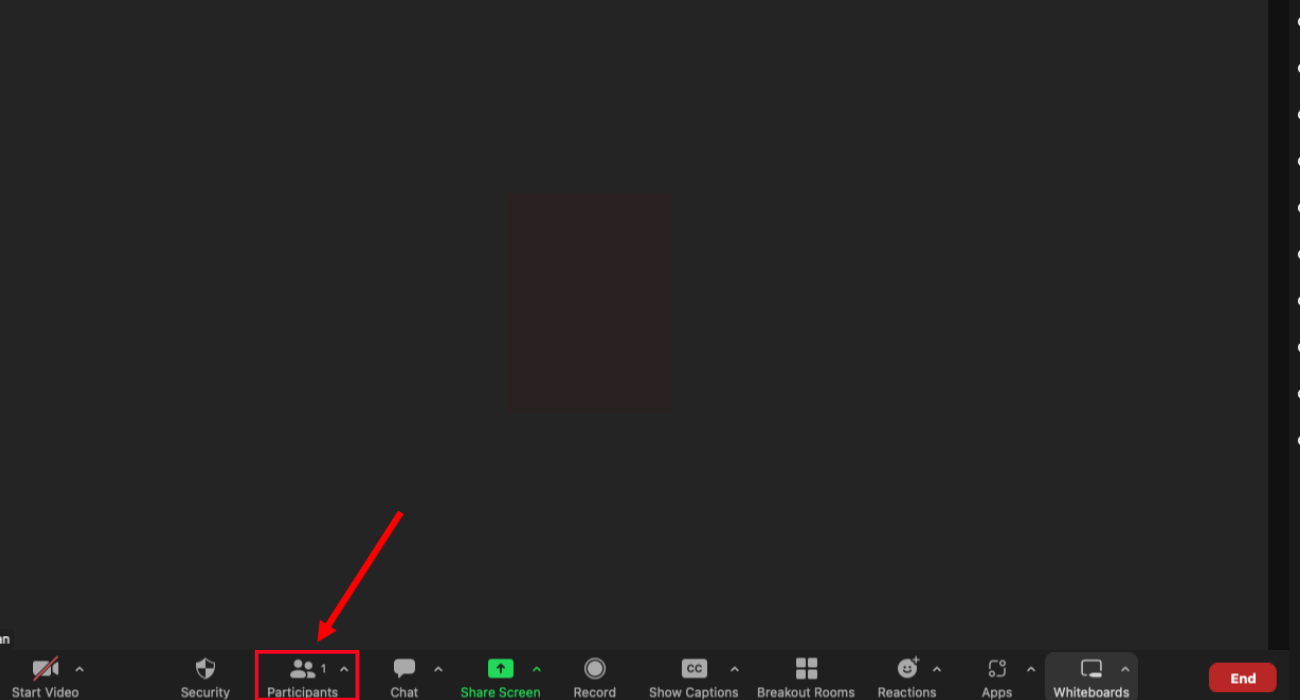
Step 2: A pop-up will appear where you can click 'Copy Invite URL' or 'Invite' to copy the invitation URL.
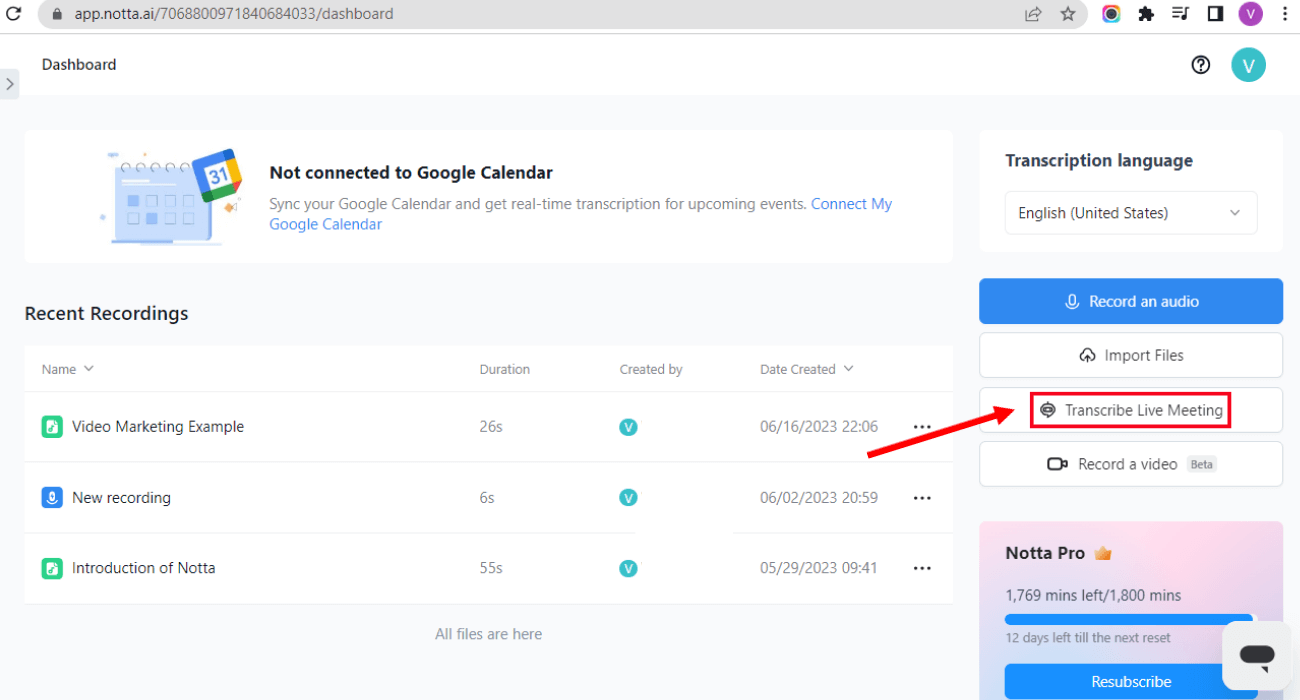
Step 3: Go to your Notta dashboard. In the right sidebar, select the 'Transcribe Live Meeting' option.
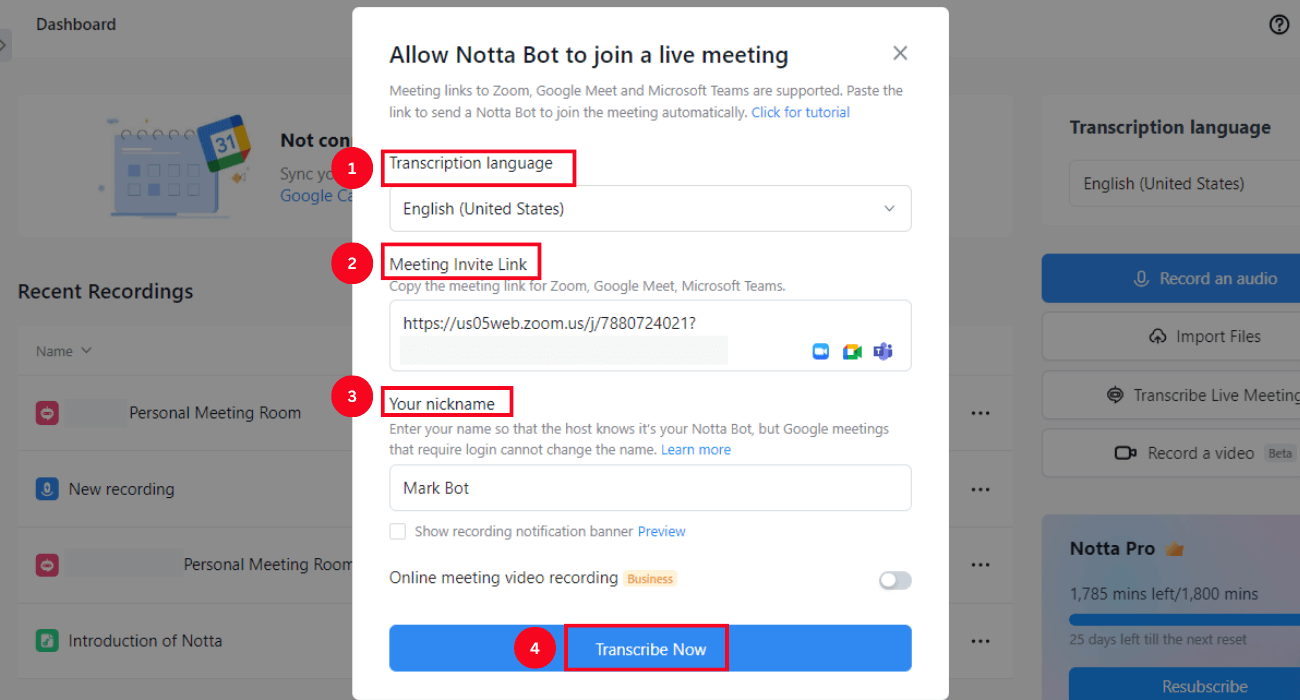
Step 4: A new pop-up window will be visible indicating 'Allow Notta Bot to join a live meeting.' Choose the transcription language and paste the meeting URL under 'Meeting Invite Link.' You can rename your Notta bot and click 'Transcribe Now.'
Step 5: The Notta bot will enter the Zoom video meeting room to generate a real-time transcript.
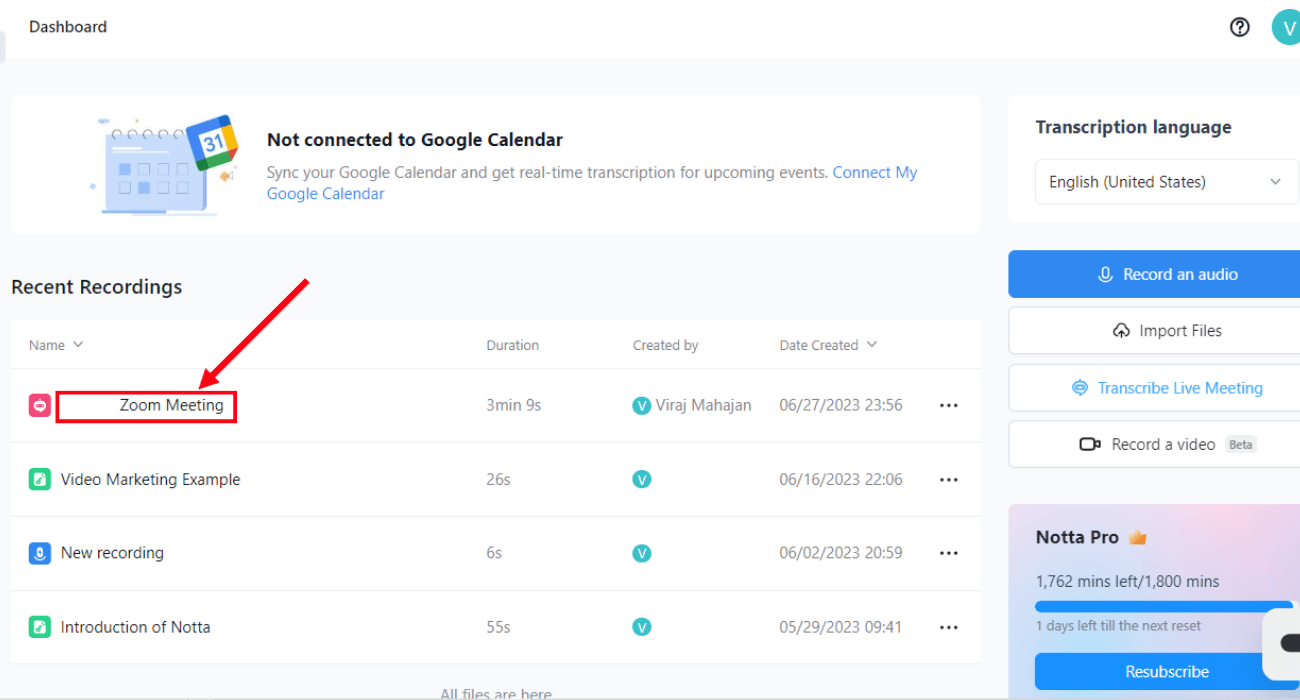
Step 6: Open the Notta dashboard again. Under 'Recent Recordings,' you can find the Notta bot transcribing your ongoing Zoom meeting.
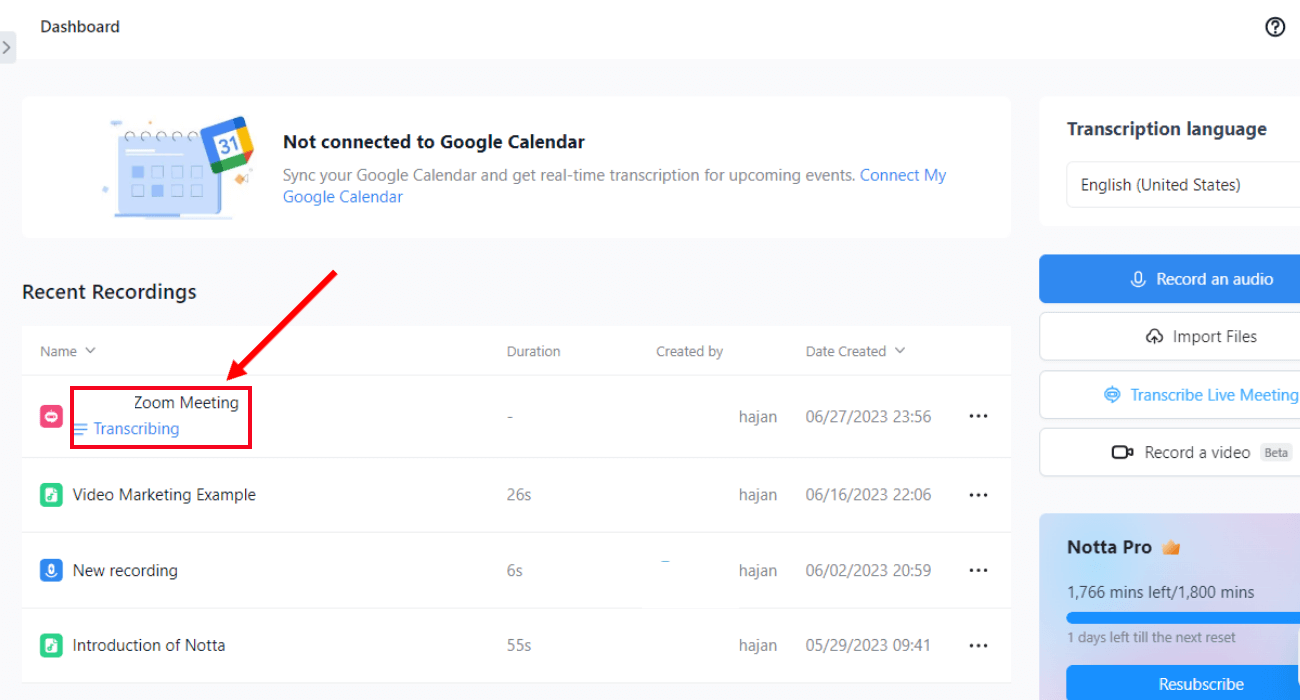
Step 7: Once the meeting ends, all the recordings and transcripts will be saved. You can click on the transcript to view, edit, or share the conversation in a few clicks.
Notta offers the most integrated AI meeting notes, summaries, and action items so nothing gets missed.
Key takeaways
Understanding how to add Zoom to Outlook automatically is a simple and effective way to save time and reduce errors. Following the step-by-step instructions given in this article, you can easily add Zoom meetings to your calendar and ensure you never miss a session again.
In addition to adding Zoom meetings to your calendar, you may also want to consider using a recording and transcribing tool like Notta.
Notta allows you to record and transcribe your Zoom meetings, so you can extract valuable information, review them later, or share them with others. If you want to improve your Zoom meetings, check out the features of Notta by creating a free account today.