
How to Add an Alternative Host in Zoom Meetings
Unlock the power of AI — Notta's meeting assistant records, transcribes and summarizes meeting minutes with one click.
Do you want to ensure your Zoom meetings run smoothly, even when you're not there? If yes, you need to add an alternative host to your Zoom sessions. As a Zoom user who schedules multiple virtual meetings in a day, I understand it's hard to attend each session on time. That’s where the alternative host comes to the rescue.
Zoom alternative hosts can handle administrative tasks like co-hosts, start the meeting when you are unavailable, and even manage the session once you leave. However, the process of adding alternative hosts in Zoom can be complex and confusing.
But not more! In this guide, I will walk you through the step-by-step instructions about how to add an alternative host in Zoom. We will also reveal how to start a Zoom meeting as an alternative host and handle it efficiently in this comprehensive guide.
Prerequisites for adding an alternative host
Zoom allows the meeting host to add an alternative host to help manage administrative tasks or take control as the host in their absence. One important thing to note is that the meeting host must add alternative hosts in Zoom while scheduling the meeting. Once the Zoom session is scheduled, the meeting host cannot assign alternative host rights to anyone.
Besides this condition, there are certain prerequisites that both the meeting host and alternative host must meet.
The alternative host must have a Zoom desktop client of Global minimum version or higher for Windows, macOS, or Linux.
When using Zoom on Android or iOS, the alternative host must install the Zoom mobile app of Global minimum version or higher.
The alternative host must be signed in to the Zoom app with the correct account to get host or co-host rights.
The meeting host and alternative host must be licensed Zoom users on the same account.
Note: While the meeting host needs a license and a webinar add-on to schedule a Zoom webinar, the alternative host only needs to use a licensed account.
How to add an alternative host in a Zoom meeting?
When scheduling a Zoom meeting, the host can designate another licensed user as the alternative host. Below are simple steps to add an alternative host to your sessions via Zoom desktop client and Zoom web portal.
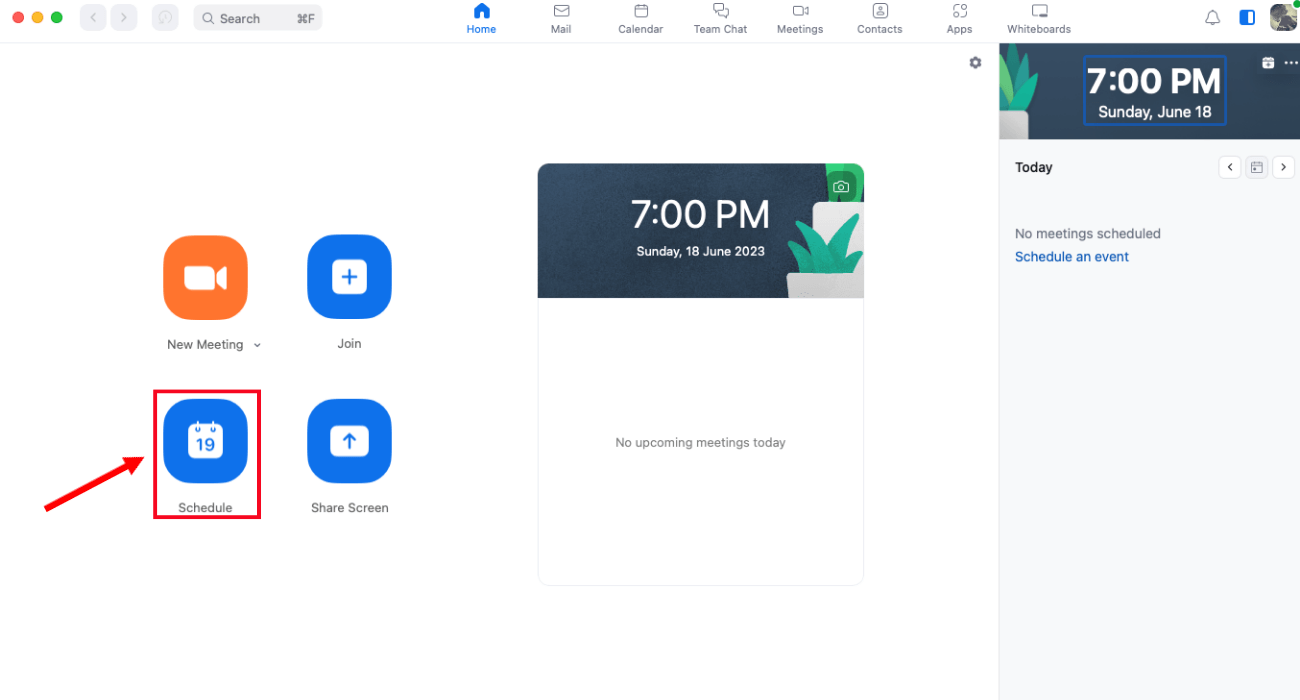
Step 1: Sign in to the Zoom desktop client and click 'Schedule' on the home tab.
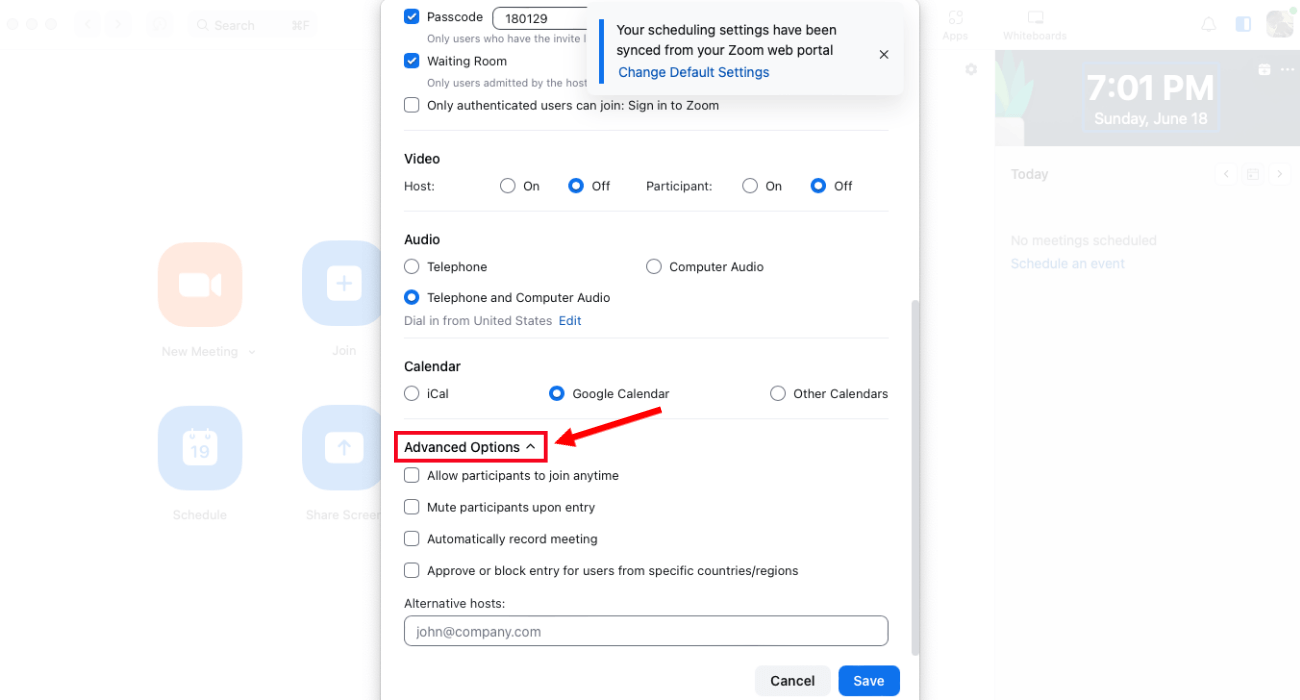
Step 2: A new pop-up window will be visible where you can schedule your Zoom meeting. Scroll down and select 'Advanced Options.'
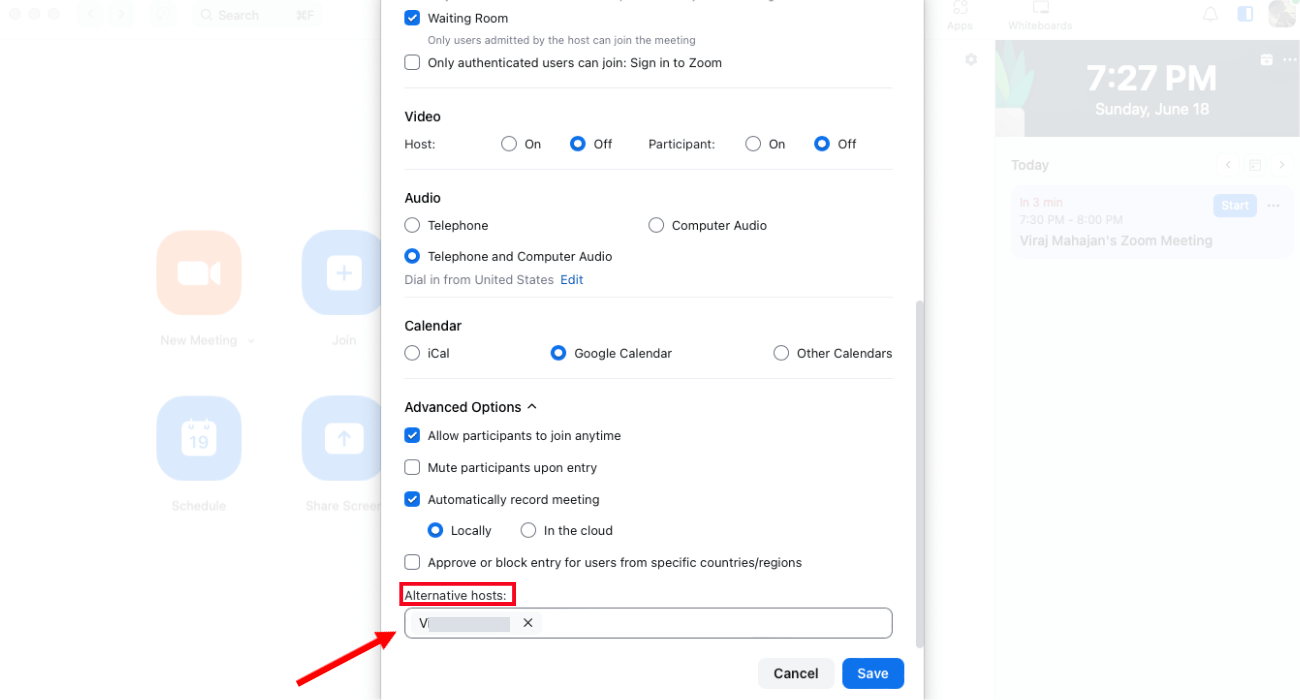
Step 3: Locate the 'Alternative Hosts' field and enter the name to search for users. If the name does not appear, try entering the email address of the person to assign them the duties of an alternative host.
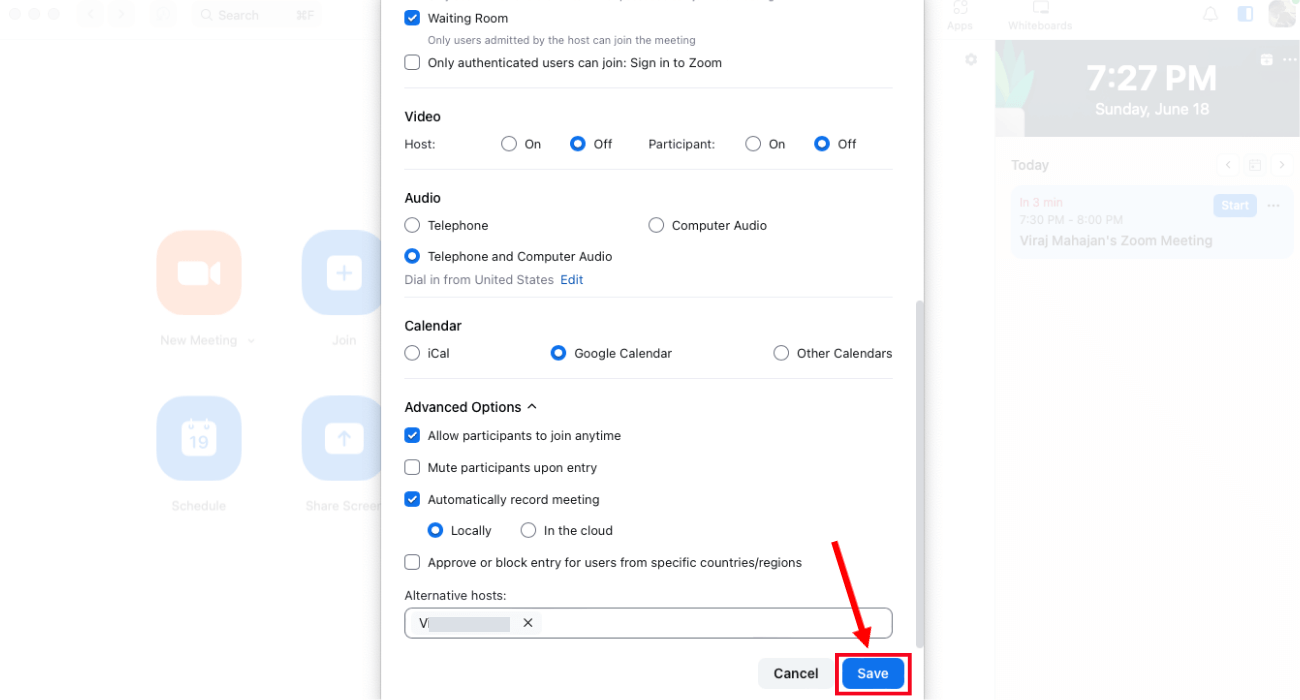
Step 4: Click 'Save' to finish and open your selected calendar.
If you want to add an alternative host using the Zoom web portal, here are the steps you need to follow:
Step 1: Sign in to the Zoom web portal. In the navigation panel, locate 'Meetings.' Click 'Schedule a Meeting.'
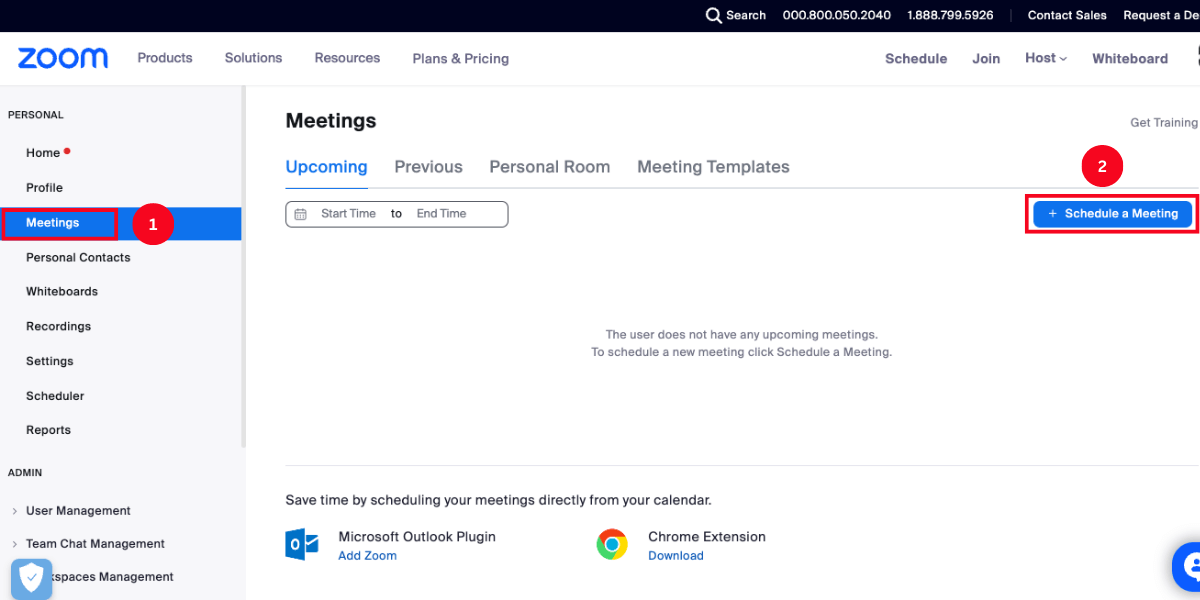
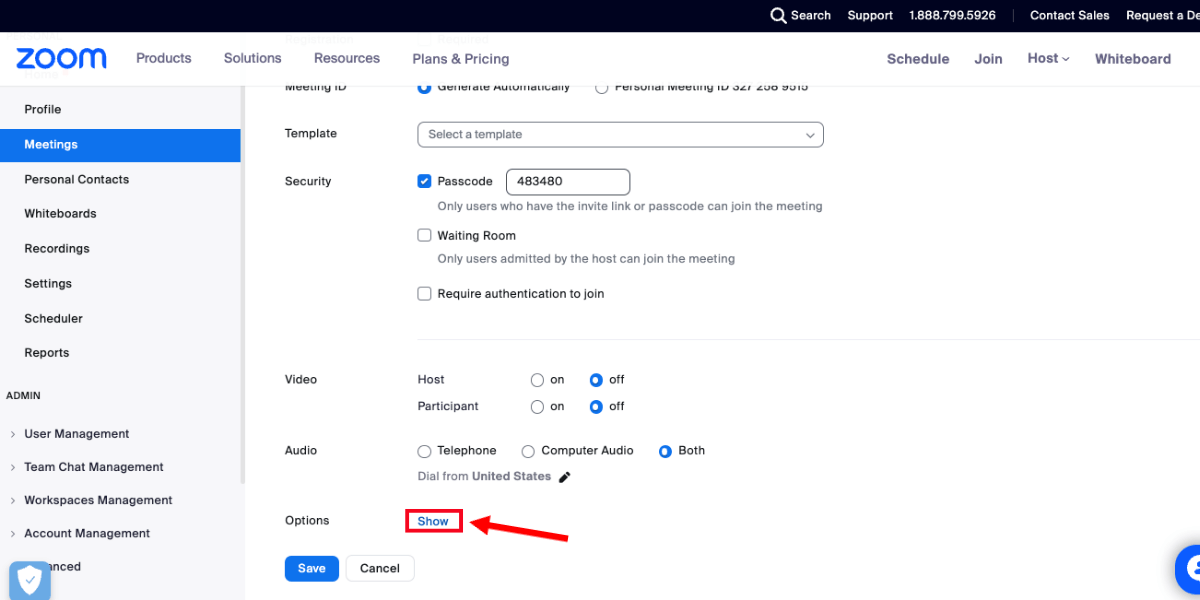
Step 2: Scroll down until you find 'Options.' Next, tap on 'Show' to view additional meeting options.
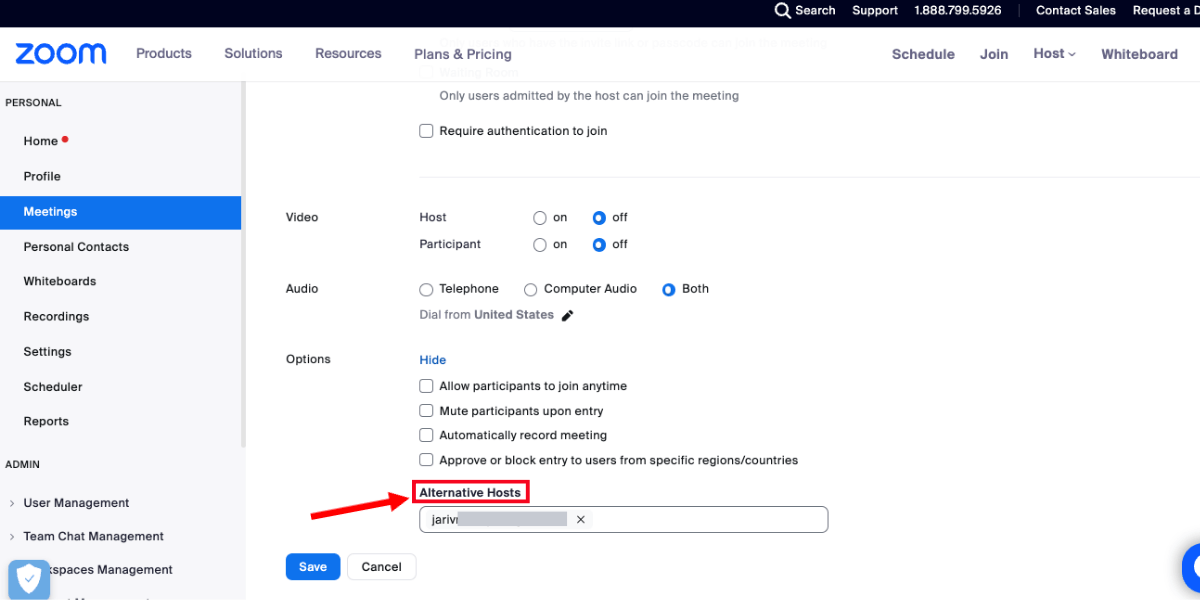
Step 3: In the 'Alternative Hosts' option, enter the email address of the alternative host.
Note: If you want the alternative host to add or edit polls during Zoom meetings, check the box next to 'Allow alternative hosts to add or edit polls.'
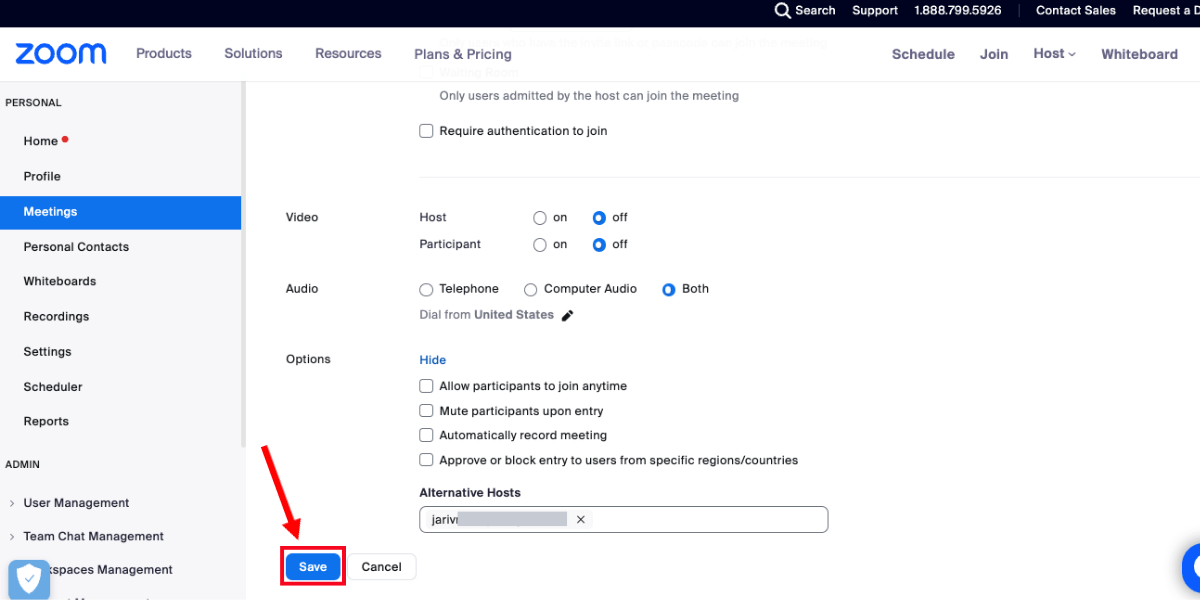
Step 4: Click 'Save' to finish the process.
Once you've followed these steps, the assigned person will receive an email notification from the host confirming they have been added as an alternative host for the specified Zoom meeting.
Notta can convert your spoken interviews and conversations into text with 98.86% accuracy in minutes. Focus on conversations, not manual note-taking.
How to start a meeting as an alternative host?
If you are designated as the Zoom alternative host, you can easily start the meeting following the simple steps.
Step 1: Check out the Zoom invitation link that includes the meeting link or meeting ID.
Step 2: Select the Zoom meeting link given in the invitation email.
Step 3: Once you click the meeting link, you will be prompted to open either the Zoom desktop client or the Zoom web portal.
Step 4: Now, you can choose the preferred option based on your device and preferences.
Step 5: The Zoom meeting will begin, and you will assume the role of the alternative host. You can easily manage administrative tasks and facilitate the Zoom session as Zoom alternative host.
How to remove an alternative host?
Removing an alternative host in Zoom is as straightforward as adding one. Here's how to remove an alternative host in Zoom.
Step 1: Sign in to your Zoom desktop client account. Locate the 'Meetings' tab.
Step 2: Navigate to the meeting you wish to update and click 'Edit.'
Step 3: Expand the 'Advanced' options to remove the existing alternative hosts from the Zoom meeting.
Step 4: Click on the name of the added alternative host to highlight and select 'Delete.'
Step 5: Once the alternative host is removed, click 'Save' to finish.
The participant will receive an email indicating they have been removed from the alternative host position.
How to automatically transcribe your Zoom meetings?
Transcribing Zoom meetings can be daunting at first glance. However, they prove to be a helpful resource to save valuable information at a hand distance.
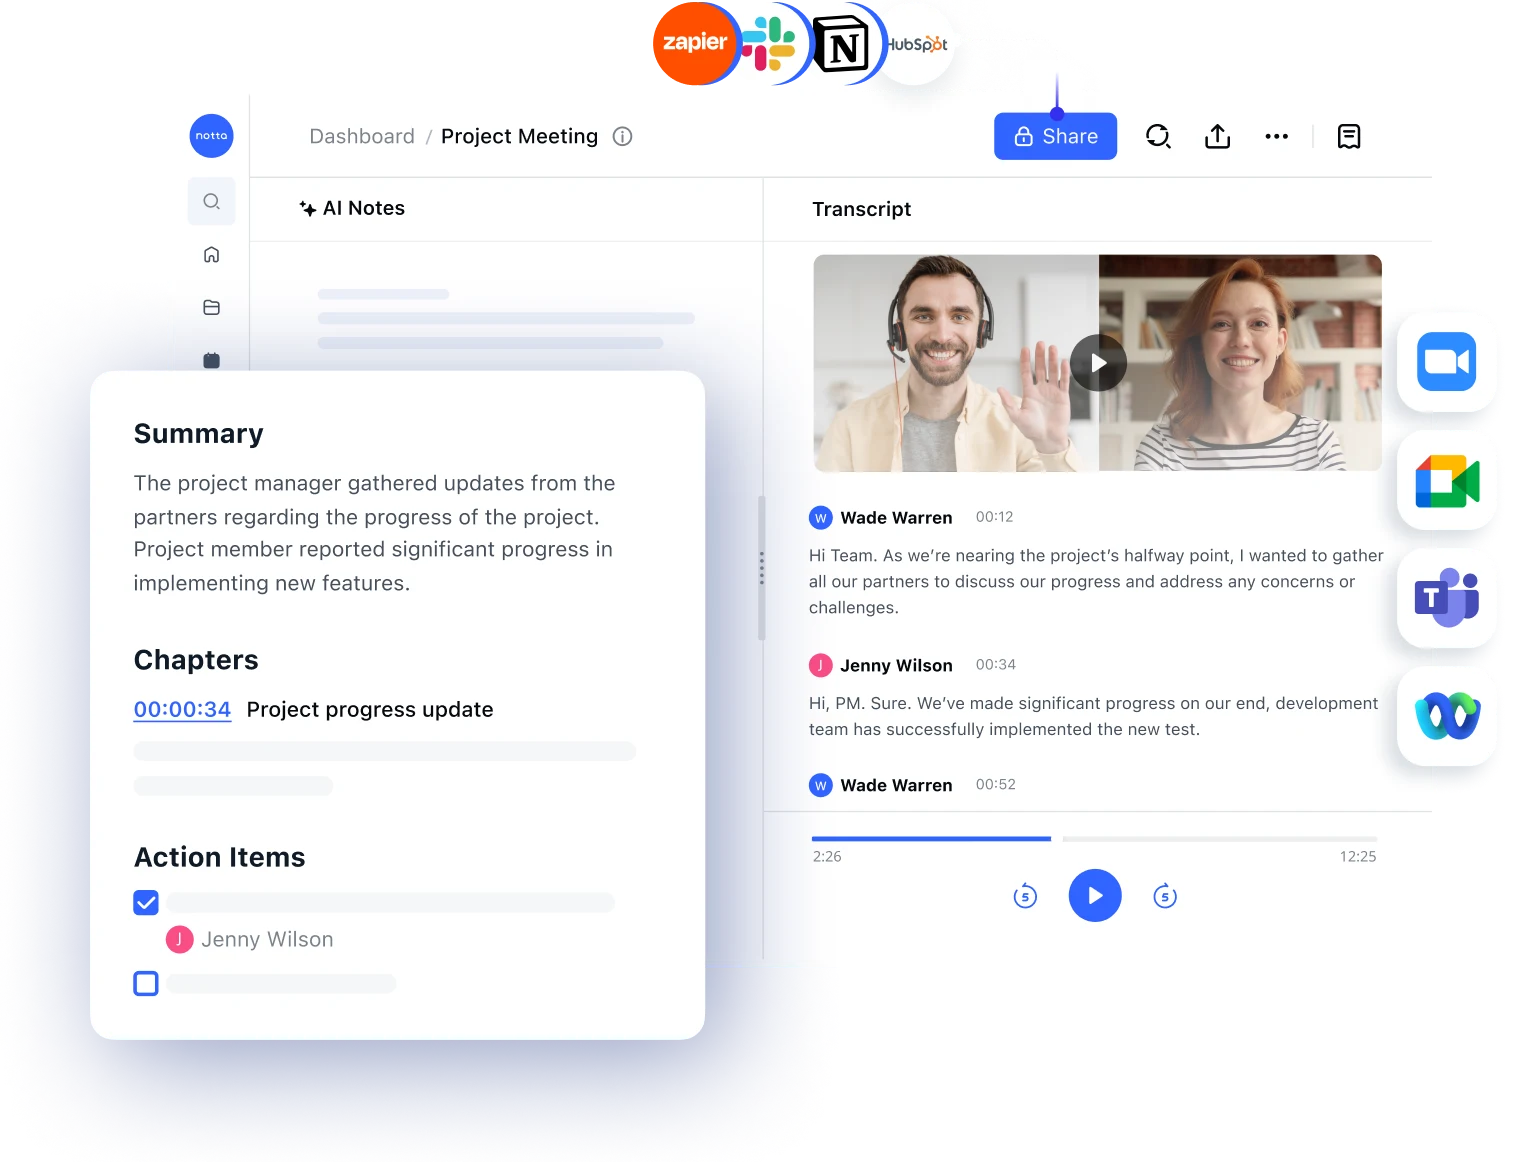
Notta is a one-stop solution for your Zoom meeting transcription. You can connect the transcribing tool to your Google Calendar to schedule events, record and transcribe live meetings, and share meeting links in a few clicks.
The best part about Notta is that it offers real-time transcription with 98.86% accuracy. It takes transcribing to the next level by providing AI summaries of the content.
Notta's AI summary generator uses AI to summarize transcripts in a few easy steps. Once the transcript is ready, you can easily export it to Text, Word, SRT, or PDF or send it to Salesforce or Notion.
Notta offers the most integrated AI meeting notes, summaries, and action items so nothing gets missed.
FAQs
Why can't I add an alternative host on Zoom?
When adding an alternative host on Zoom, there are specific prerequisites one must meet. If you are unable to add an alternative host, it could be due to the following reasons:
The person who you want to be an alternative host has a basic Zoom account instead of a licensed account.
The alternative host's email address does not match the email address of your Zoom account.
They might be using an outdated Zoom client or an app version that does not support alternative host options.
If you have checked all these factors and still cannot add an alternative host, contact the Zoom support team.
What are the differences between co-host and alternative host?
In a Zoom meeting, the co-host and alternative hosts are two distinct roles, each with their own responsibilities. Here are the primary differences between Zoom alternative host vs. co-host.
Co-host: The co-host in the Zoom meeting shares the same responsibilities as the host. They can manage the administrative side of meetings, such as attendees.
The host can grant co-host permissions to anyone when the Zoom meeting starts. One important thing to note is that a co-host cannot start Zoom sessions on behalf of the host.
Alternative host: The alternative host of Zoom meetings shares the same controls as co-hosts.
While a co-host cannot start the meeting, alternative hosts have the right to start a Zoom meeting by using the meeting link.
Unlike co-hosts, the meeting host must assign the rights of an alternative host to a user while scheduling the Zoom meeting.
Can a free Zoom account be an alternative host?
No. A person using a free Zoom account cannot act as an alternative host. Only a user having a licensed Zoom account can be designated as an alternative host by the meeting host. In addition, the alternative host must be a member of the same Zoom account as that host.
Do alternative hosts receive Zoom recordings?
Although the alternative host can start the Zoom meeting and click the 'Record' icon, the session recording will not be saved in their account. Instead, the Zoom recording will be saved in the original host's cloud. However, once the meeting ends, the host can send the recording link to the alternative host, co-hosts, and other participants.
Key takeaways
Whether you are a busy professional juggling multiple responsibilities or a team leader wanting to distribute hosting responsibilities, this guide will help you understand how to add an alternative host in Zoom.
Zoom's alternative host feature ensures seamless management of meetings and uninterrupted connectivity for all participants. But that's not all! Recording and transcribing Zoom meetings help attendees make the most out of their Zoom sessions.
With Notta's transcription features, you can effortlessly convert your meeting recording into accurate transcriptions. Furthermore, you can review or edit Zoom transcriptions and share them with other participants. Sign up for a free Notta today and start recording and transcribing meetings in a minute.