Read next: How to extract subtitles from MP4

How to Hardcode Subtitles to a Video in 5 Simple Steps
98% accurate, real-time transcription in just a few clicks. 58 languages and multiple platforms supported.
Subtitles are a valuable tool for expanding the reach of your video content, but they are not supported on every device and platform. You can solve this problem by hardcoding your subtitles so they become a permanent part of your video, but many creators are unfamiliar with the process.
In this post, I'll discuss the advantages of hardcoded subtitles and how they differ from softcoded subtitles. Finally, I'll explain how to hardcode subtitles into any video file using free software that works on all major operating systems.
What are hardcoded subtitles?
Hardcoded subtitles are a type of closed captioning used in video files. Audio information such as dialog, sound/music effects, and voiceover content is displayed as text on the screen along with the rest of the video file.
Hardcoded subtitles are often used to display alternate language translations and improve accessibility for hearing-impaired individuals. They display automatically as part of the video file, with no additional input required from the viewer.
Hardcoded vs. softcoded subtitles
Subtitles can be added to a video in two different ways: hardcoded and softcoded. Hardcoded subtitles are permanently rendered into the video file before playback, while softcoded subtitles are added to a video stream in real-time from an external file during playback.
Hardcoded subtitles are always visible and always displayed at the correct point in the video. A video editing app is necessary to render the subtitles into the video file, and you cannot change or edit them after that point.
Softcoded subtitles are much more flexible. Viewers can choose to display or hide them, and they can select between multiple sets of subtitles for different languages. Unfortunately, softcoded subtitles can have display issues. They may be out of sync with the audio, completely missing, or otherwise unusable for the viewer.
How to hardcode subtitles to a video
Note: The screenshots used for this tutorial are from the Windows 11 version, but HandBrake is similar across all operating systems.
There are several different ways to hardcode subtitles. You can even hardcode subtitles online, but these tools can be expensive due to the processing power required for rendering video files - and there's a better option.
The simplest way to hardcode subtitles to a video is with the open-source video conversion app HandBrake. It is available as a free download for Windows, macOS, and Linux.
To begin hardcoding subtitles to a video, you will need the HandBrake app, a video file, and a subtitles file in a standardized format like SRT or SSA. Now let's take a closer look at how to hardcode subtitles!
Step 1. Install HandBrake
Start by installing the free HandBrake app, available from the official developer website.
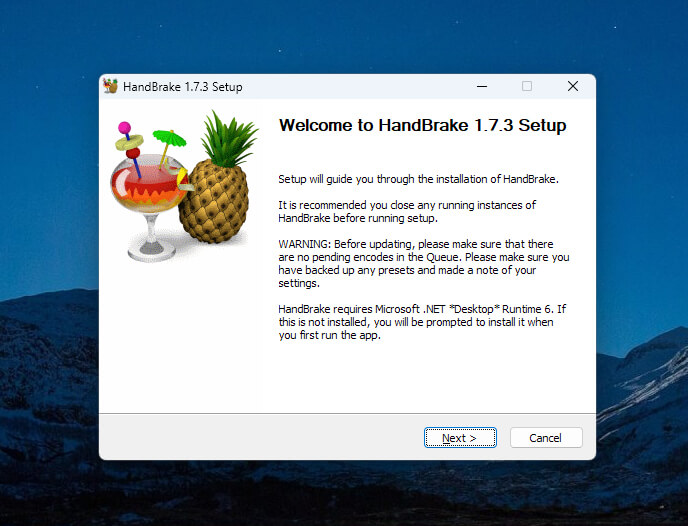
Follow the on-screen instructions to complete the installation. If you run into any problems, you can refer to the official installation guide.
Step 2. Prepare your subtitle file
There is a wide range of subtitle formats, but the simplest option is the SRT (SubRip Text) file format. SRT files contain text and timing information, and you can create them using any basic text editor.
If you don't already have an SRT file prepared, Notta has a helpful guide on how to create SRT subtitles that can simplify the process.
If you want to create customized subtitles, you will need to use a more advanced format like SSA (SubStation Alpha). SSA files support multiple fonts, different colors for different speakers, and the ability to position your subtitles anywhere on the screen.
HandBrake can hardcode your subtitles using both SRT- and SSA-formatted subtitle files.
Notta offers multi-language, accurate transcriptions to boost your video engagement
Step 3. Open your video in HandBrake
Open the HandBrake app, and click the 'File' button. Browse to select your video file, and click 'Open'.
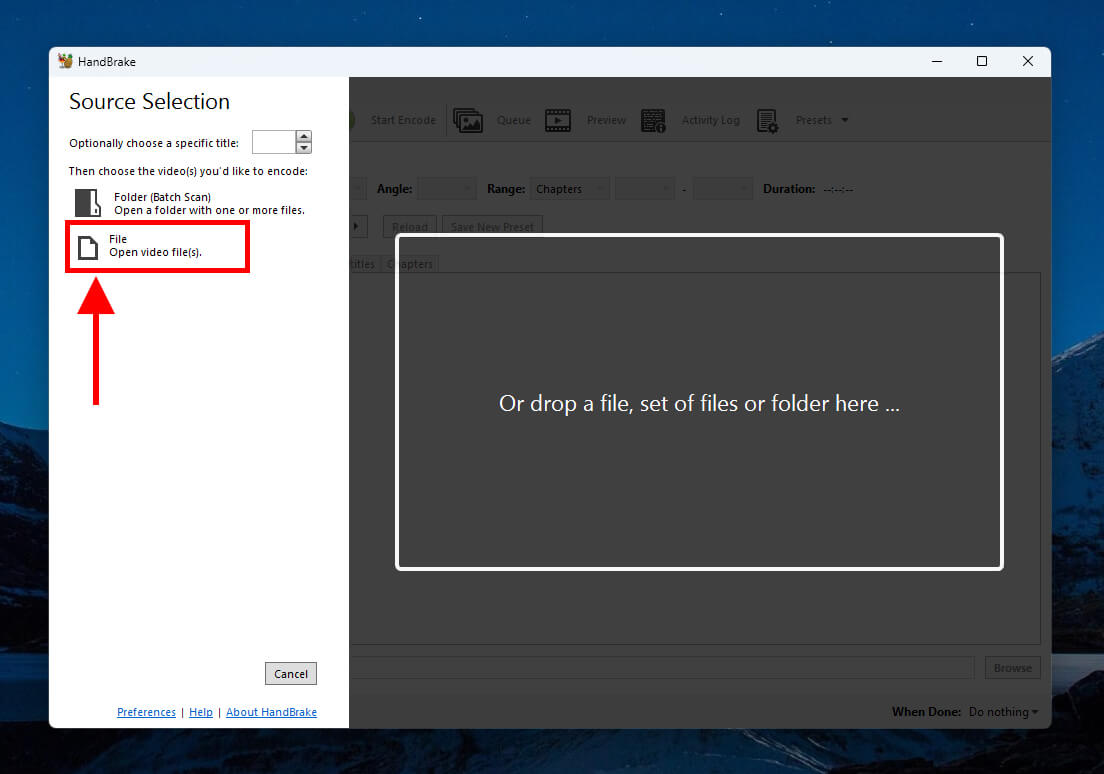
HandBrake will load your video file and display a preview of the content.
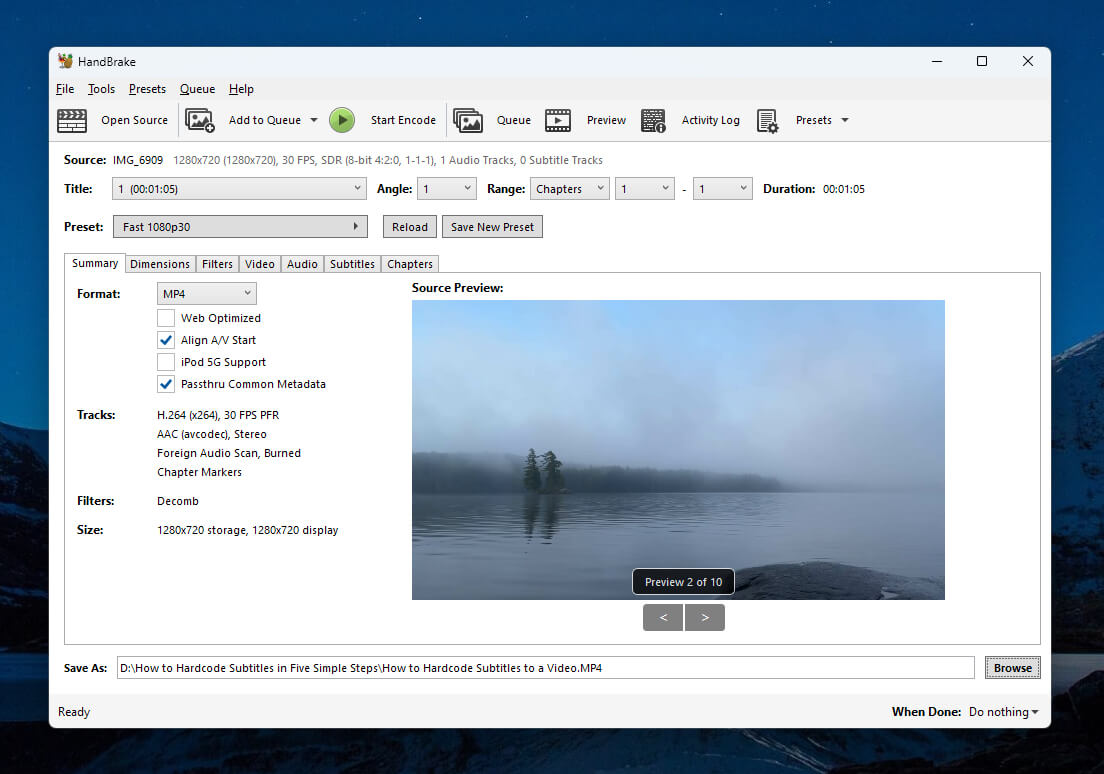
Step 4. Configure your subtitle settings in HandBrake
Click the 'Subtitles' tab in HandBrake to view the subtitle settings for your video, and then click the 'Clear' button to remove any default options.
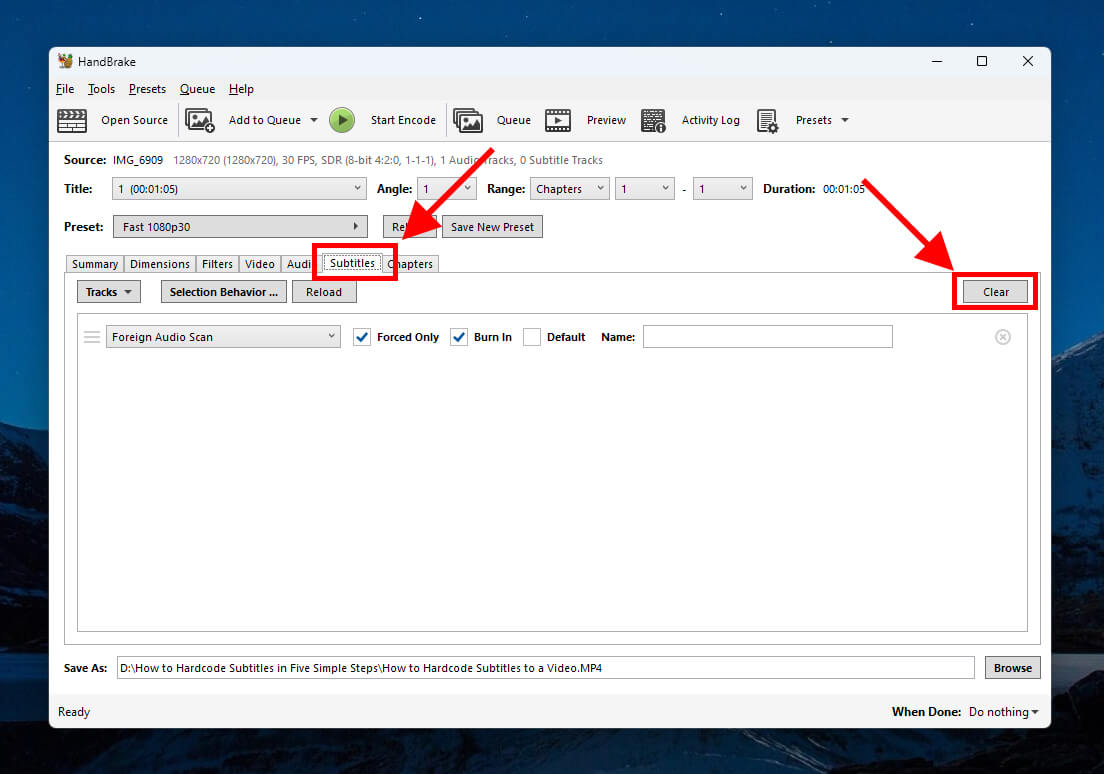
Open the 'Tracks' dropdown menu and click 'Import Subtitle'. Browse to select your subtitle file and click 'Open'.
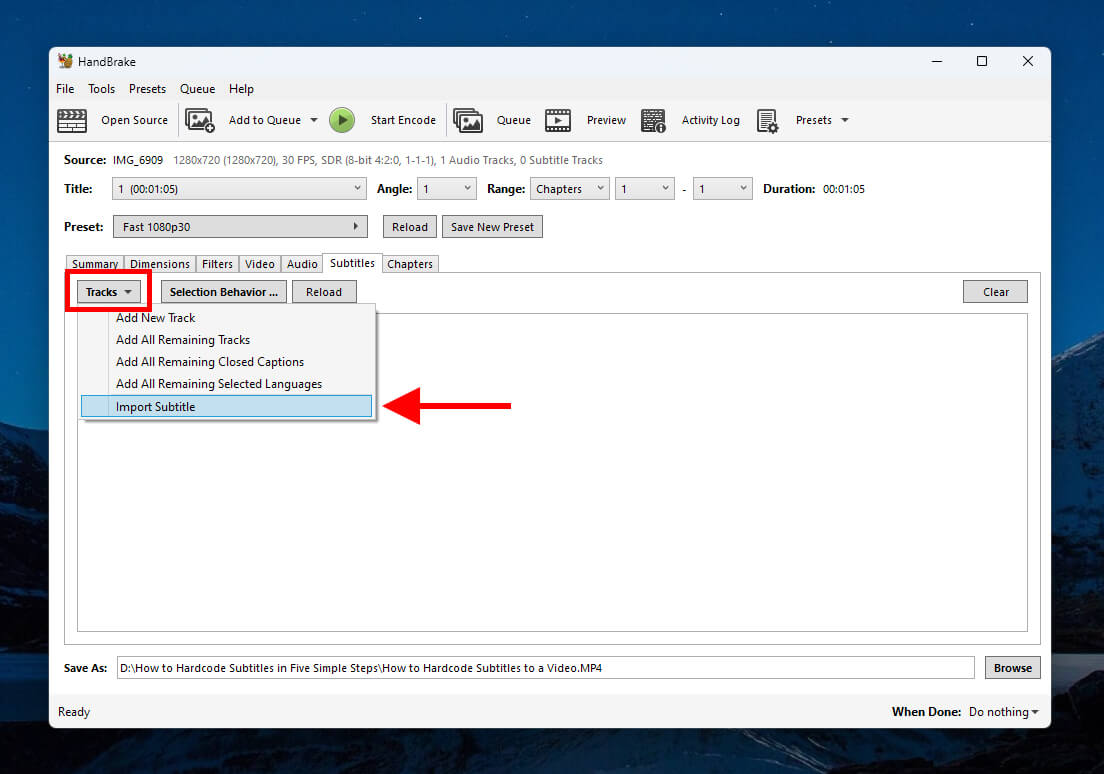
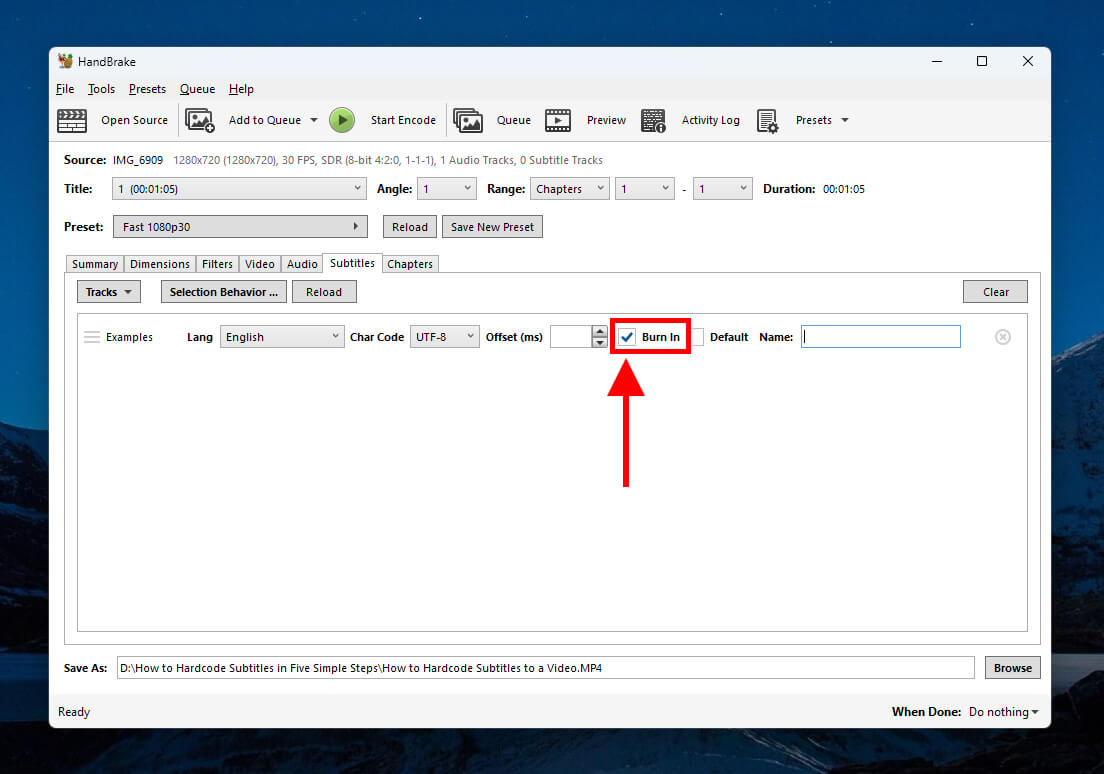
To ensure that your subtitles get hardcoded into your video, select the 'Burn In' checkbox.
Step 5. Encode your video and verify the results
Use the 'Preset' button to select your desired output format, as shown below. It's usually a good idea to match the same resolution as your source file unless you want to create a file with a different resolution.
When you're happy with the settings, click the 'Start Encode' button at the top of the HandBrake window.
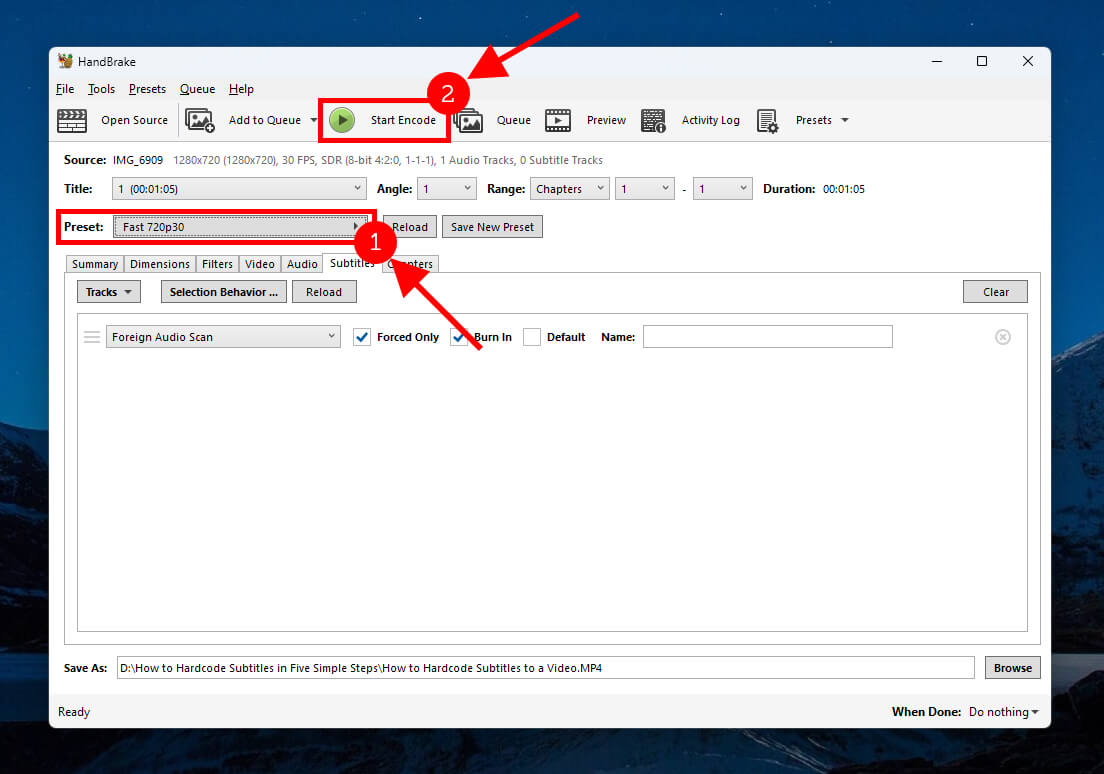
HandBrake will combine your files and burn your subtitles permanently into the video file. It's a good idea to review your newly rendered video file to confirm that your hardcoded subtitles display correctly.
FAQs
How do I hardcode subtitles to MP4?
You can hardcode subtitles into MP4 videos using the same steps as any other video format. When preparing your video file in HandBrake, simply select MP4 as your output format on the 'Summary' tab.
How can I hardcode subtitles without losing quality?
Unfortunately, there is no way to hardcode subtitles without losing some video quality. Every time a video gets compressed during the rendering process, some quality is lost. You can minimize this loss of quality by using the correct settings, but there will always be some.
Can I remove hardcoded subtitles?
No, you cannot remove hardcoded subtitles from a video file. It is possible to crop, cover, or blur out hardcoded subtitles, but there is no way to remove all traces of them from a video. Advanced AI tools like VSR may be able to remove hardcoded subtitles in certain videos, but these tools still create a visible distortion effect around the removed text.
How do I permanently burn subtitles to a video?
Permanently burning subtitles to a video is another term for hardcoding subtitles to a video. You can use the same steps outlined above for hardcoding subtitles using Handbrake on any platform (Windows, macOS, or Linux).
Key takeaways
Hardcoded subtitles are the most reliable solution for providing language translations for international viewers and improving video accessibility for hearing-impaired individuals. Hardcoded subtitles will always display as intended, and they cannot be disabled or removed. HandBrake is a popular free app that is ideal for anyone who wants to know how to burn subtitles into video files in a wide range of formatting options.