
How to Convert Zoom Recording to MP4
98% accurate, real-time transcription in just a few clicks. 58 languages and multiple platforms supported.
Do you have recorded Zoom sessions that you need to share with others, but they are in a format that cannot be easily played? If so, you're not alone. Sometimes, Zoom recordings are saved in a proprietary format that can't be played by most media players.
But don't worry; there's an easy way to convert them to MP4, a more widely supported format. Whether you're sharing presentations, uploading videos to online platforms, or archiving important sessions, converting to MP4 ensures compatibility and accessibility in real-life scenarios.
I have extensively tested various methods and discovered the most reliable techniques to convert Zoom recordings to MP4. In this article, I'll show you how to convert Zoom recordings to MP4 using the built-in converter in the Zoom desktop client, zTscoder for Windows, Transcode for macOS, and switching to new .zoom files.
Method 1: Convert within Zoom desktop client
Zoom automatically converts the local recordings to MP4. However, if it doesn't, you can follow the steps to manually convert recordings within the Zoom desktop client.
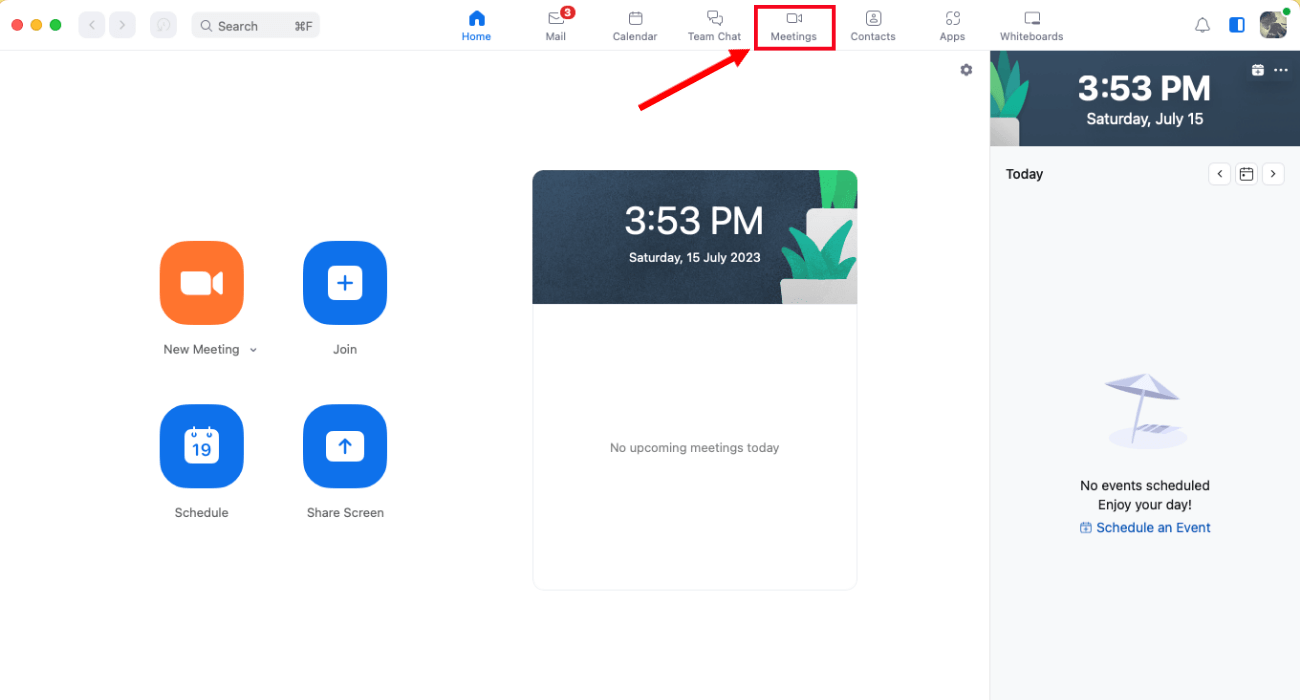
Step 1: Navigate to the Zoom desktop client and sign in with your login details. On the home page, locate 'Meetings.'
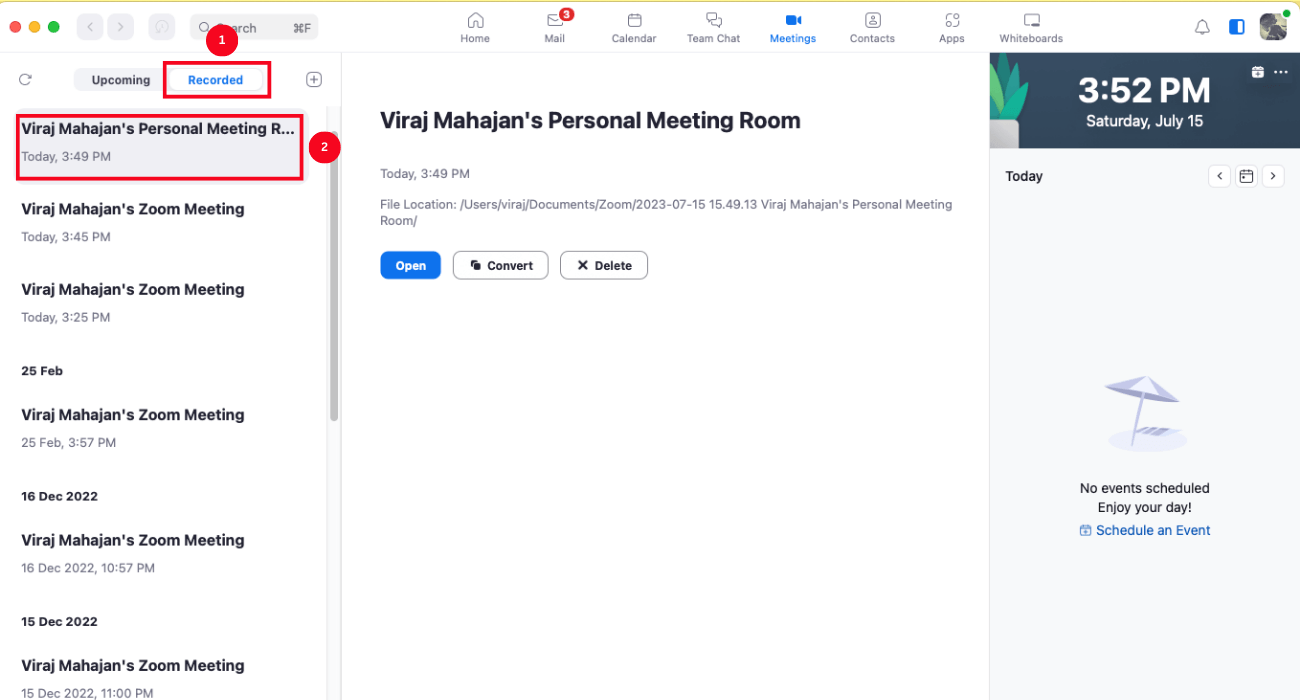
Step 2: Select the 'Recorded' option, and all your recorded Zoom sessions will appear. Click the Zoom recording you wish to convert to MP4.
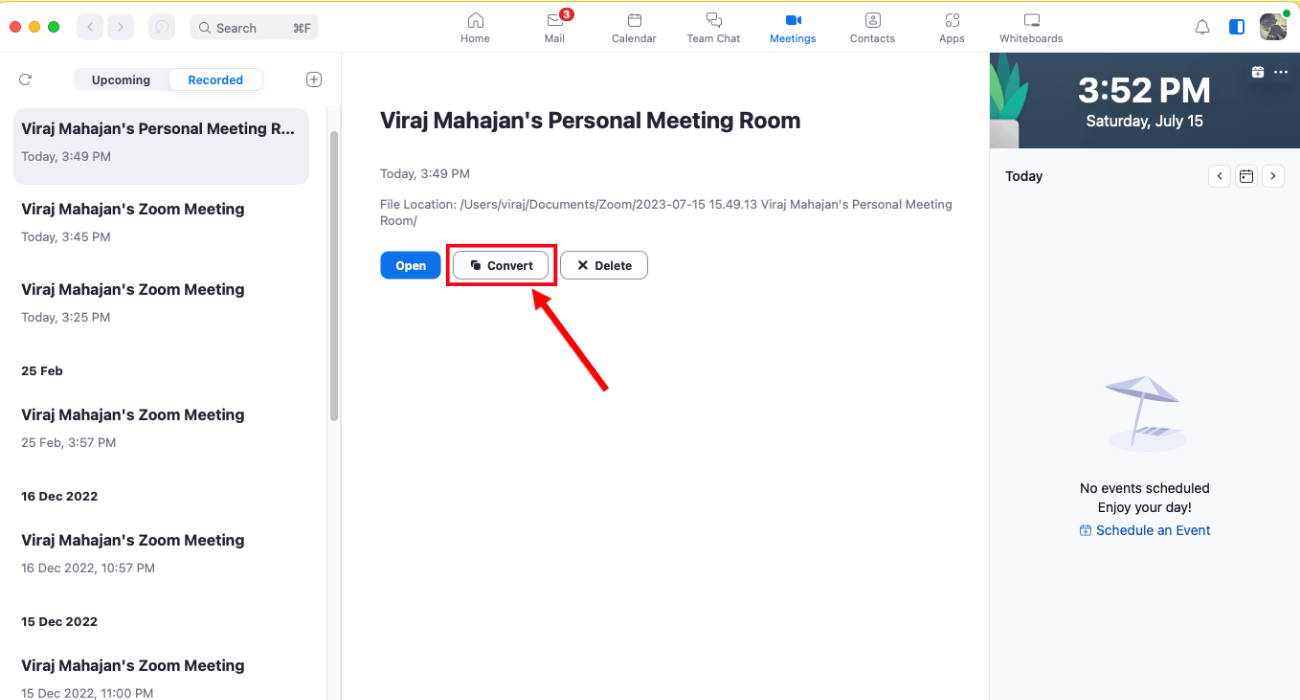
Step 3: You'll see the complete meeting details. Select 'Convert' to start the conversion process.
Advantages:
Using the in-built converter of Zoom eliminates the process of converting Zoom recordings to MP4 format using third-party tools.
It is one of the most straightforward methods to quickly convert recordings to MP4.
Disadvantages:
Converting recordings via the Zoom desktop client may not work in all scenarios, especially when the file is corrupted.
The method fails when you cannot locate the file in the recorded folder on the Zoom desktop client.
Notta offers the most integrated AI meeting notes, summaries, and action items so nothing gets missed.
Method 2: Use zTscoder on Windows
If you encounter situations where your Zoom recording is not available in the 'Recorded' section of the Zoom app, the zTscoder tool can come to the rescue. Let's say you have a large Zoom recording of a conference presentation, and you need to convert it to MP4 for editing purposes.
By following the steps outlined below, you can utilize zTscoder to convert your recording into various formats, including MP4, and seamlessly incorporate it into your post-production workflow.
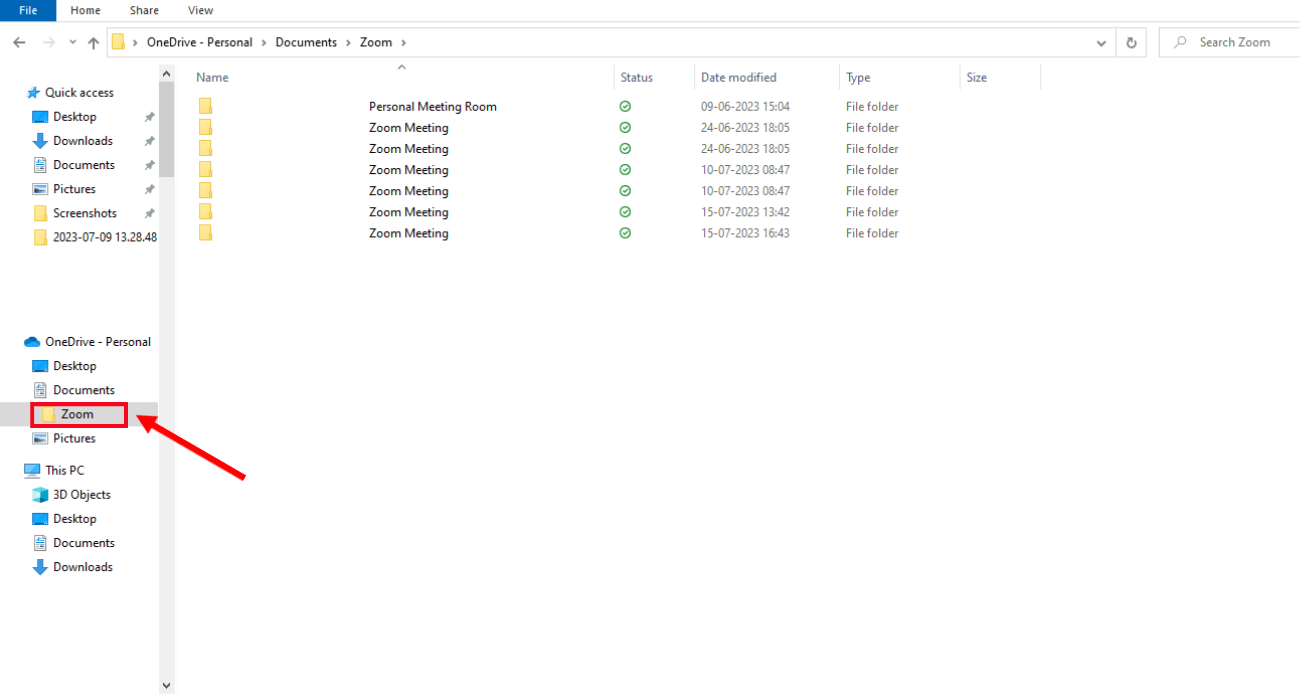
Step 1: On your Windows, locate the folder where all the Zoom meetings are saved. It is usually in the 'Documents' folder.
Step 2: Open the Zoom meeting folder you wish to convert and right-click the file. Select the 'Open with' option.
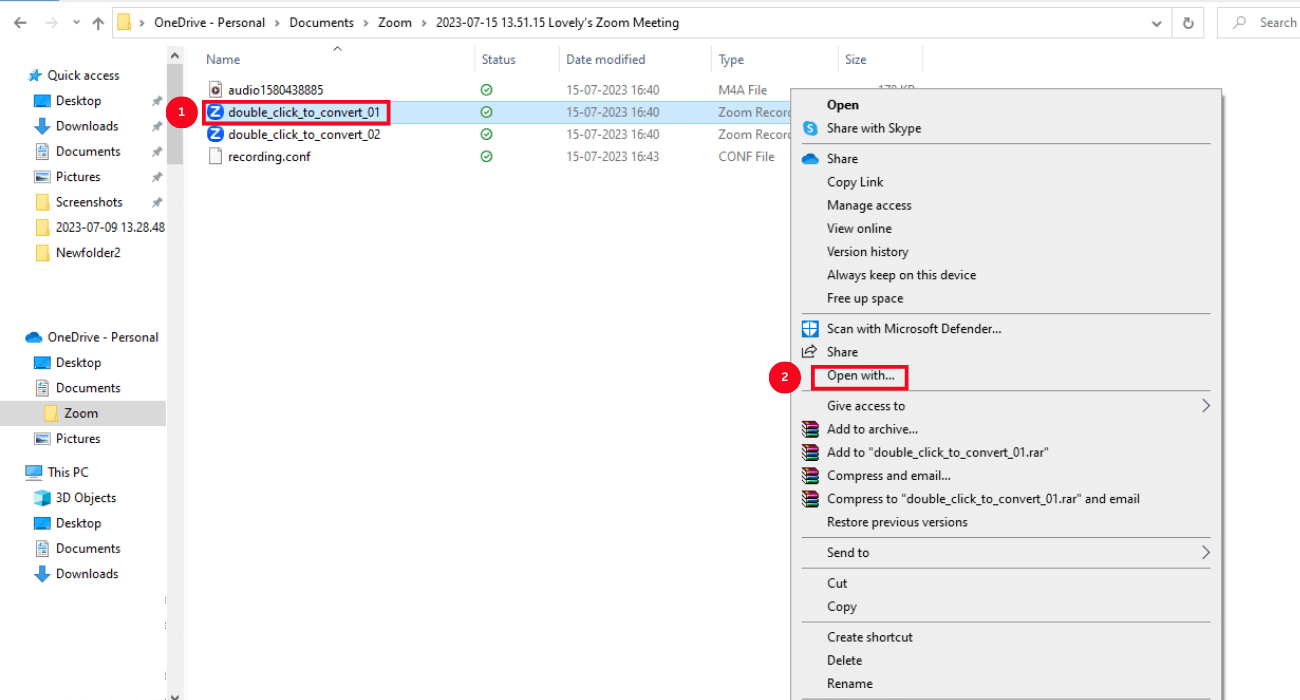
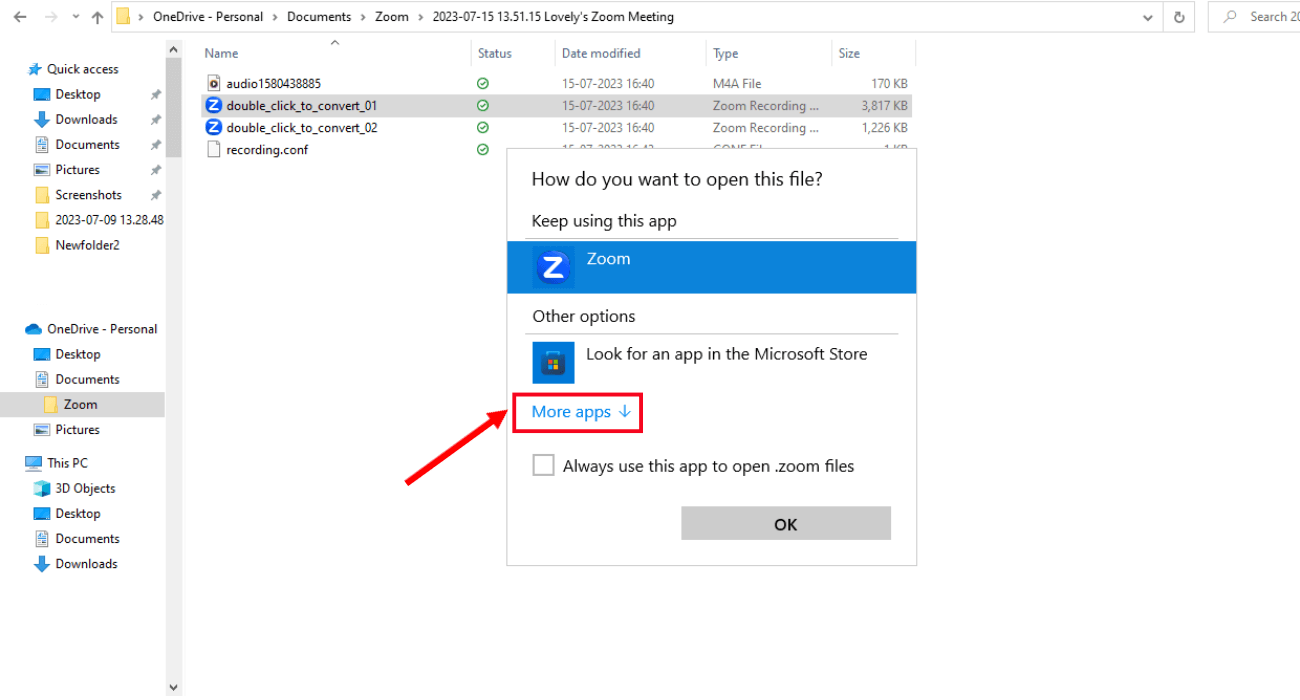
Step 3: A new window, 'How do you want to open this file' will appear where you can choose 'More apps.'
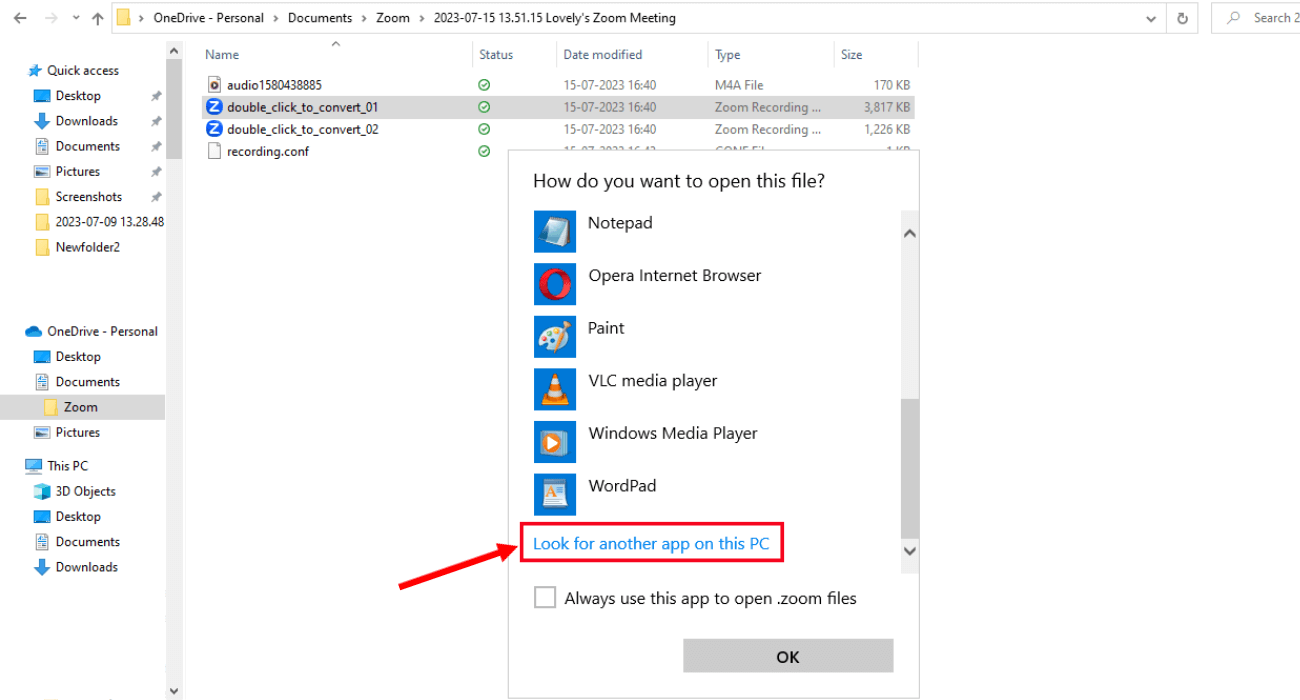
Step 4: Scroll down until you locate the 'Look for another app on this PC' option.
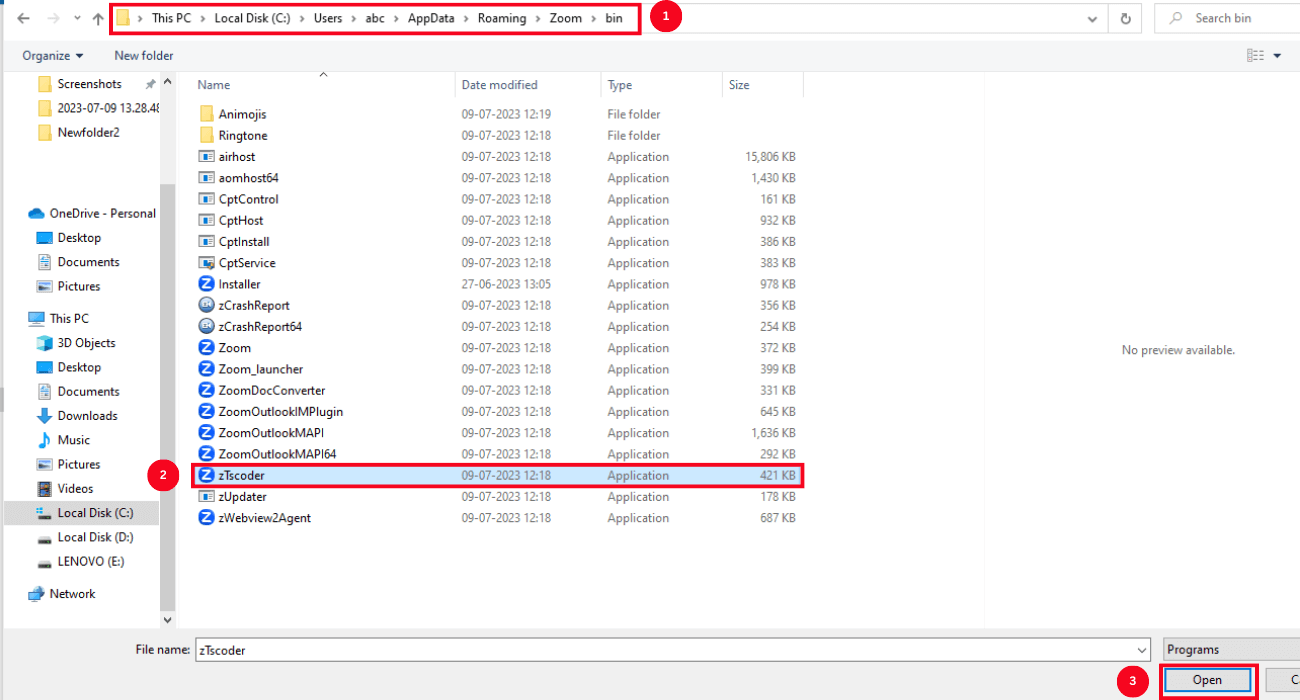
Step 5: Follow this path C:\Users\UserName\AppData\Roaming\Zoom\bin, select 'zTscoder.exe' or 'zTscoder' and click 'Open.'
Step 6: The conversion process will start automatically, and you'll see an MP4 video file.
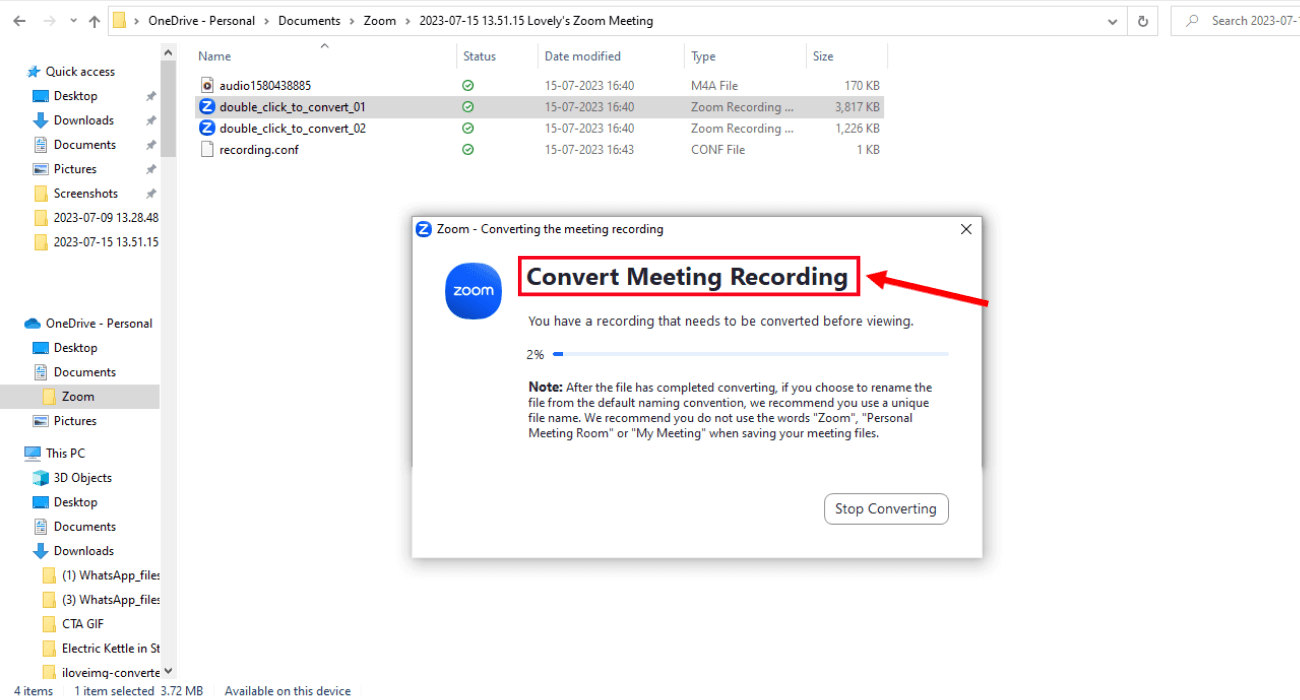
Note: If the zTscoder method has no response, you can run zTscoder.exe and perform the conversion. Here's how you can start the conversion on Windows.
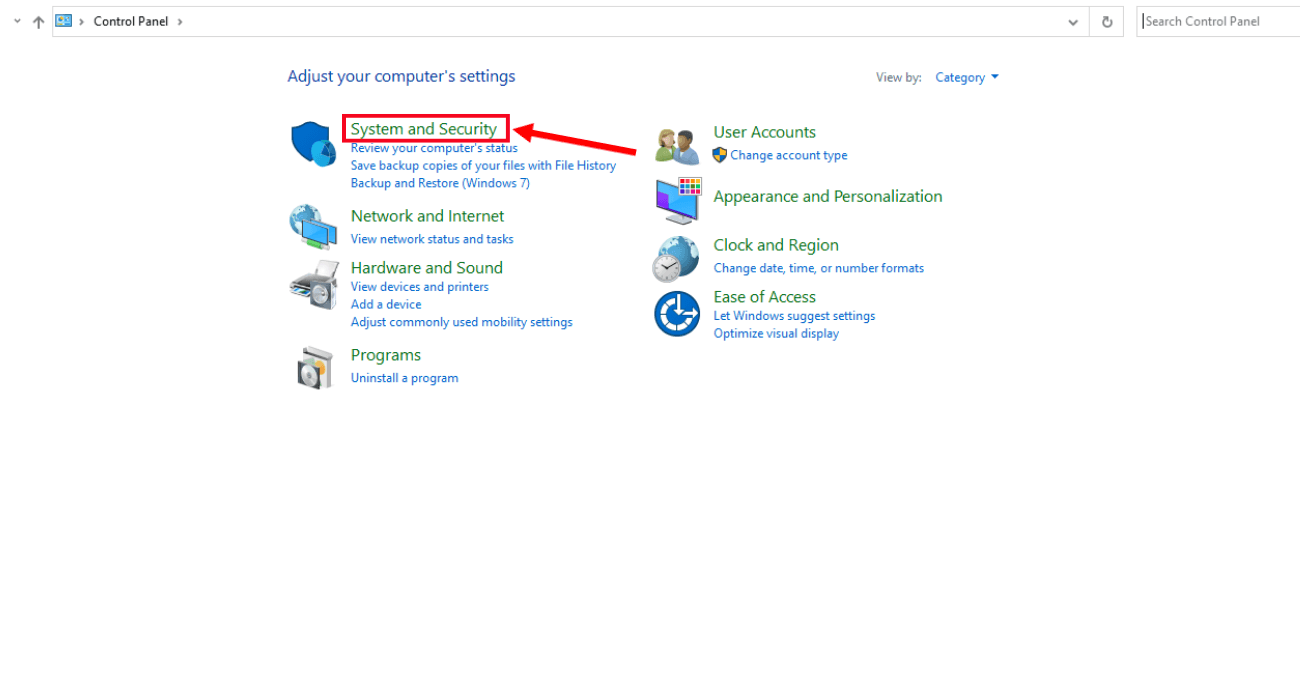
Step 1: Type and search 'Control Panel' in the Windows search bar. Then, select 'System and Security.'
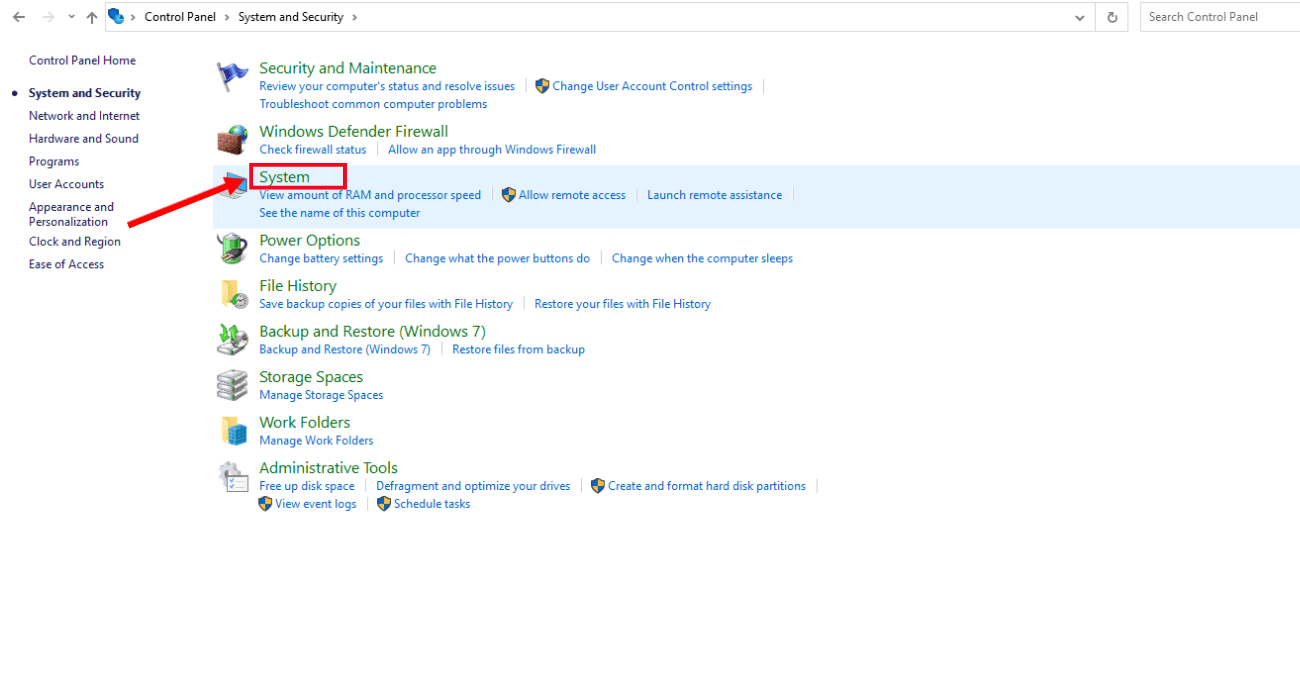
Step 2: Next, hover over the 'System' option, or you can type System and Security > System in the search bar.
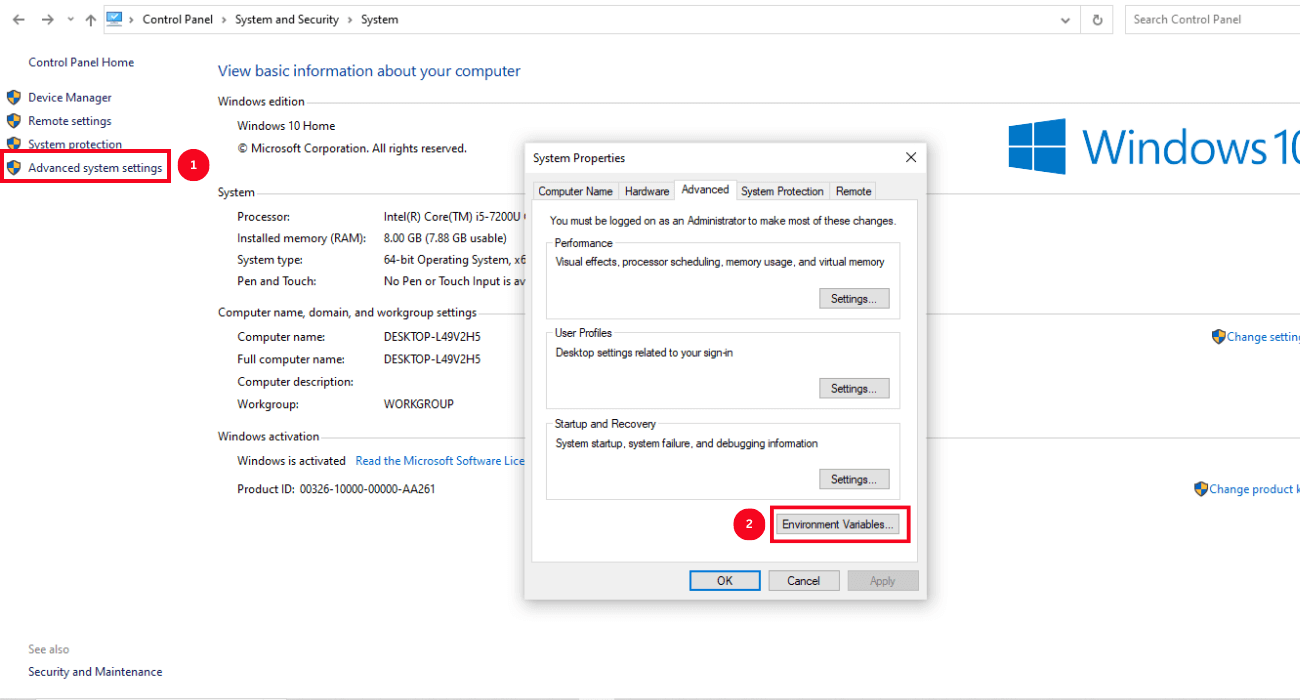
Step 3: A new screen will appear where you can navigate to the 'Advanced system settings' section. Here, select 'Environment Variables.'
Step 4: From the 'System Variables,' proceed to the 'Path' variable section and click 'Edit...'
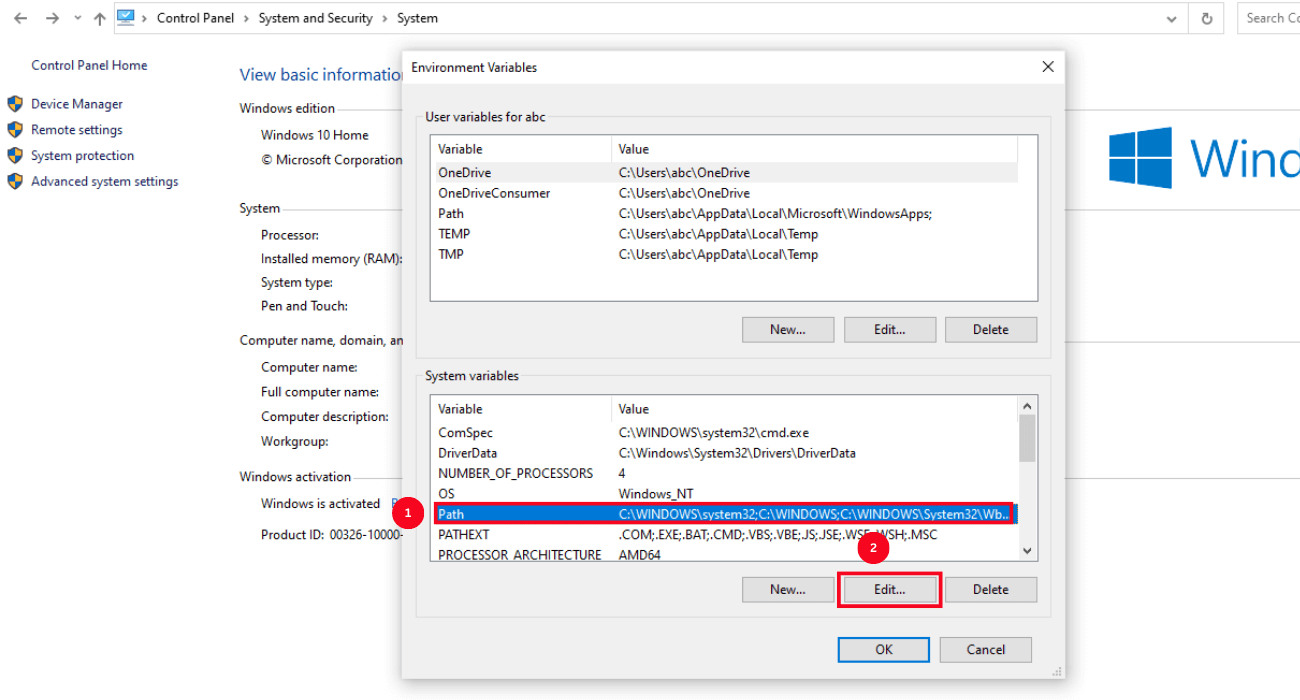
Step 5: In the 'Edit environment variable' window box, type 'C:\Users\UserName\AppData\Roaming\Zoom\bin' and finally select 'OK.'
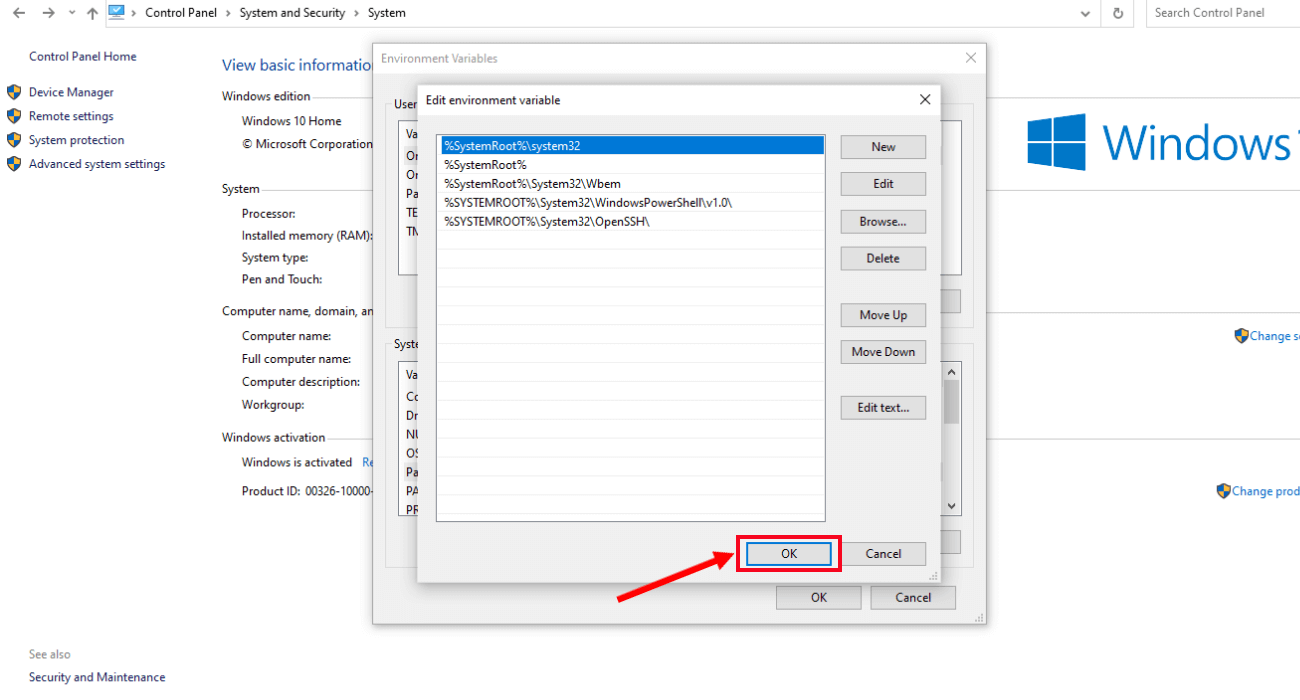
These simple steps will help you convert the recording of the Zoom session into MP4 formats on Windows.
Advantages:
zTscoder for Windows lets you convert Zoom recordings that are not visible in the Zoom desktop client.
The free and open-source tool ensures you can convert recordings without installing any third-party software.
Disadvantages:
zTscoder for Windows can be slow for large recordings. If you have a long Zoom recording, it may take a few minutes for zTscoder to convert it into MP4.
Method 3: Use Transcode on macOS
Similar to zTscoder for Windows, Transcode is a free and open-source tool that can convert Zoom recordings to MP4. However, it's important to note that Transcode is platform-specific and may not be suitable for users operating on other platforms, such as Windows or Linux.
Here's how to convert Zoom recordings to MP4 using Transcode.
Step 1: Double-click on the .zoom file you wish to convert. Click 'Open With.' If you see the 'Transcode (By Default)' option, click it to start the conversion.
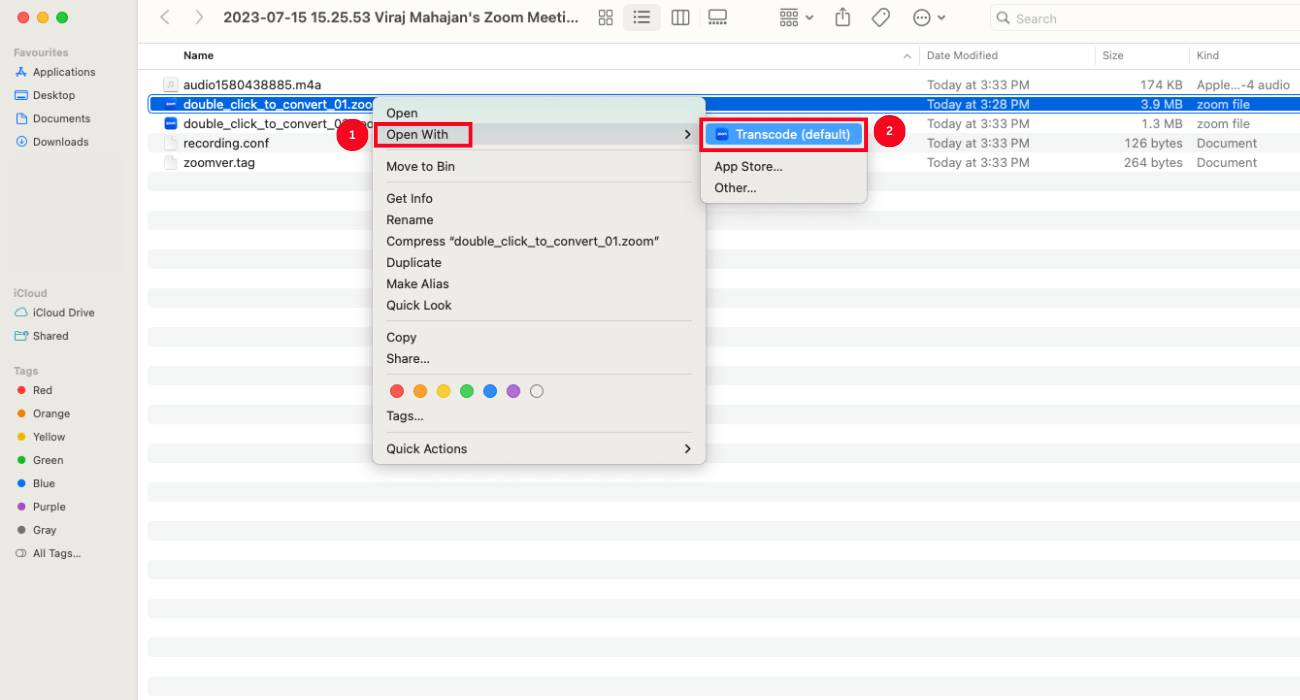
If you cannot see the option to convert the recording directly, follow the below steps.
Note: If you see the prompt, 'There is no application set to open the document,' select 'Choose Application.' Alternatively, right-click on the .zoom file and click Open with > Other.
Step 2: On your keyboard, press Command, Shift, and G simultaneously. Go to the path: Applications\zoom.us.app\Contents\Frameworks\.
Step 3: In the 'Frameworks' folder, enable 'All Applications.' Next, check 'Always Open With,' select 'Transcode.app', and open.
Step 4: The conversion will start. Once it is completed, select a folder to save the converted MP4 file.
Advantages:
Transcode offers an intuitive and user-friendly interface, making it easy to navigate and utilize for conversion tasks.
Disadvantages:
Transcode is specifically designed for macOS, so it may not be suitable for users operating on other platforms.
Fully customizable scheduling, live meeting notes, and ready-to-use AI summary templates to streamline and automate your meeting processes.
Method 4: Switch with new .zoom files
Converting Zoom recordings to MP4 can be a challenge, but there is a workaround that can work in some cases. This method relies on the fact that Zoom converts recordings to MP4 automatically when the meeting ends.
To use this method, you must create and record a new meeting. Once the session ends, the newly created recording will be converted to MP4. You can replace the new recording file with the previous non-converted files. This will trick Zoom into converting the earlier files to MP4 as well.
Here's how to convert Zoom recording to MP4 using the new .zoom files method.
Step 1: Head to the Zoom app and click 'Meetings.' Select 'Recorded' and choose the file you want to convert. If the file is not visible on the Zoom desktop client, head to the Zoom folder and copy the '.zoom' files you want to convert to MP4.
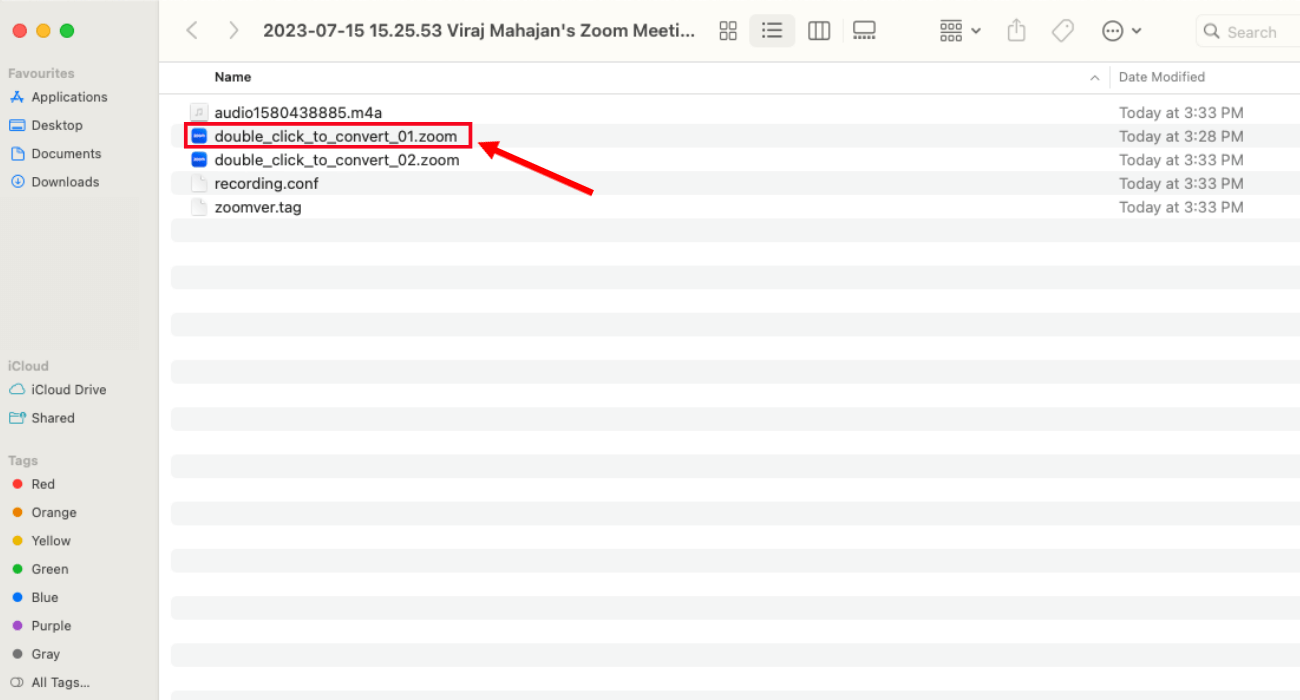
Step 2: Open the Zoom app and start a new meeting. At the bottom toolbar, click 'Record' to start recording the session. After a few minutes, pause or stop the recording in the active Zoom session.
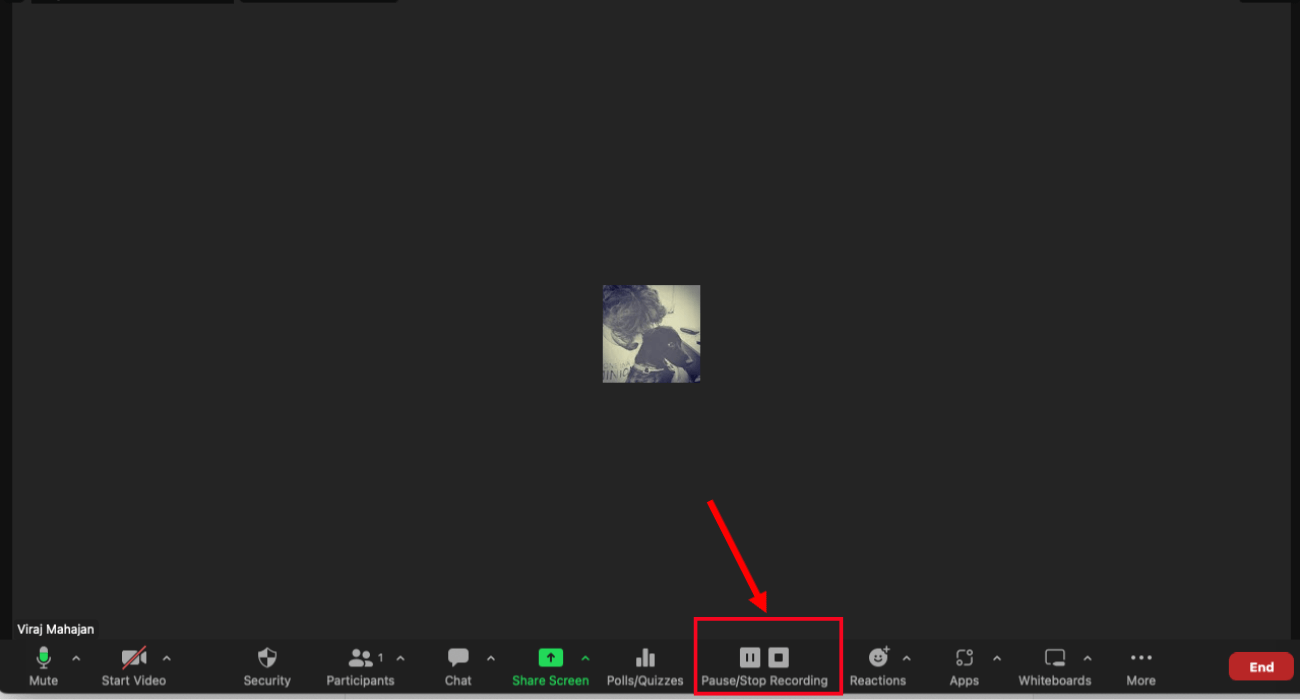
Step 3: The new recording will create another folder in Zoom. Move to the local directory to access the new '.zoom' file.
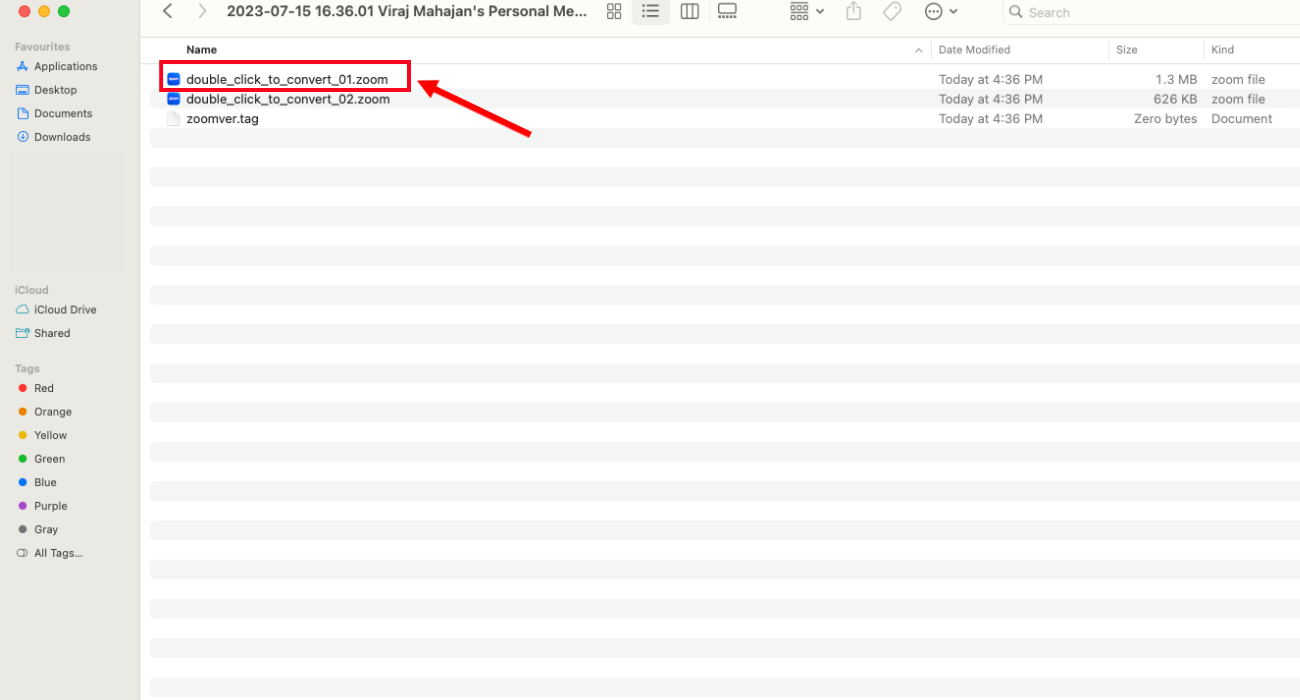
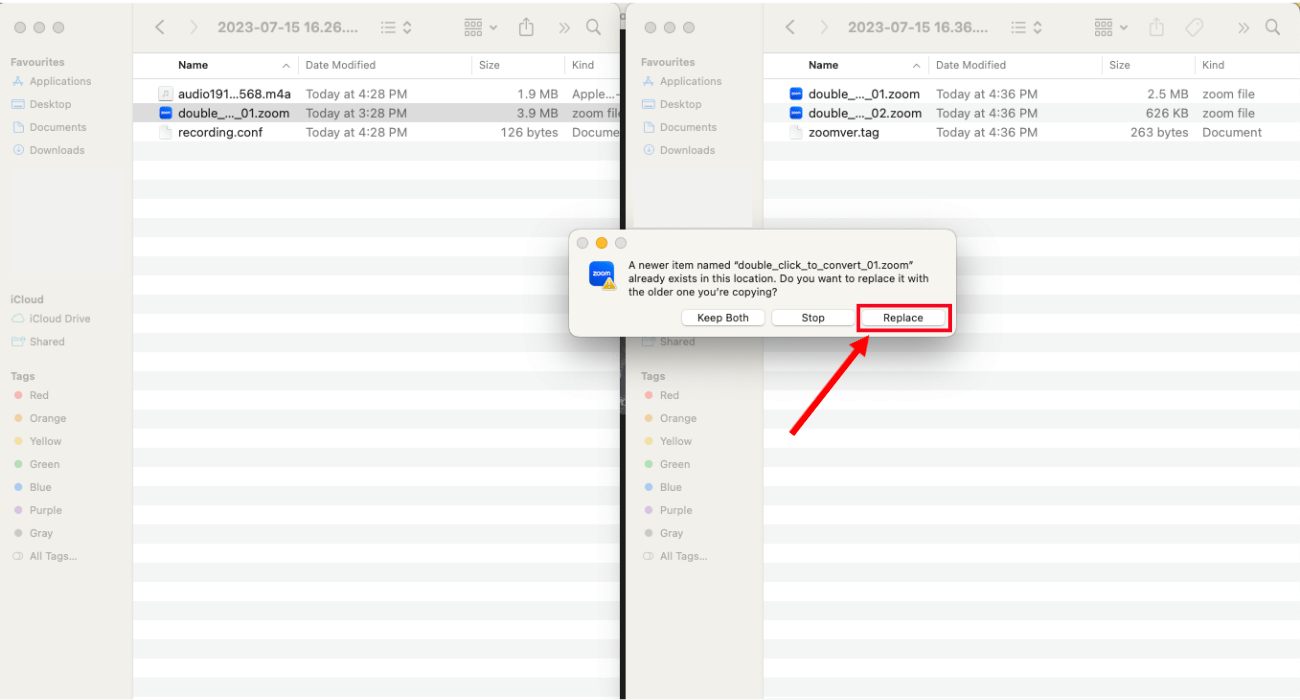
Step 4: Copy the desired '.zoom' recording file that you intend to convert to MP4 format. Paste the file into the newly created Zoom folder, which contains the ongoing recording. When prompted, select the option to 'Replace' the ongoing meeting with the older recording.
Step 5: Proceed to the ongoing Zoom meeting and click on the 'End' button, followed by 'End Meeting for All,' to conclude the session.
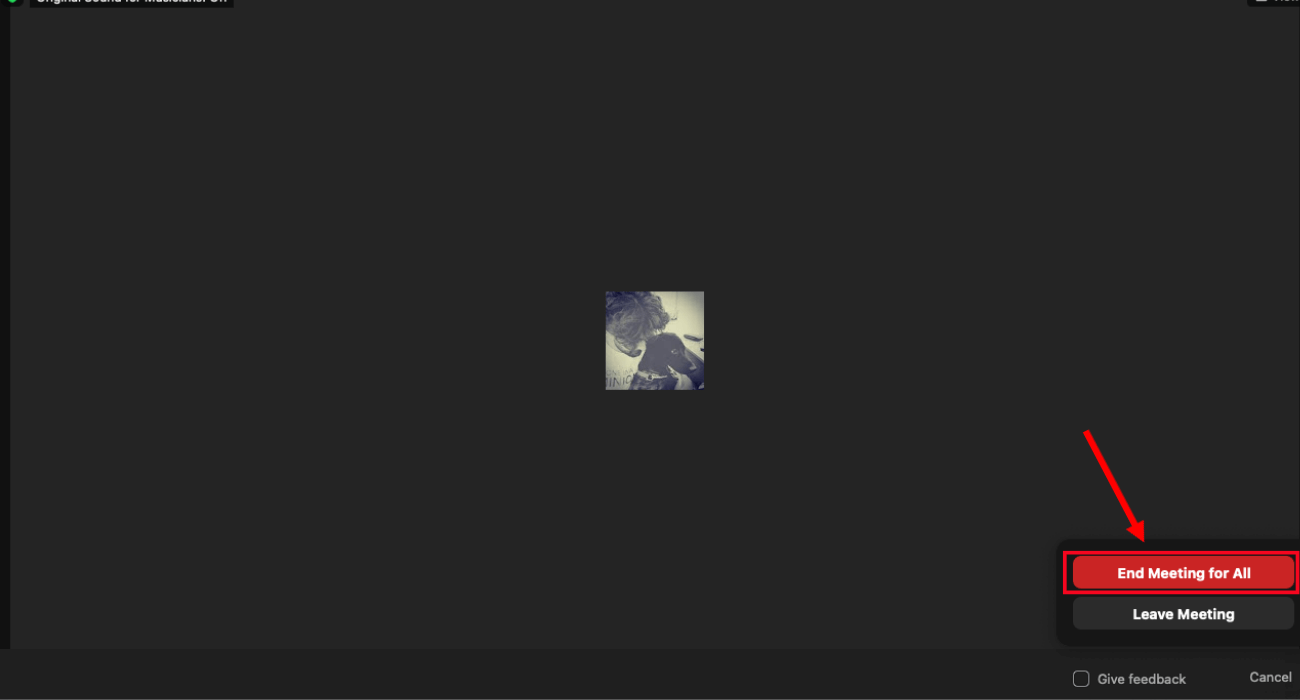
Step 6: Zoom will now initiate the conversion process and ensure the files are successfully converted this time.
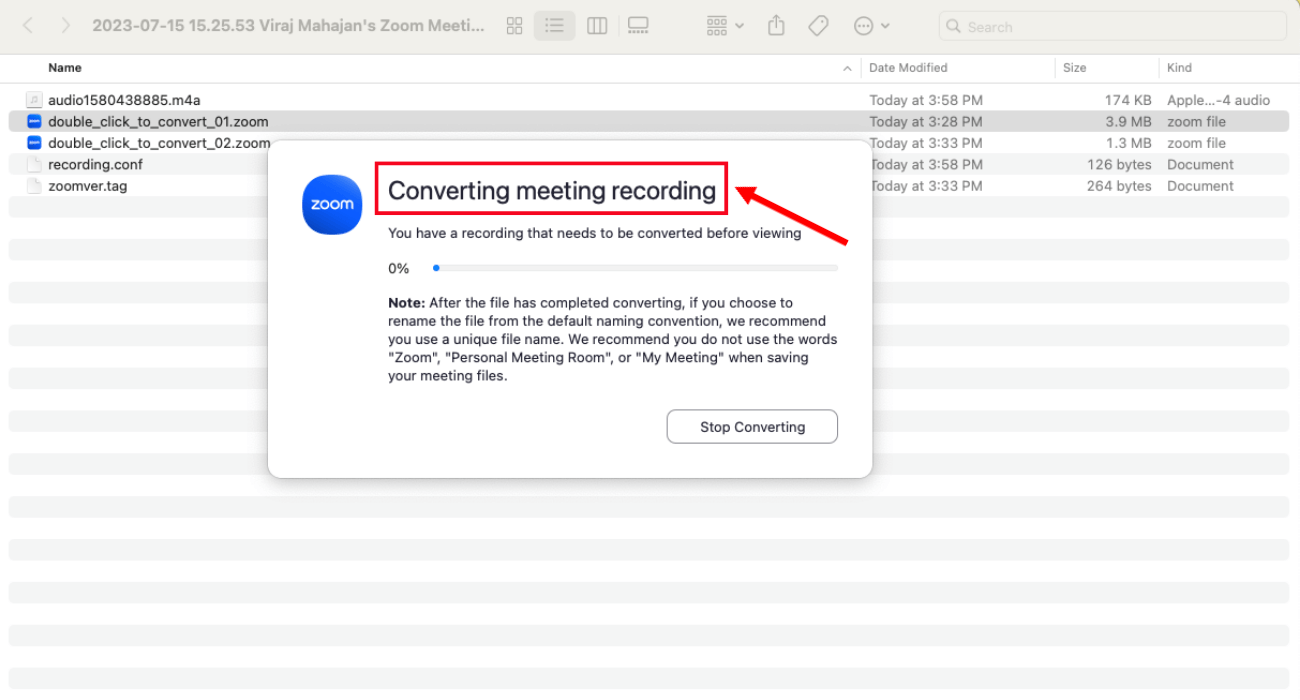
Advantages:
This method works in most cases and helps users convert Zoom recordings to MP4.
This method involves using the built-in feature of Zoom and only requires copying and pasting the file, making it quick and straightforward.
Disadvantages:
Executing the method might be challenging for some users.
FAQs
What format are Zoom meetings recorded in?
Zoom local and cloud recordings are generally saved in MP4, M4A, M3U, TXT, VTT, and CC.VTT formats. Let's understand these file formats below:
MP4: It is the audio or video file named as video[random number].MP4 by default.
M4A: It is the audio-only file named audio[random number].m4a by default.
M3U: It is the playlist file to play all individual MP4 files. By default, the playlist is named playback[random number].m3u.
TXT: It is the text file that contains saved in-meeting chat messages. By default, the TXT file is named chat.txt.
VTT: The text file contains the audio transcription for the Zoom cloud recording.
CC.VTT: The text file contains closed captioning for the cloud recording.
How do I turn my Zoom recording into a Transcript?
Turning Zoom recordings into transcripts is a great way to ensure you've all the vital information handy without going back and forth, listening to the audio, or watching the video. However, manually converting recordings into transcripts is not only a pain in the hands but also wastes your precious time.
One of the best ways to generate transcriptions is by using an online transcription tool like Notta. It can seamlessly integrate with apps like Zoom to accurately transcribe meetings in 58 languages. Here's how to convert Zoom recording to transcript using Notta.
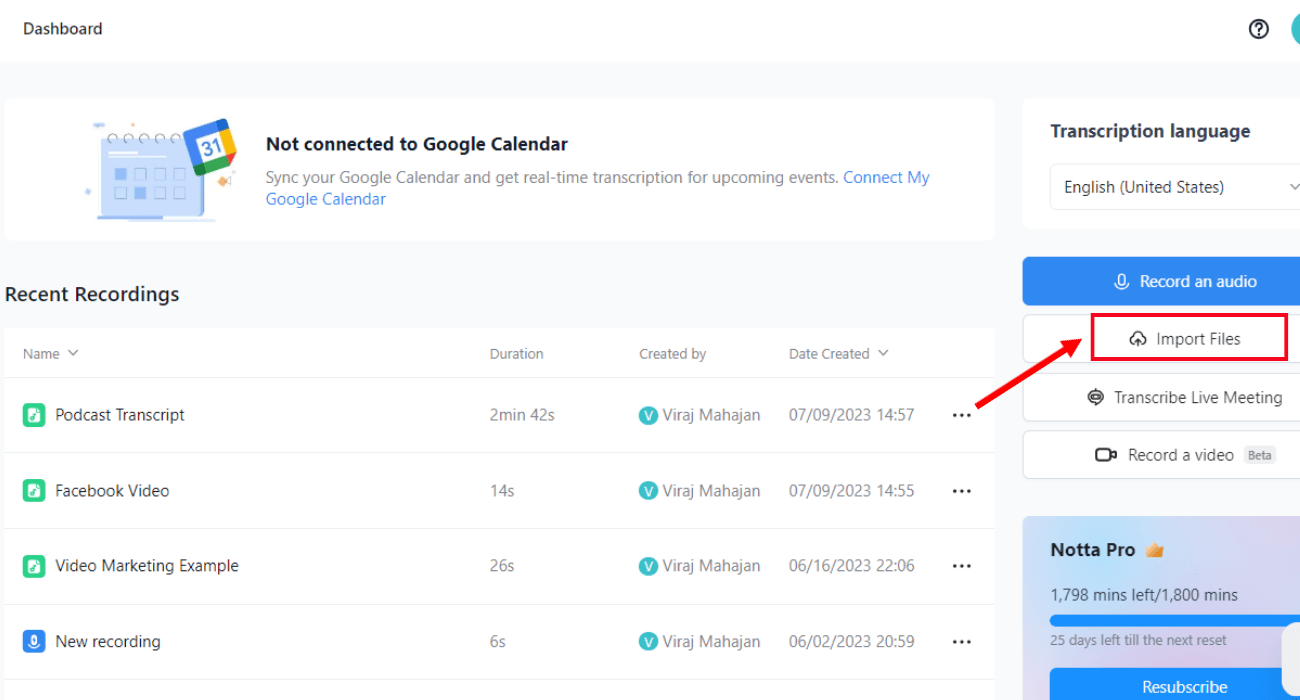
Step 1: Go to the Notta website and log in to your account. If you are using Notta for the first time, create an account for free. On the Notta dashboard, select 'Import Files.'
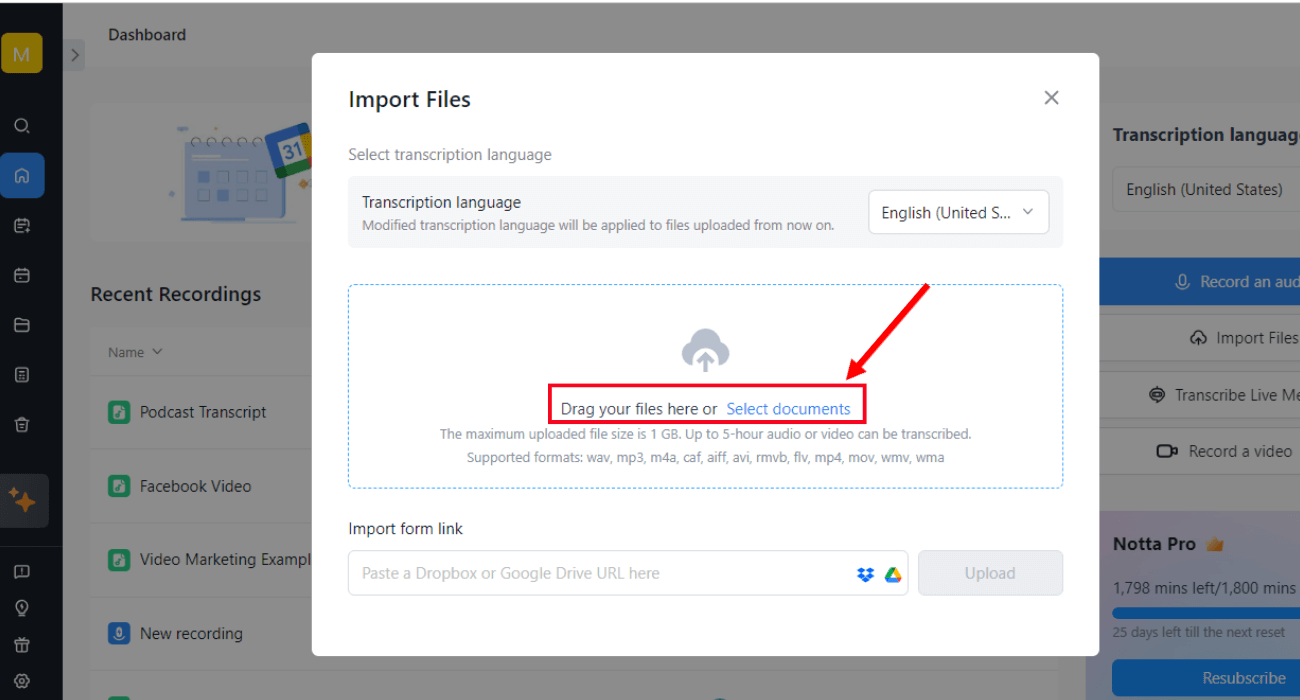
Step 2: Drag your files here or choose documents from your computer.
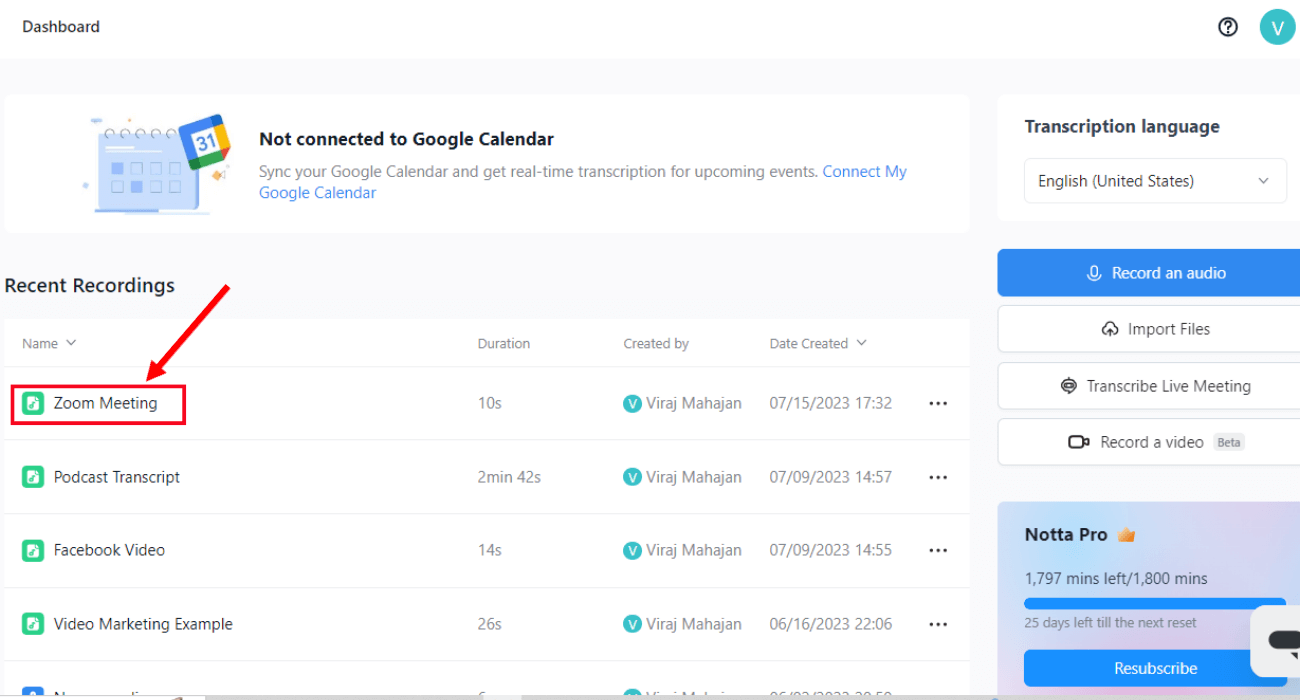
Step 3: Once you drop the file, Notta will automatically start the transcription process. You can find the transcribed audio under the 'Recent Recordings' section.
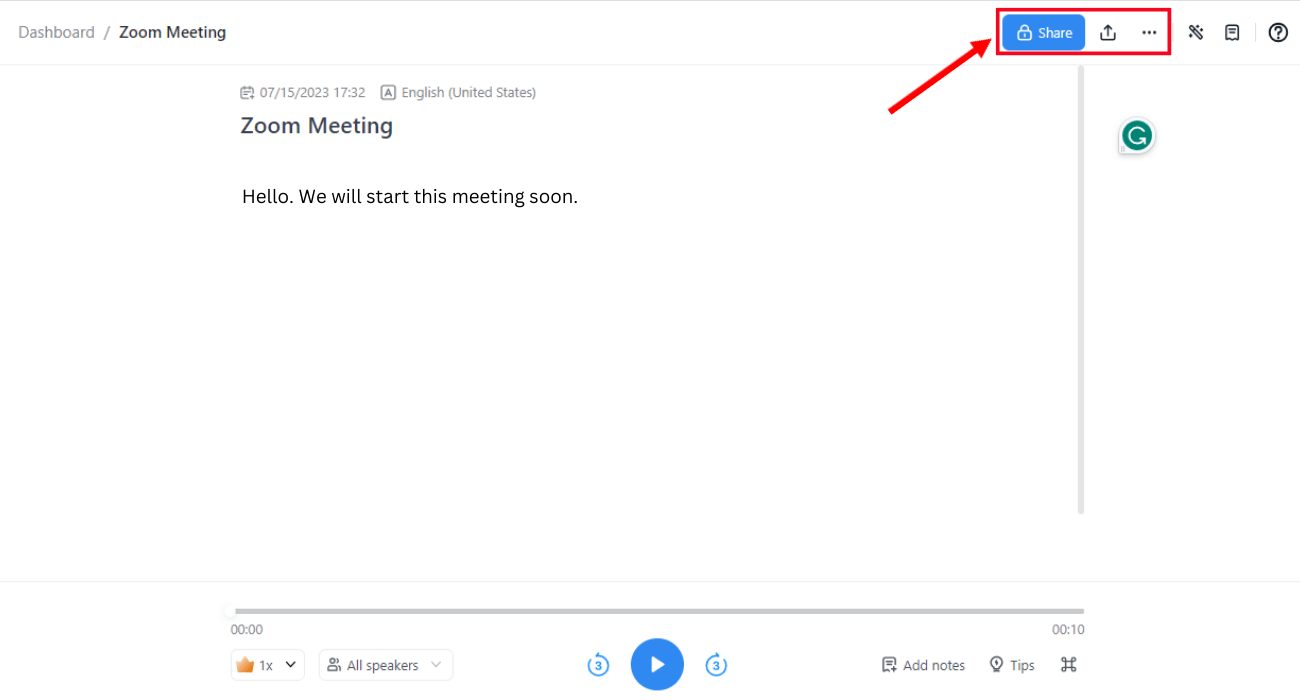
Step 4: Click on the transcript to export, edit, or share it with others.
Why is my Zoom video not converting?
There are multiple scenarios in which your Zoom video might not automatically convert to MP4.
Low Disk Space: Your computer may have insufficient disk space and show Error Code 614. In this case, you'll need to free up some disk space.
Invalid Path: Sometimes, the video conversion stops due to an invalid working path/folder or network connection. In order to resolve this issue, change the recording location and ensure it is a valid path string/folder.
Sometimes abnormal errors, invalid commands, file corruption, or logic issues can stop the conversion process.
Where do Zoom recordings go after converting?
All the Zoom recordings are automatically saved in a folder created by Zoom on your Windows or macOS.
Windows: Go to the 'Documents' folder and find the Zoom folder. You can find separate folders for all your Zoom recordings. In case you cannot locate the folder, go to C > Users > [Username] > Documents > Zoom.
Mac: Similar to Windows, you can find a separate 'Zoom' folder in the 'Documents' folder. Go to Users > [Username] > Documents > Zoom to find the recording folders.
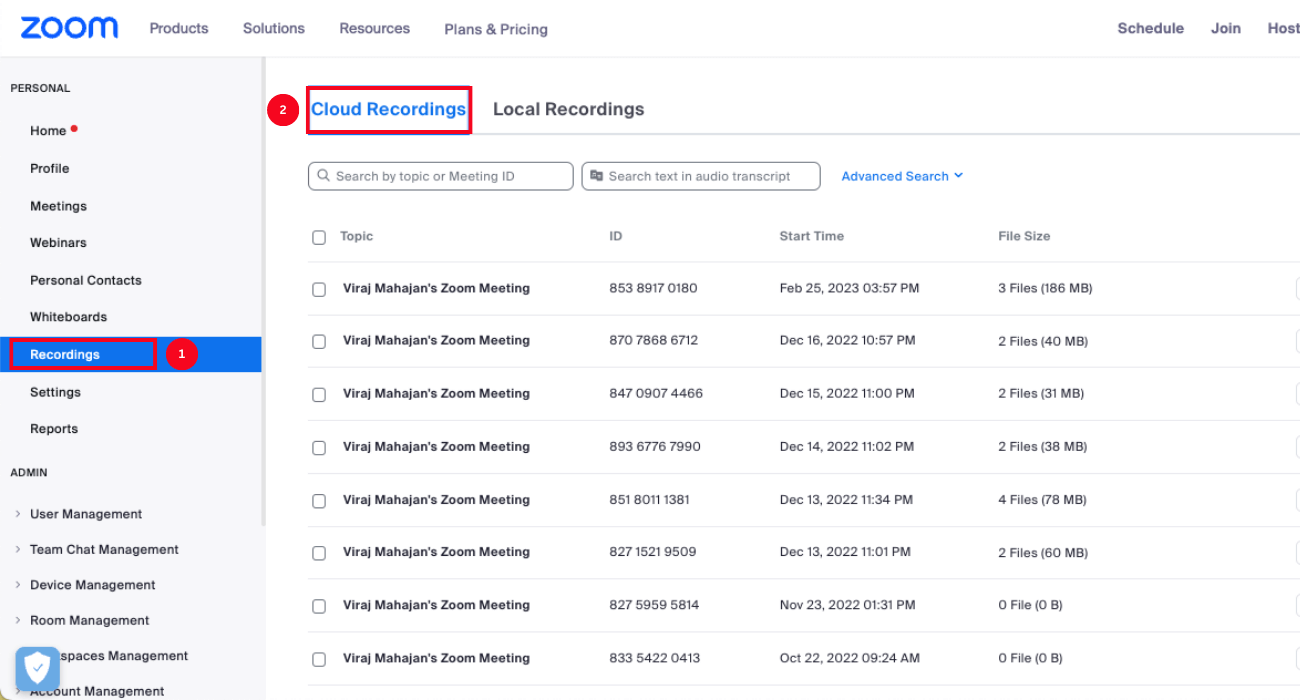
Web Portal: If you are cloud recording your Zoom meeting, you can find the recordings in the Zoom web portal. Sign in to your account and select the 'Recordings' tab. Click 'Cloud Recordings,' and you'll find the entire list.
Notta is a powerful meeting assistant that can help transcribe virtual meetings on Zoom, Microsoft Teams, Google Meet and Webex in real time and convert meeting recordings in seconds.
Key takeaways
All the methods for converting recordings into MP4 format are effective but have advantages and disadvantages. Depending on your recording needs and preferences, you can choose the suitable approach to convert Zoom recording to MP4.
In addition to converting Zoom recordings to MP4, you can use a tool like Notta to generate meeting transcripts. Notta is a free and easy-to-use tool that can automatically transcribe your Zoom recordings into readable text, ensuring you never miss any information.
Sign up for a free Notta account to transcribe your meetings in a few clicks.