
How to Add Subtitles & Captions in iMovie (Mac/iPhone/iPad)
98% accurate, real-time transcription in just a few clicks. 58 languages and multiple platforms supported.
As a content marketing consultant myself, I've created more videos with subtitles and captions than I can even count — both for myself and my clients. Hence, I've seen firsthand how valuable and powerful they can be. An interactive video might catch the eyes of the viewers, but it's the caption and subtitles that help them learn the value it can provide.
While there are tons of video editing software, iMovie (which is available for free on Mac) is one of my favorite entry-level ones. Its Title feature can help you add subtitles and captions to the videos — without the need to learn any technical skills. Here, I'll share how to add subtitles in iMovie on Mac and even on iPhone or iPad.
Can iMovie automatically add subtitles?
No, iMovie does not automatically generate subtitles for the videos — but you can type subtitles or captions manually and then use the Title feature to add them to the video. The feature also allows you to adjust the font size, transitions and timings, font color, and caption positioning for a movie, sideshow, or video.
How to add subtitles or captions in iMovie on Mac?
Creating some great videos takes a lot of time and work. There's researching, writing, editing, and a lot more involved in the process. After all of that, you'll need subtitles and captions to improve the reach of content. Manually adding subtitles or captions to iMovie videos on Mac needs time and effort, but it's pretty simple. Here's how to add subtitles to iMovie on Mac.
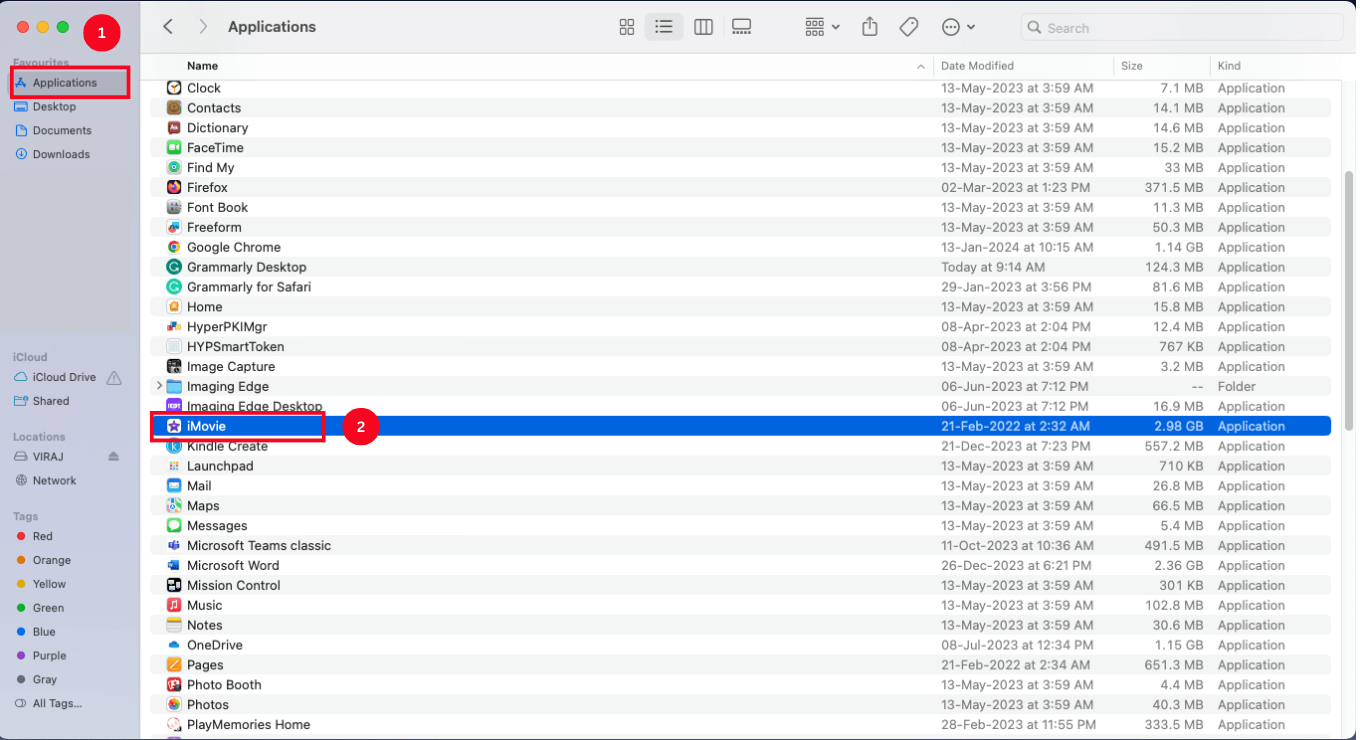
Step 1: The first step is to simply launch an iMovie application on Mac, which is generally available in the dock. If you can't find the app here, just head to the Finder > Applications folder and open iMovie.
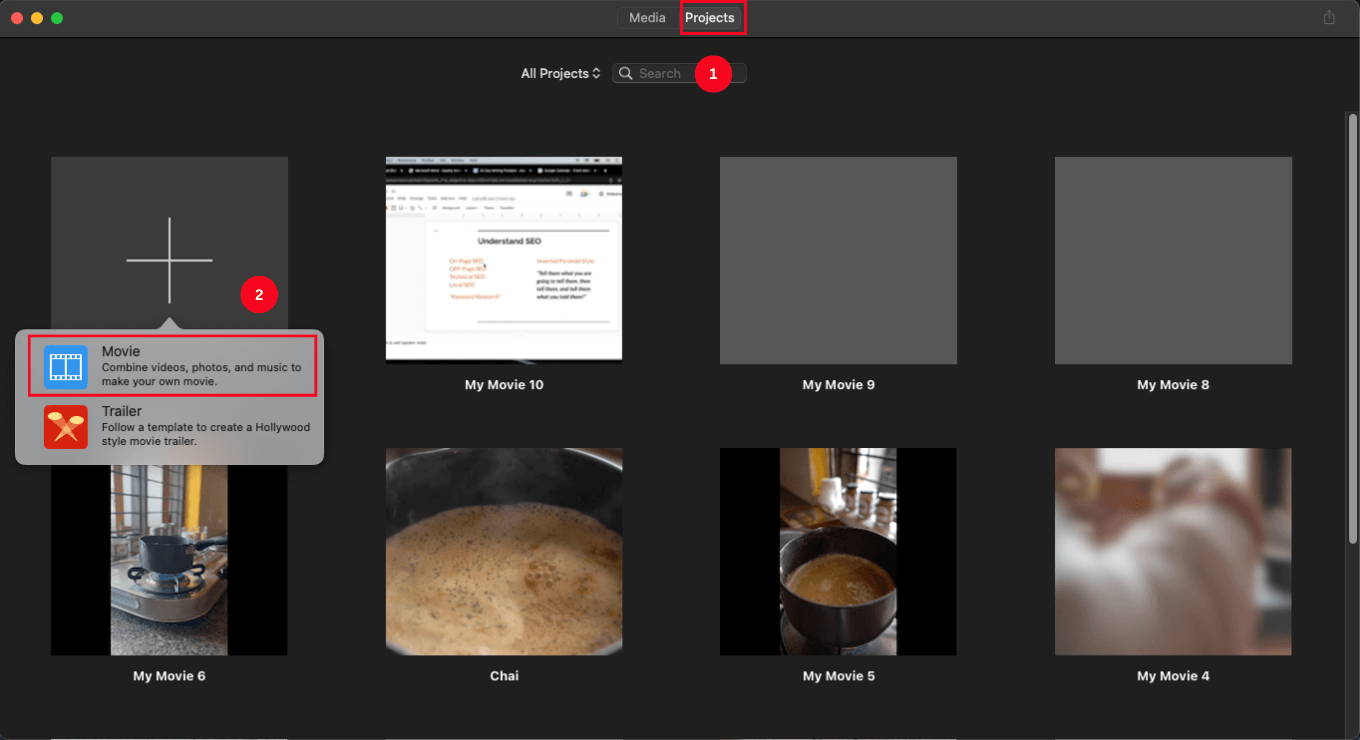
 Step 2: Next, you'll need to create a new project. For this, go to Projects > Create New and then select the ‘Movie’ option. Finally, import the video in which you'd like to add subtitles.
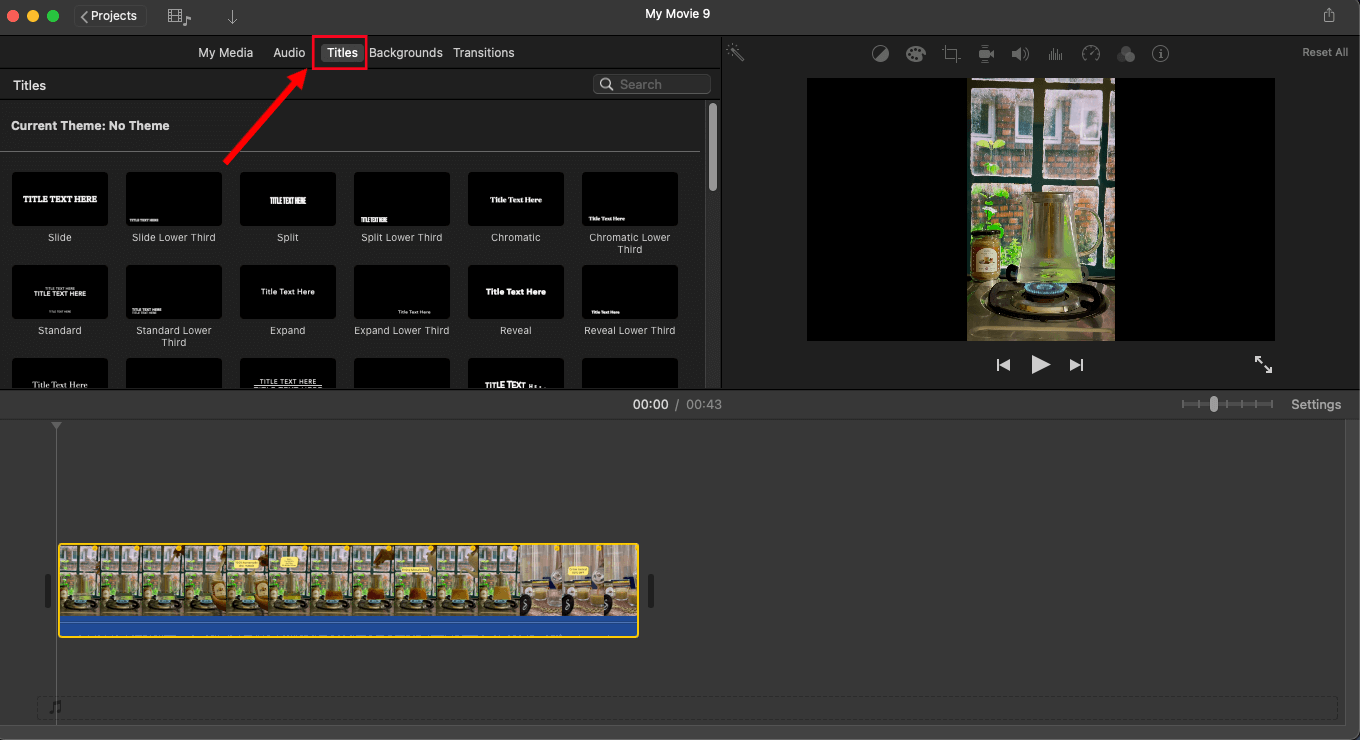
 Step 3: Locate and select the ‘Titles’ sign, followed by picking the title style of your choice from the available options like Split, Focus, Slide, and Expand. You can either drag the option to the desired location on the clip or double-click the preferred title (or subtitle) style to add it.
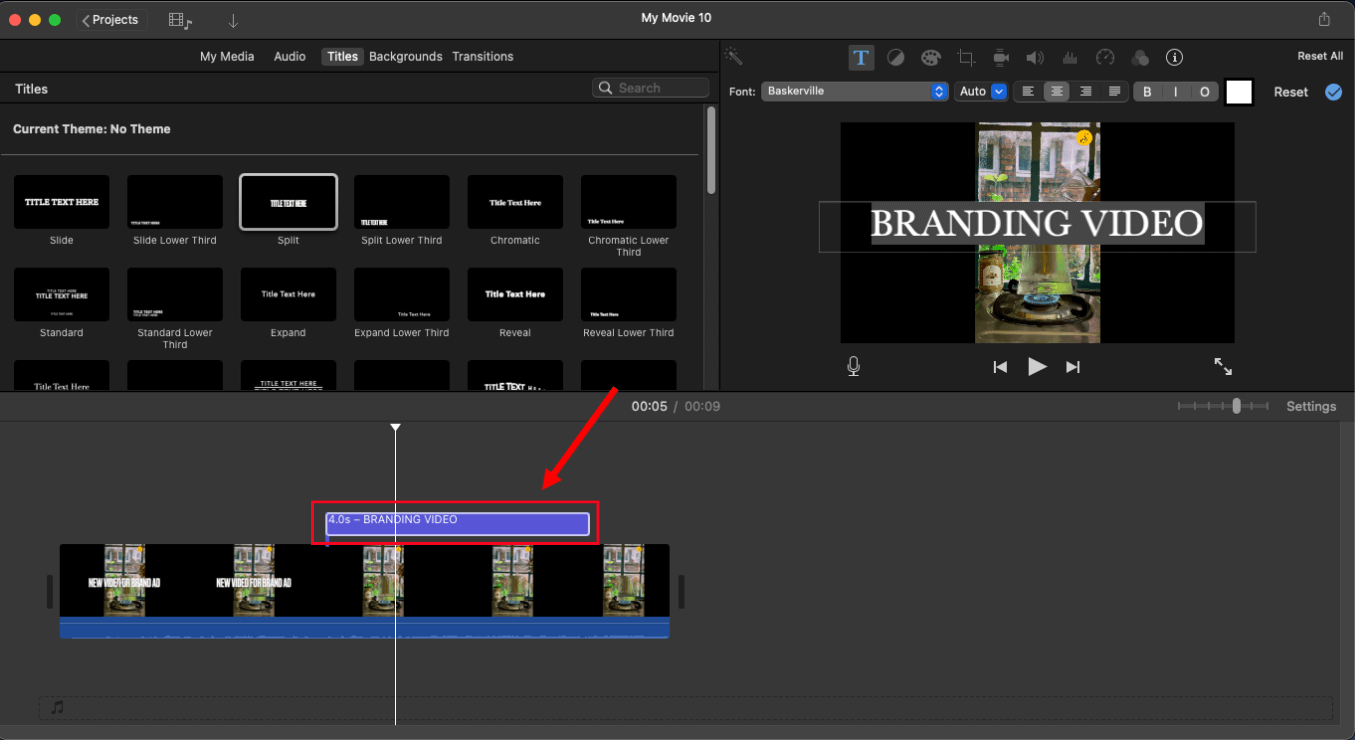
 Step 4: Now, drag and drop the Title box to the timeline and pick when you'd like to begin the subtitles. Each text box will be available above the video clip and have a timestamp on it. Start typing the subtitles or captions directly into the text box.
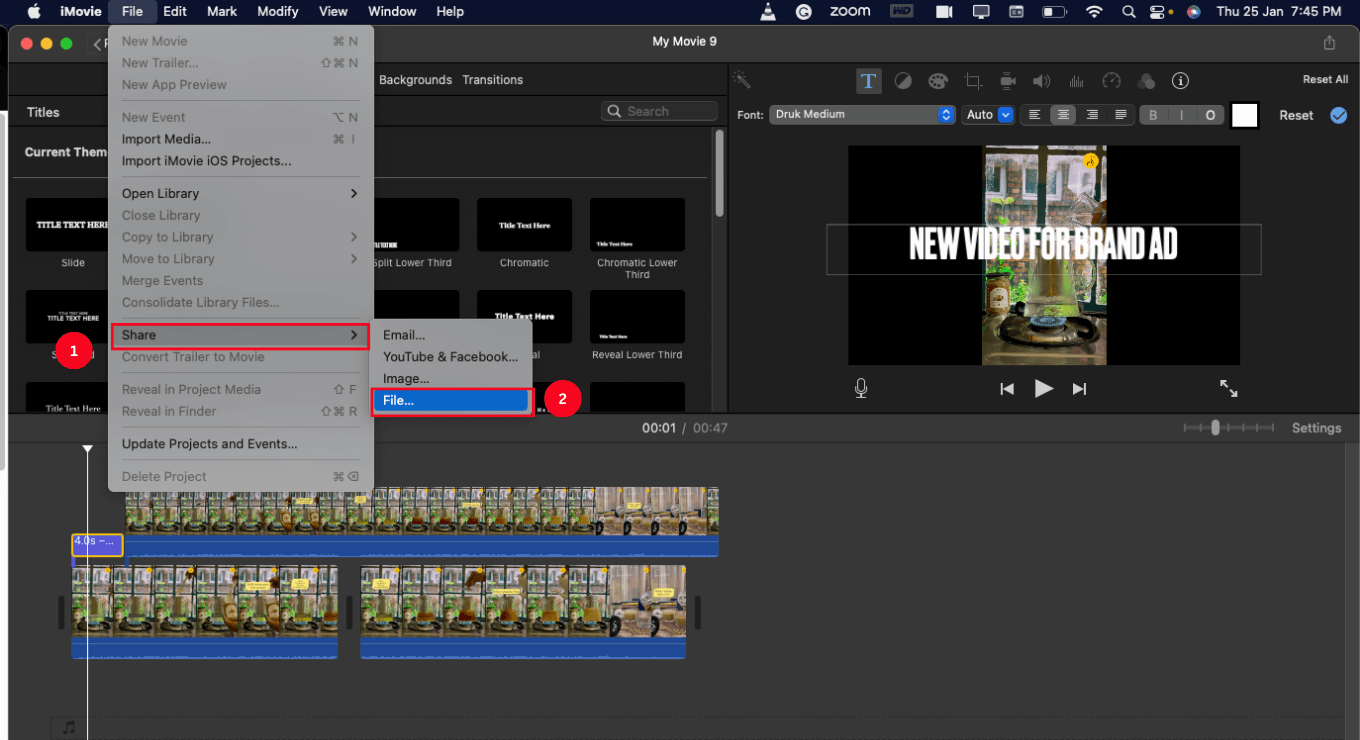
 Step 5: Once you've added all the subtitles or captions, the final step is to save the video. For this, select File > Share, followed by choosing the File again. Lastly, you can name the edited video and click ‘Save.’
How to add subtitles or captions in iMovie on iPhone/iPad?
Just like Mac, it's quite simple and straightforward to add subtitles and even captions to iMovie videos. Here's how to add captions in iMovie.
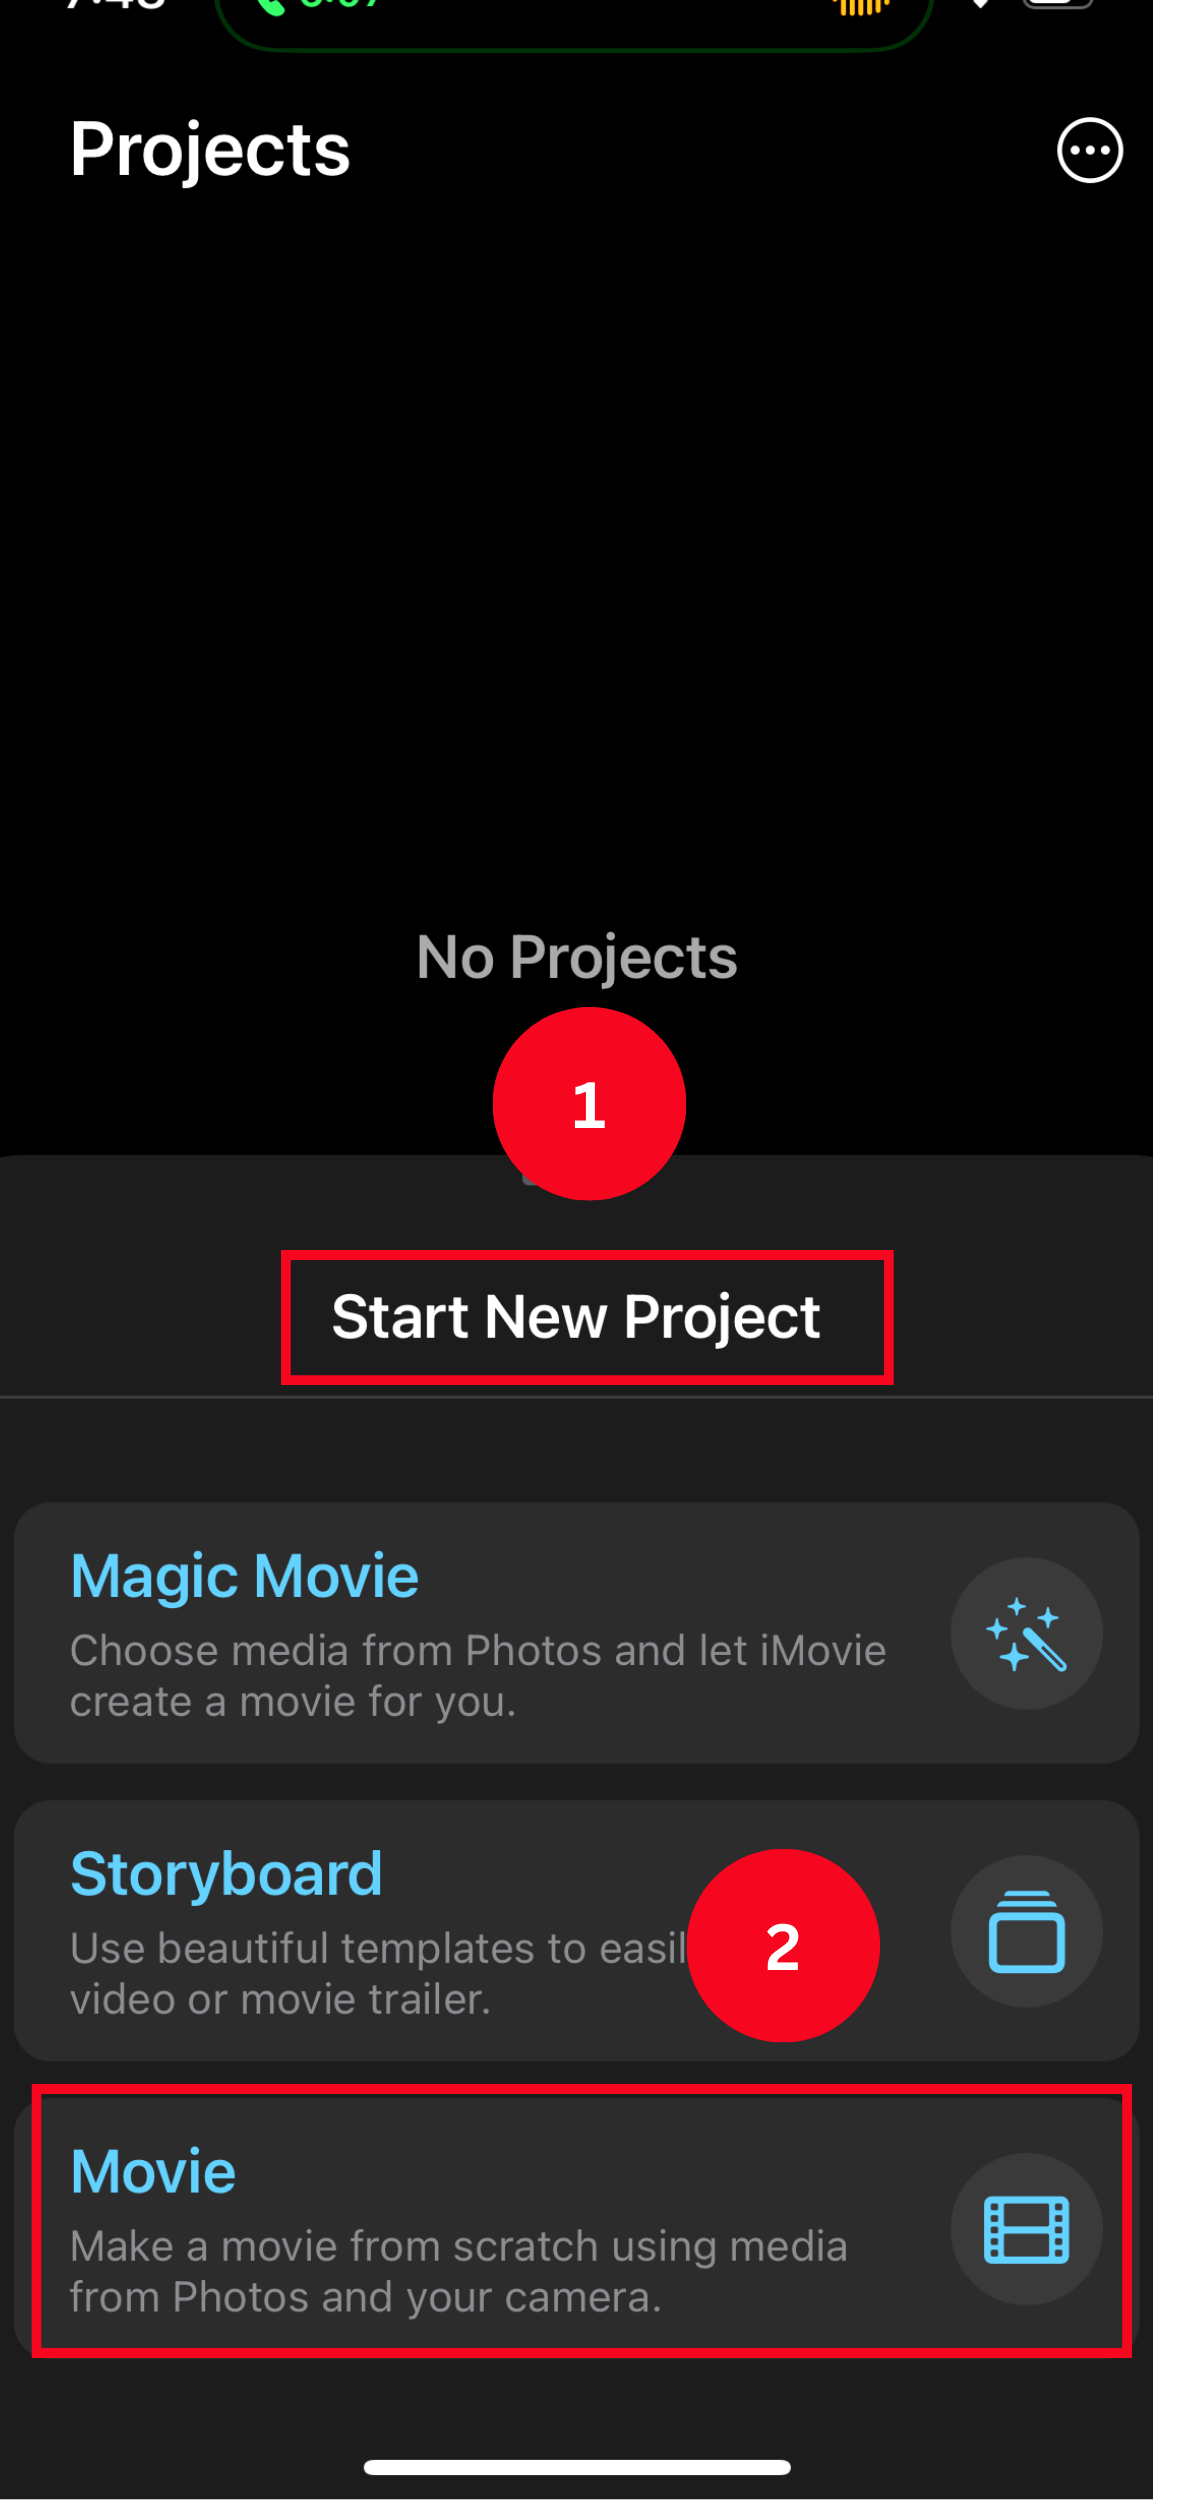
Step 1: Similar to Mac, launch the iMovie application on iPhone or iPad and locate the ‘Start New Project’ option. Click the ‘Movie’ icon and then import the video from the iOS device by selecting the ‘Create a Movie’ option.
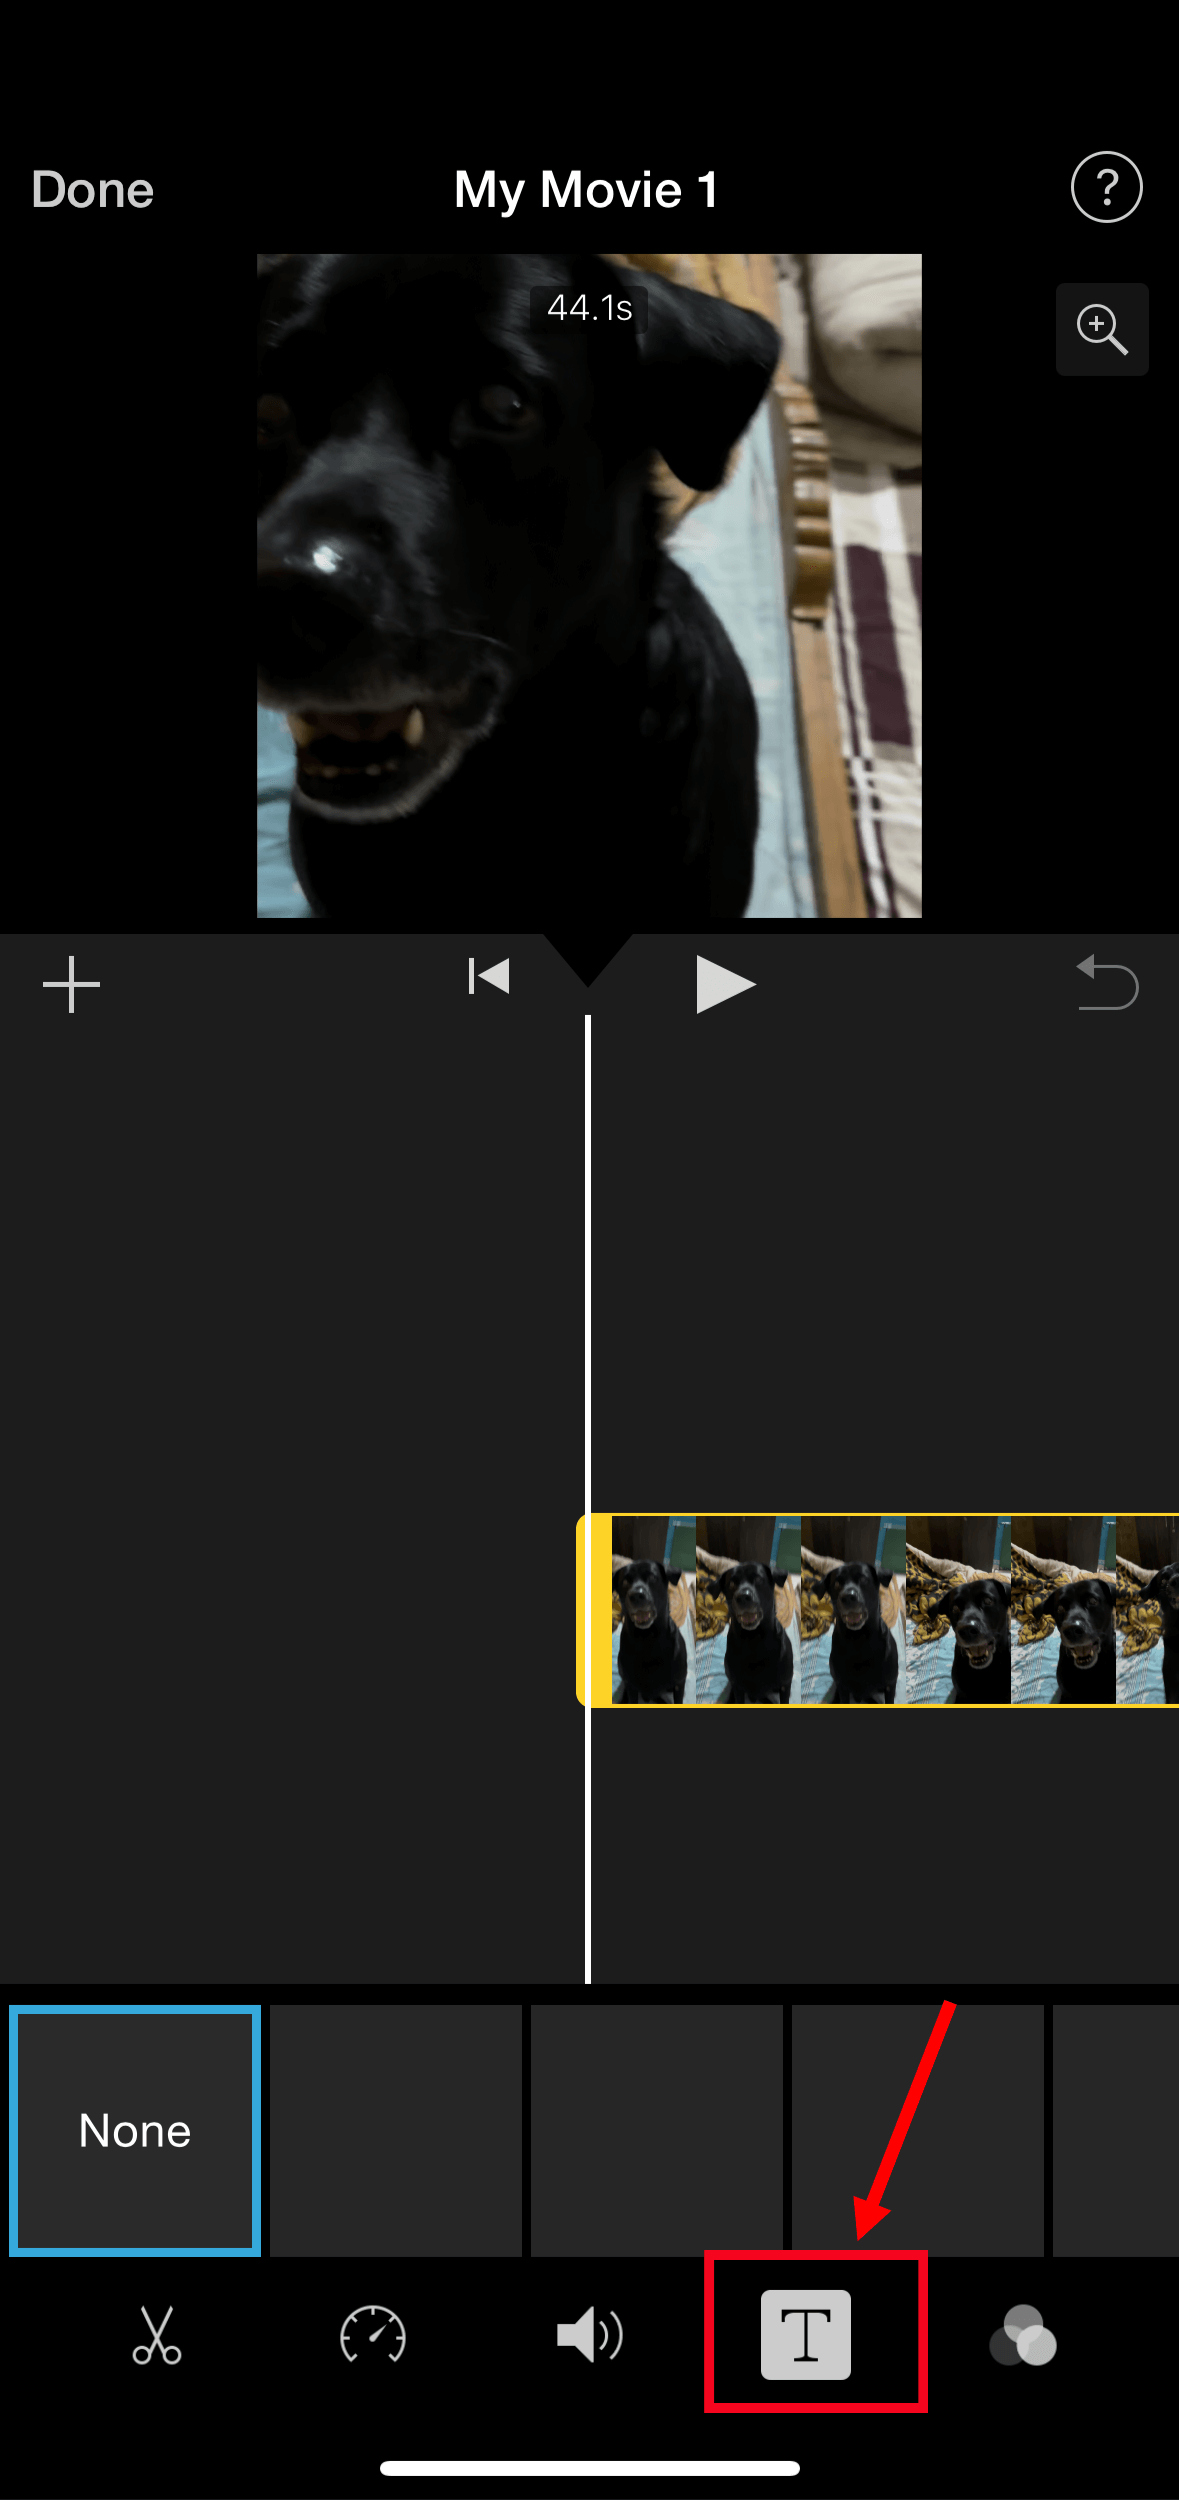
 Step 2: Next, select the media in the timeline, followed by the ‘T’ button at the bottom of the screen. A wide range of Title styles will be available beneath the timeline so you can choose the one that best suits your needs.
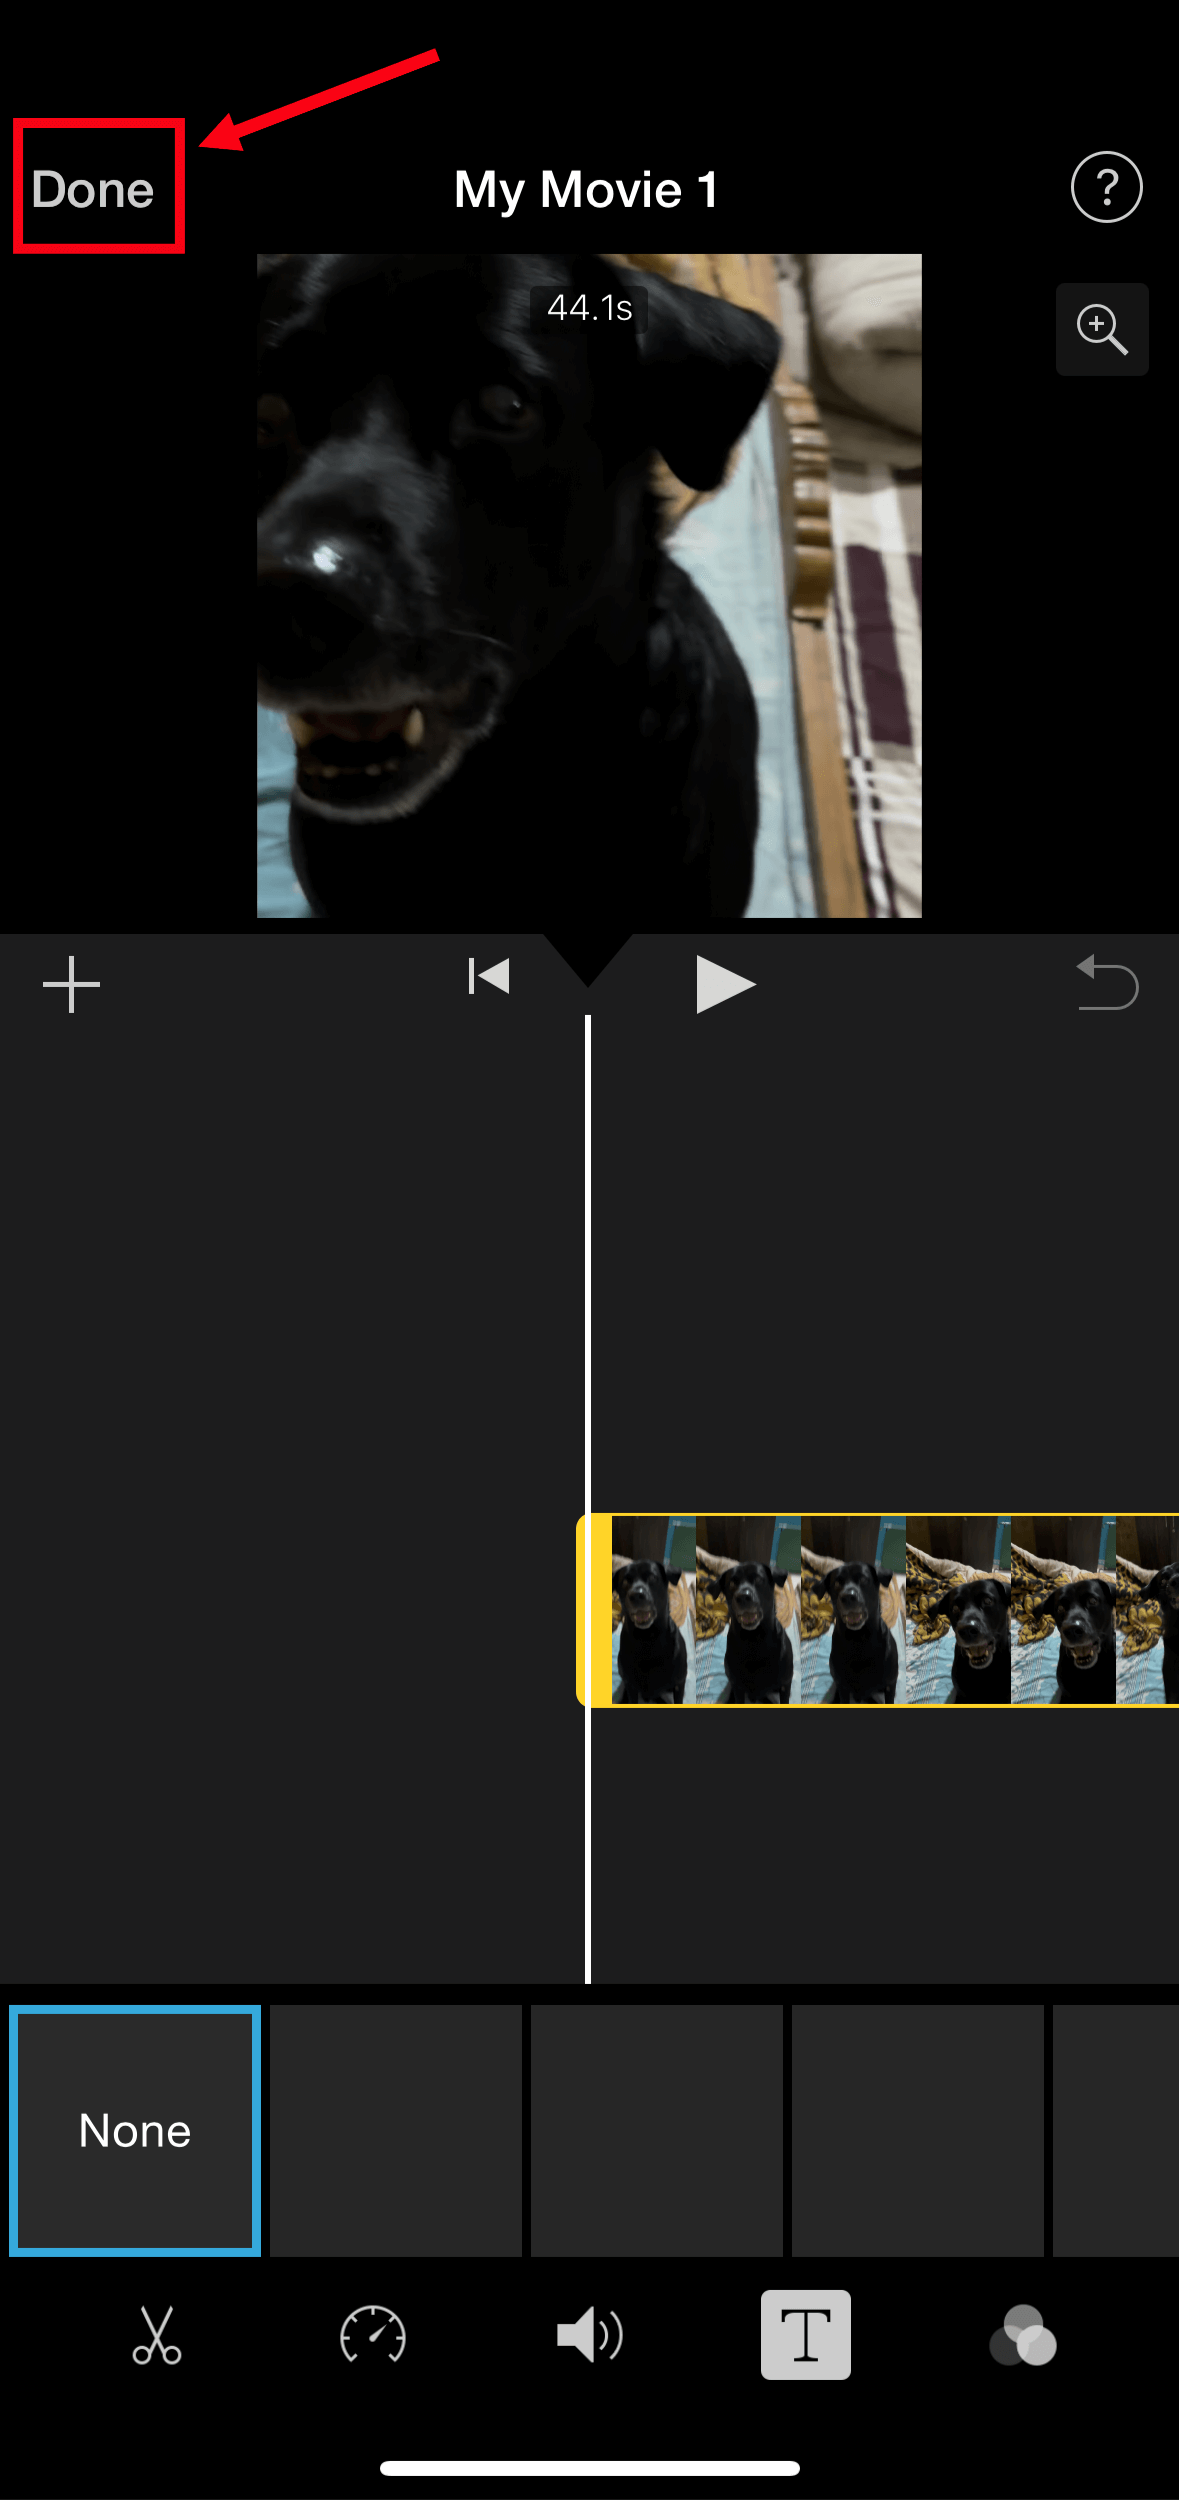
 Step 3: You can start typing the captions, and it'll appear at the top of the screen. In the top-left of the screen, click ‘Done’ and then select ‘Share’ to save the file.
Notta offers multi-language, accurate transcriptions to boost your video engagement.
How to edit and customize subtitles in iMovie?
iMovie is a decent video editing app for Mac, iPhone, and iPad and comes with a handful of advanced features to play with. It also integrates with iCloud Photo Library to easily preview or drag and drop clips into the timeline. If you want to further edit or customize the added subtitles on Mac, here are the steps you'll need to follow.
Open the video and click the Title box you want to edit. You can then double-click the subtitle you'd like to customize.
If you wish to open the text options, locate the ‘T’ icon and adjust the font type, font size, and alignment. The additional options like Italic (I), Bold (B), and Outlined (O) further improve the text style.
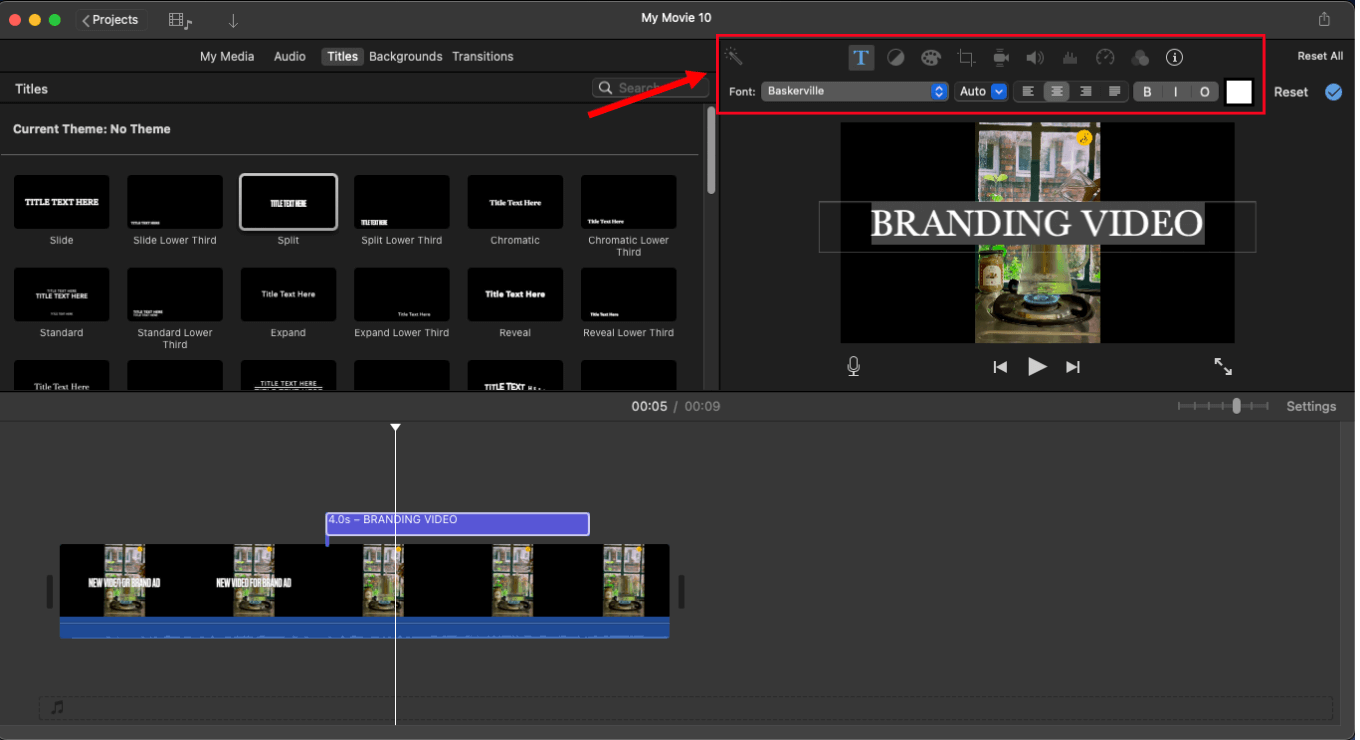
With the help of the subtitle (title) option in the timeline, you can even shorten or extend the duration of the subtitles by dragging the edges. Once done, you can export the video to save all the changes.
FAQs
How do I automatically create an SRT file from a video?
An SRT file is just a simple text file that's typically used alongside the video file. While you can manually listen to the video and convert the audio to text, it can be time-consuming. Thankfully, there's a solution — the Notta AI transcription tool. Here's how to automatically create an SRT file from a video.
Step 1: Open the Notta Web App on Mac or Windows. If you don't have a Notta account yet, create one and then log in with your credentials. In the right sidebar of the Notta dashboard, click the ‘Import Files’ option and drop the video.
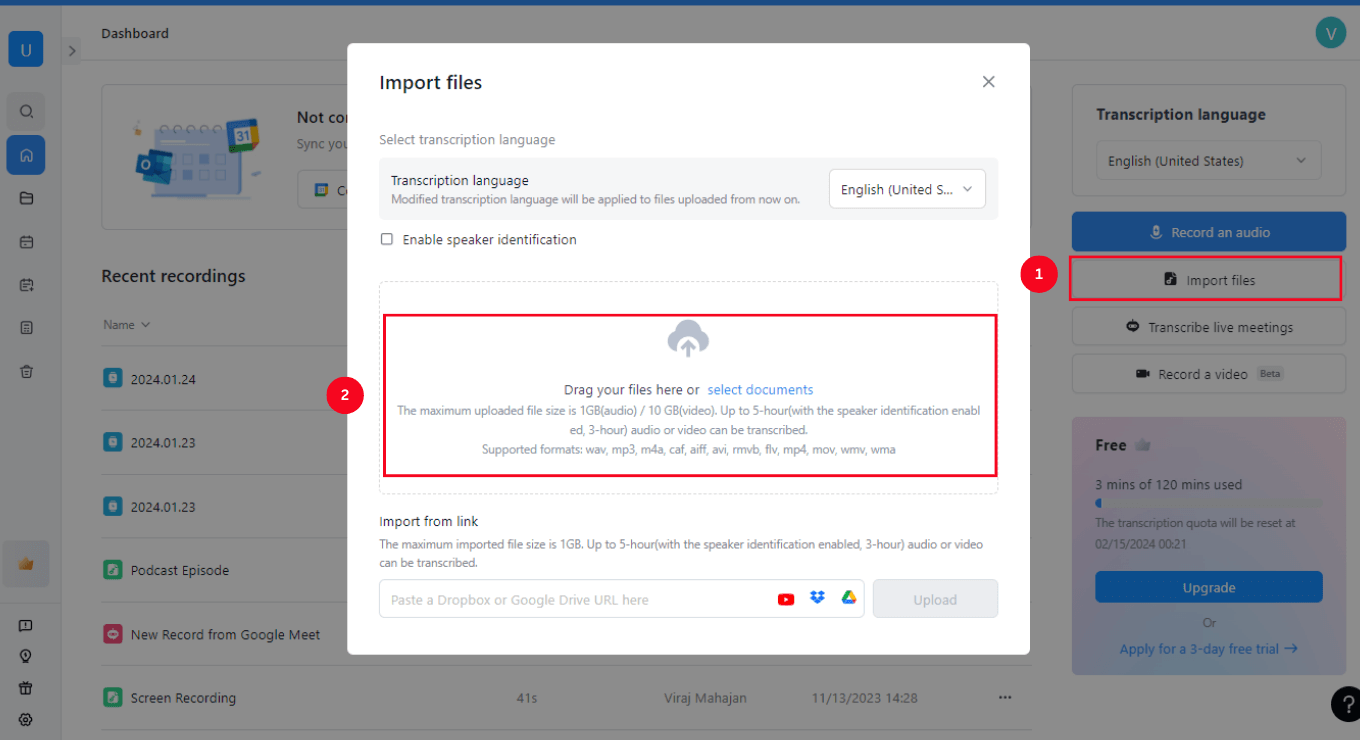 Step 2: Wait for a few minutes, as Notta will capture the voice from the uploaded video and then convert it into subtitles with maximum accuracy. Once done, double-click and open the recently transcribed file available under the ‘Recent Recordings’ section.
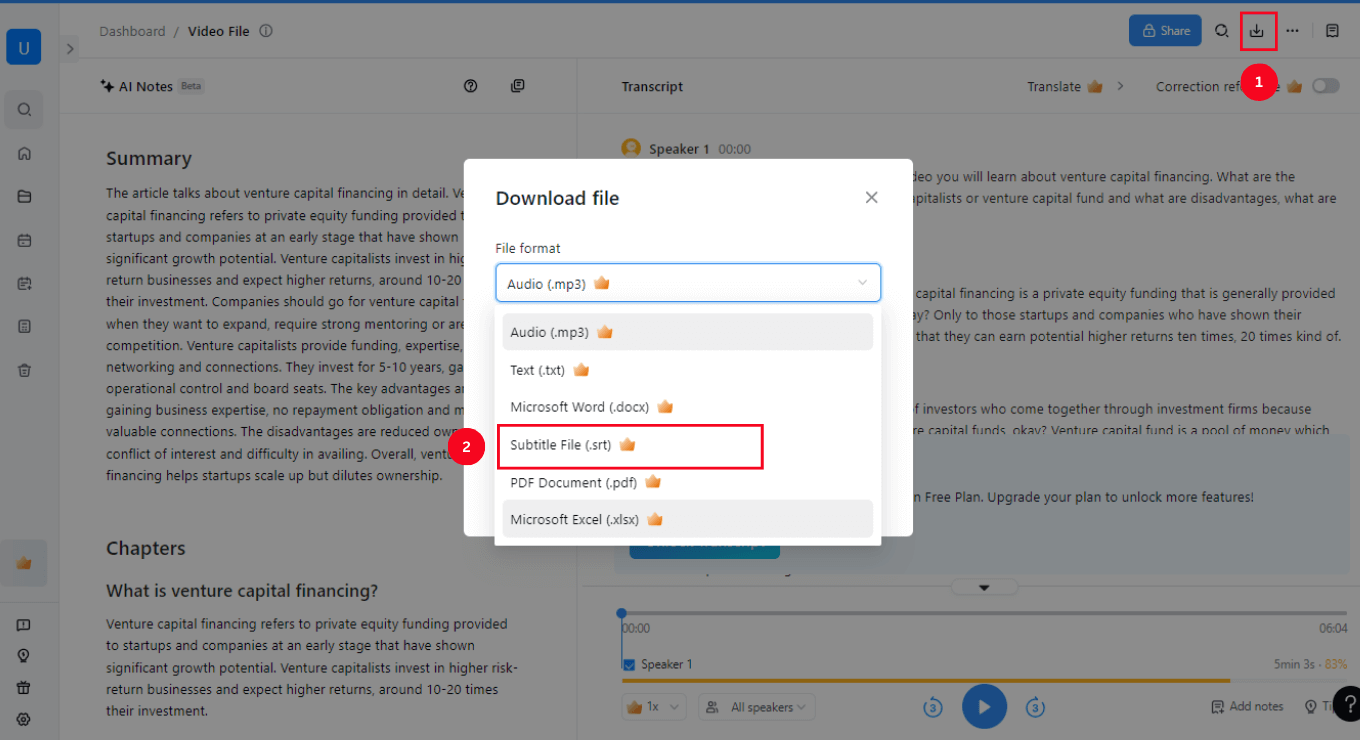
Step 3: At the top-right corner of the transcript page, locate and select the ‘Download’ icon. This will open a pop-up asking you to choose the file format. Choose ‘Subtitle File (SRT)’ and finally select the ‘Export’ option.
How do I add background subtitles in iMovie?
In order to add background subtitles in iMovie, just click any area of the video where you'd like to add the subtitles. The next step is to select the ‘Titles’ option typically available in the top toolbar of iMovie. Type the text and then adjust the font, size, and text alignment using the additional options available in the toolbar.
How to add subtitles to videos on iPhone?
iMovie and Inshot are two apps that help you add subtitles to videos on your iPhone. Here's a short guide on how to add subtitles to videos on iPhone via iMovie.
First, open the video in the iMovie app by tapping the ‘+’ icon on the screen.
The next step is to select the video clip and then tap the ‘Add Text’ option or the ‘T’ icon available right at the bottom of the iMovie window.
Now that you've added the text, there's an important thing to do: sync audio and subtitle text.
If you want to adjust the position and duration of the text caption, just tap the title in the timeline and move its beginning and end.
Once you've added the subtitles to the video, click the ‘Save Video’ option, and it’ll be directly saved to the iOS device.
Key takeaways
Now, whenever you create a video, you don't have to worry about how to add subtitles in iMovie on Mac, iPhone, and iPad. With a few clicks on the screen, iMovie allows you to add subtitles and captions alongside the video. You can even take things a step further by automatically creating an SRT file from any video using Notta's web or mobile apps. This voice-to-text app automates the process of converting spoken words into simple text, which can then be downloaded in various formats.