How to Screen Record on Mac (with Audio) Effortlessly
98% accurate, real-time transcription in just a few clicks. 58 languages and multiple platforms supported.
Your Mac comes with everything you need to record the screen. They are easy ways to record the entire screen, a particular tab, or even a specific window. However, the built-in screen recording tools are often hidden behind the keyboard shortcuts — that aren't obvious to crack.
I've always loved how screen recording makes it easy to show how things work — or how they don't work. But different people are going to look for different things — or different ways to record a screen record on Mac.
In this comprehensive guide, I'll reveal the three best answers to how to screen record on a Mac — both using the built-in methods and third-party tools.
How to screen record on Mac using screenshot toolbar
Let me admit it — I'm not good at memorizing keyboard shortcuts. But if you are one of those who love them, Mac comes with a built-in Screenshot toolbar. Here is how to screen record on Mac shortcut using the Screenshot toolbar.
Step 1: Press Command + Shift + 5 on your Mac keyboard to launch the Screenshot toolbar. The buttons with small circles on them (the ones marked in the below image) let you record the entire screen or a particular section.
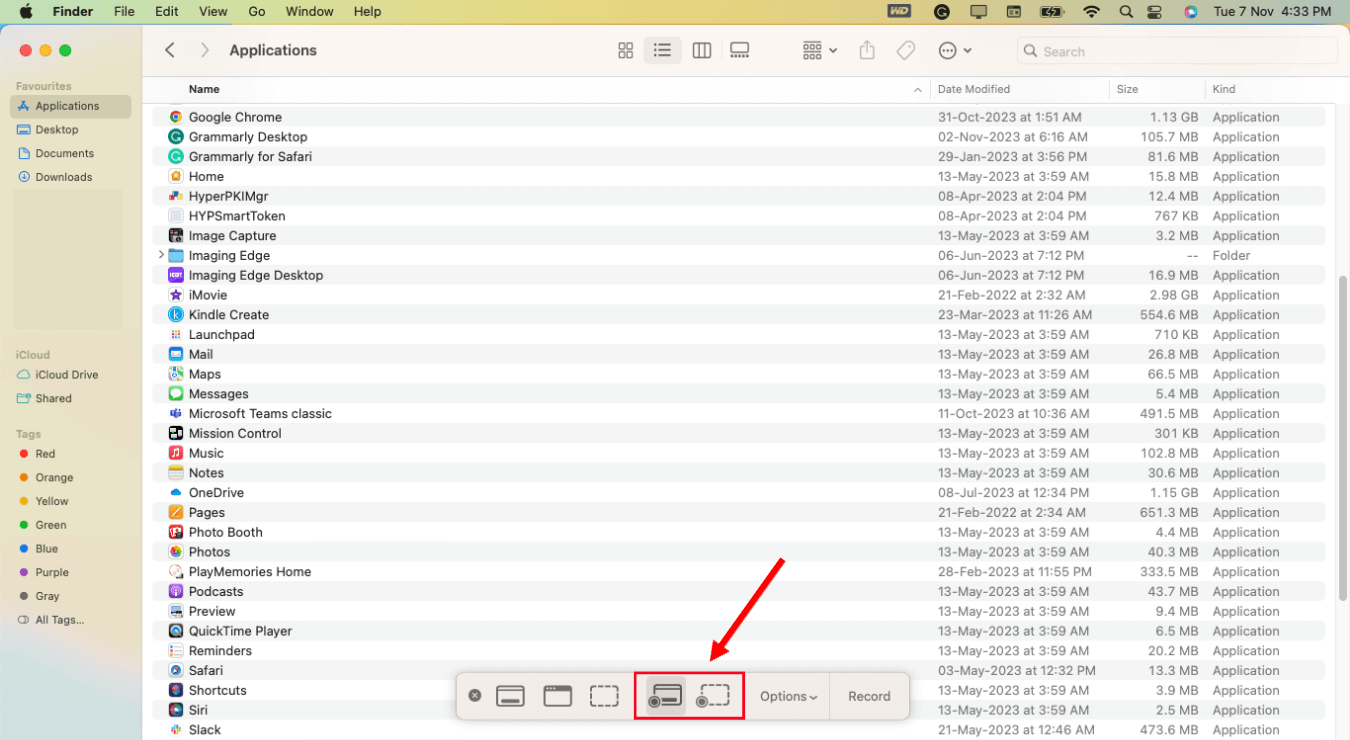
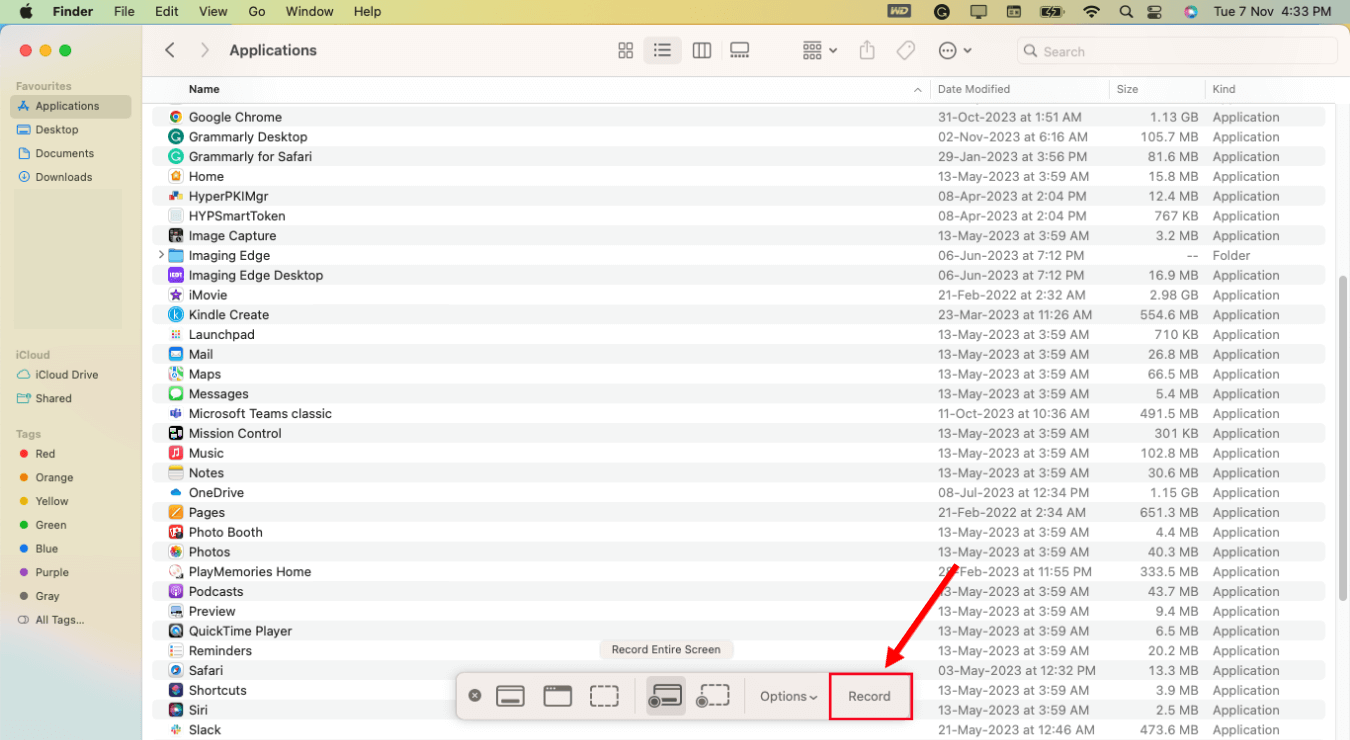
Step 2: From the various icons available, choose how you wish to record: Full screen or a specific portion of the screen. When you’re ready to record, select the red 'Record' button, and the Screenshot toolbar will start capturing (or recording) the screen.
Step 3: Finally, click the 'Stop' icon, typically located at the top of the screen, to finish the ongoing recording and save the file on your device.
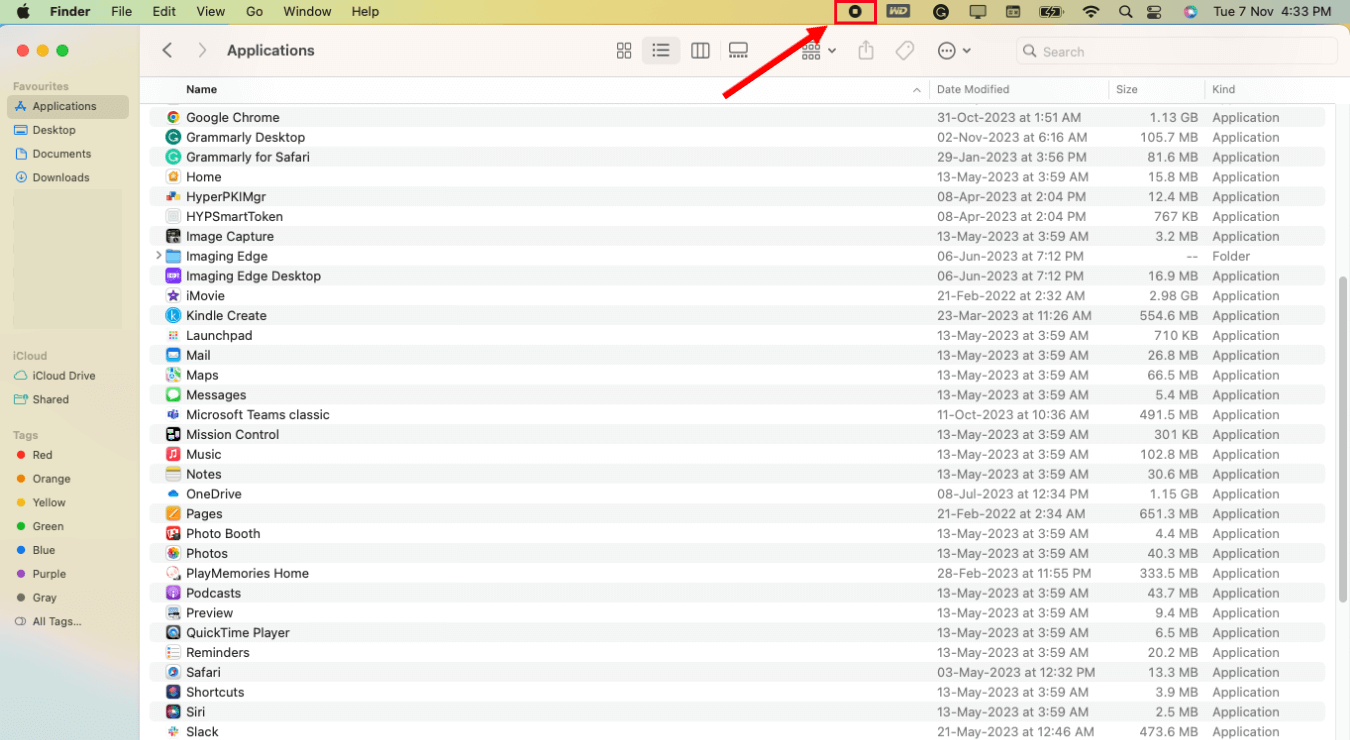
The result will be automatically saved as a MOV file to your Mac desktop. You'll have to use any third-party converter to convert the MOV file to any other popular format like MP4.
Notta can record and convert your spoken interviews and conversations into text with 98.86% accuracy in minutes. Focus on conversations, not manual note-taking.
How to screen record on Mac using QuickTime Player
Another easiest way to screen record on Mac is by using the QuickTime Player because every Mac comes pre-installed with it. It's free to use — and a great choice for beginners. Here's how to screen record on MacBook Pro or Macbook Air with QuickTime Player.
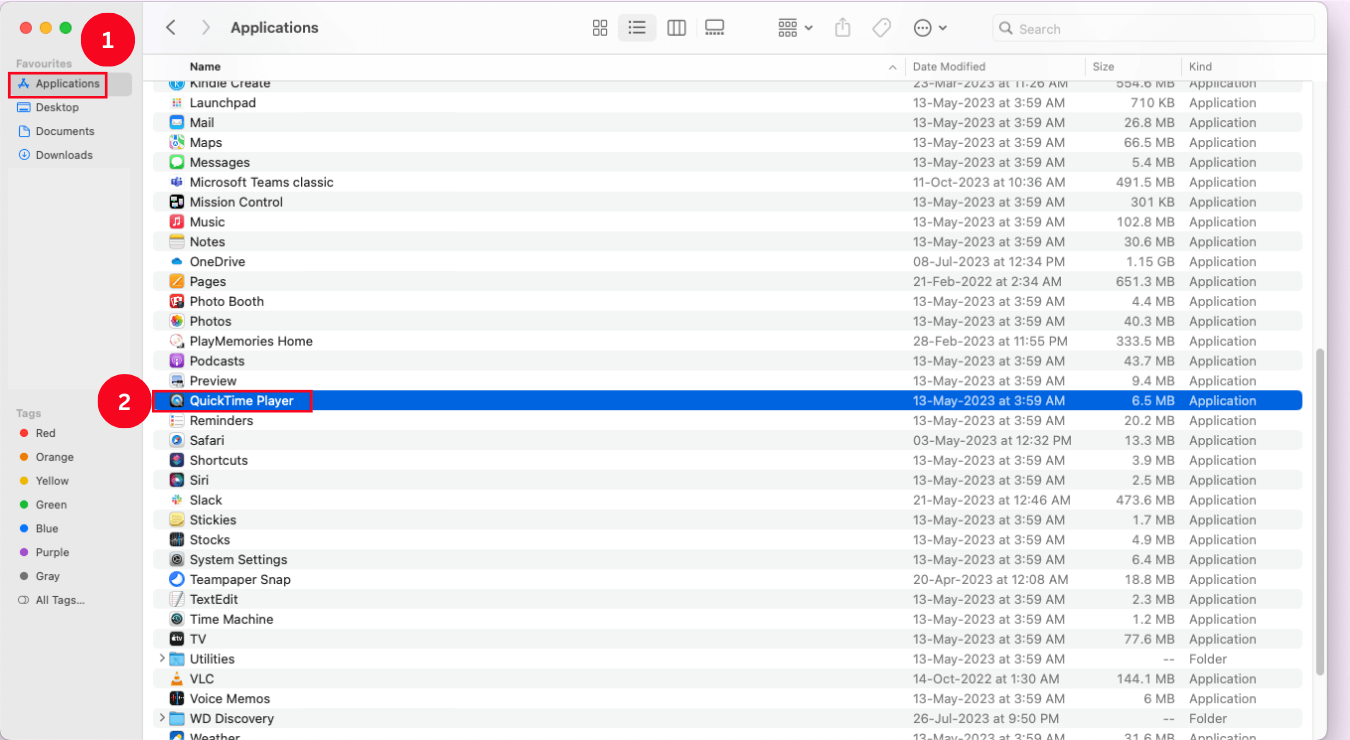
Step 1: Open Finder > Applications from where you've to choose 'QuickTime Player.'
Step 2: At the top of your Mac screen, locate 'File' and then select 'New Screen Recording.'
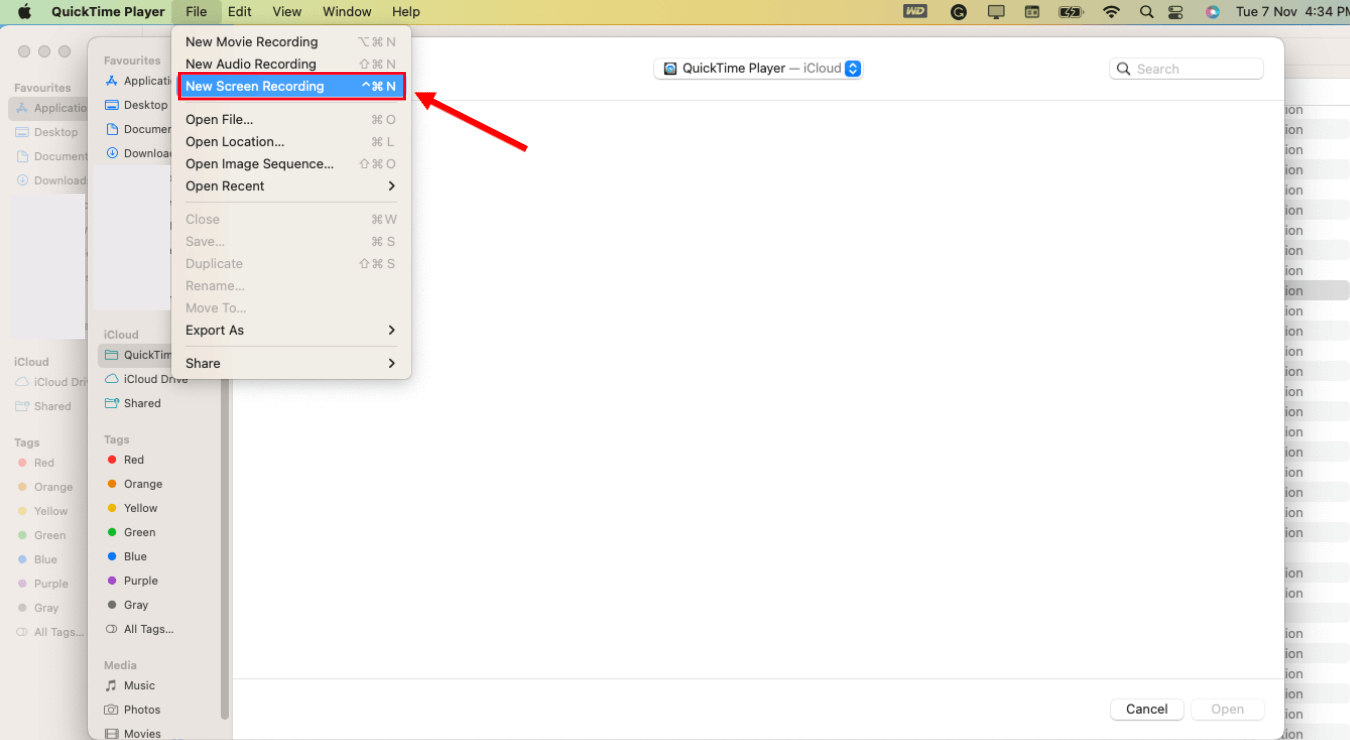
Note: If you see the same options as in the case of the Screenshot toolbar, follow the same steps mentioned in the above section. If not, follow the below steps to record the screen on Mac using the QuickTime Player.
Step 3: You'll see a red 'Record' button on your Mac screen. Click the drop-down arrow next to it and choose the audio input. (Note: This is only applicable if you wish to record a screen with audio.)
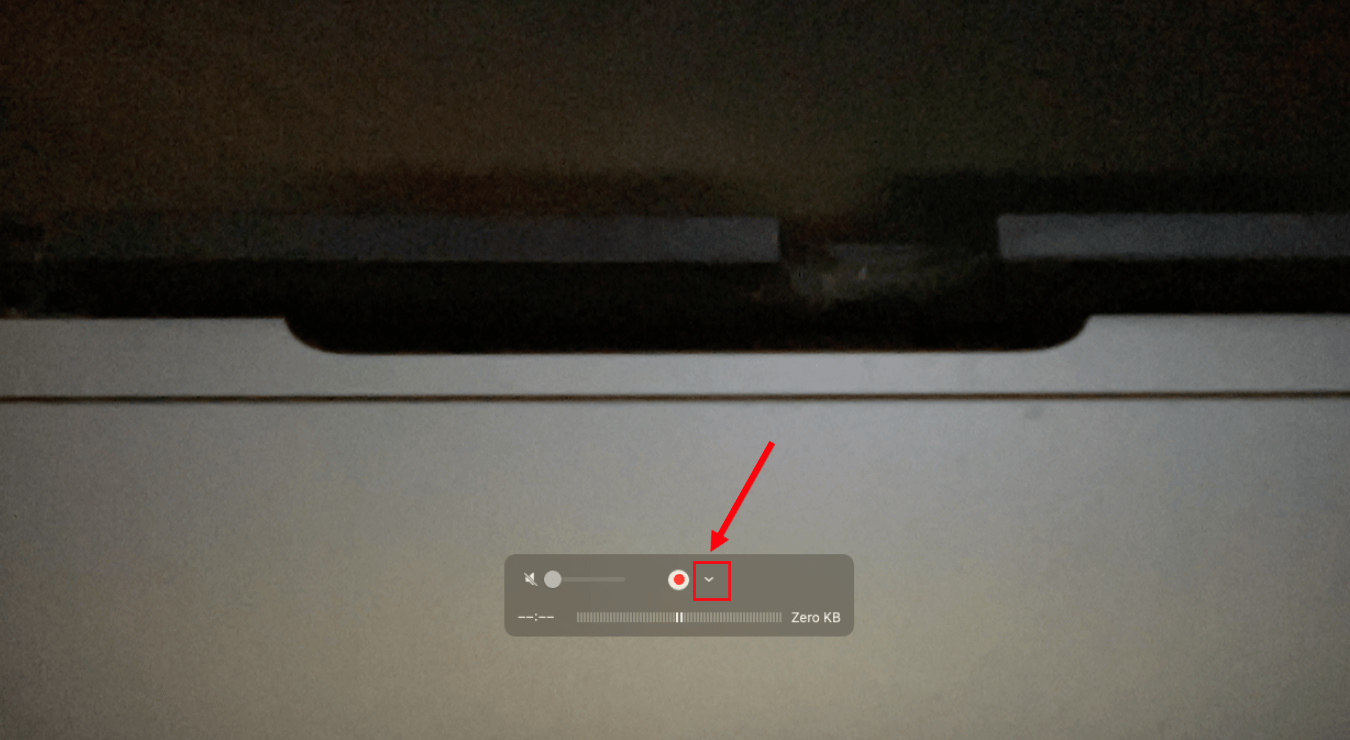
Step 4: Once you have modified the settings, click the 'Record' button, and then the QuickTime Player will start doing the task.
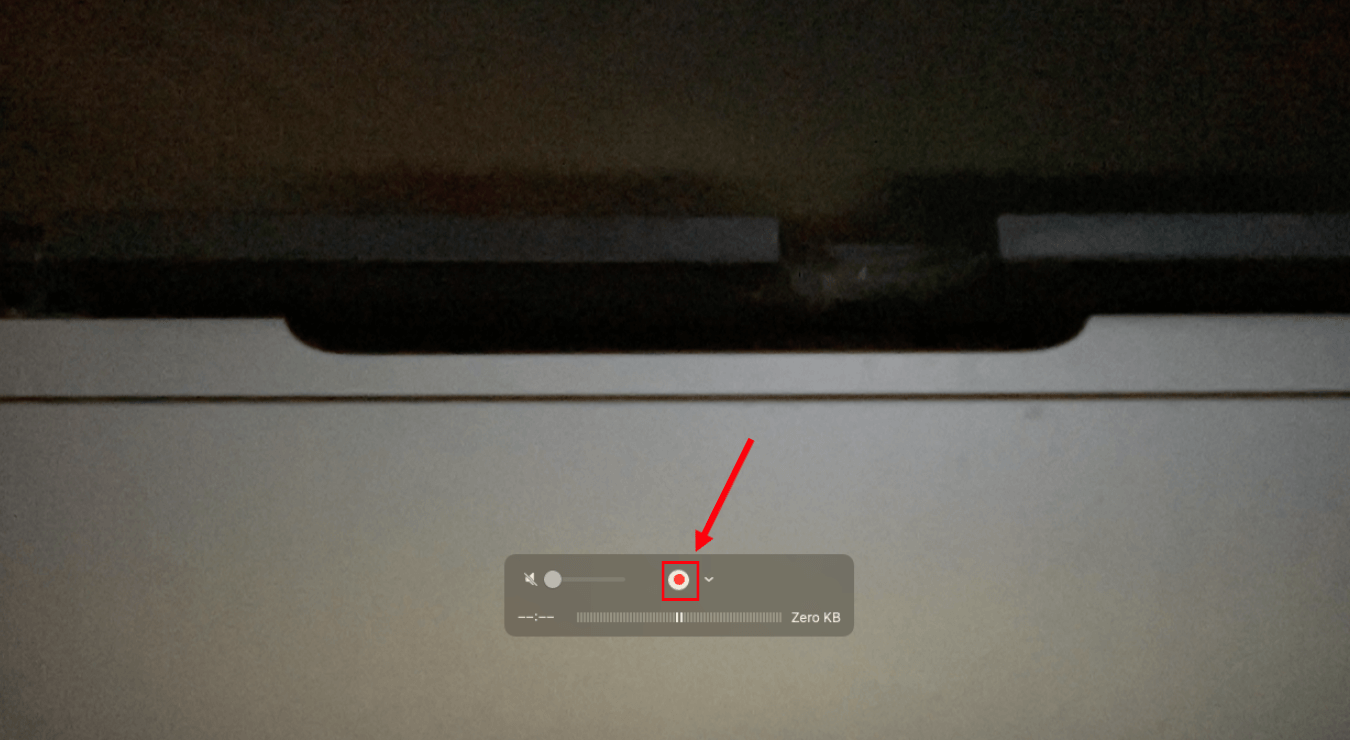
Step 5: In the top menu bar of the Mac, click the 'Stop' button to finish recording or press Command + Ctrl + Esc on the keyboard.
The built-in screen recorders of Mac are great options for starters or for someone who doesn't use it often. But they do fall short in many ways — for one, you cannot generate any transcripts, and secondly, there are no advanced editing options available.
How to screen record on Mac using Notta
Mac makes it so easy to record the screen: there are dedicated built-in recorders like Screenshot toolbar and QuickTime Player. However, they aren't perfect — there are fewer editing features, and you can only save the recordings in MOV format.
Fortunately, there's a workaround for that: Notta is a third-party recording and transcribing tool that lets you record the screen with audio — and even transcribe the spoken words into text. One impressive feature of Notta is its ability to work on both Windows and Mac.
Here's how to screen record on MacBook Air or MacBook Pro with audio using Notta.
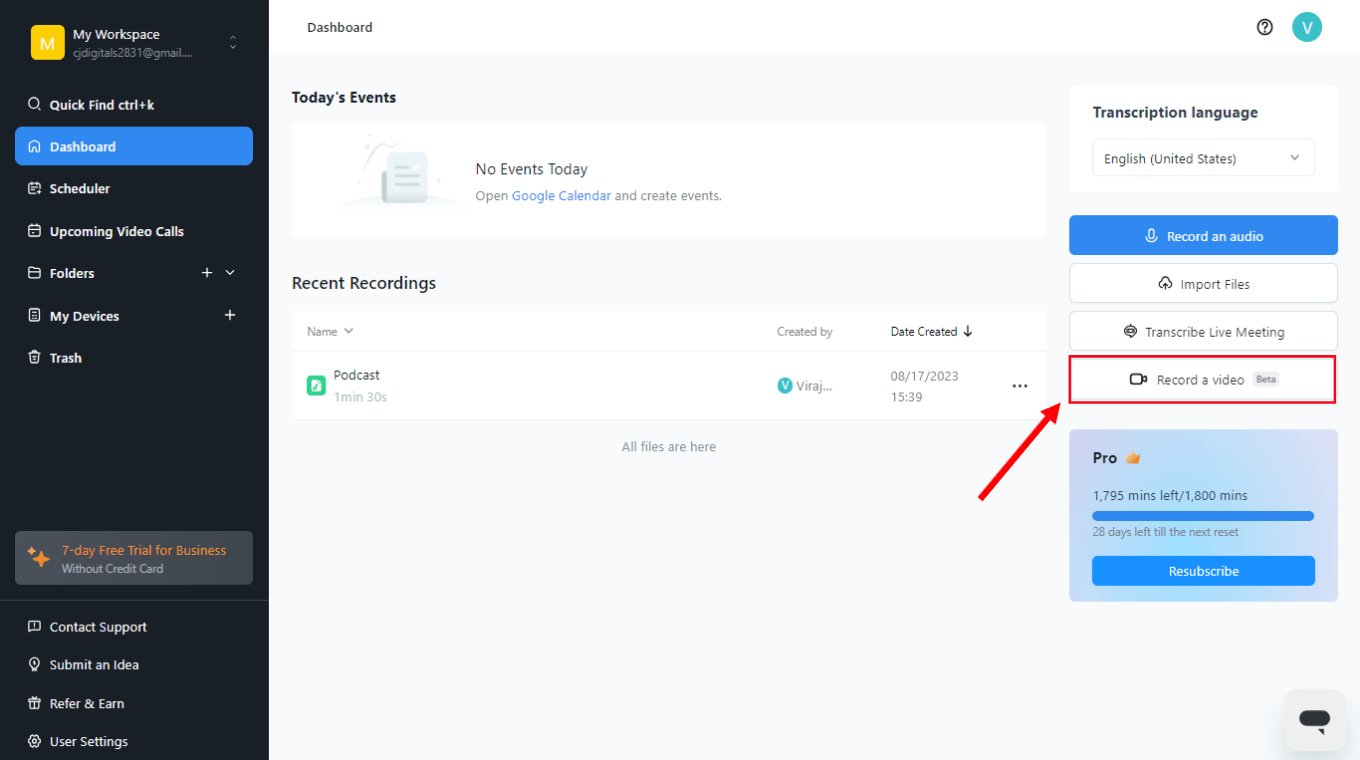
Step 1: Go to the official Notta website and sign up for a free account. Head to the navigation panel, then click the 'Record a Video' option.
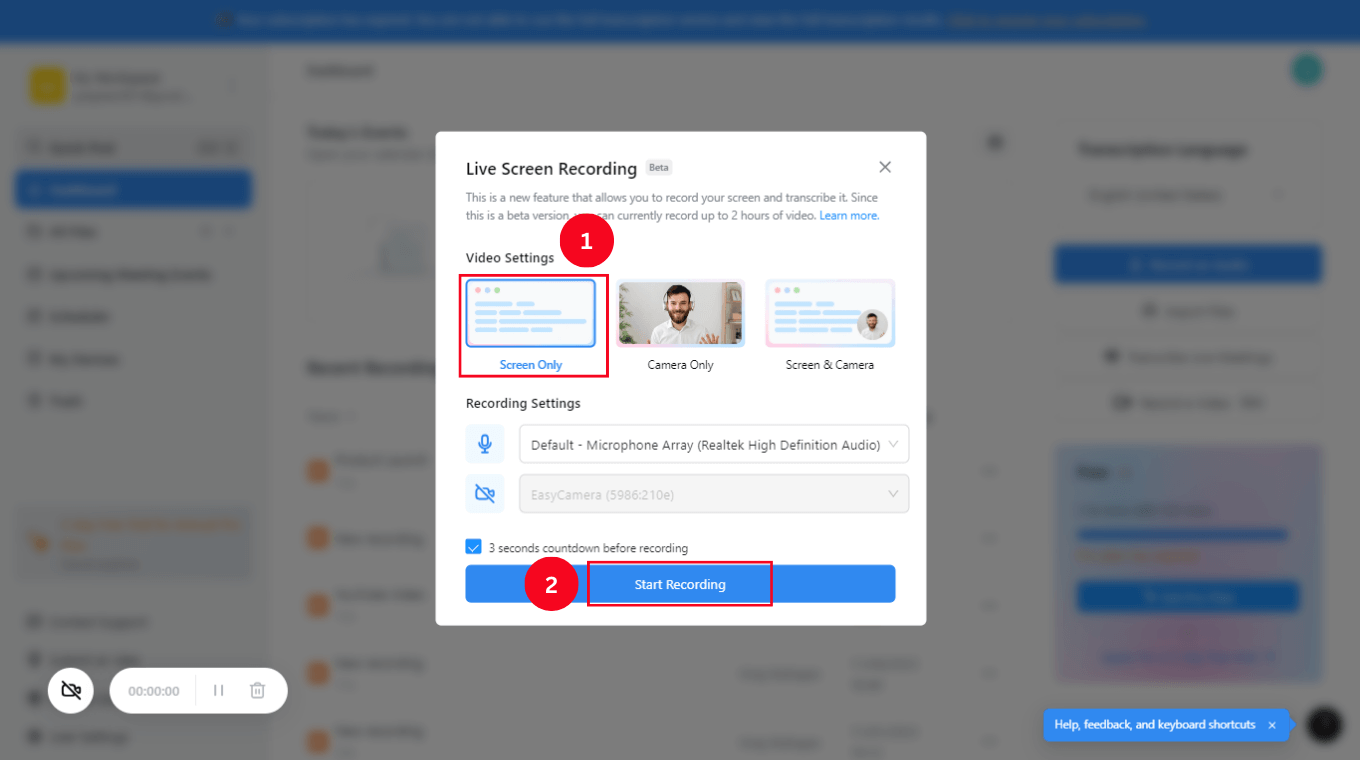
Step 2: You'll see a pop-up window with different recording options: Screen Only, Camera Only, and Screen & Camera. Select 'Screen Only' to record the Mac screen, followed by the blue 'Start Recording' button.
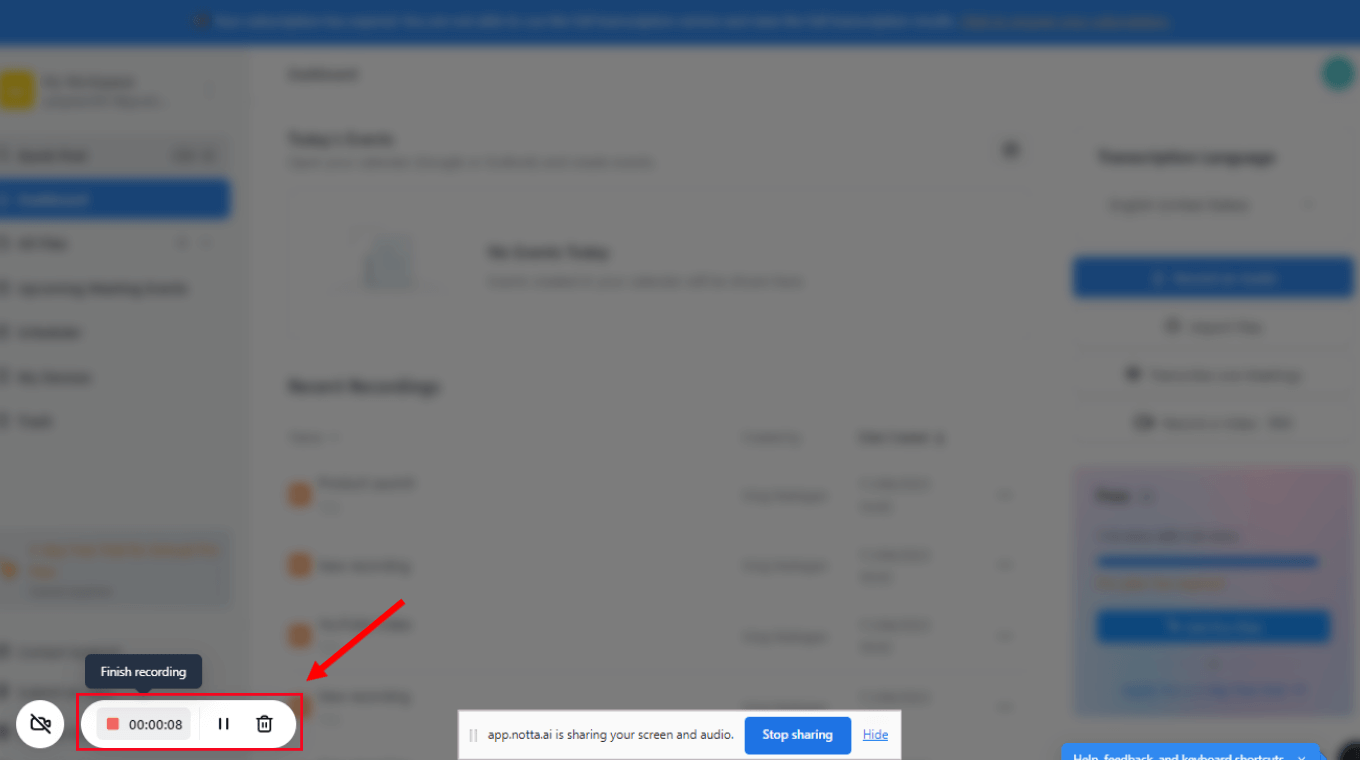
Step 3: Notta will start recording the screen content. Once done, you can select the red 'Stop' button to finish the screen recording.
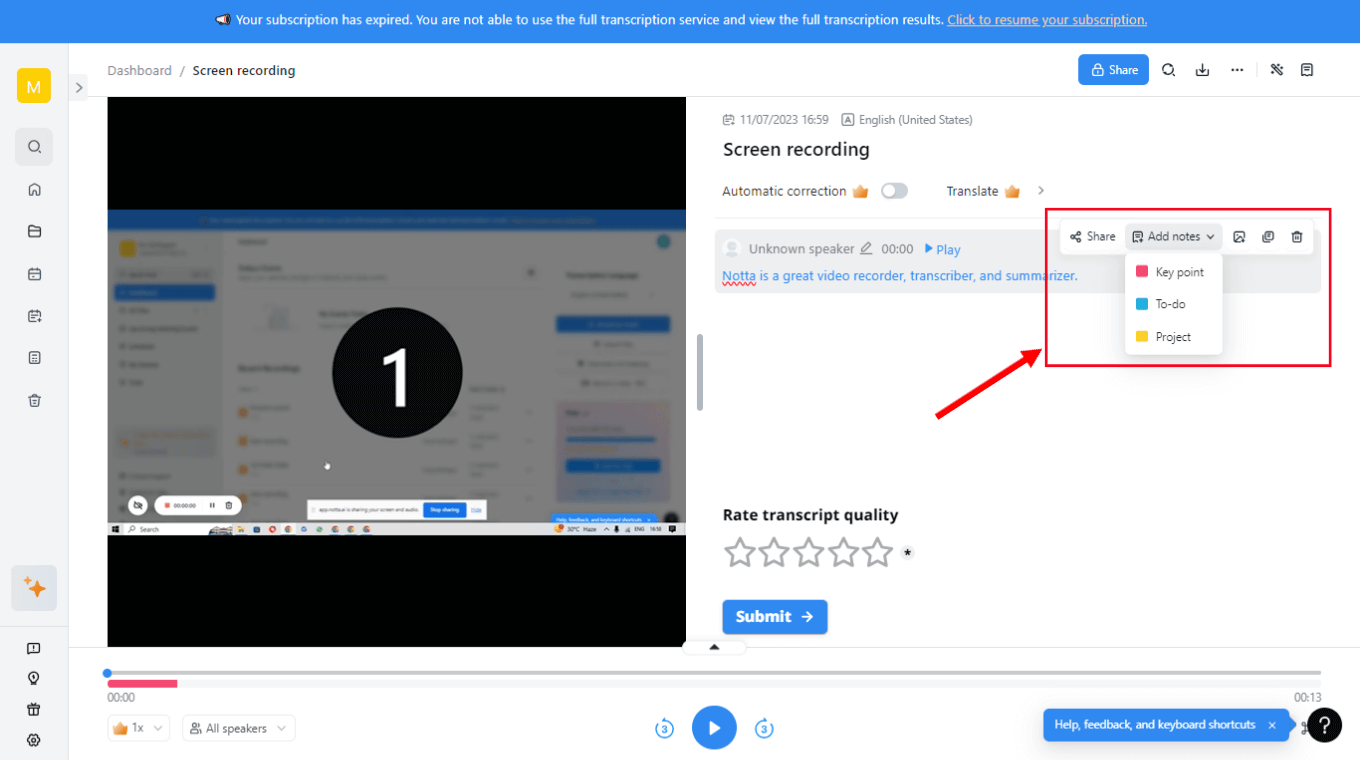
Step 4: One thing where Notta outperforms Mac's built-in recorders is its transcription features. The recorded file is quickly transcribed with advanced speech recognition technology.
You can even add notes, highlight text, or insert images to the transcript — to make collaboration with the team members easy.
Step 5: Finally, you can download the screen recordings in many formats like MP3 (audio), MP4 (video), TXT, DOCX, PDF, SRT, and XLSX.
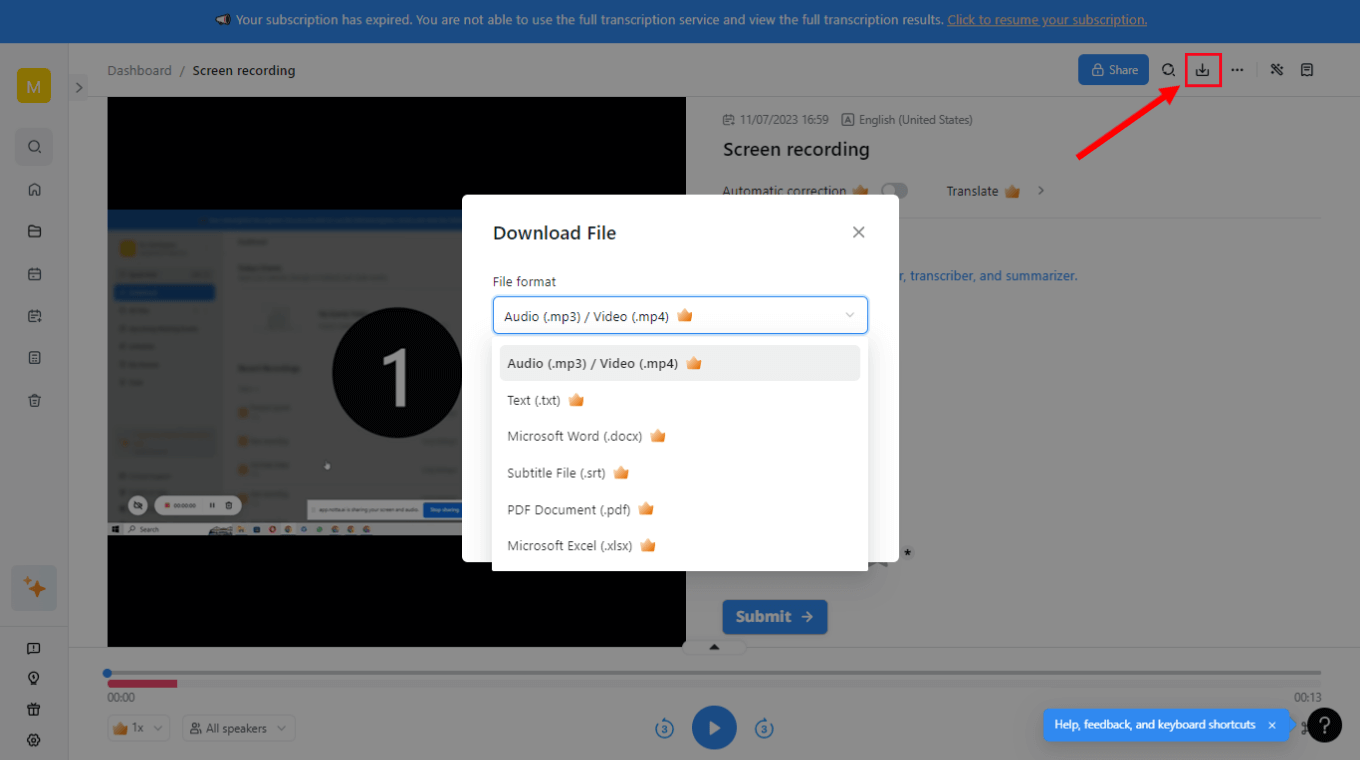
One thing to note: It's also possible to generate a summary of the transcript using the Notta AI Summary Generator. All you need to do is select a summary template on the left side of the screen, and Notta will summarize the transcript for you.
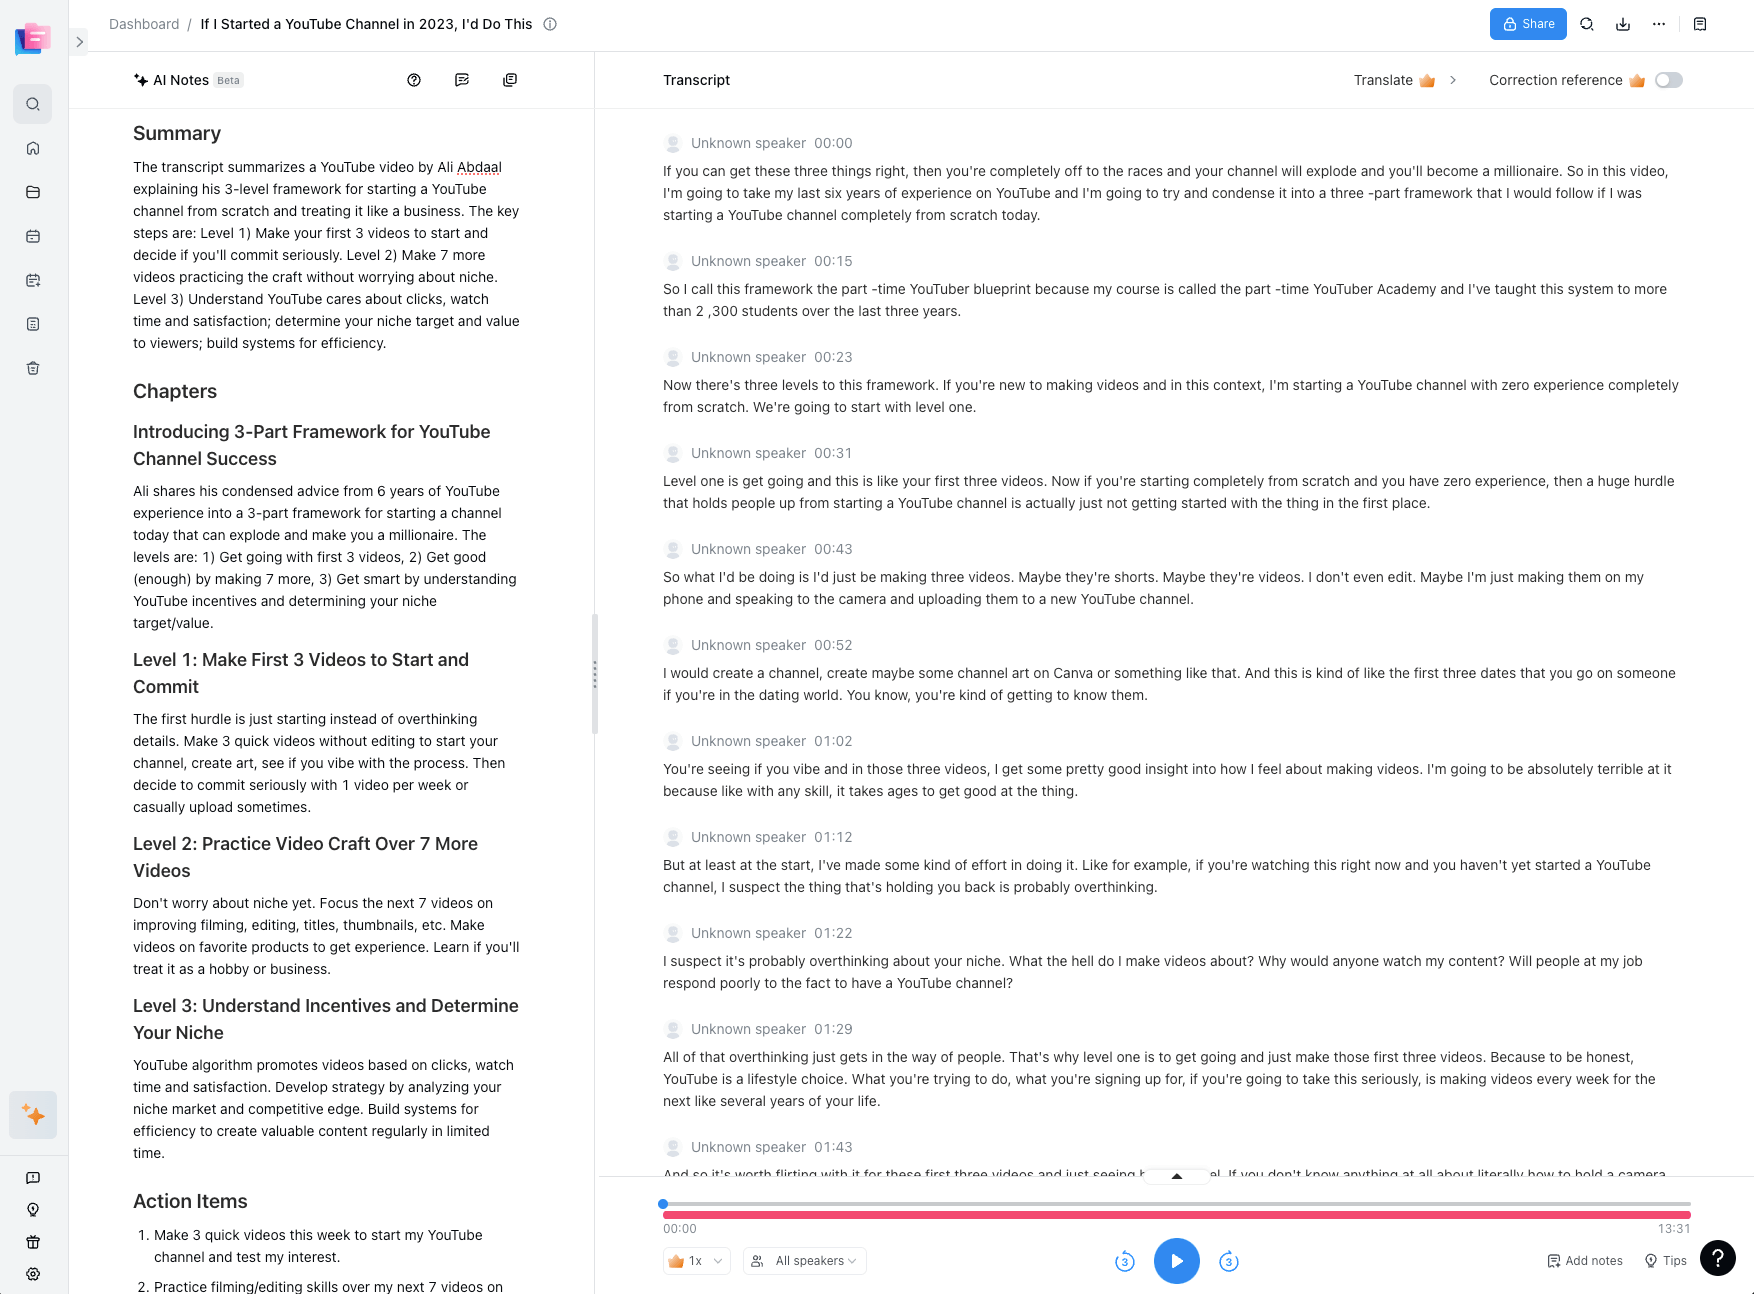
With Notta, you can easily record videos, turning spoken content into written records with 98.86% accuracy.
How to screen record on Mac using Movavi screen recorder
Movavi Screen Recorder is excellent software to record a screen on a Mac. It is a fast and reliable, providing essential settings and features to make your screen recording experience effortless. It works well on both Mac and Windows computers.
Here's how to capture your screen and audio on Mac with Movavi Screen Recorder:
Step 1: Go to Movavi's official website and download the installation file. Once done, open it from your 'Downloads' folder and follow the on-screen instructions to complete the process.
 Step 2: Launch Movavi Screen Recorder. You'll see an overlay panel with screen recording options on the right side. You can move it around and place it anywhere on the screen as per your convenience.
Step 3: Enter the 'Settings' to adjust the recording settings such as frame rate, hardware acceleration, audio input, and webcam, set custom hotkeys, select the color of the cursor, and even create a schedule for recording if needed. Click OK when done.
 Step 4: Hit the Video Camera icon to open the recording mode. Enable or disable system audio, microphone, and webcam. Check the box for reducing background noise. Select a specific area by dragging the selection frame, click a specific window or app to record, or choose the entire screen. Click the red 'REC' button to start recording.
 Step 5: During the recording, you can use quick annotation tools like shapes, arrows, and pen in different colors to highlight any necessary information.
 Step 6: To stop recording, click the 'Stop' button or press the corresponding hotkey on your keyboard. Your recorded video will appear in a preview window with basic editing options. Cut out unwanted parts and proceed to save the recording.
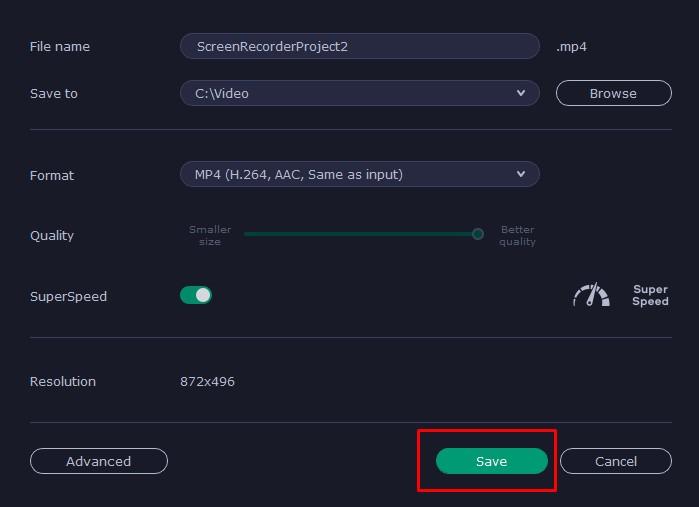
 Step 7: Pick the desired output format and quality for your recorded video. Save the file into any popular video format by clicking 'Save'.
Key takeaways
I hope you've got the answer to how to screen record on Mac. While it's way easier than one may think, the best screen recorder is the one that saves you time and offers some additional features.
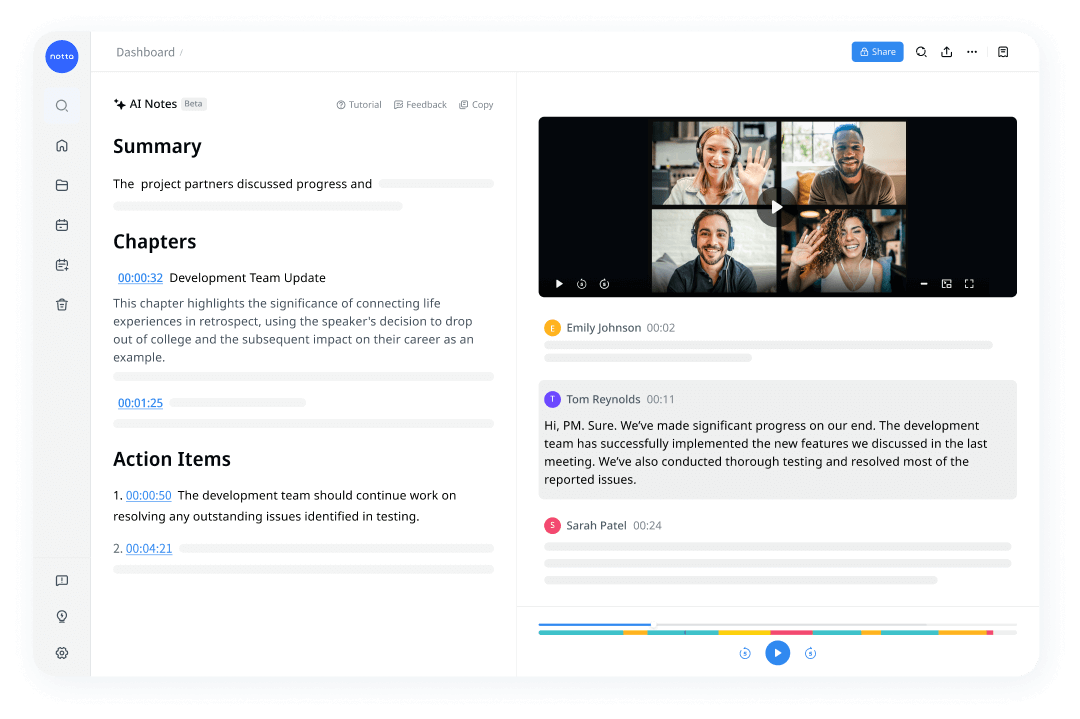
Notta is a great screen recorder and transcriber for Mac, complete with built-in transcription features that get the job done — very well.
I've found Notta to be by far the most robust recording and transcription tool — and it's free. You can record the Mac display along with the webcam and even transcribe the video into text — something where Mac's built-in recorders fail.
FAQs
How to record screen and audio at the same time on Mac?
Apple's very own native built-in recorder — QuickTime Player — helps you record screen and audio — at the same time — on Mac. Here is the tutorial on how to record screen on a Mac with audio.
Step 1: Open the QuickTime Player and select File > New Screen Recording.
Step 2: Before you hit the red 'Record' button, click the drop-down arrow (v) next to it. Choose a microphone to record audio during the screen recording.
Step 3: Now click the 'Record' icon to start recording the screen and audio simultaneously. Click it again if you wish to stop the ongoing recording.
Where does screen recording go on a Mac?
By default, the screen recordings are automatically stored in the desktop folder. However, the answer will differ depending on the app you choose to record the screen.
Take Mac's native Screenshot toolbar, for example. The screen recordings are automatically saved to the desktop folder. If you wish to change the recording destination, select 'Options' while recording, followed by 'Save to.'
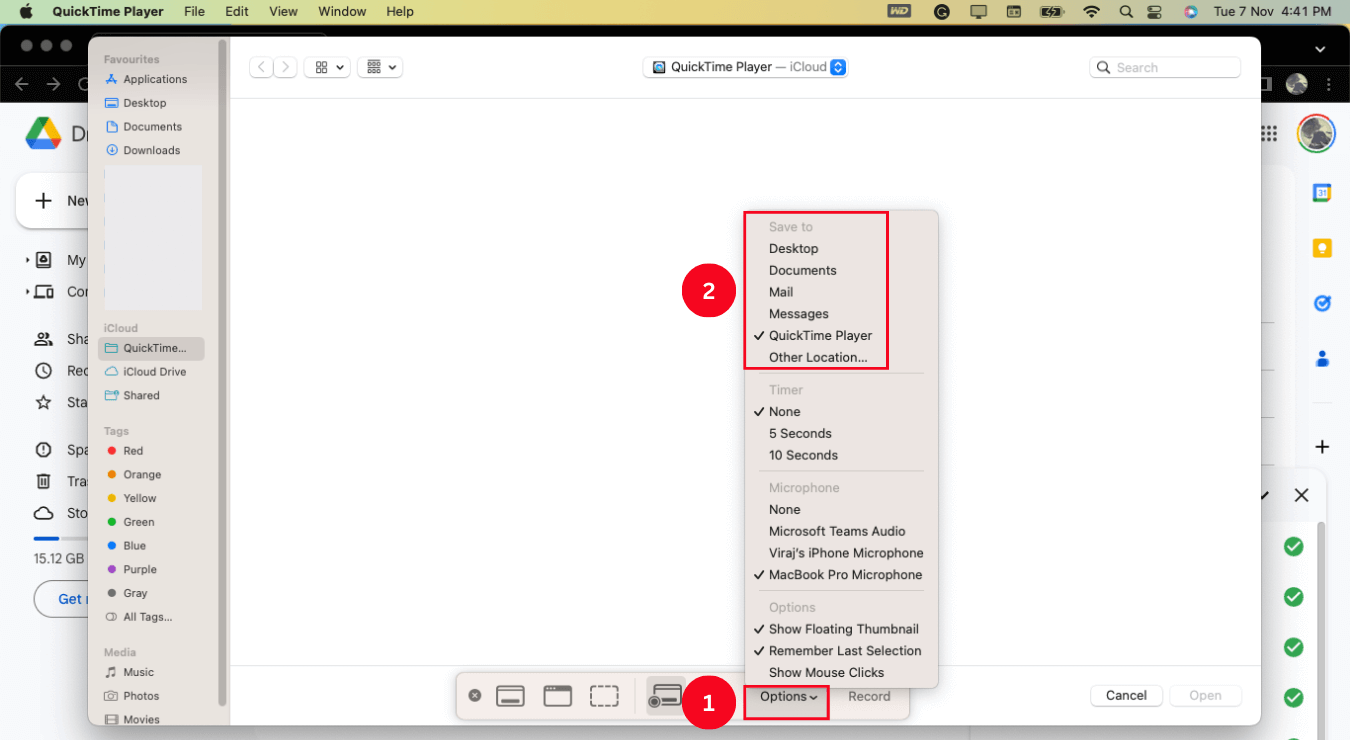
But where do the recordings go when you record via QuickTime Player? Well, QuickTime Player automatically opens the video after the recording — and you can choose where you wish to save the file.
Apps like Notta let you save the recordings directly within the Notta dashboard — and even support downloading and saving the files on Mac.
Why is there no sound when I screen record on a Mac?
Both Mac's Screenshot toolbar and QuickTime Player help you record the screen with audio input. If the recorded file still does not include sound, check the settings or options in the screen recording application.
You can also avoid the 'no sound' problem by choosing an alternative screen recorder like Notta. It isn't overly complicated when it comes to recording: you can choose whether you wish to record just the screen, just your webcam, or both your screen and webcam video.