How to Transcribe Audio in Premiere Pro
98% accurate, real-time transcription in just a few clicks. 58 languages and multiple platforms supported.
In the ever-growing landscape of content creation, two topics remain relevant today: How do you stand out in an already saturated market, and is your content inclusive? One solution that perfectly answers these two questions is using transcripts when creating audio and video content.
Unfortunately, many content creators find manual transcription to be taxing and time-consuming. Alternatively, different platforms' auto-captioning capability only partially solves the problem. Why? The creator loses control of the transcript quality and customization options.
What if you could generate a transcript straight from your video editing platform?
Premiere Pro, one of the best editing platforms for content creators, now has a speech-to-text feature that can auto-generate transcripts and captions. Join us as we explore how to use the Premiere Pro transcription tool and what it can do for you.
Why use speech-to-text in Premiere Pro
The Premiere Pro speech-to-text feature is available in every creative cloud app or single app subscription of Premiere Pro at no added cost. It lets users caption their video and audio files automatically to improve their visibility and engagement capacity. This feature is beneficial to editors because:
It gives you complete creative control over the result of your output.
Editing becomes much easier since you can use the transcript as a guide to edit the visuals.
After creating the transcript, you can change it into captions from your timeline.
The Adobe transcription panel is searchable, making finding specific clips in the sequence easier.
You can export the text and repurpose your content.
NB: The speech-to-text feature is available in the Premiere Pro version 15.4 or later. It's also present in Premiere Pro (beta).
How to auto-transcribe your video with Premiere Pro
You can transcribe audio in the video sequence of Premiere Pro by following the steps below:
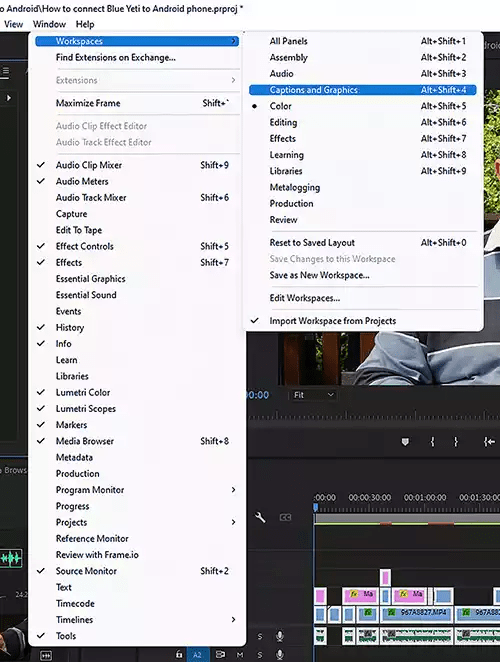
Step 1: Navigate to the main menu bar and click 'Windows>Workspaces>Captions and Graphics.' An alternative method to access the captions and graphics workspace is to use the keyboard shortcut 'Alt+Shift+4.'
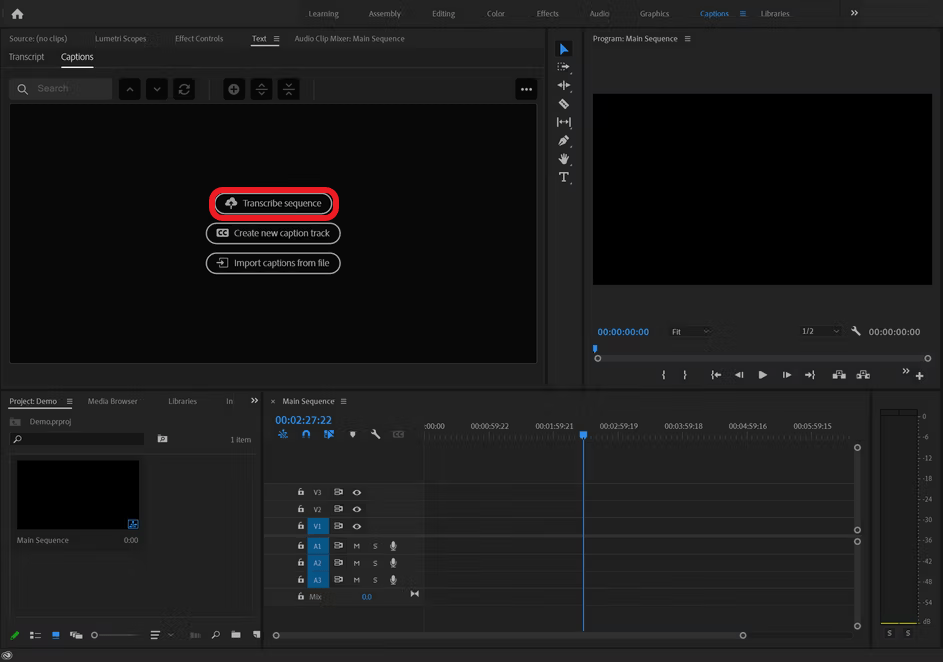
Step 2: In the floating panel that appears, click 'Transcribe sequence' to open the 'Create Transcript Panel.'
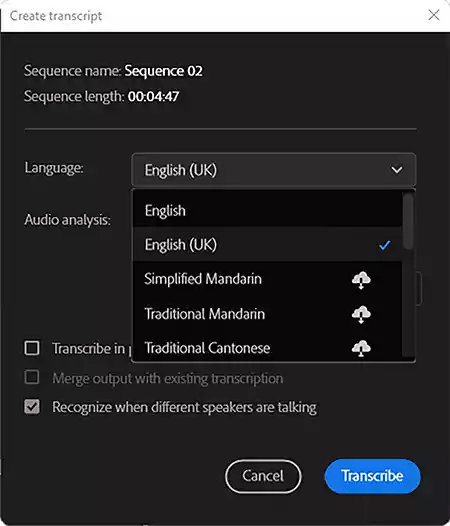
Step 3: Choose the transcription language from the drop-down menu below the sequence name and length in the 'Create Transcript Panel.'
Step 4: Select the audio you wish to transcribe. The number of options available will depend on the number of tracks available in the sequence. To transcribe all tracks at once, click on 'Mix.'
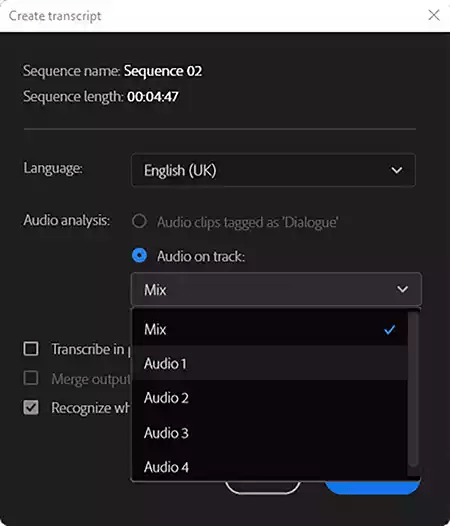
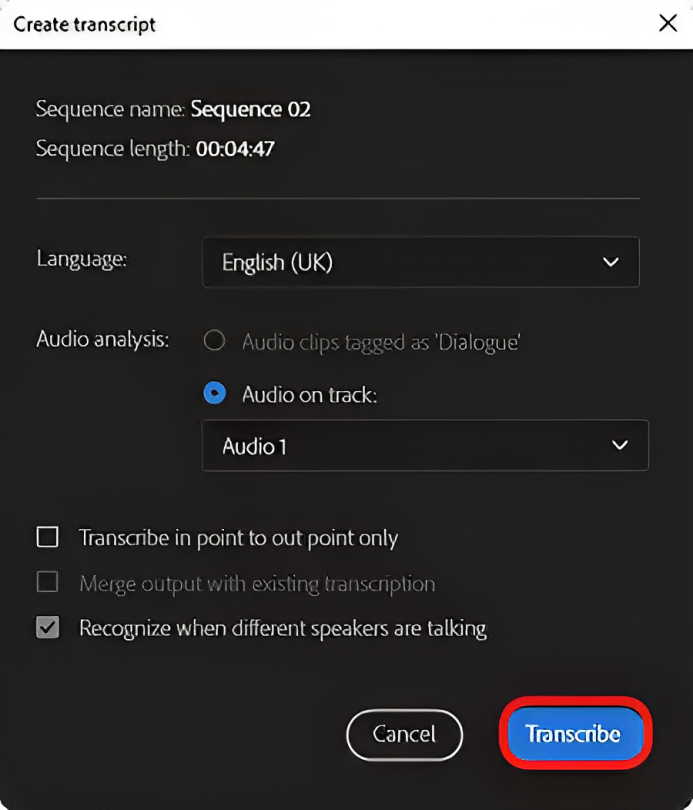
Step 5: The next step involves customizing your transcription instructions. There are three options to choose from here:

Transcribing your audio by selecting an in-point and out-point - click this checkbox to set the desired transcription starting point and endpoint on your timeline. Leave it unchecked to transcribe the entire audio file.
Merging the transcription output- Click on this checkbox if you have an existing transcription file that you want to integrate with the output.
Recognizing the different speakers: This option will help distinguish the voices in the audio file and identify them as 'Speaker 1, Speaker 2, etc'. You can make edits to the names later on in the text box.
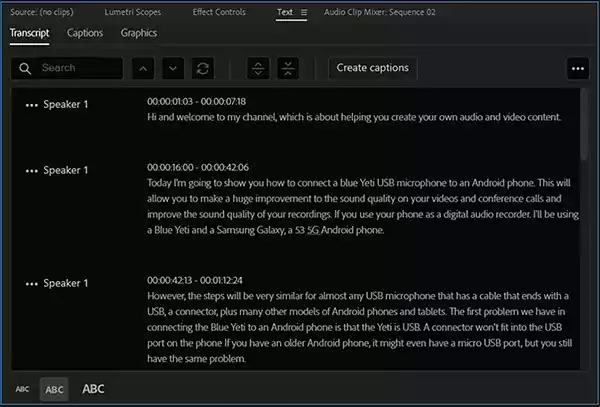
Step 6: Finally, click the blue 'Transcribe' button to begin transcription. The transcription time for the audio will be a few seconds or a few minutes, depending on the audio length and your computer's processing speed. The transcription will appear in the 'Transcript' tab under the 'Text Panel.'
Step 7: Review the transcript to make any necessary edits and change the names of your speakers. Premiere's transcription feature is fairly accurate. However, it's likely to make some mistakes with unfamiliar brands, spellings, and punctuation. To edit the errors present, double-click on the incorrect word to make the section editable and use the built-in text editor. Click anywhere outside the section to confirm the changes.
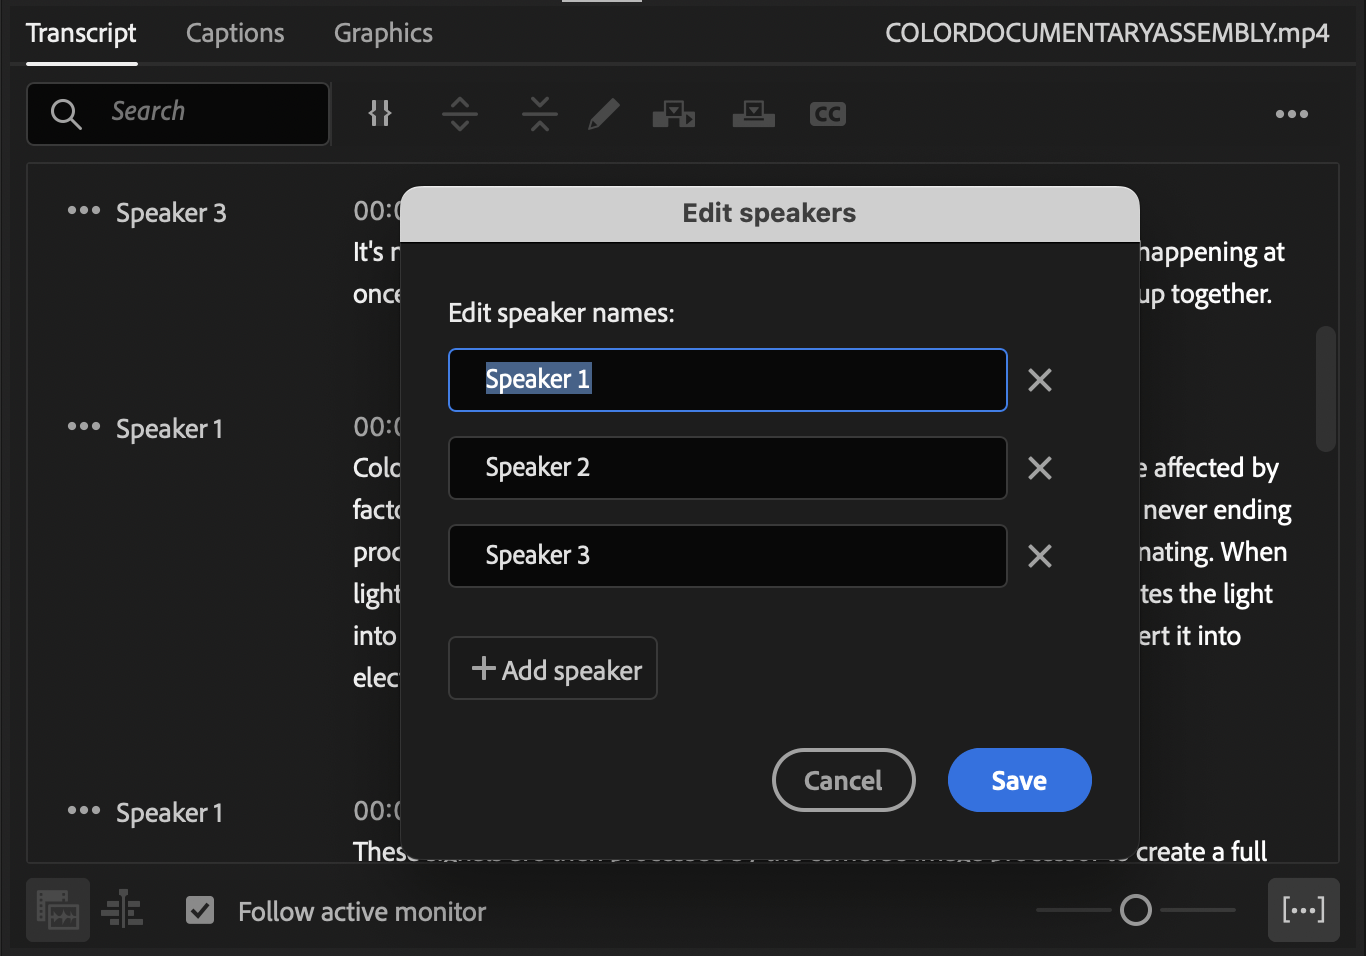
To edit the speaker name, click on the three dots '...' on the left side of the speaker. A dialog box screen will appear where you can change the speaker's name accordingly.
Notta can convert your videos and conversations into text with 98.86% accuracy in minutes. Boost your video engagement in simple clicks.
How to generate captions with Premiere Pro
Premiere Pro provides users with three ways to create captions;
Get them from the automatic transcriptions
Import from a third-party
Add captions manually
Automatic transcription
To generate captions from transcriptions, complete the edit to the transcript first. Once satisfied with the text, convert them into captions by following the steps below:
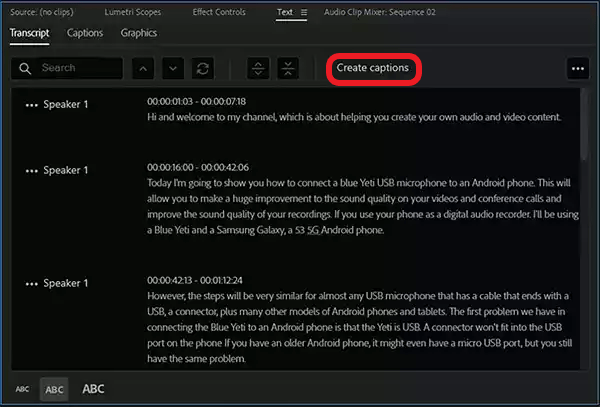
Step 1: Click the 'Create Captions' button at the top right corner of the 'Captions Panel.' This opens up a dialog box with an array of settings.
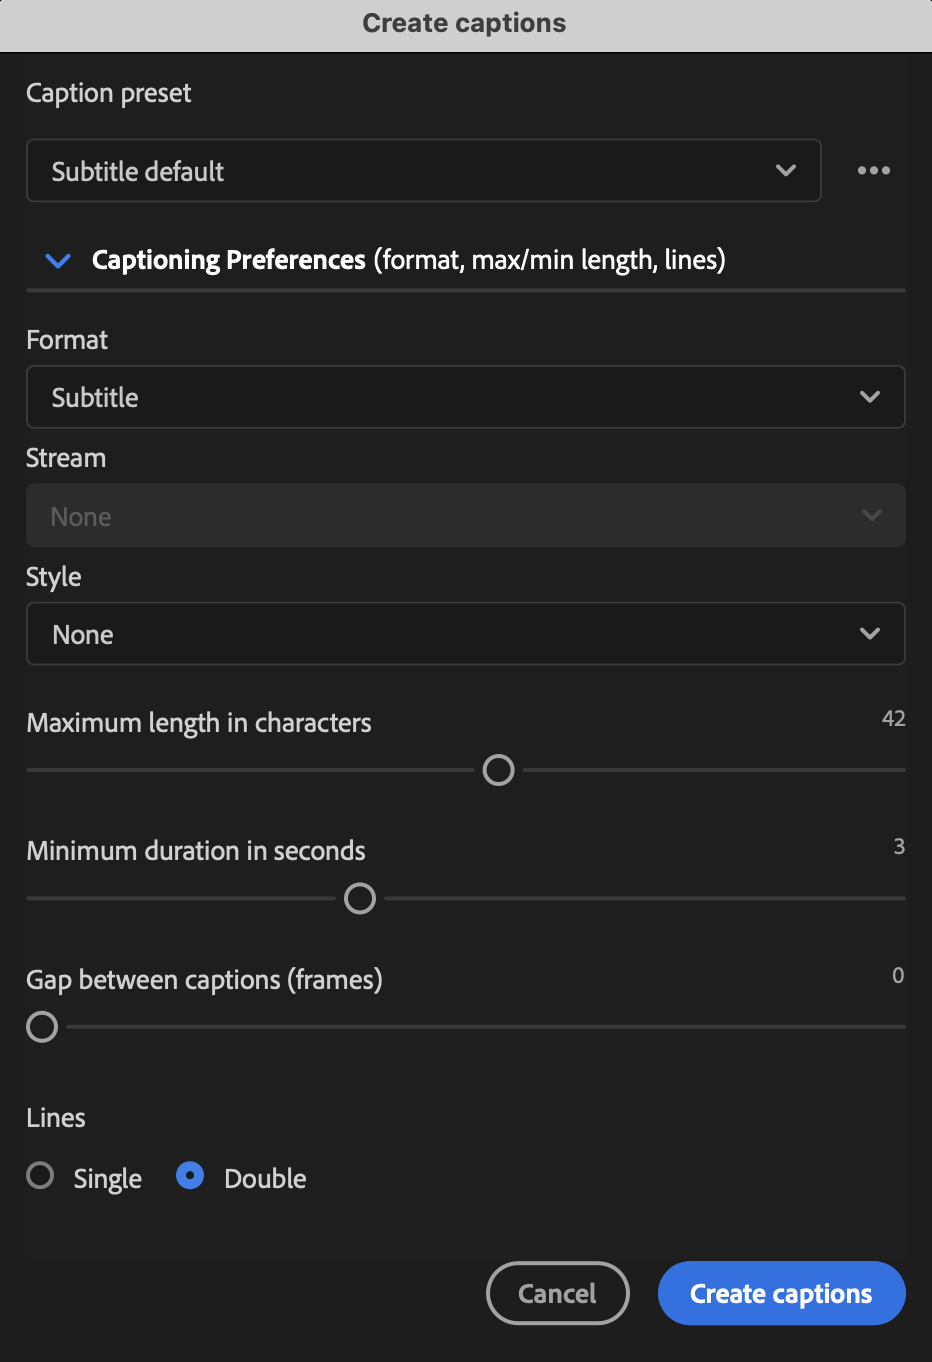
Step 2: In the captions dialog box that appears, choose the subtitle preset (the best option in most cases is often the 'Subtitle default'), the caption format, style, character length, duration between each line, and the gap between the captions.
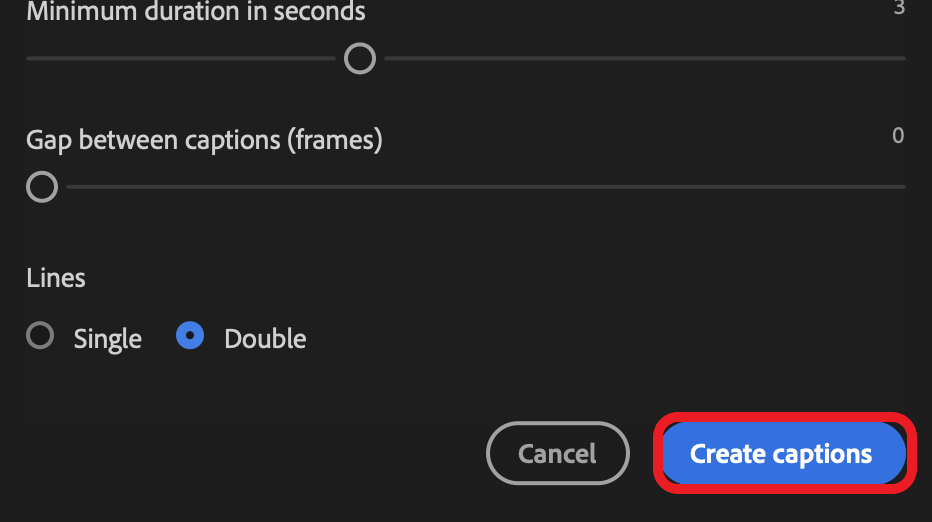
Step 3: Finally, click the 'Create captions' button. Premiere Pro will create your captions and align them with your audio.
Import transcript from a third party
You can use a third-party tool like Notta to create your transcript and later import it to your Premiere Pro project.
Step 1: Head over to the 'Captions' workspace by clicking 'Windows>Workspaces>Captions and Graphics.'

Step 2: In the panel that pops up, select 'Import captions from file' and select the SRT file from your local drive.
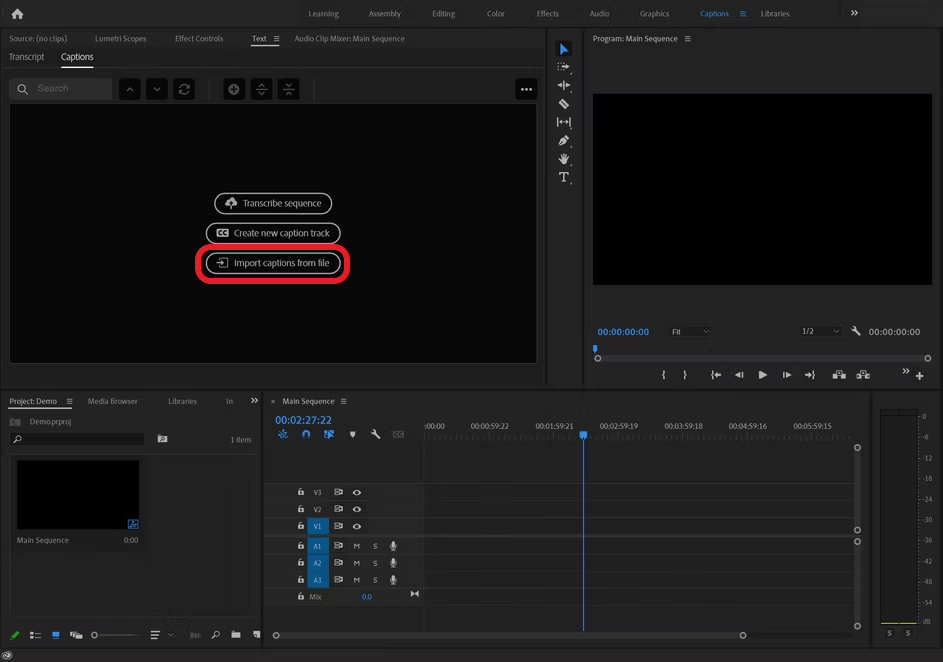
You can also import the SRT file, like any other media, into your project and drag it into your sequence to add to the audio file.
Manually transcribe your captions
This method can be laborious, but it's one of the best ways to maintain your caption's accuracy. It involves listening to the audio and typing out the captions manually. To do it:
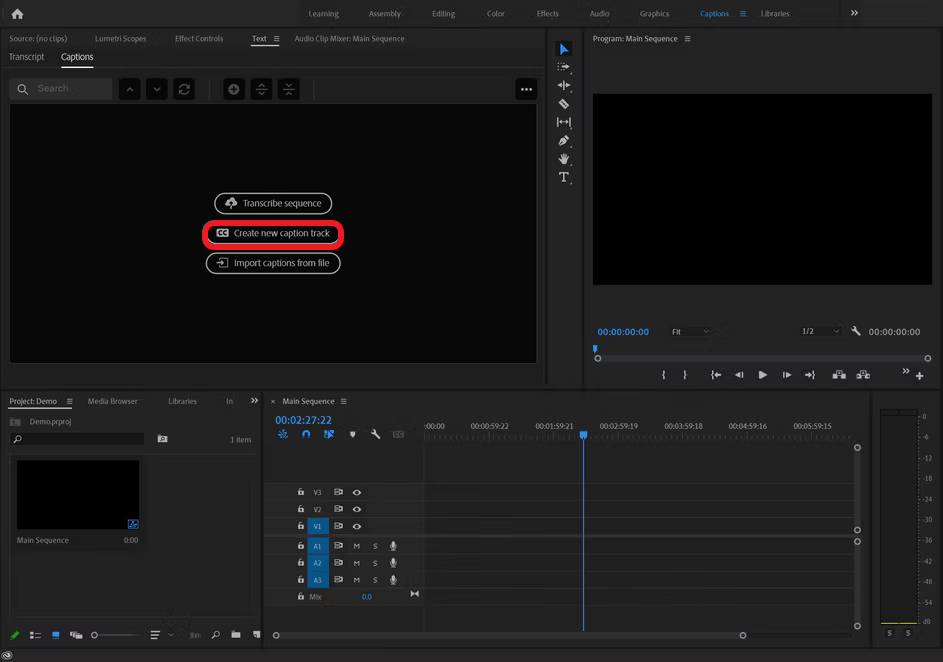
Step 1:Navigate to the captions workspace and click 'Create new caption track.' A faster way to do this is using the shortcut [Ctrl+Alt+A] in Windows and [Opt+Cmd+A] in Mac.
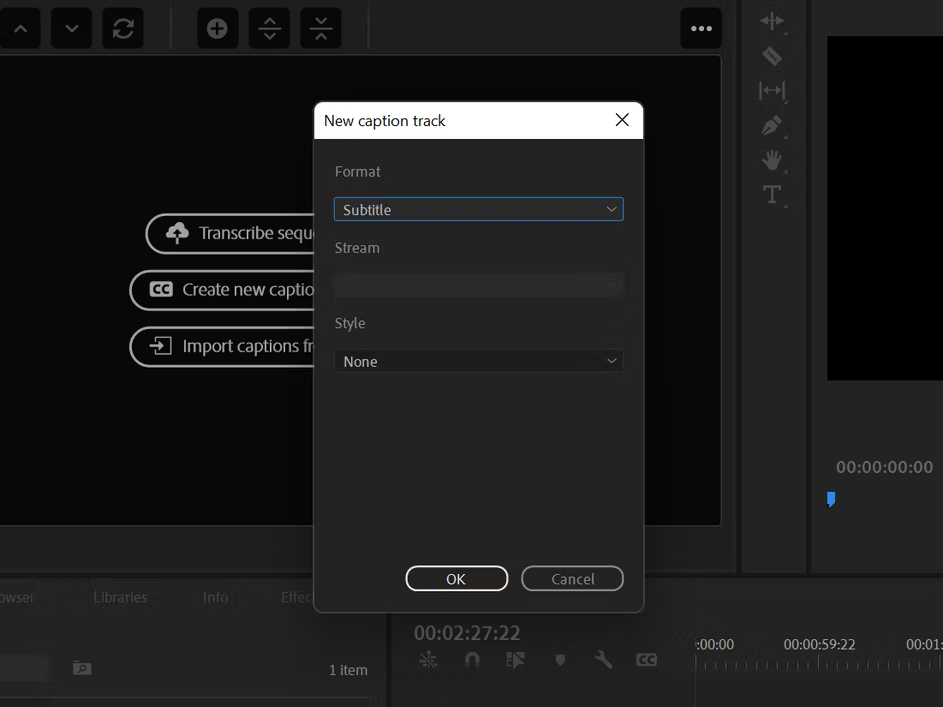
Step 2: Next, choose the format as 'subtitle' and select the style before clicking the 'okay' button. In the timeline, a new track will appear above what is already present.
Step 3: Add your audio or video footage and adjust the playhead on the wavelength where the first speaker is talking.
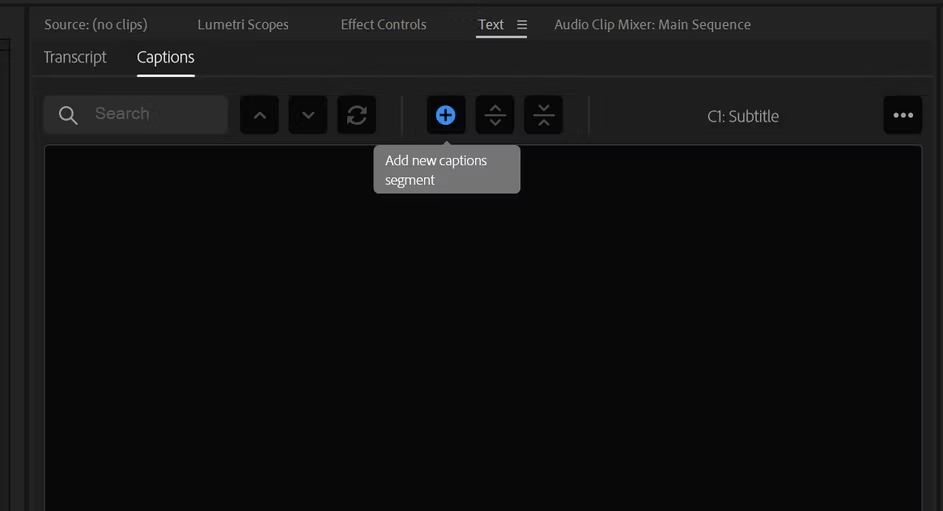
Step 4: Head to the Text panel and click the [+] icon under captions to add new caption segments. Alternatively, use the shortcut [Ctrl+Alt+C] on Windows and [Opt+Cmd+C] on Mac.
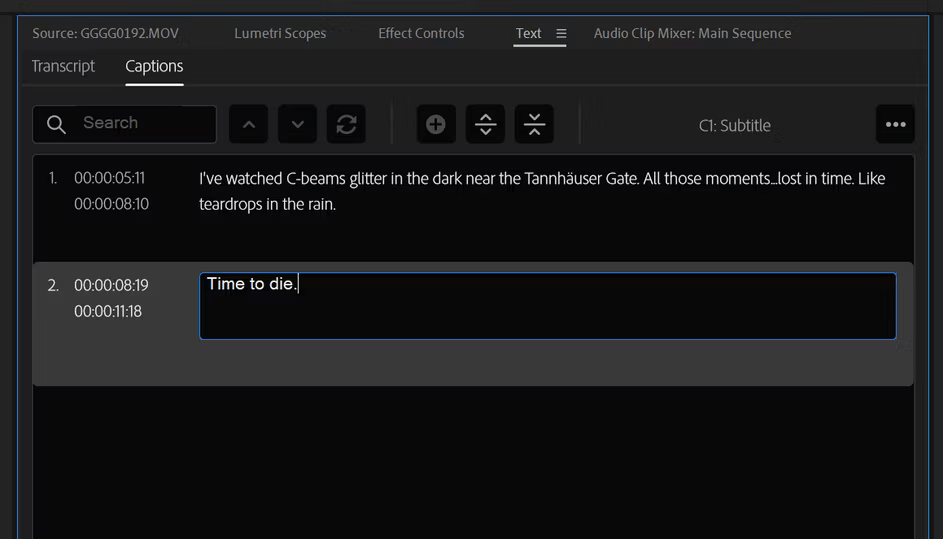
Step 5: Type what the speaker is saying in the text field that appears. Keep adding more captions until you complete the entire sequence.
Step 6: Edit the caption's screen time from the timeline. Trim it just right for the timing to coincide with your visuals.
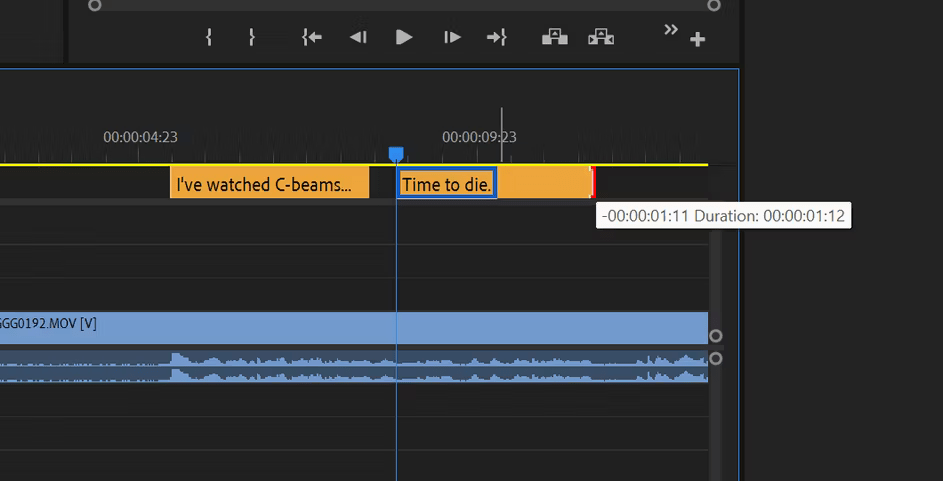
Note: Be careful not to delete captions while editing a video. This can happen when the captions item and the audio are linked. Unlike video or audio clips that are easy to restore, this action is permanent to captions; you may have to recreate them again.
How to stylize your captions
After creating your captions, you can stylize them using the text option in the Essential Graphics Panel. To access this, navigate to 'Essential Panel' and click the 'Edit panel'.
Stylizing involves giving the captions a unique look. Premiere Pro provides five options for this, including:
Changing the font: This allows you to change font properties like type, style, and size.

Caption Alignment: Use it to determine the vertical position of a caption. There are only three options due to Premiere Pro's limited control over style.
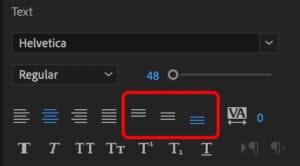
Captions alignment is also possible through the align and transform options. This allows you to choose where to place the captions according to zones.

Tracking and Leading: Add or reduce space between the characters and lines.
Faux styles: Use formatting options such as bold, italics, underline, superscript and subscript, all caps, and small caps to improve the caption's look and feel.
How to export captions
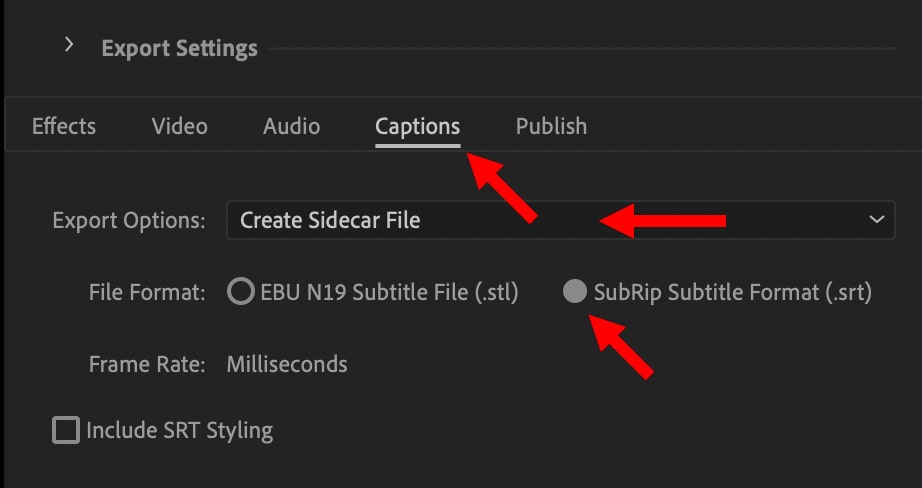
To export your captions as an SRT file, navigate to File>Export>Media and select the Captions tab. Choose the export options as 'create sidecar file' and the file format (Subrip subtitle format is the most common) before finally exporting.
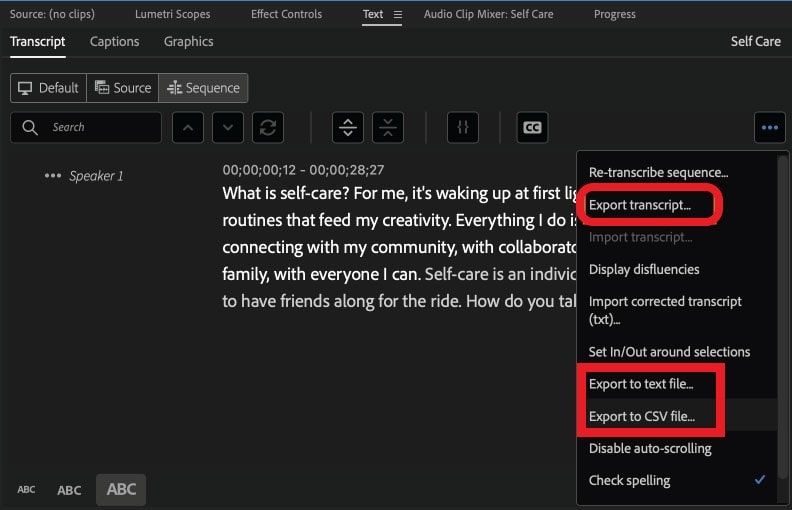
To get a text version of the captions, export the transcript.
Click on the 'Text panel' to access your transcript. Next, click the dotted (...) icon on the right corner of the 'Transcript tab.' Then, click on 'Export transcript' and select the file version.
Supported languages of Premiere Pro
Adobe Premiere’s transcription feature supports 16 languages. These include:
English (US & UK)
Korean
Danish
Norwegian
Dutch
Portuguese
French
Russian
German
Swedish
Hindi
Spanish
Italian
Simplified and traditional Chinese (Mandarin)
Japanese
Traditional Cantonese
There must be an internet connection to download and use the language packs. You can install them from the creatives cloud app or within Premiere Pro.
When using the Creatives Cloud app:
Click 'All Apps' to see all apps in your ecosystem.
Scroll down to Premiere Pro and click the three-dotted lines'...' on the right next to the open button.
Select 'Add-on' in the drop-down option and 'Add' your preferred language.
When installing within Premiere Pro, navigate to the transcript tab under 'Windows>Text' and click 'Create Transcript.' Next, click the drop-down icon on 'Languages' to reveal the various language packages you can download.

The latest Premiere Pro version (as of the writing of this article), Premiere Pro 22.2, comes with an already installed English Language pack.
To use other language packs, download them individually. Once downloaded, you can use the Adobe speech-to-text feature without an internet connection.
Alternative way to generate transcripts
Premiere Pro does an excellent job of enabling users to create transcripts from the app. Although the accuracy level is fair, it's not the best. Therefore, be ready to spend some time on edits.
If accuracy and time are your top considerations, consider using Notta to streamline your workflow. Notta is a cloud-based speech-to-text app that uses A.I. to transcribe and summarize audio and video content.
The platform provides much better service because:
It supports 58 languages.
The transcription accuracy is 98.86% (expect minimal edits).
Transcription speed is fast (it takes a few minutes to generate a transcript and download the SRT).
The transcripts are saved in the cloud and are available when needed.
How to use the tool:
Step 1: Head to Notta's webpage and sign in. Create a free account if you don't have one.
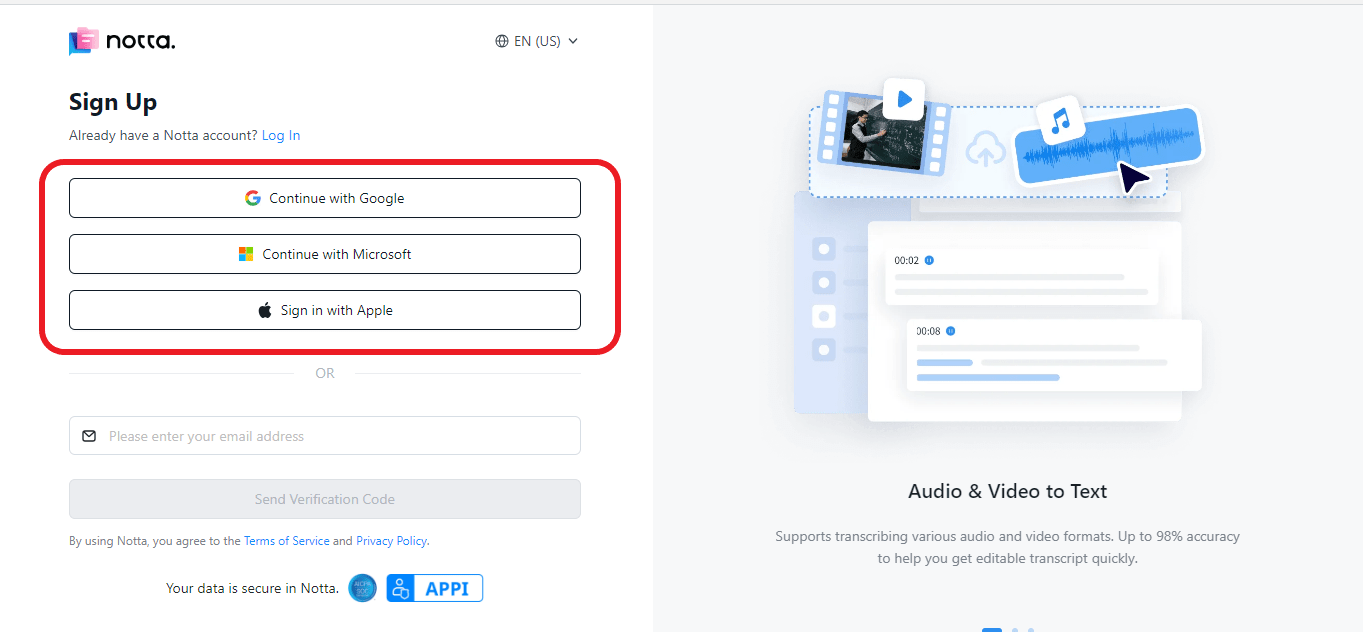
Step 2: Click 'Import files' on the left side of your dashboard.

Step 3: Set your transcription language in the pop-up window and choose whether to enable speaker identification.
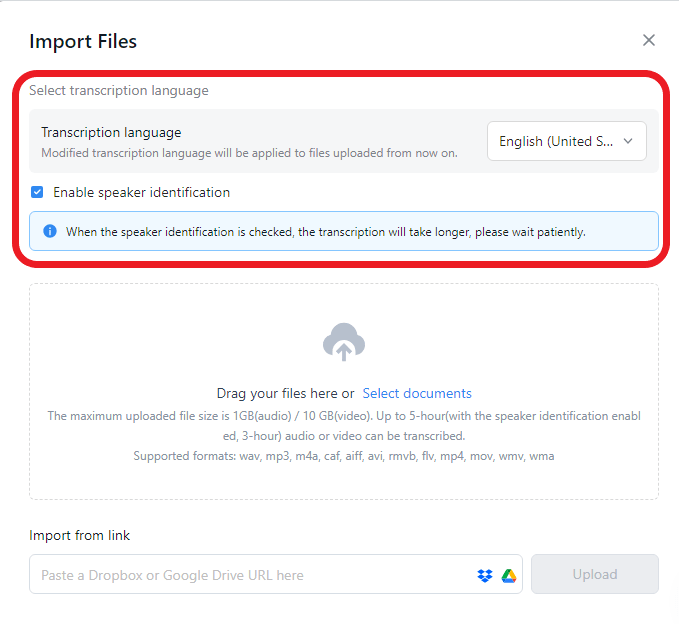
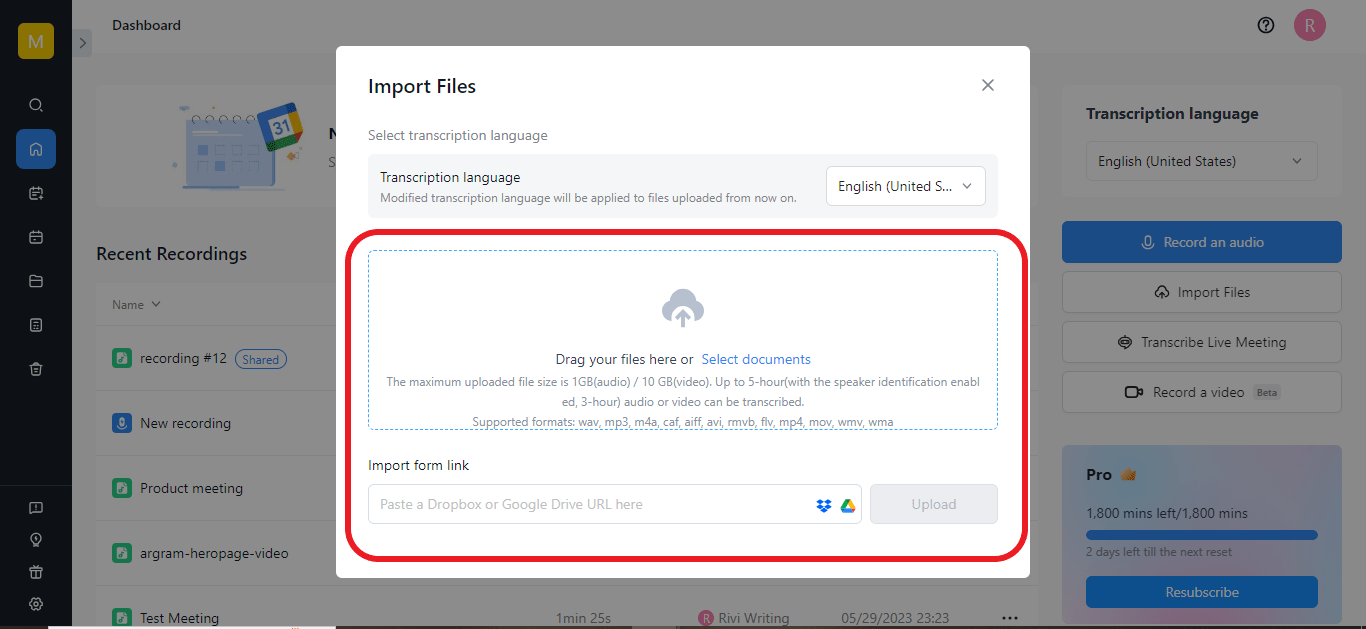
Step 4: Drag and drop your audio/video file to start the transcription.
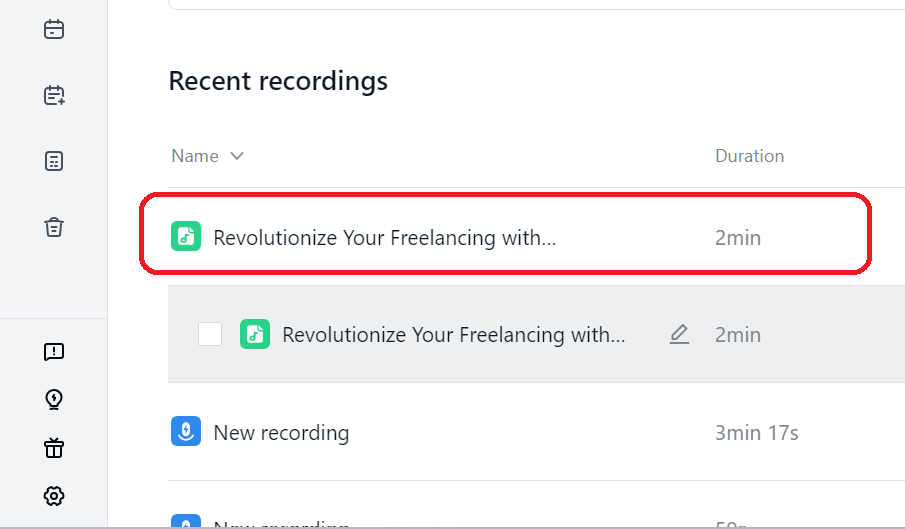
Step 5: Navigate to the dashboard to find the transcript under 'Recent recordings.' Double-click on it to open and make any edits.
Step 6: Click 'download' on the top right corner to export the transcript. Select the file format as 'SRT' and click ‘Export.’
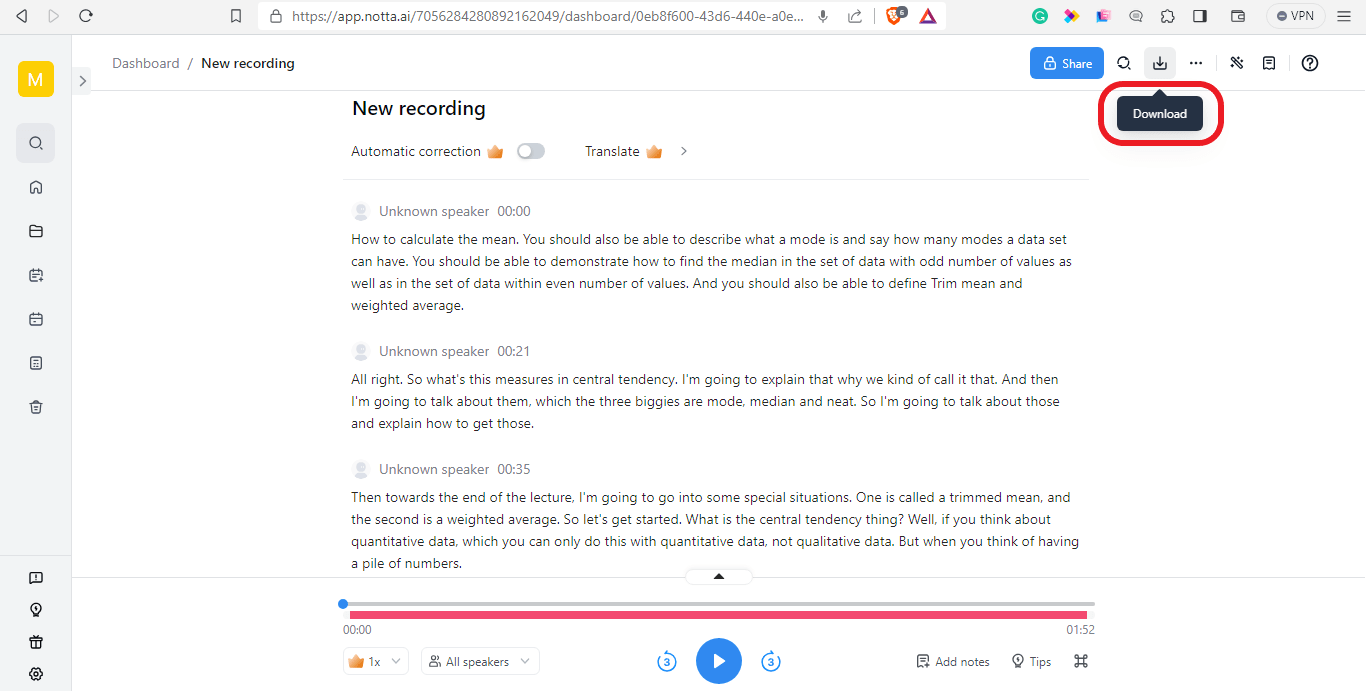
Step 7: Import the SRT file into your Premiere Pro project (follow the steps noted above on importing the SRT file from a third party)
Fed up with slow documentation? With Notta, you can record and access error-free transcripts seamlessly synced across all your devices.
In sum
Every content creator wants to make their content stand out. Captions and transcripts make your content visible to Google's SEO crawlers, making it easy for them to rank. It also taps into the people who are hard of hearing, thus expanding your audience.
Premiere Pro's transcription feature eases the headache of generating captions with the help of A.I. It also gives you back control over how and when to use the captions.
Although its accuracy may not be the best, the ability to import transcripts into a project allows you to use much more accurate transcription tools like Notta to make your work easier. Don't let your content get lost in an already saturated market. Make use of these tools today to improve your content.