![How to Record a Zoom Meeting on Laptop/Phone [Full Guide]](https://www.notta.ai/pictures/record-zoom-meeting.png)
How to Record a Zoom Meeting on Laptop/Phone [Full Guide]
Saving time and effort with Notta, starting from today!
Recording a Zoom meeting saves every audio, video, and chat exchange so you can review decisions and share updates from your calls. Zoom's built-in screen recorder works on desktop for all plan tiers and on mobile for paid users only. Without host permission, you can use Notta’s screen recording toolas an alternative.
In this guide, you’ll learn how to record a Zoom meeting step-by-step, use Notta for recording and transcription, and the best practices to follow before you hit record.
How Do You Record a Zoom Meeting on a Laptop? (As the Host)
To record a Zoom meeting as the host, open the Zoom desktop app, start a meeting, and click ‘Record’ in the bottom toolbar. Zoom converts and saves the file automatically when the meeting ends. Free users must save recordings locally as MP4 files, but paid users can choose between local and cloud storage.
Local recording saves the meeting directly to your computer as an MP4 or M4A file, so you can access it without an internet connection. Cloud recording stores the file in your Zoom account online, where you can access it from any device after the meeting ends.
Step 1: Open the Zoom app and host a new meeting.
Step 2: Select ‘Record’ in the bottom menu to start recording.
Note: Zoom automatically saves recordings to a local folder for free users. If you’re a paid user, you’ll see two options: ‘Record on this Computer’ or ‘Record to the Cloud’ and you can choose where to save your file.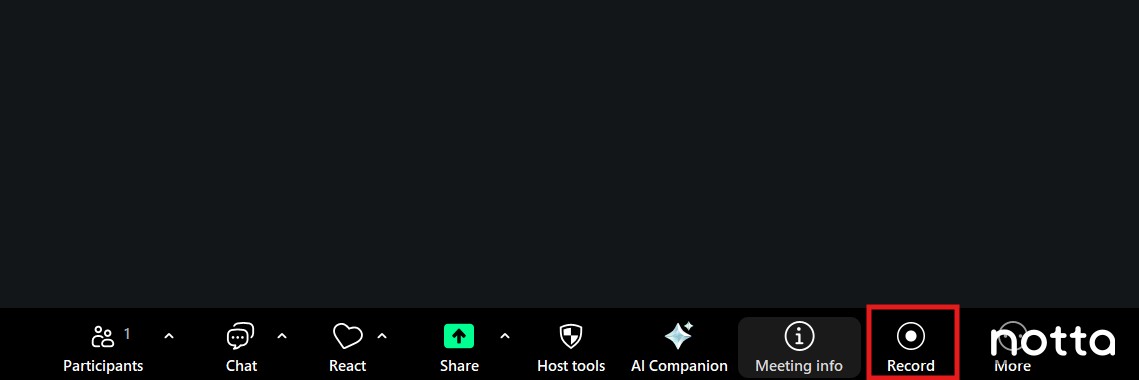
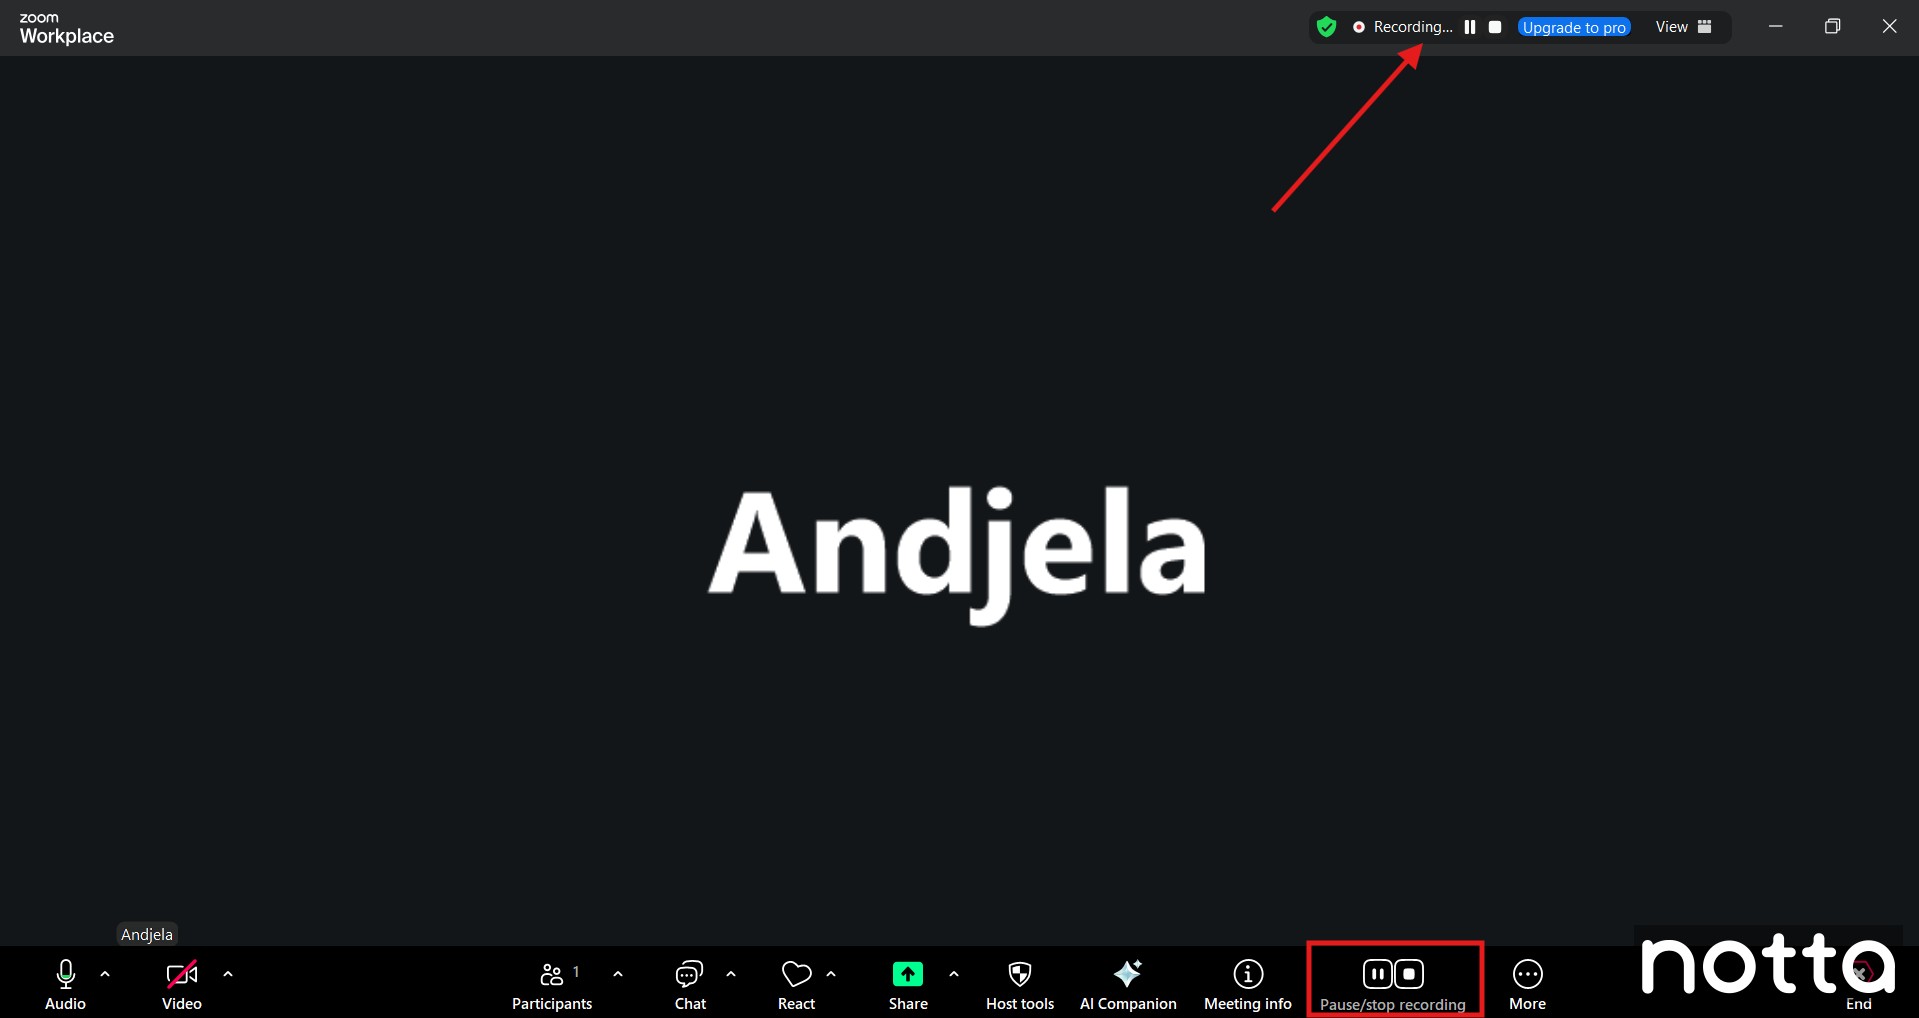
Once recording starts, Zoom displays a ‘Recording’ indicator in the upper-right corner of the screen, along with ‘Pause’ and ‘Stop’ controls.
Step 3. To pause the recording, click the ‘Pause’ icon in either the recording indicator at the top of the meeting window or the ‘Record’ controls in the bottom toolbar. To stop the recording, click ‘Stop,’ or use the keyboard shortcuts ‘Alt + R’ on Windows or ‘Command + Shift + R’ on Mac.
Zoom automatically converts and downloads the recording as soon as the meeting ends. Local recordings save to your computer’s hard drive, while the cloud recording option saves them to your Zoom cloud folder, which you access online.
Keep in mind that Zoom saves video recordings as MP4 files inside the Zoom recording folder on your computer. If you enable separate audio recording in Settings, Zoom also saves audio-only files as M4A files in the same meeting folder.
Can you record a Zoom meeting if you are not the host?
You can record Zoom meetings as a participant in two different ways. One approach is to request permission from the host, and the other is to introduce a third-party meeting recorder.
Method 1: Getting permission from the host
Only the meeting host can control recording permissions in Zoom. If you join as a participant, you need the host’s approval before you can record inside the app.
If the host isn’t sure how to enable recording for you, share these steps:
Step 1: During a meeting, click ‘Host Tools’ at the bottom of the Zoom toolbar.
Step 2: Enable either ‘Record to computer’ (participants can record immediately) or
‘Request to record to computer’ (participants must ask for approval first).
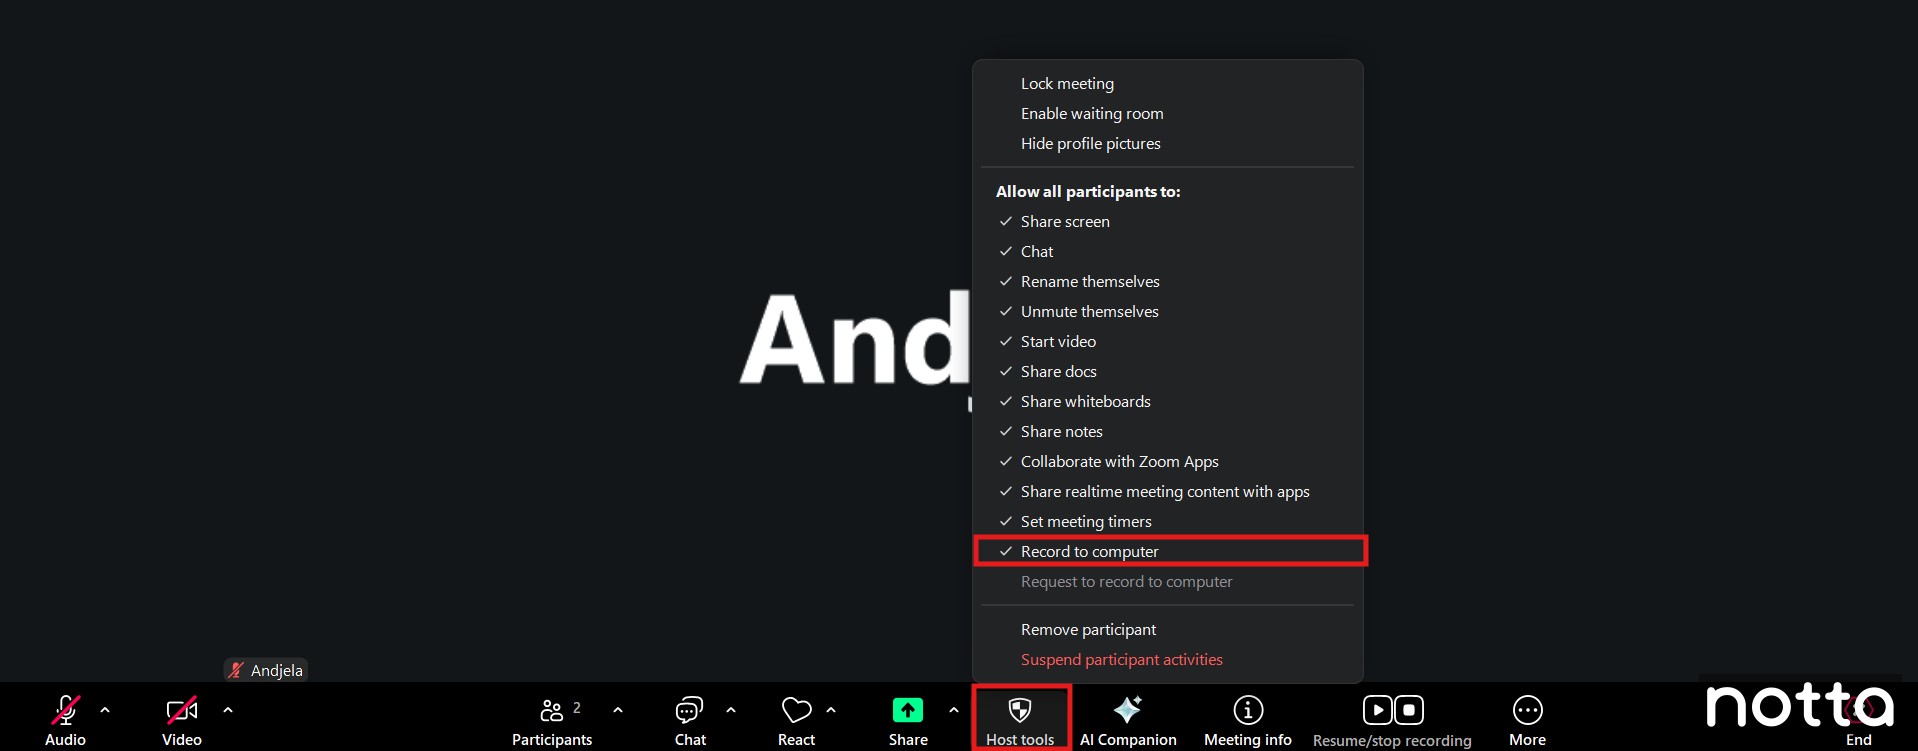
To remove access, open ‘Host tools’ and turn off participant recording or disable requests.
Method 2: Using a third-party meeting recorder
Zoom includes built-in recording, but you can only use it if the host gives you recording permissions. Since hosts can disable recording at any time, it’s more practical to use Zoom recording software instead.
Notta lets you record meetings using screen recording when in-app recording isn’t available. It’s an all-in-one meeting assistant and offers several practical benefits:
Automatically record your online meetings with live transcripts and timestamps so you don't miss out on crucial details.
Capture and transcribe audio and video with up to 98.86% accuracy.
Access your meeting recordings immediately and review them with adjustable playback speed.
In addition to Zoom, Notta integrates with Google Meet, Microsoft Teams, and Webex.
How do you record a Zoom meeting without permission?
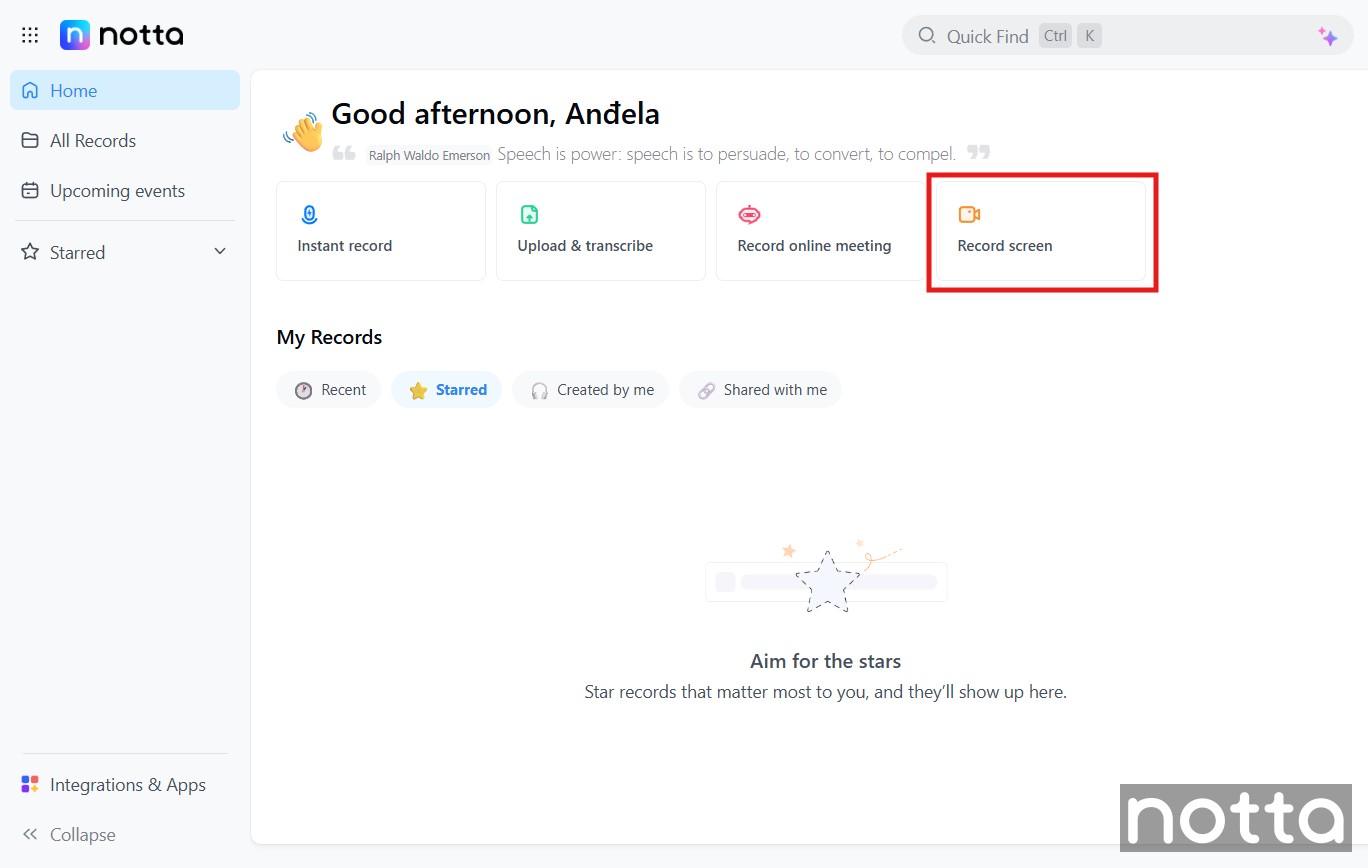
To record a Zoom meeting without host permission, use Notta’s screen recording tool. Open Notta, click ‘Record Screen’ on the dashboard, select your Zoom call window, and click ‘Share.’ Notta captures the meeting and automatically generates a transcript. Always confirm you have consent before recording.
To record a Zoom meeting without the host's permission, you’ll need a Notta account.
Step 1: Set up your account using your email address or a Google, Microsoft, or Apple account and sign in.
Step 2: Click ‘Record screen’ on the Notta dashboard.
Step 3: Choose ‘Screen Only’ under ‘Video Settings.’ Check your microphone and camera and adjust transcription settings, then click ‘Start Recording.’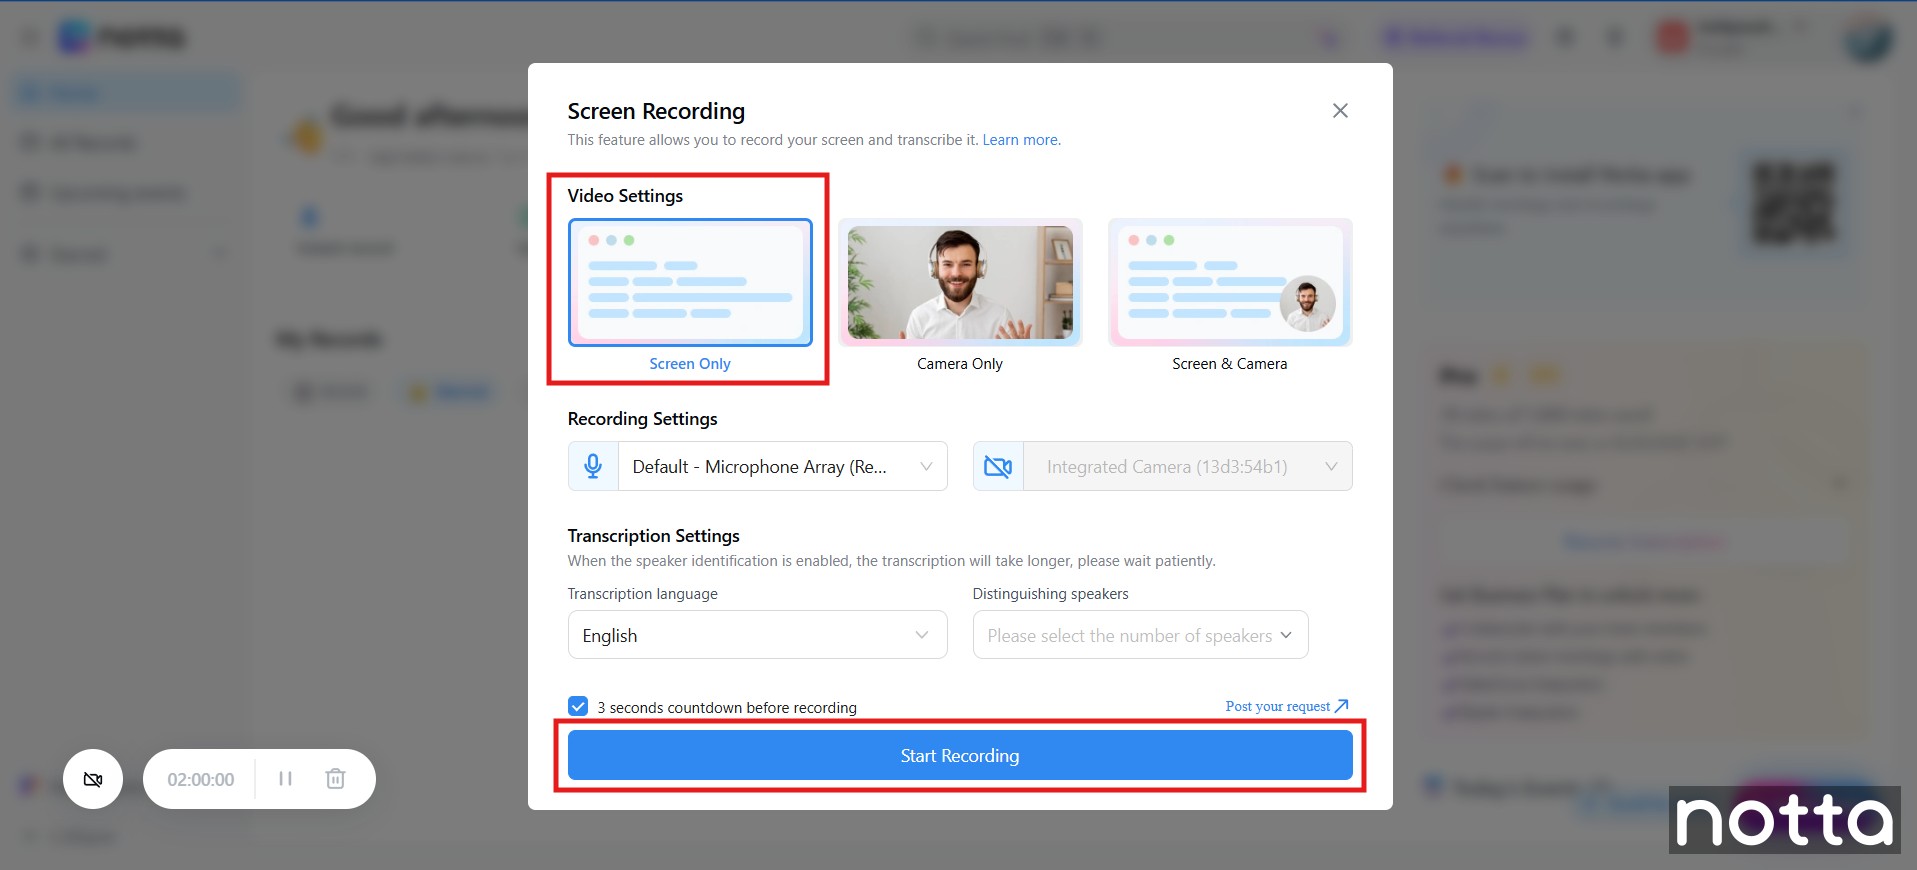
Switch to the ‘Window’ tab, select your Zoom meeting window, and click ‘Share’ to continue.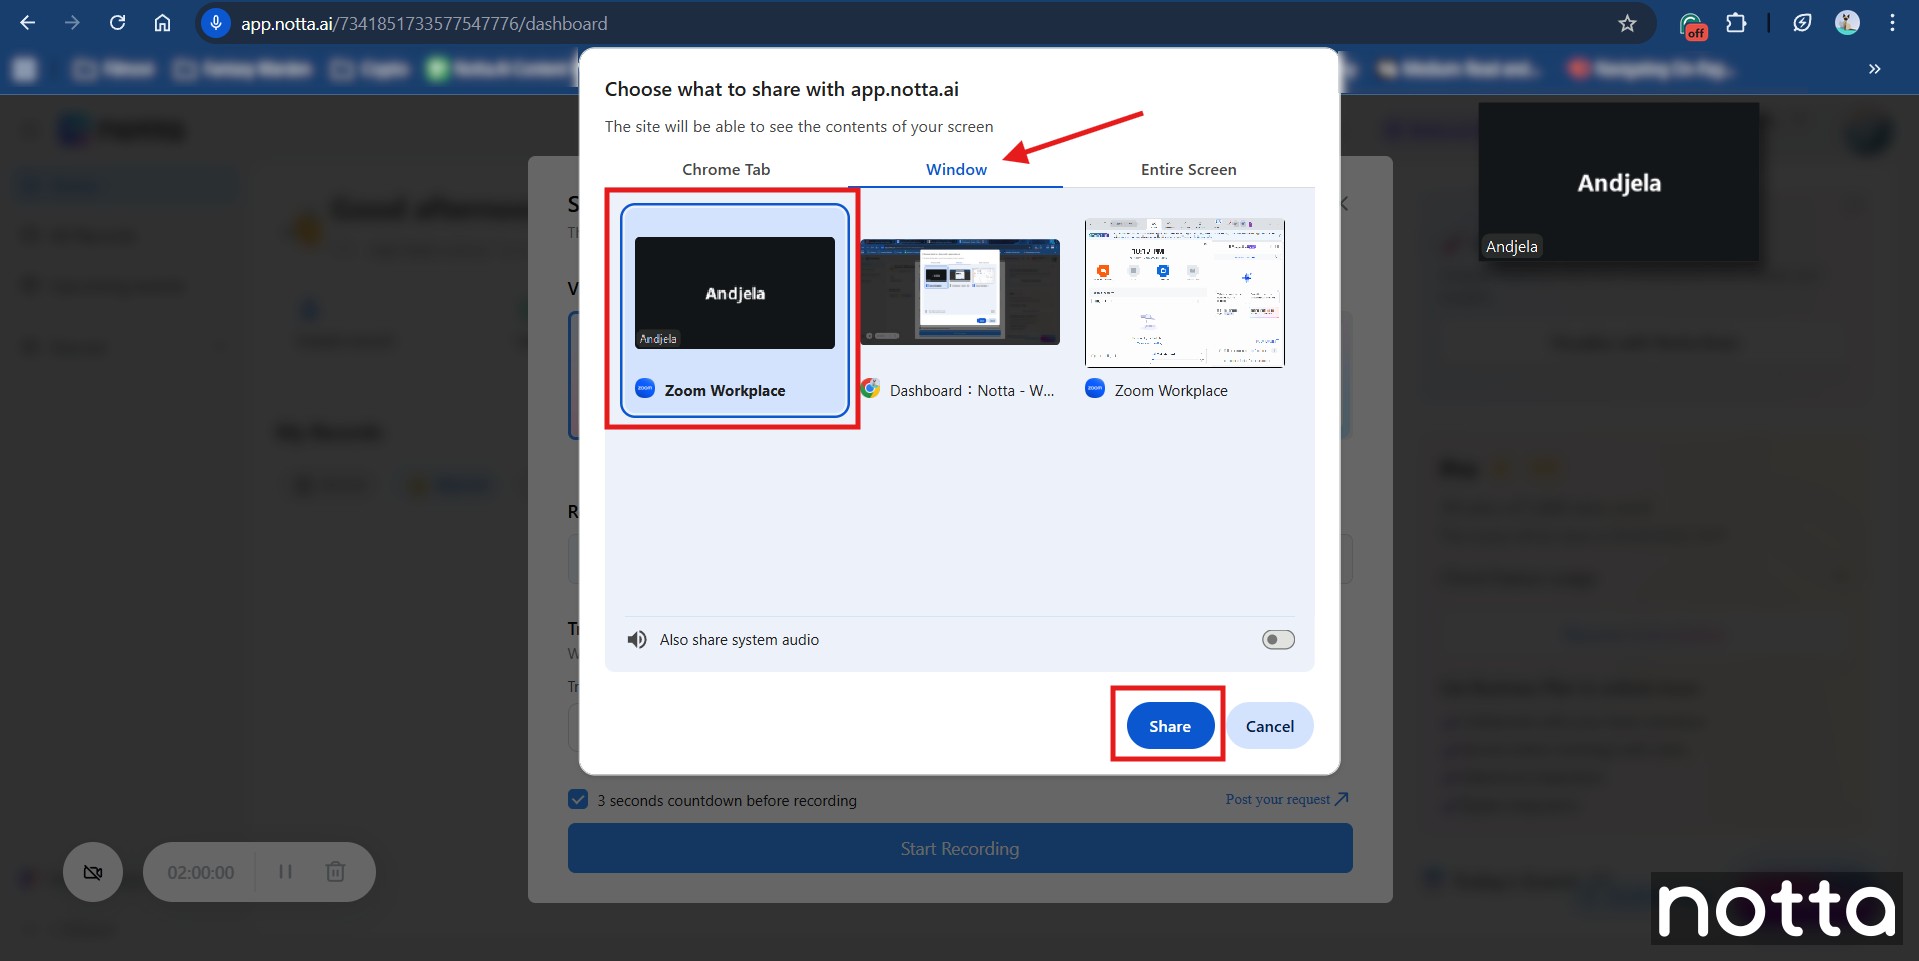
You’ll see a recording indicator at the bottom that confirms that Notta is capturing your screen.

After you stop recording, give Notta a few moments to process the file. Once processing finishes, you’ll see the recording appear in your dashboard.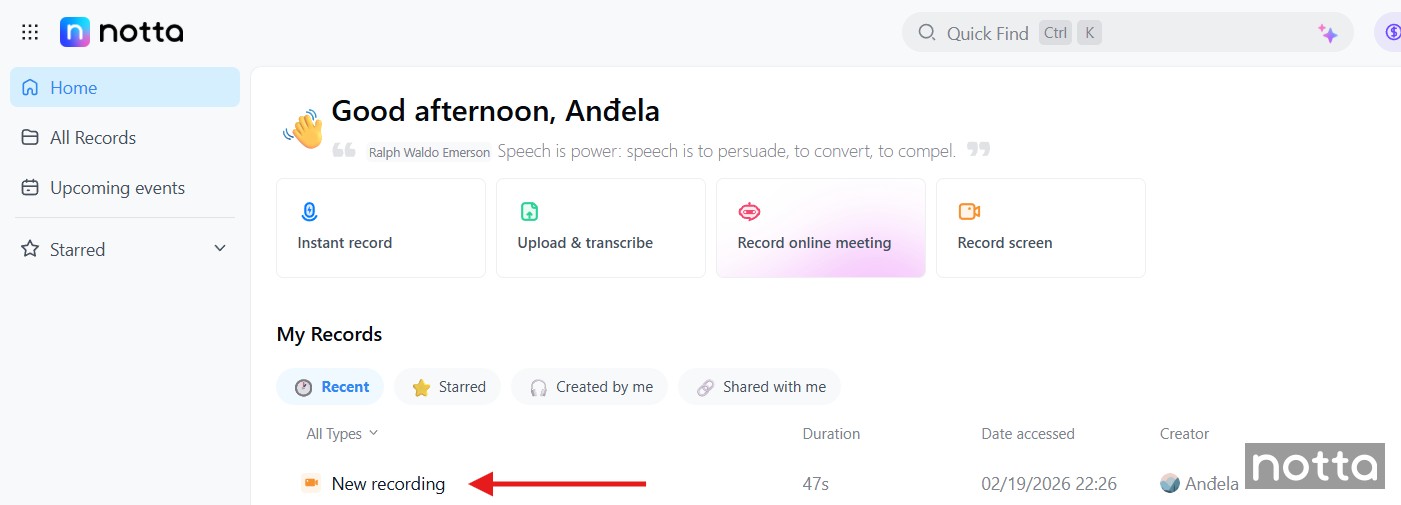
Open the file from your dashboard to view the recording, read the full transcript, and generate AI meeting notes.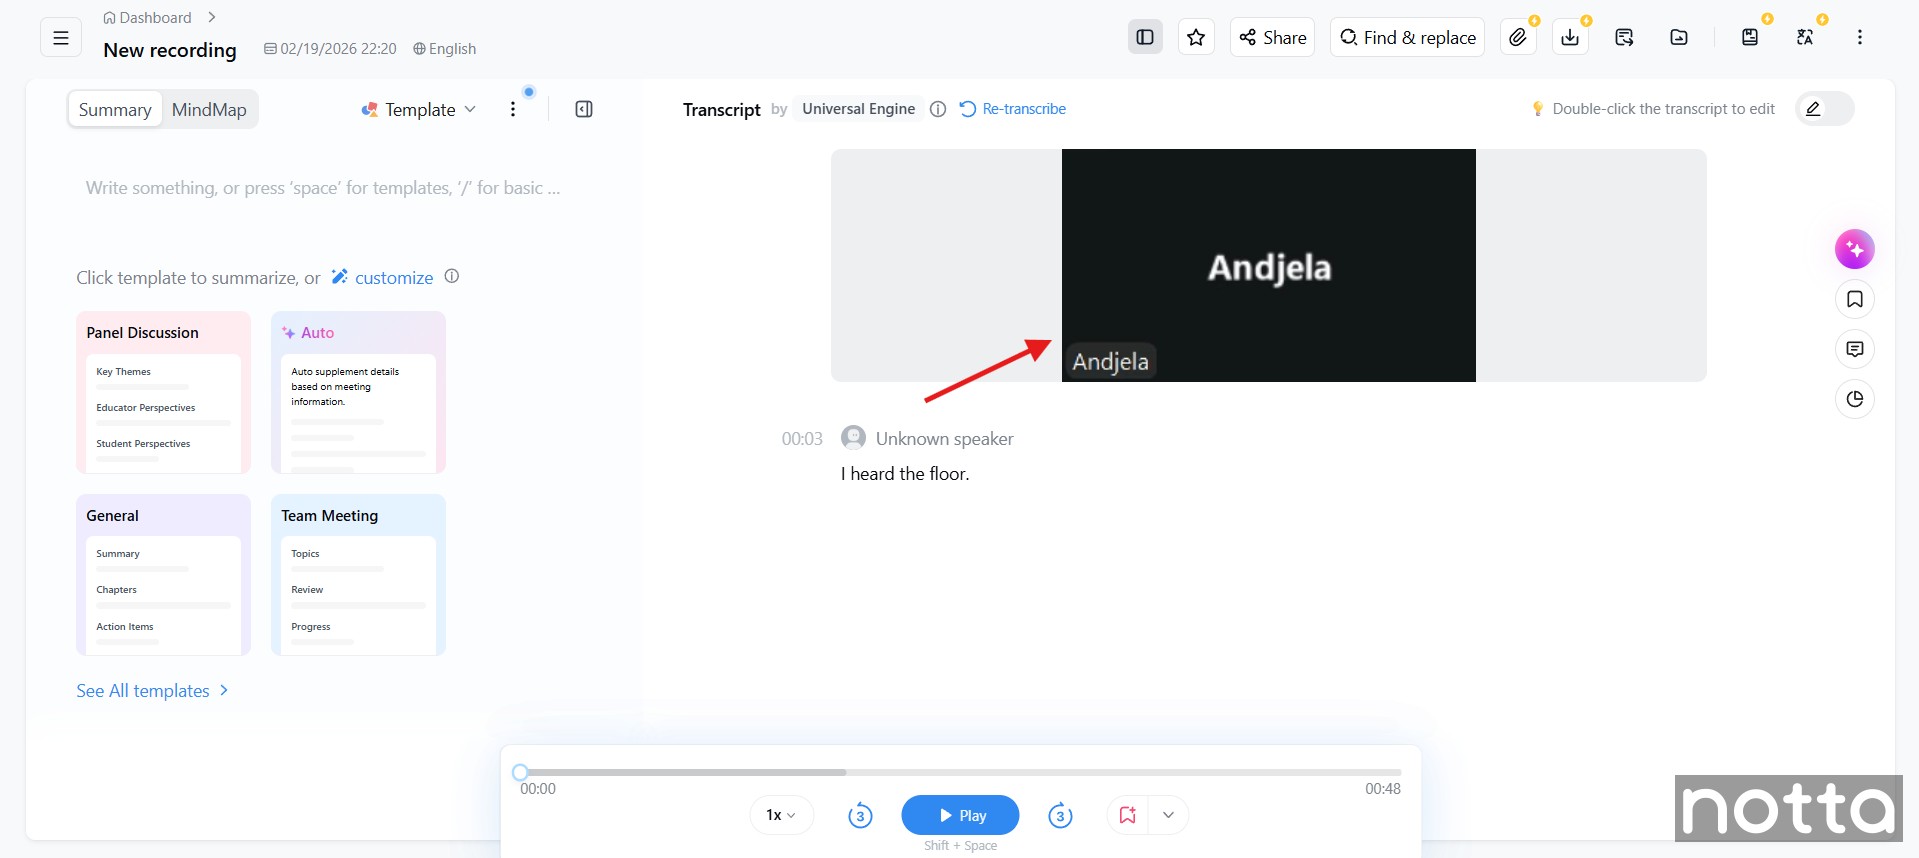
How do you record Zoom meetings on mobile devices?
To record a Zoom meeting on a mobile device, you need a paid Zoom plan. Tap ‘More’ in the bottom-right corner of an active meeting, then tap ‘Record’ and select ‘Start Recording.’ All mobile recordings save automatically to your Zoom cloud account. Local device storage is not available on mobile.
Follow this step-by-step process to record on Zoom on your iPhone or Android device.
Step 1: Once you are in a Zoom meeting, tap the ‘More’ option (three horizontal dots) at the bottom right corner of your screen.
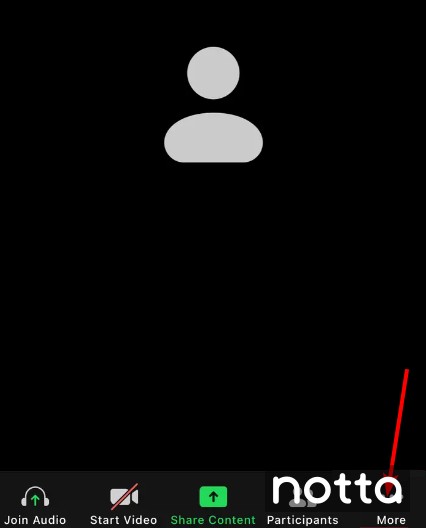
Step 2: Tap the ‘Record’ icon in the meeting control toolbar, then tap ‘Start recording.’
Zoom will display a ‘Recording’ indicator in the top-left corner.
Step 3: To stop or pause the recording, tap the ‘Record’ button again and select either ‘Pause recording’ or ‘Stop recording.’
Once you stop the recording, Zoom automatically saves the file to the ‘Recordings’ folder in the Zoom web portal.
Get the most out of your Zoom recordings with Notta
You recorded the meeting. Now what? The recording shouldn’t end up buried in a folder you never open again. Notta extracts value from every meeting the moment it ends.
Stop replaying entire meetings. Notta turns your Zoom recordings into transcripts with up to 98.86% accuracy, so you can search for keywords instead of scrubbing through a two-hour call just to find one detail. Perfect for client calls, interviews, or team meetings where everything matters.
Move through recordings faster. Speed up playback, jump to timestamps, and go directly to the part you’re searching for to save yourself a lot of time and frustration.
Know who said what without guesswork. Speaker identification keeps conversations clear, especially during group discussions or panel-style meetings. No more wondering who made the decision or who promised the follow-up.
Share recordings without the file chaos. You don’t need to download videos and upload them somewhere else. Share directly from Notta and keep absent team members aligned.
Collaborate directly inside Notta. Your teammates can review transcripts, leave notes, and align on next steps in one platform.
Turn long calls into useful summaries. AI notes and templates help you organize meetings, whether you’re running business updates, healthcare consultations, marketing reviews, education sessions, or media interviews.
Keep sensitive conversations protected. Notta uses 256-bit AES-standard encryption, so you can record and share your meetings without worrying about security.
Ask questions instead of digging through recordings. Use Notta Brain's AI chat to ask questions about your meeting and get instant answers pulled from the transcript.
What are the Best Practices for Recording Zoom Meetings?
Recording a Zoom meeting effectively comes down to using the right settings, having reliable equipment, and keeping participants informed. The following best practices help you avoid device audio issues, protect privacy, and make sure your recording is clear and usable for review, sharing, or transcription.
Inform participants before you start recording. Let everyone know the meeting is being recorded and confirm consent, especially if you plan to share or publish the file.
Use a stable internet connection. A wired connection or a strong Wi-Fi signal prevents lag, frozen video, and audio dropouts in your recording.
Use high-quality audio and video equipment. An external microphone improves clarity more than a built-in laptop mic, and proper lighting makes recordings easier to watch.
Choose the right Zoom recording settings. Enable HD video (if needed), record separate audio files for each participant for easier editing, and select the correct layout (speaker view or gallery view).
Close unnecessary applications and notifications. It prevents distractions, protects privacy, and reduces the risk of recording pop-ups during screen sharing.
Use Notta to record, transcribe, and create meeting notes automatically. Notta helps you capture key points, summaries, and action items without manual note-taking.
Test your setup before the meeting starts. Run a short test recording to confirm audio levels, camera framing, and recording permissions work correctly.
Why is Zoom Recording Not Working?
Zoom recording issues come down to permissions, file processing, or audio settings. Here are the most common problems and quick fixes.
Pro tip: Before you start troubleshooting, update your Zoom app and check that your device has enough storage.
Why Can’t I Record on Zoom?
You won’t see the option to record at all, even as the host, unless recording is enabled in your account settings first. It’s turned on by default for most users, but it’s worth checking your web settings if you don’t see the ‘Record’ button.
Solution: Sign in on the Zoom web portal, click ‘My Account,’ open ‘Settings,’ and select the ‘Recording’ tab. Turn on ‘Record to computer files.’ If the option is locked, your account administrator has restricted recording permissions and will need to enable it.
Why Is My Zoom Recording File Missing?
Your recording may appear missing because Zoom is still processing it after the meeting ends, or it has been saved to a different folder. It happens when you close Zoom before the conversion finishes, so the file doesn’t appear immediately.
Solution: Open Zoom again and let it complete the conversion process. Check the default Zoom folder or open the app and click ‘Open recordings’ at the bottom of the homepage to locate the file.
Why Is the Record Button Missing or Disabled?
The record button won’t appear if you don’t have recording permissions. You’ll run into this problem if you join as a participant, use a free account without cloud recording, or enter the meeting from a browser instead of the desktop app.
Solution: Ask the host to grant you recording permission during the meeting, then switch to the Zoom desktop app if you joined from a browser. Check your Zoom settings to confirm recording is enabled for your account.
Why Is There No Audio in My Zoom Recording?
Missing audio means Zoom recorded video but didn’t capture the correct input source. This happens when Zoom uses the wrong microphone, your system blocks microphone access, or you switch audio devices during the meeting.
Solution: Check your Zoom audio settings before you begin recording and run a quick audio test. Make sure your operating system allows microphone access and avoid changing audio devices mid-meeting.
What are the Zoom Recording Limits By Plan?
Zoom recording features depend on your subscription plan. Free users can record meetings locally on desktop, but they can’t record on mobile or use cloud storage. Paid plans unlock cloud recording, mobile recording, and automatic transcription across devices.
| Feature | Free Plan | Pro/Business Plan |
|---|---|---|
| Local recording (desktop) | Yes | Yes |
| Cloud recording | No | Yes |
| Mobile recording | No | Yes, cloud only |
| Participant recording | Yes (with host permission) | Yes (with host permission) |
| Automatic transcription | No | Yes |
| Cloud storage retention | N/A | 3 years by default |
Turn Your Zoom Recordings into Results with Notta
Recording a Zoom meeting is only the first step. You still need to review the discussion, find key moments, and share all the outcomes. Notta takes you from raw recordings to usable content faster.
With Notta, you can jump directly to important moments using timestamps, review your transcripts while listening to the audio, and quickly pull out highlights for teammates or stakeholders. Whether you record client calls, team meetings, interviews, or lectures, Notta saves time and keeps your information organized.
Finally, the Notta bot automatically joins Zoom meetings through your calendar, so you don’t have to start recordings manually every time.
Zoom captures the call, but Notta helps you turn it into data you can use.
FAQs
Can I record a Zoom meeting without permission?
You can record a Zoom meeting without host permission using Notta meeting recording software. Click ‘Screen Record’ on the Notta dashboard, choose the Zoom window, and click ‘Share’ to begin. Check your local laws and company policies, and make sure you have consent before recording any meeting.
Why can't I record my Zoom meeting?
You cannot record a Zoom meeting if you lack host permission, use the mobile app without a paid plan, or your organization has disabled recording in account settings. Check your Zoom account type and recording settings in the web portal to identify which restriction applies.
Does Zoom record your whole screen or just the meeting?
Zoom records only the meeting window, not your whole screen. It records audio, video, chat, and shared content within the meeting, but it does not capture other apps open on your device. However, if you use ’Share Screen,’ the recording will include all content you share on screen.
Where do recorded Zoom meetings go?
Recorded Zoom meetings go to the default recording location on your computer. To find or change it, click your profile picture in the Zoom desktop app, then select ‘Settings’ and go to ‘Recording’. Under ‘Local recording storage’, you can open the current folder or click ‘Change’ to choose a new one. Zoom saves cloud recordings in your online Zoom account in a ‘Cloud Recordings’ folder.
How can I share recorded Zoom meetings?
You can share recorded Zoom meetings by locating the file on your computer and uploading it to Google Drive, the cloud, or another file-sharing service, then sending the link to the other person. Depending on the file size, you may also be able to share it as an email attachment. If the file is too large, you can edit the Zoom meeting recording to remove unnecessary parts before you share it.
This one is a little better than the previous one, but it does tend to be long-winded and overly academic in phrasing. Please remember to keep the current internal links as you rewrite.
Main keyword: how to record a zoom meeting
Top ranking (non-Reddit) pages:
1. https://support.zoom.com/hc/en/article?id=zm_kb&sysparm_article=KB0063640
2. https://service.uoregon.edu/TDClient/2030/Portal/KB/ArticleDet?ID=101835
To-do List:
1. The intro is too long (and long-winded) for a how-to, so please swap to the new short how-to/Claude hybrid style.
2. Review the process steps and update as necessary, with new screenshots if needed. Fix any outdated language/phrasing along the way.
3. Go through the rest of the highlighted sections, including the new CA notes:
- Add a section on 'Good Recording Practices' and 'Optimizing Recording Settings' to provide more comprehensive advice, similar to competitors. (Affects all users looking for best practices)
- Include troubleshooting tips for common recording issues (e.g., corrupted files). (Affects users encountering technical problems)
- Expand on the 'When to record' section to provide more use cases and benefits beyond just 'not missing details'. (Enhances value for all users)
----
Not too clear about this last point. There is no matching section, but 'provide more use cases and benefits' is pretty straightforward, so we can integrate that more throughout.
4. Implement Claude analysis results to improve the score, and add the SERP prompt results for review
5. Surfer optimization will need to be pretty high this time, let's aim for 80 at minimum, since it sees the current top as 76. If we can push it higher up to 85 without making it seem unnatural, that would be even better.
here's the first iteration of Claude https://claude.ai/share/62bdbff6-99f5-486f-a226-9be6410118db, going to run it again after we agree on the changes
SERP: https://claude.ai/share/2d01916f-fba4-48f9-adf1-1ada6b43fd06 - I didn't look at it in depth, will go over it again tomorrow
Has this been re-run through C?
Here you go https://claude.ai/share/62bdbff6-99f5-486f-a226-9be6410118db
Left the rest as suggestions
https://claude.ai/share/62bdbff6-99f5-486f-a226-9be6410118db
OK I think this is finally ready - one last analysis with the latest changes, and we should be good to go.
https://claude.ai/share/62bdbff6-99f5-486f-a226-9be6410118db
Just the two question-based headings
https://www.ucl.ac.uk/isd/services/communicate-collaborate/zoom/changes-to-zoom-cloud-recording-retention

