Read next: Top 6 Subtitle Editors in 2024 [Free & Paid]

How to Add Subtitles & Captions in Premiere Pro
98% accurate, real-time transcription in just a few clicks. 58 languages and multiple platforms supported.
Videos are an important part of the modern Internet, whether they are short viral clips on TikTok, in-depth video tutorials on YouTube, or stories on Instagram. Of course, you can just shoot the video and make it live — but you'll need to add subtitles and captions for a wider reach.
I've used all sorts of video editing applications in the past — and one of them is Premiere Pro. Adobe Premiere Pro is an industry-standard video editing tool with a clean and uncluttered interface. While it has certain features to automatically add subtitles to videos, it might be hard for beginners.
Here, I'll reveal how to add subtitles in Premiere Pro — a powerful video editing app.
How to add subtitles or captions automatically
Premiere Pro comes with a built-in automated captioning feature that can convert audio to text and then create a caption track that can be edited, adjusted, and moved around. Here's how to add subtitles in Premiere Pro automatically.
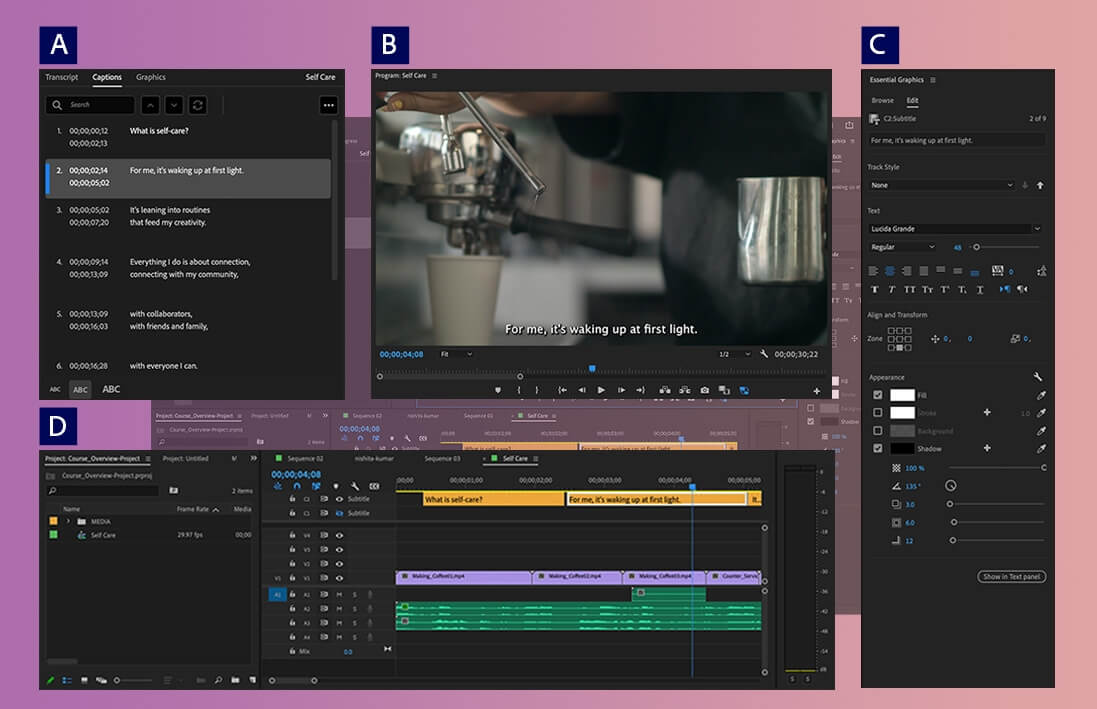
Step 1: Open the Adobe Premiere Pro and then locate the ‘Workspace’ option, typically located at the top right corner of the window. Select ‘Captions’ to open the captions workspace and generate a transcript.
 Image Ref: Adobe
Step 2: Next, you'll need to click ‘Transcribe Sequence’ and then select the audio language of your choice. What I really like about Premiere Pro is its ability to either transcribe a specific point-to-point section or a whole sequence timeline.
If you're looking to create subtitles rather than captions, all you need to do is tell Premiere Pro only to transcribe clips tagged as ‘dialogue.’ You can create dialogues by selecting the clip in the Premiere Pro timeline and then categorizing it as dialogue in the sound panel.
Finally, click ‘Transcribe’ and watch Premiere Pro, which automatically converts speech to text.
Step 3: In order to automatically add these captions to the timeline, just click the ‘Create Captions’ button.
How to add subtitles or captions from third-party tanscriptions
If you've access to a third-party transcription service, the process to add subtitles or captions is easier than you may think. One of my favorite AI free transcription software— Notta — can help you make the overall process even easier. It has a high 98.86% accuracy rate, so you never have to worry about hour-long editing.
Here's how to add subtitles in Premiere Pro with the help of third-party transcription tools.
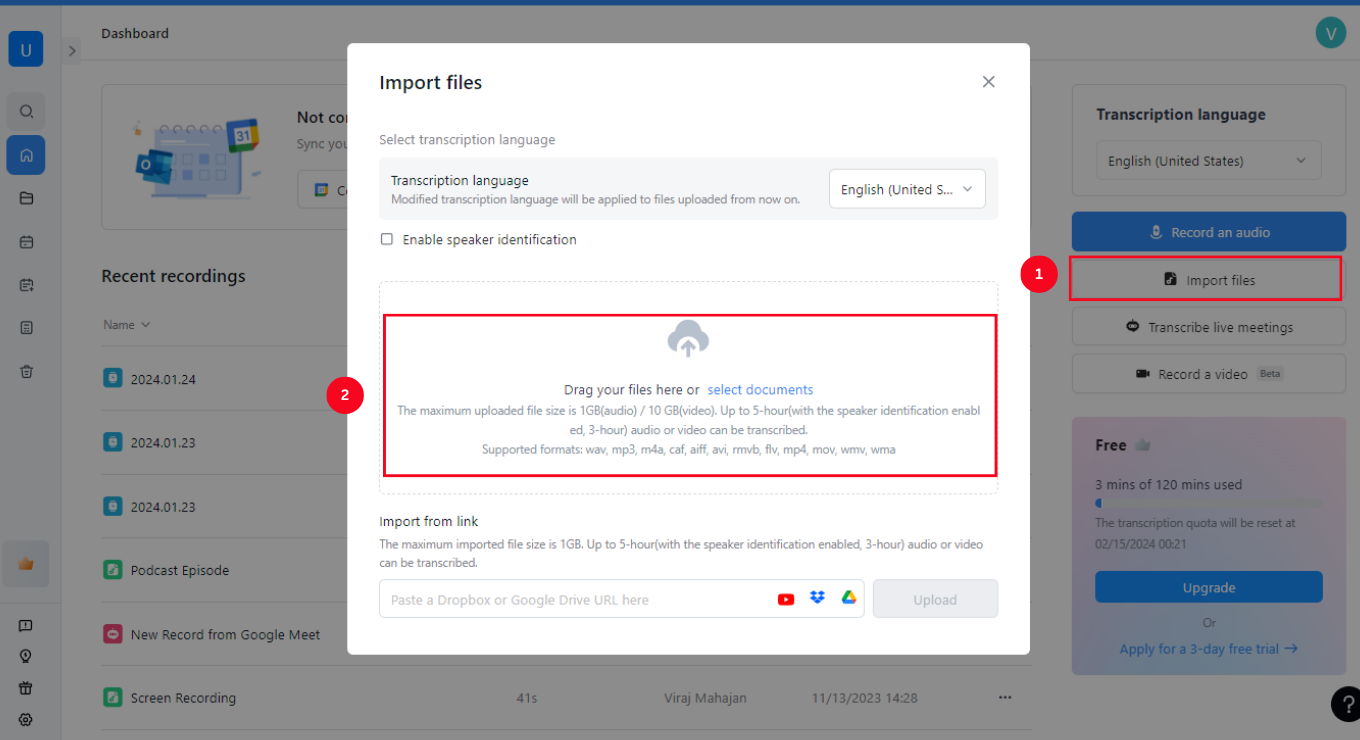
Step 1: Go to the Notta and click ‘Import Files’ located on the right side of the window. When the pop-up window appears, simply drag and drop the video files saved on your device.
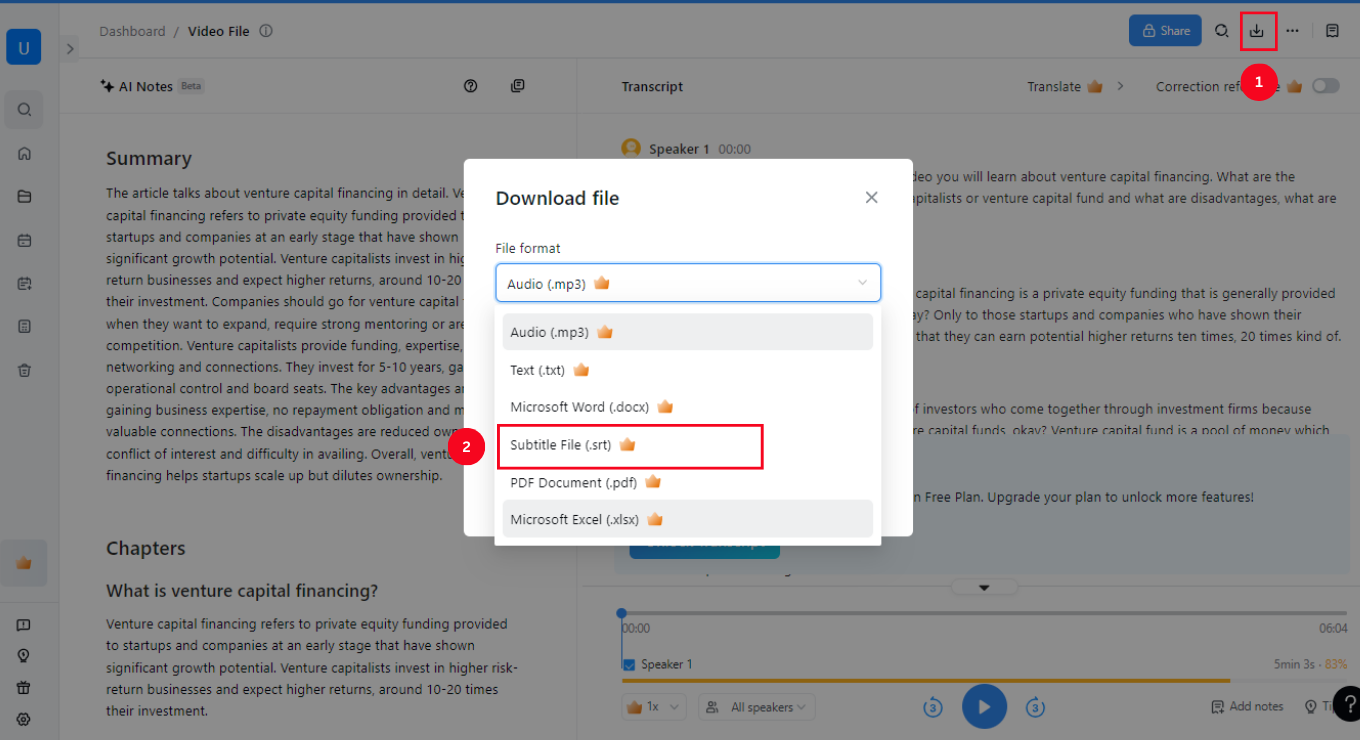
 Step 2: Next, double-click the recently transcribed file to view the transcription and then select the ‘Download’ icon to save the Subtitle (SRT) file.
 Step 3: Just like any other media, drop the SRT text file into Premiere Pro, followed by dragging SRT from the project panel into your sequence. Premiere Pro will automatically create a new caption file with all the subtitles.
Notta offers multi-language, accurate transcriptions to boost your video engagement.
How to add subtitles or captions manually
Premiere Pro's transcription accuracy is fair but not the best. Occasionally, the speech-to-text feature will make mistakes with brand names, punctuation, and spelling. For this reason, some people prefer to add subtitles or captions manually — though the process can be time-consuming. Here's how to add captions in Premiere Pro manually.
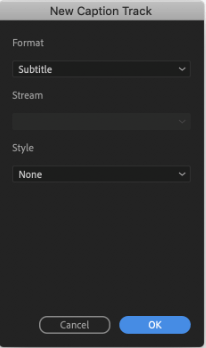
Step 1: Open Premiere Pro and directly head to the Captions workspace. There, you must locate and select ‘Create New Caption Track’ followed by ‘Subtitle.’ Click ‘OK’ to confirm to view a new subtitle track in the timeline.
 Image Ref: Adobe
Step 2: In the top left-hand corner, locate the ‘Text Panel’ and select the ‘+’ icon to add a new caption line. Simply listen to the segment where you want to add a caption line and convert the audio to text.
Step 3: Repeat these steps until you've transcribed and successfully added captions to the whole video.
How to edit and customize subtitles and captions in Premiere Pro
With the help of the Essential Graphics Panel in Premiere Pro, you can edit and customize subtitles and captions. Here are some ways to get started.
Font: In order to change the font of the subtitles or captions, move to the Essential Graphics Panel and choose a font from the drop-down list. Here, you can even adjust the font size, the space between the characters, and the paragraph alignment of the subtitles.
Appearance: The ‘Appearance’ section, typically located in the Essential Graphics Panel, helps change the color, thickness, shadow, or background of the subtitles.
Position: There's an ‘Align and Transform’ section that allows Premiere Pro users to adjust the caption placement. For example, the ‘Zones’ box can manipulate how the captions appear in the final edited version.
Animation: If you want to add some animation or effects to the captions, all you need to do is change the captions into ‘Source Graphics.’ For this, go to the ‘Graphics and Titles’ and then choose ‘Upgrade Caption to Graphic.’
FAQs
What is the Premiere Pro plugin for subtitles?
While the Adobe Premiere Pro comes with a built-in captioning feature that gets the job done, there are many plugins worth trying.
Trint: It's a plugin that automates the process of audio transcription and even helps convert it into text subtitles.
SUGARfx Subtitle: This is another Premiere Pro plugin that streamlines the process of working with subtitles in a common SRT format. With this plugin, you can automatically add subtitles and even work with files created by others.
SubBits: It's an app specially designed for subtitling. While it's a standalone app, it can be easily integrated with Premiere Pro.
What caption file formats can I use in Adobe Premiere Pro?
It's pretty simple to add captions and subtitles in Adobe Premiere Pro with the right caption file formats. Here are the caption file formats supported by Premiere Pro.
MacCaption VANC File (MCC)
Scenarist Closed Caption File (SCC)
SubRip Subtitle Format (SRT)
EBU N19 Subtitle (STL)
SMPTE Timed Text (XML)
Why are my captions not showing up on Premiere?
It can be really frustrating if you cannot see the captions on the Premiere Pro even after spending hours on it. To resolve this error: Go to the ‘Settings’ option available in the program monitor and then select ‘Closed Caption Display’ to make sure you've enabled the caption. If this doesn't work, head to ‘Settings’ and then enable CEA-608 or CEA-708.
Key takeaways
I've been producing, editing, and even sharing videos for over a decade as a part of my career. For me, the most important part of any video is the subtitles and captions — as they can improve the reach. While Adobe Premiere Pro allows you to add subtitles to videos both manually and automatically, it can be time-consuming. That's where the Notta AI transcription tool sounds like a great solution to how to add subtitles in Premiere Pro query. Its accurate speech-to-text feature analyzes the audio and converts it into a text (SRT) file.
For additional tips and resources to master Premiere Pro, explore the Envato Elements blog. Packed with tutorials and creative assets, it's a valuable complement to your learning journey.