
How to Screen Record on Chromebook in 3 Steps (and Audio)
98% accurate, real-time transcription in just a few clicks. 58 languages and multiple platforms supported.
When you only need certain web applications, Chromebooks are a great — and cheap — alternative to Windows or Mac. And they, too, let you record the screen with the keyboard shortcuts. I've used a Chromebook, and I admit recording any screen in a Chromebook works almost the same as on a Windows PC or Mac.
Chromebook also includes built-in screen recorders like Screen Capture and Screencast apps, which work much like the recording tools of Windows. They can record a full screen, a specific window, or just a section of the screen — with or without sound.
But how to screen record on Chromebook with the built-in recorder and third-party tools? Let me walk you through the detailed steps!
How to screen record on Chromebook with the keyboard
The keyboard shortcut method is one great way to quickly record the screen you need — but if you want to customize the size of the screen while recording, you'll have to follow a few more steps.
Step 1: Press Ctrl + Shift + Show all Windows (the rectangle-shaped icon that is typically located on the right side of your Chromebook keyboard and has two lines in it).
Note: If you cannot find the 'Show all Windows' option on the Chromebook keyboard, press Ctrl + Shift + F5 to simply start the recording.
Step 2: In the menu generally located at the bottom of the toolbar, click the 'Screen Record' option.
Step 3: Choose how you want to record the screen: Full Screen, Partial Screen, or Window — and the screen recording will automatically begin.
Step 4: Once done, click the 'Stop Recording' icon to finish the ongoing screen recording.
Chrome OS saves the screen recording to your download folder by default. Also, it shows a notification after you've recorded the screen — click it to open the recording on your Chromebook.
Notta AI meeting assistant records, transcribes, and summarizes meetings so everyone can stay engaged without missing important details.
How to screen record on Chromebook with screen capture
One of the reasons screen recordings are so popular today is that they're easy to share with team members and show them how things work. Screen Capture is one of the default screen recording tools available on Chrome OS 89 or newer versions. Here's how to screen record on Chromebook with audio.
Step 1: Locate and click the clock icon at the lower-right corner of the Chromebook screen. This will quickly open the Quick Settings panel, where you can locate the 'Screen Capture' option.
If you cannot find the 'Screen Capture' tool directly, click the 'arrow' icon to expand the settings panel.
Step 2: Click the 'Video' icon at the bottom of the Chromebook screen to capture the screen recording.
Step 3: The 'Screen Capture' lets you record in different ways: Full Screen, Partial Screen, or a Specific Window.
Step 4: Click the 'Settings' option to modify the audio input, camera settings, and where to save the recording. If you want to record the screen with audio, turn on the microphone.
Step 5: Click anywhere on the screen, and the recording will start. Finally, select the red 'Stop' button to finish the ongoing screen recording.
How to screen record on Chromebook using Notta
When done right, screen recording makes it easy to show what's happening on the screen, including the movement of the cursor. Notta is a powerful recording and transcribing tool that can be used for anything from webinar presentations to tutorials and more.
At its most basic, Notta allows users to record their Chromebook, Windows, or Mac screen and even generate a transcript of the audio. As the video recording feature is still in its beta phase, you can record only up to 2 hours of video. Here's how to screen record on Chromebook with the help of Notta.
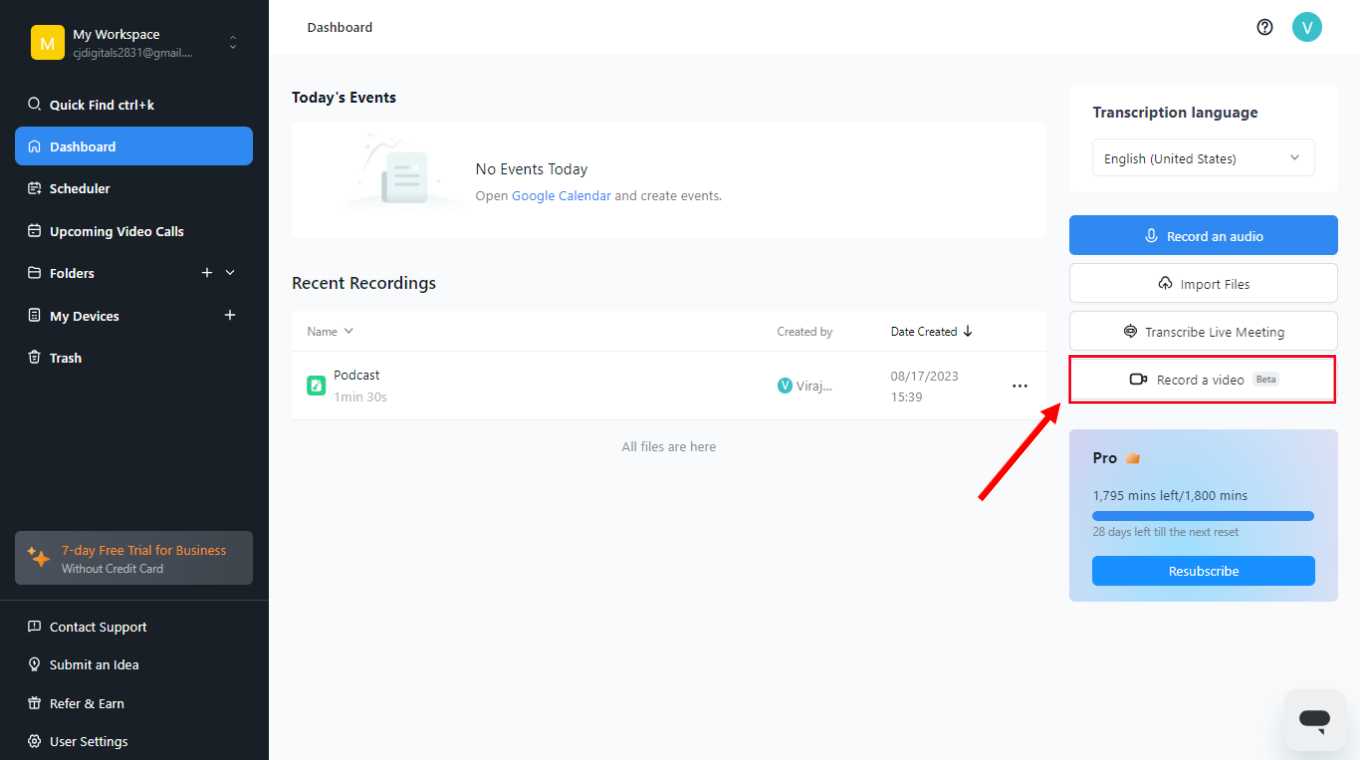
Step 1: Go to Notta's website and create a free account. Upon entering the Notta dashboard, locate and select the 'Record a Video' option.
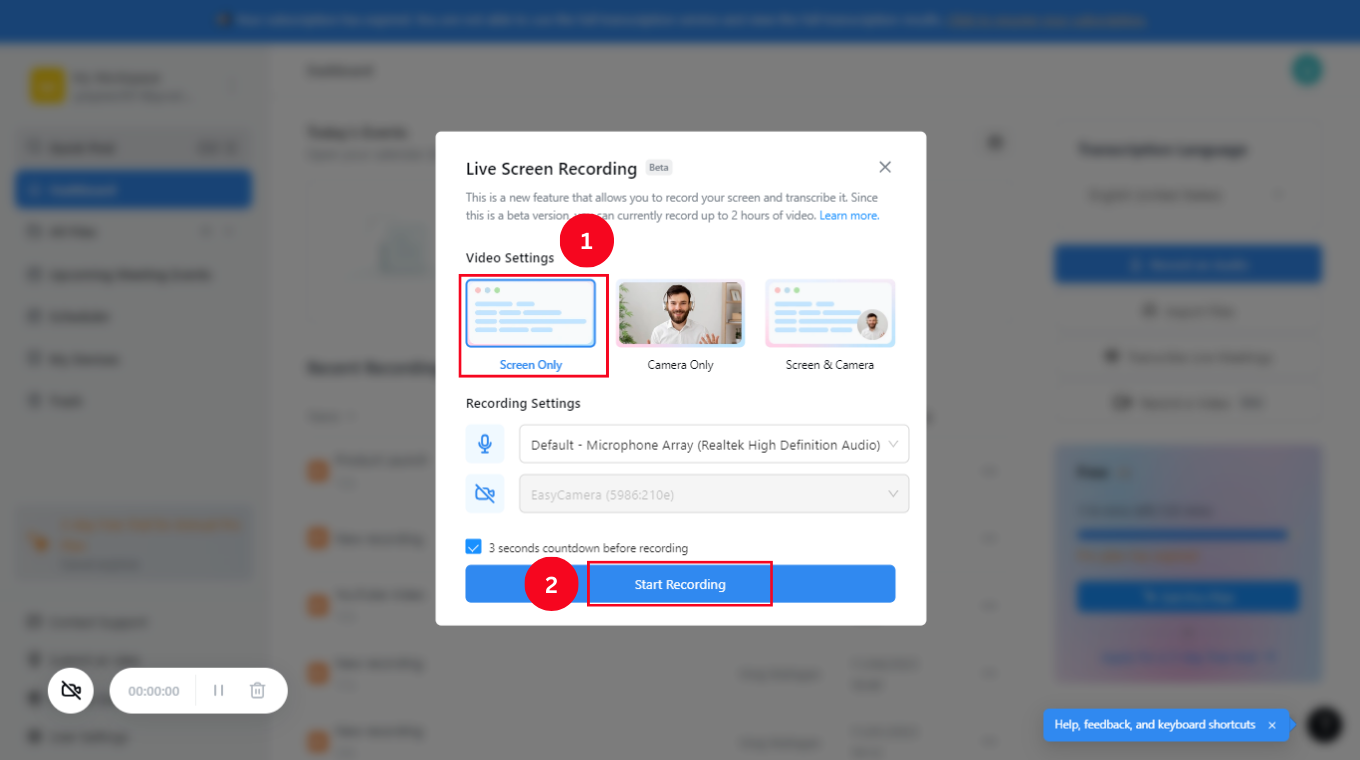
Step 2: You'll see three recording options: Screen Only, Camera Only, and Screen & Camera. To record the screen on Chromebook, click 'Screen Only' and then the blue 'Start Recording' button.
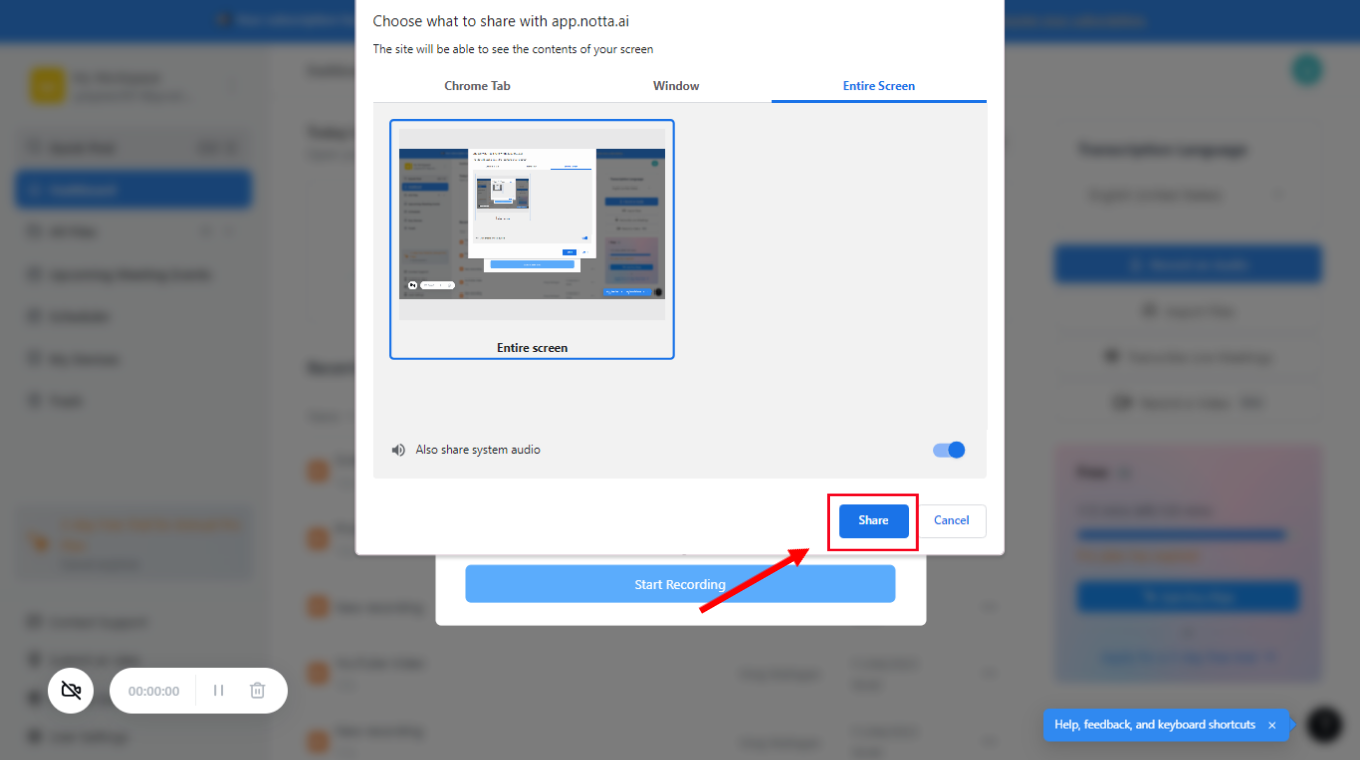
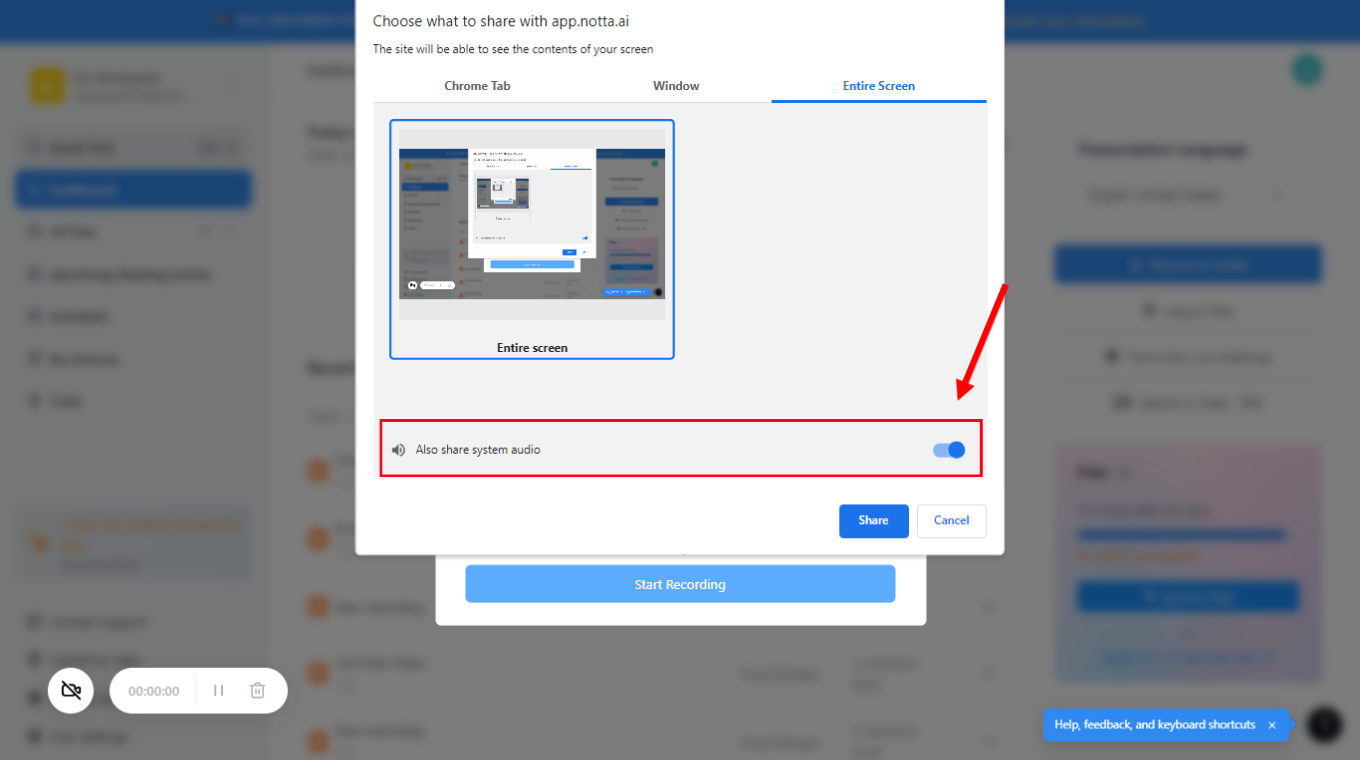
Step 3: Choose what you wish to record from the three options: Entire Screen, Chrome Tab, or Windows. Once done, click the blue 'Share' button, and Notta will start recording the Chromebook screen.
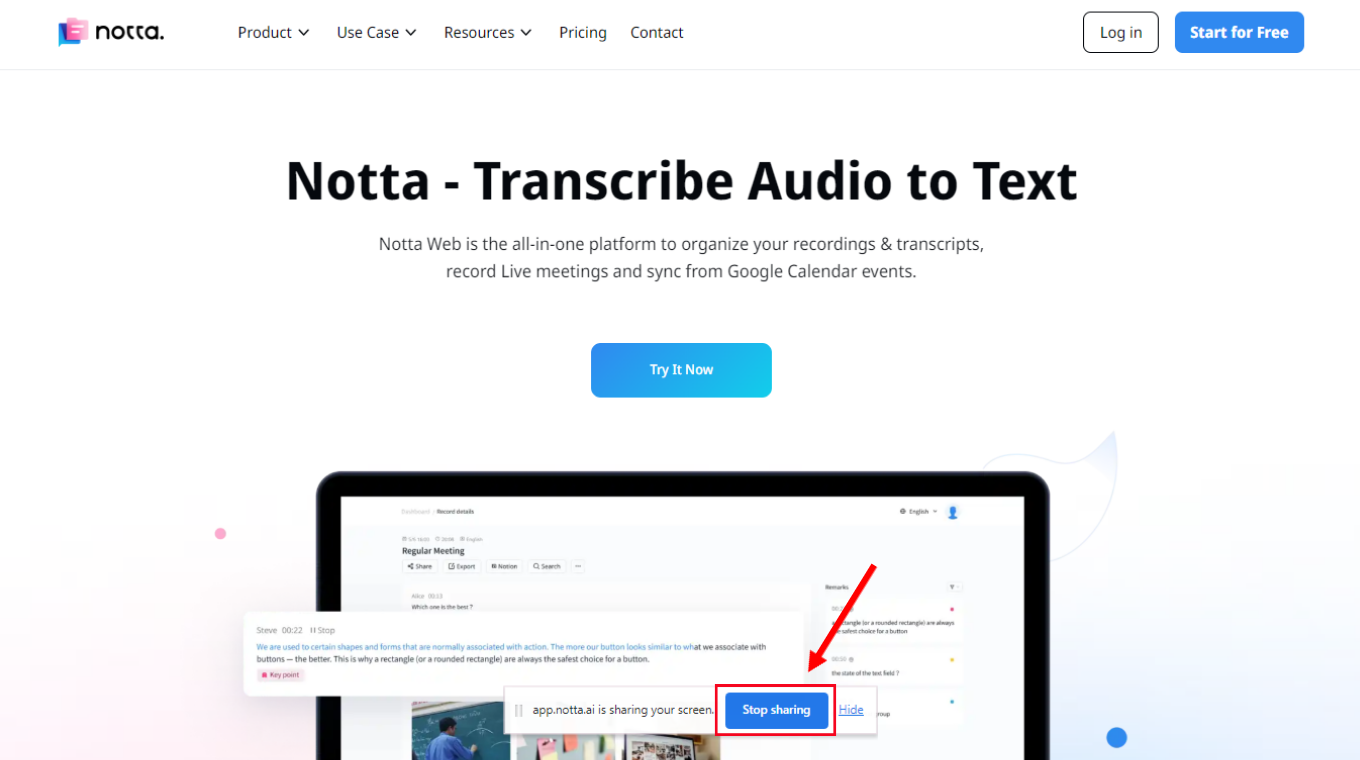
Step 4: Finally, click 'Stop sharing' to finish the recording and save it automatically on the Notta dashboard.
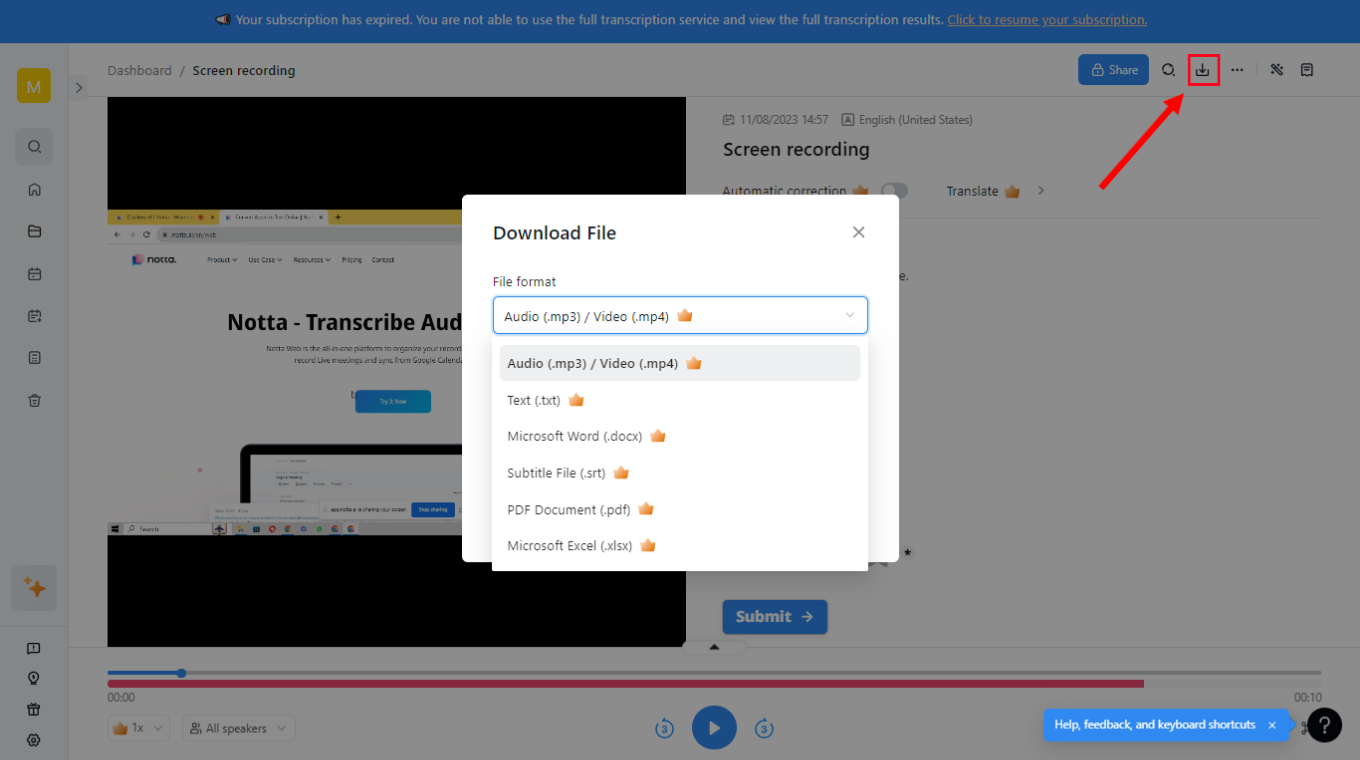
Step 5: Find and open the recently recorded Chromebook file to view the recording and transcript. Click 'Download' and choose how you want to save the file (MP3, MP4, TXT, DOCX, PDF, SRT, and EXCEL) to your Chromebook.
Notta is a powerful meeting assistant that can help transcribe virtual meetings in real time and convert meeting recordings in seconds.
How to screen record on Chromebook using Screencast
Chrome OS 103 or above versions also come with an additional tool called the Screencast app. It's free to use — and comes pre-installed on your Chromebook. It's also a handy tool if you want to record a screen with some quick annotations. Here are the steps on how to screen record on a Chromebook.
Step 1: First, open the app launcher and locate the 'Screencast' application. At the top left corner, you'll see the '+ New Screencast' option, and the toolbar will appear at the bottom of the display.
Step 2: Select how you want to record: Full Screen, Partial Area, or a Specific Window. Next, tap the 'Settings' icon to turn the 'Microphone' on to record audio.
Step 3: Once you've modified the settings, click the red 'Record' icon to start the screen recording on the Chromebook. You can even add annotations by simply selecting the 'Pen' icon.
Step 4: Finally, click the red 'Stop' button to finish the ongoing recording, and then save the recording to the Screencast app or share it directly via the link.
FAQs
How do I screen record on my Chromebook with audio?
If you want to screen record on a Chromebook with audio, Notta is a handy tool. Open the Notta Web App and select 'Record a Video' in the navigation panel. Select Screen Only > Start Recording, and choose what you want to record. Make sure to turn the toggle next to the 'Also share system audio' option, and Notta will begin recording the screen with sound.
What file types are screen recordings on a Chromebook?
Generally, the screen recorder with the built-in tools on Chromebook is saved as WEBM files, which may not be the most convenient file type. Hence, you'll need to convert WEBM to MP4 to make them more compatible with other devices.
If you use the Notta Web App to record screens, they'll be automatically saved in MP4 (video) format. The transcript can be saved in many formats, including SRT, TXT, DOCX, PDF, and even XLSX.
Where are screen recordings saved on a Chromebook?
By default, the created screen recordings are saved in the 'Downloads' folder. When you are recording via the built-in screen recorders, a prompt will appear indicating 'Screen recording taken.' Click on the prompt to find the recorded video on your Chromebook.
Key takeaways
If you don't want to remember keyboard shortcuts each time you record the screen on Chromebook, the Notta Web App makes more sense. It's one of the best answers to how to screen record on Chromebook with sound and comes with a free plan.
One feature that makes Notta a great tool is its transcription and summarization features. Once the screen video and audio are successfully recorded, Notta turns the voice into text and even generates a summary of the transcript — without any extra effort!