How to Set Up a Zoom Meeting: A Complete Guide for Beginners
Saving time and effort with Notta, starting from today!
Whether you need it for work, school, or a personal call, you can set up a Zoom meeting in just a few steps. You can schedule a Zoom meeting in advance, start one instantly, or create a recurring meeting. This guide walks through how to set up Zoom meetings step by step, invite participants, and use Notta to capture every detail.
What Is a Zoom Meeting and Why Use Them?
A Zoom meeting is a live video call where people can speak, share screens, and collaborate from anywhere. Remote work has made communication harder, and 29% of remote workers say communication gaps are a major issue, according to Neat’s 2025 State of Remote Work survey.
Zoom helps close that gap by allowing people to see each other and ask questions in real time. It is also widely used, so most participants already know how to join and navigate the interface, which makes meetings easier to run with less confusion.
What Should I Do Before Setting Up a Zoom Meeting?
You can set up a Zoom meeting in a few quick steps. Zoom lets you schedule meetings, start one instantly, or create recurring links for ongoing sessions. Once you have your meeting set up, you can bring tools like Notta in to handle note-taking and summaries, but the setup itself is simple.
How Do You Sign Up for a Free Zoom Account?
Creating a Zoom account takes three minutes and only requires a valid email address. Visit zoom.us, verify your email through a confirmation code sent to your inbox, and set your password to access your Zoom dashboard immediately. You can also sign up using Apple, Google, Facebook, or Microsoft accounts for faster registration.
Teacher's Tip: If you teach or train groups, select ‘For Educators’ when signing up. You’ll use the same Zoom interface, but Zoom applies classroom-friendly settings automatically. It turns on the Waiting Room, mutes meeting participants when they join, and limits screen sharing to the host.
How Do You Download the Zoom Desktop Client?
Log in to your Zoom account on the web. Click the 'Download Zoom' button on the right side of the dashboard.

Zoom will start downloading automatically. If the download doesn’t start, select ‘restart the download’ to try again.
How Do You Download the Zoom Mobile App?
Open your phone’s app store and type ‘Zoom’ in the search bar. Look for ‘Zoom Workplace’, the name of the official Zoom app. Tap ‘Install’ and wait for the download to finish.
Open the app and sign in with the same information you used to set up your account.
What is the Difference Between Free and Pro Zoom Accounts?
The main difference between Free and Pro Zoom accounts is in meeting length. The Free plan lets you host up to 100 participants, share your screen, use breakout rooms, and record to your computer.
All meetings end at 40 minutes on the Free plan. The call stops at the 40-minute mark, and you’ll need to restart the meeting to continue. The Pro plan removes that 40-minute limit and lets you run meetings for as long as you need. It also adds cloud recording, which is helpful if you want to store recordings online and not on your device.
Pro currently starts at $16.99 per month per user, which is the lowest paid tier. Choose Pro for client calls, workshops, team meetings, or interviews that exceed 40 minutes.
What Are Zoom's System Requirements?
Zoom requires Windows 10 or later, macOS 10.13 or later, iOS 12.0 or later, or Android 8.0 or later. For optimal video quality, use a device with at least 4GB RAM and a dual-core processor. Zoom recommends 3.8 Mbps upload and 3.0 Mbps download speeds for 1080p HD video, though 720p video works with lower bandwidth.
How Do You Set Up a Zoom Meeting on a Computer? (Windows & Mac)
Most people host Zoom meetings from their computer because it gives more control over video, audio, and screen sharing. The setup process is simple, and the steps are the same on both Windows and Mac.
Method 1: How to Schedule a Meeting in the Zoom App
Open the Zoom desktop app and click the ‘Schedule’ button on the home screen. Zoom will open the ‘Schedule Meeting’ window, where you can set the basic details for your call.
Enter a clear meeting name in the ‘Topic’ field. Set the date and time using the dropdown selectors, and adjust the time zone if needed.
Meeting ID Explained: Personal ID vs. Auto-Generated
Under ‘Meeting ID’, you’ll see two options: ‘Generate Automatically’ and ‘Personal Meeting ID’.
Choose ‘Generate Automatically’ when you’re scheduling one-time or private meetings. You’ll get a unique link for that meeting.
Choose ‘Personal Meeting ID’ if you want to use the same link every time, which is great for weekly check-ins or standing calls.
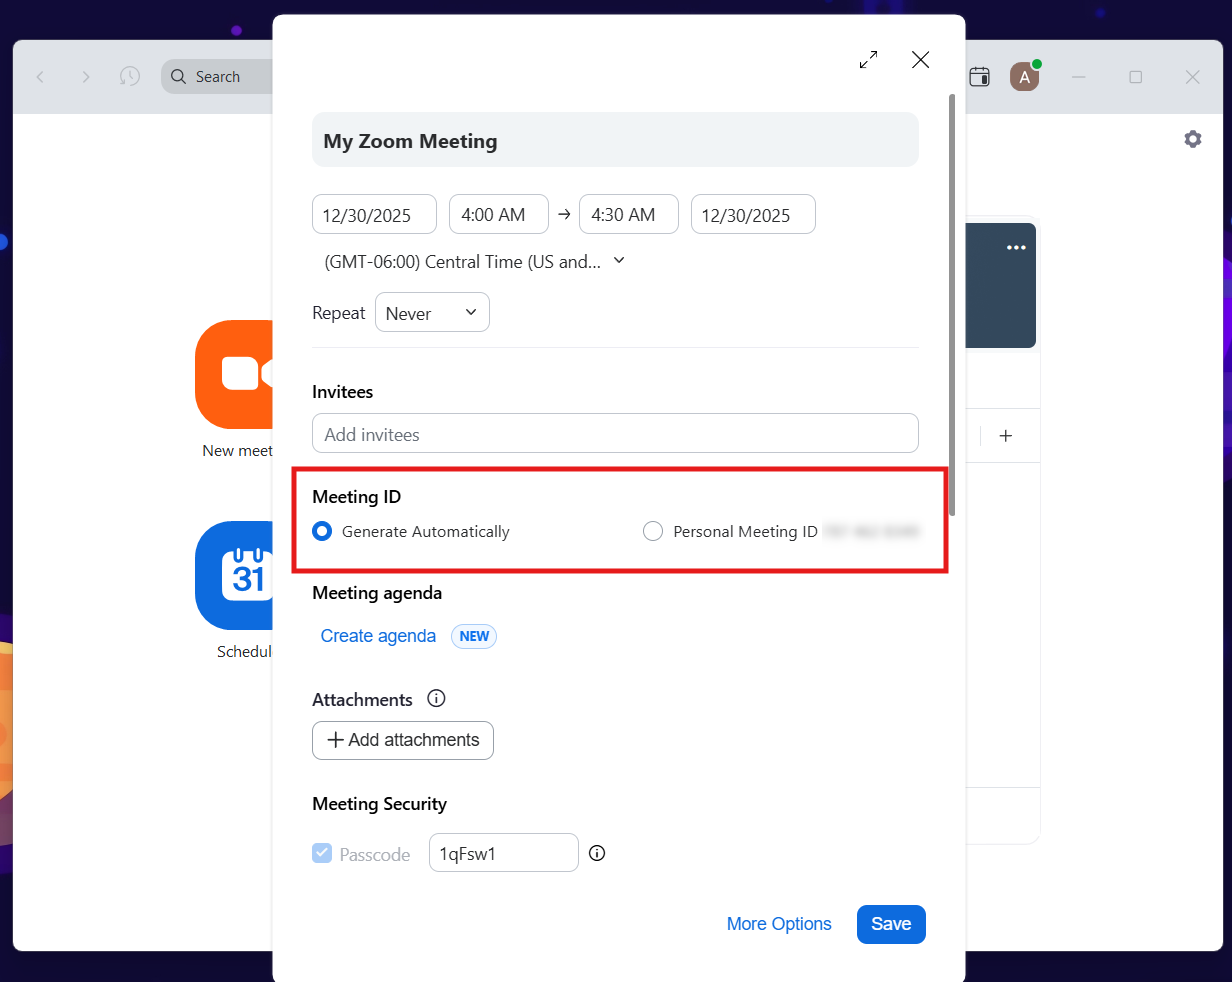
Meeting IDs link to specific Zoom sessions, while passcodes control access to those sessions. Personal Meeting IDs remain constant across all your meetings, but auto-generated IDs create unique numbers for each scheduled event.
How Do I Set Up a Passcode?

Scroll to the Meeting Security section. Make sure ‘Passcode’ is turned on. You can use the suggested passcode or type your own. Attendees will enter this code when they join, so it helps keep the meeting secure.
How to Use the Waiting Room Feature
Turn on ‘Waiting Room’ if you want to approve each meeting participant before they enter. It’s a great feature for classes, interviews, or any other meeting where you need control over who joins and when.

Pro tip: If you want a smooth start, turn on the option to mute participants on entry so background noise does not interrupt the beginning of the call.
Configuring Video and Audio Options for Host and Participants
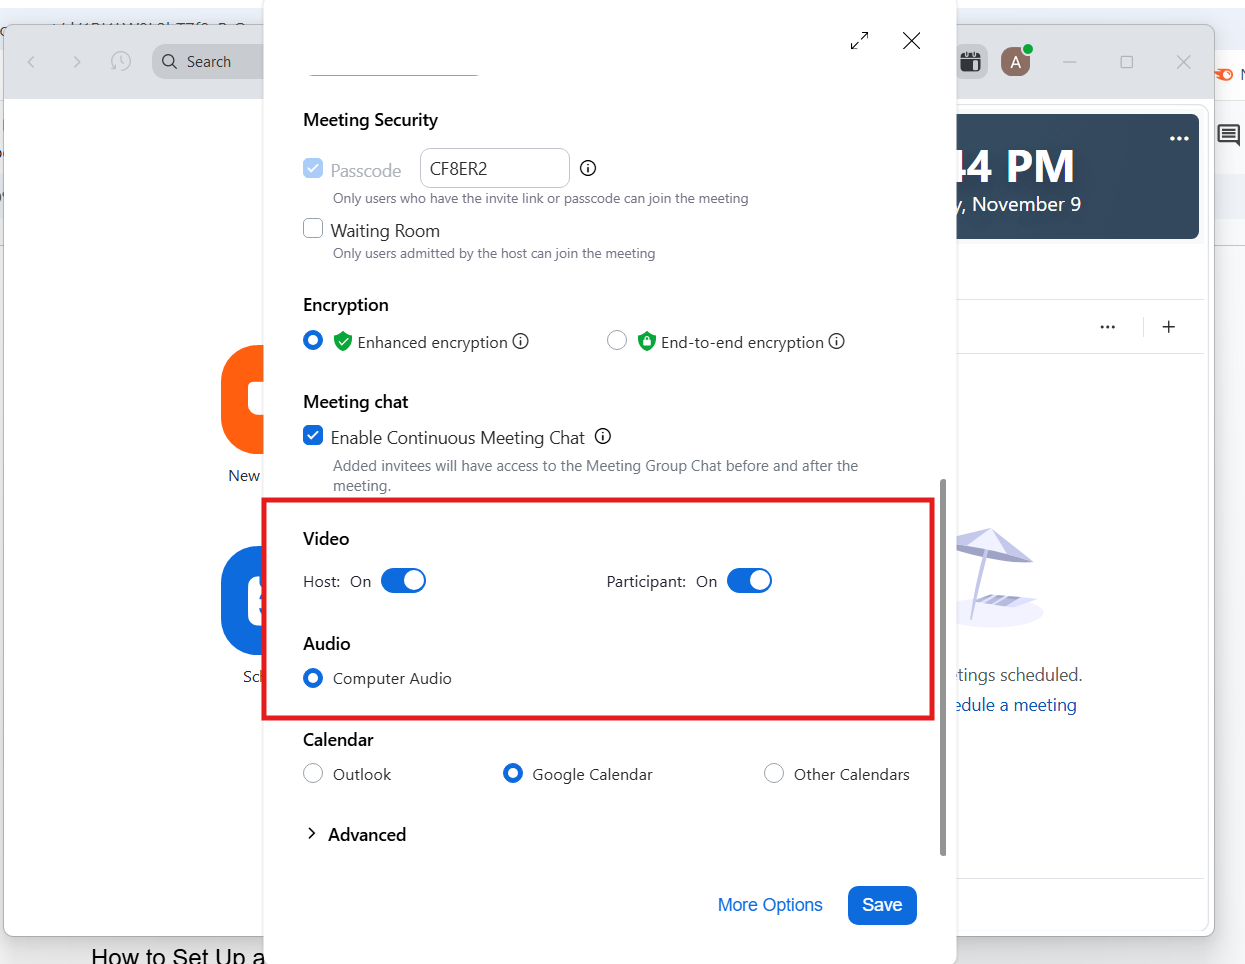
In the ‘Video’ section, choose whether your camera and participant cameras start ‘On’ or ‘Off’ when the meeting begins. In the ‘Audio’ section, leave ‘Computer Audio’ on so everyone can join with their device’s microphone.
Calendar Integration: Adding Your Meeting to Google Calendar or Outlook
At the bottom of the window, choose where you want to store the meeting. If you use Google Calendar or Outlook, select the calendar you prefer. Zoom will open the calendar event so you can add guests and reminders. When everything looks right, click ‘Save’.

This step also enables automatic meeting transcription with Notta. When your Zoom meetings appear on your calendar, Notta will recognize them and join the call for you at the scheduled time, so you don’t have to invite the bot every time.
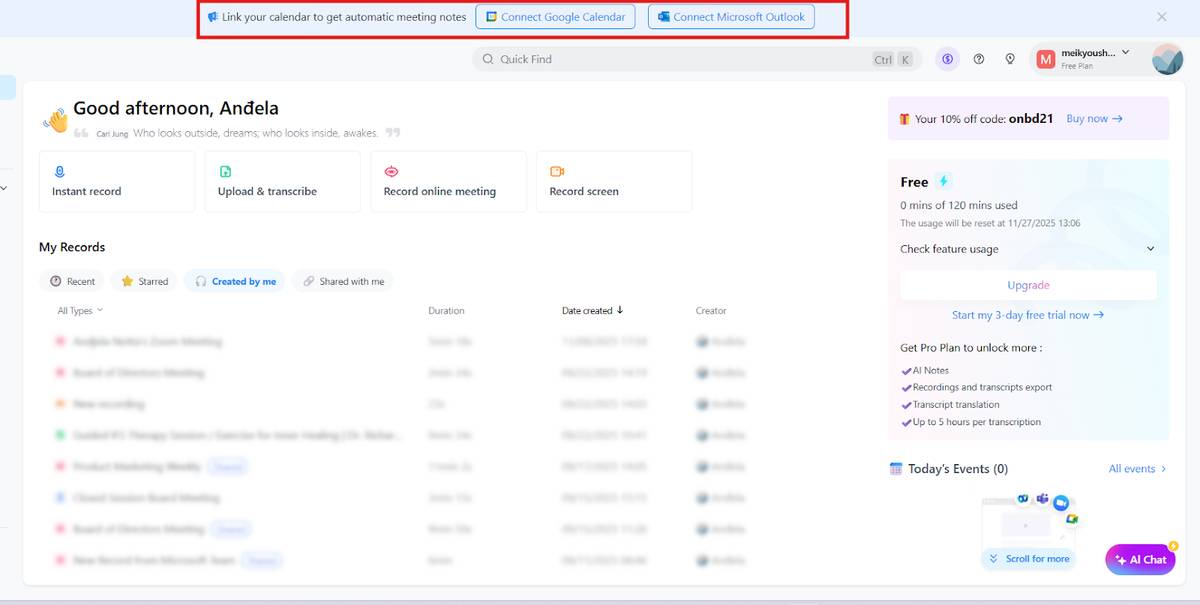
To turn it on, select ‘Connect Google Calendar’ or ‘Connect Microsoft Outlook’ at the top of your Notta dashboard. Link your calendar, and Notta will auto-join your scheduled Zoom meetings, transcribe the conversation in real time, and create meeting notes you can review or share afterward.
Method 2: How to Start a Zoom Meeting Instantly
Open the Zoom desktop app and click New Meeting on the home screen. Your meeting opens right away.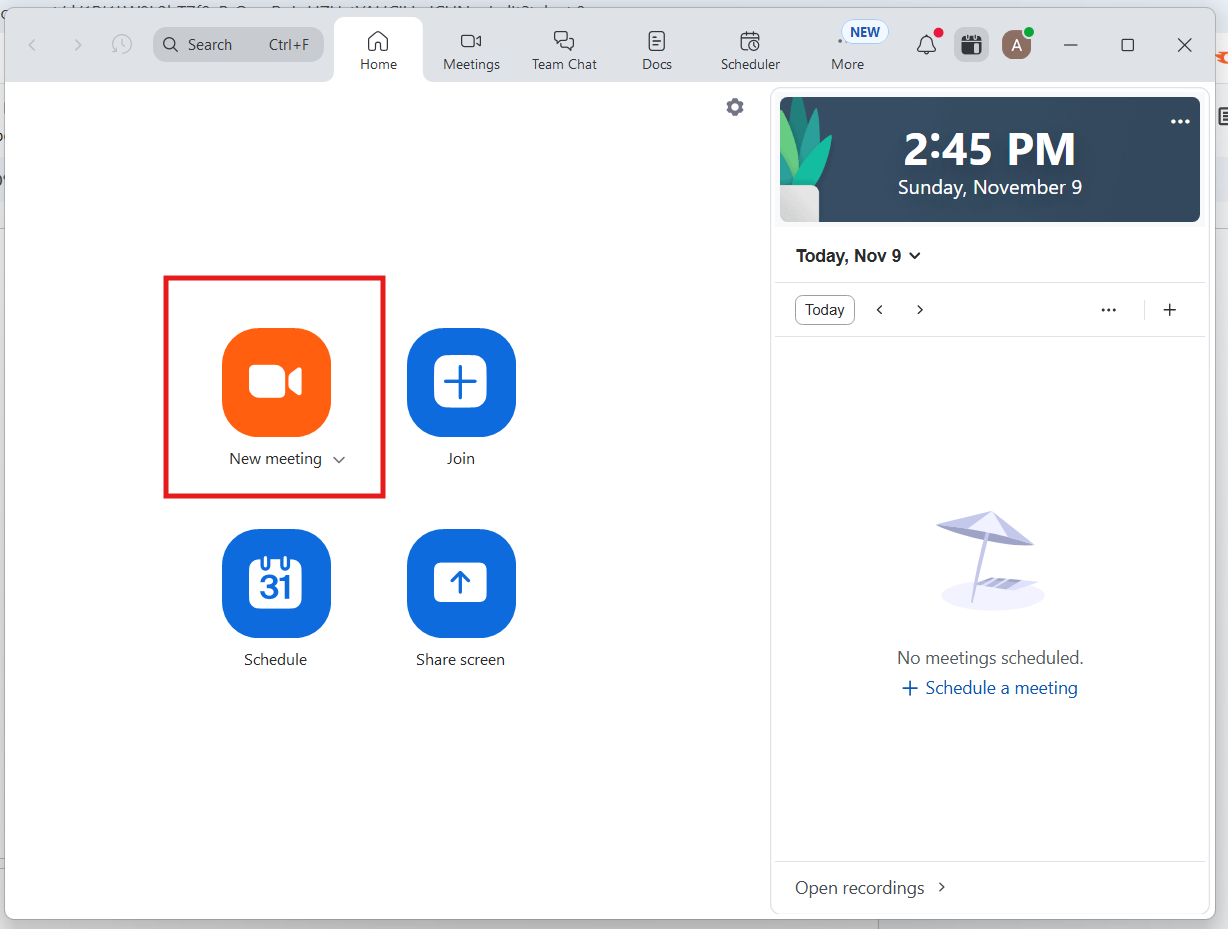
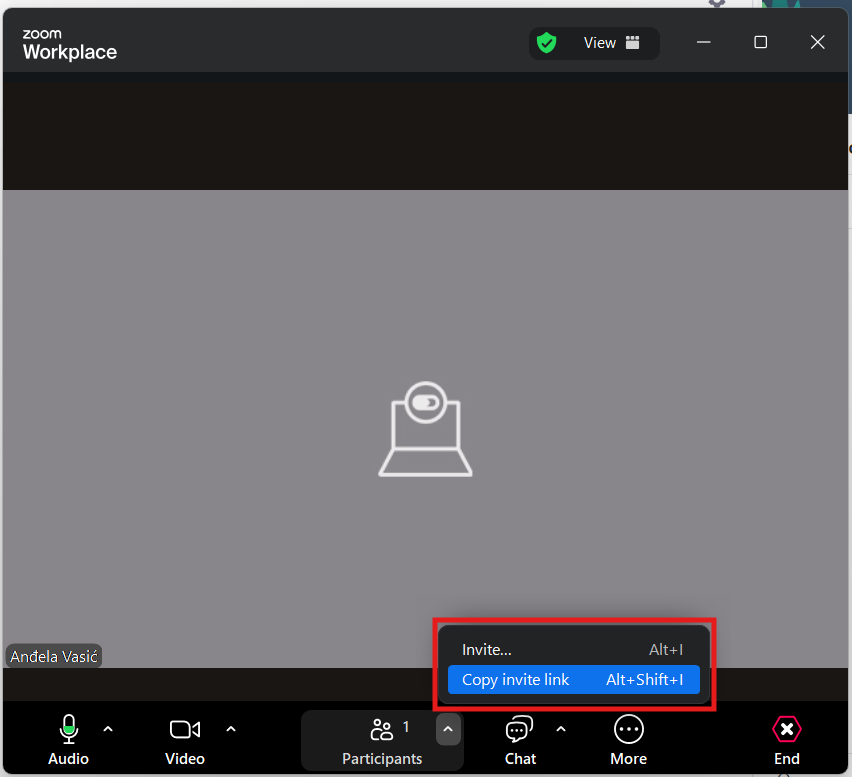
When you’re ready to invite others, click ‘Participants’ at the bottom, then select ‘Invite’ and copy the meeting link. Share it through chat, email, or whichever platform you already use.
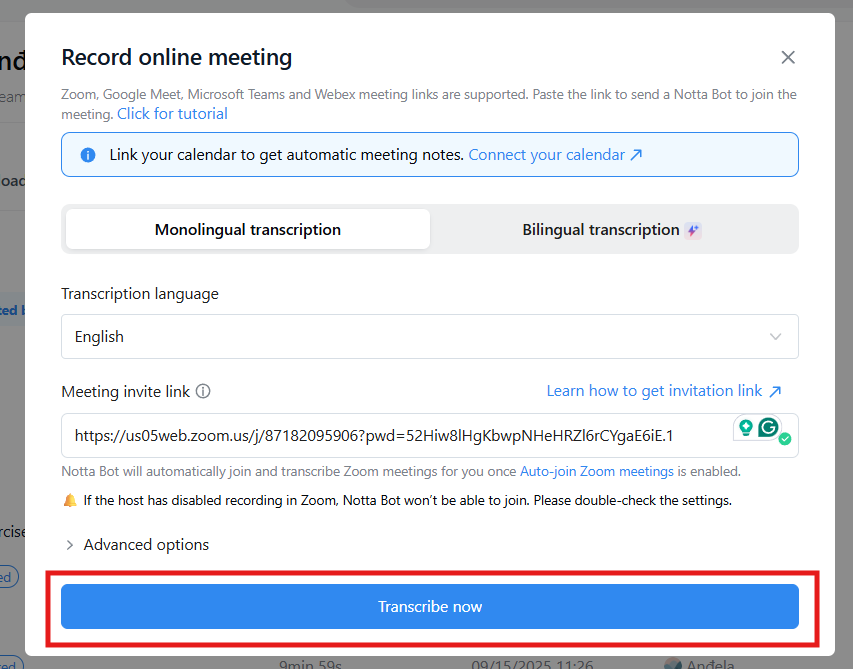
Finally, invite the Notta bot to automatically record and transcribe your meeting. Open ‘Record online meeting’ on the Notta dashboard and paste the Zoom meeting link URL in the designated box. Click ‘Transcribe Now’ and Notta will join your meeting and start taking notes.
How Do I Share My Screen During a Zoom Meeting?
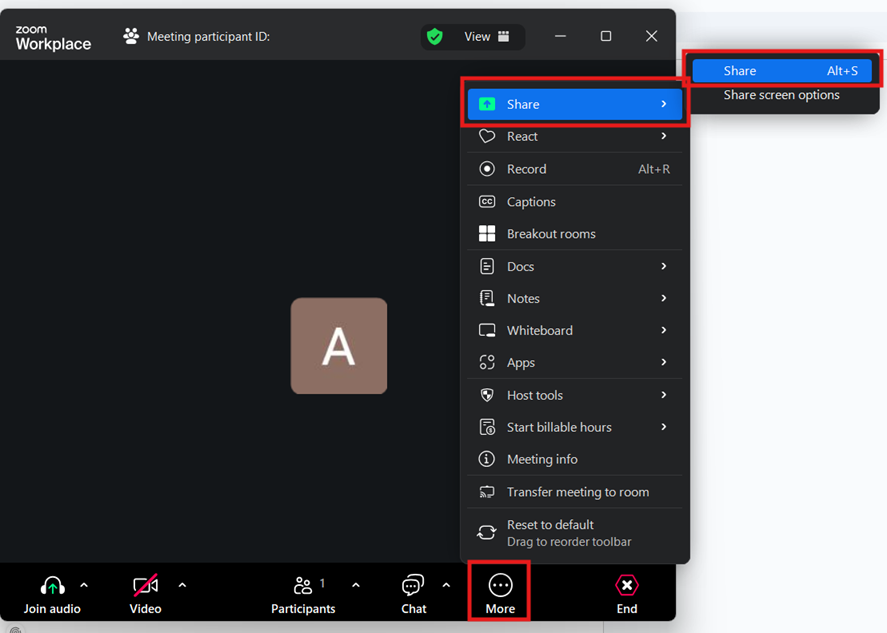
To share your screen in Zoom, select ‘More’ on the meeting toolbar and choose ‘Share’ (or press ‘Alt’ + ‘S’). A window opens with all available sharing options, including your full screen, specific apps, or a browser tab. Pick what you want to show and select ‘Share.’ A red bar appears at the top of your screen while you're sharing, and you can stop anytime by clicking ‘Stop Share.’
How to Set Up a Zoom Meeting on Mobile (iOS & Android)
You don’t need to be at your desk to host a meeting. The Zoom mobile app lets you schedule or start calls right from your phone. The setup is quick and uses the same steps on both iOS and Android.
Scheduling a Meeting on the Zoom Mobile App
Open the Zoom app and tap ‘Schedule’ on the Home screen. Enter your meeting name, date, time, and any repeat settings. You can also configure meeting settings here, including passcode, video preferences, and calendar integration.
Tap ‘Done’ to create the meeting.
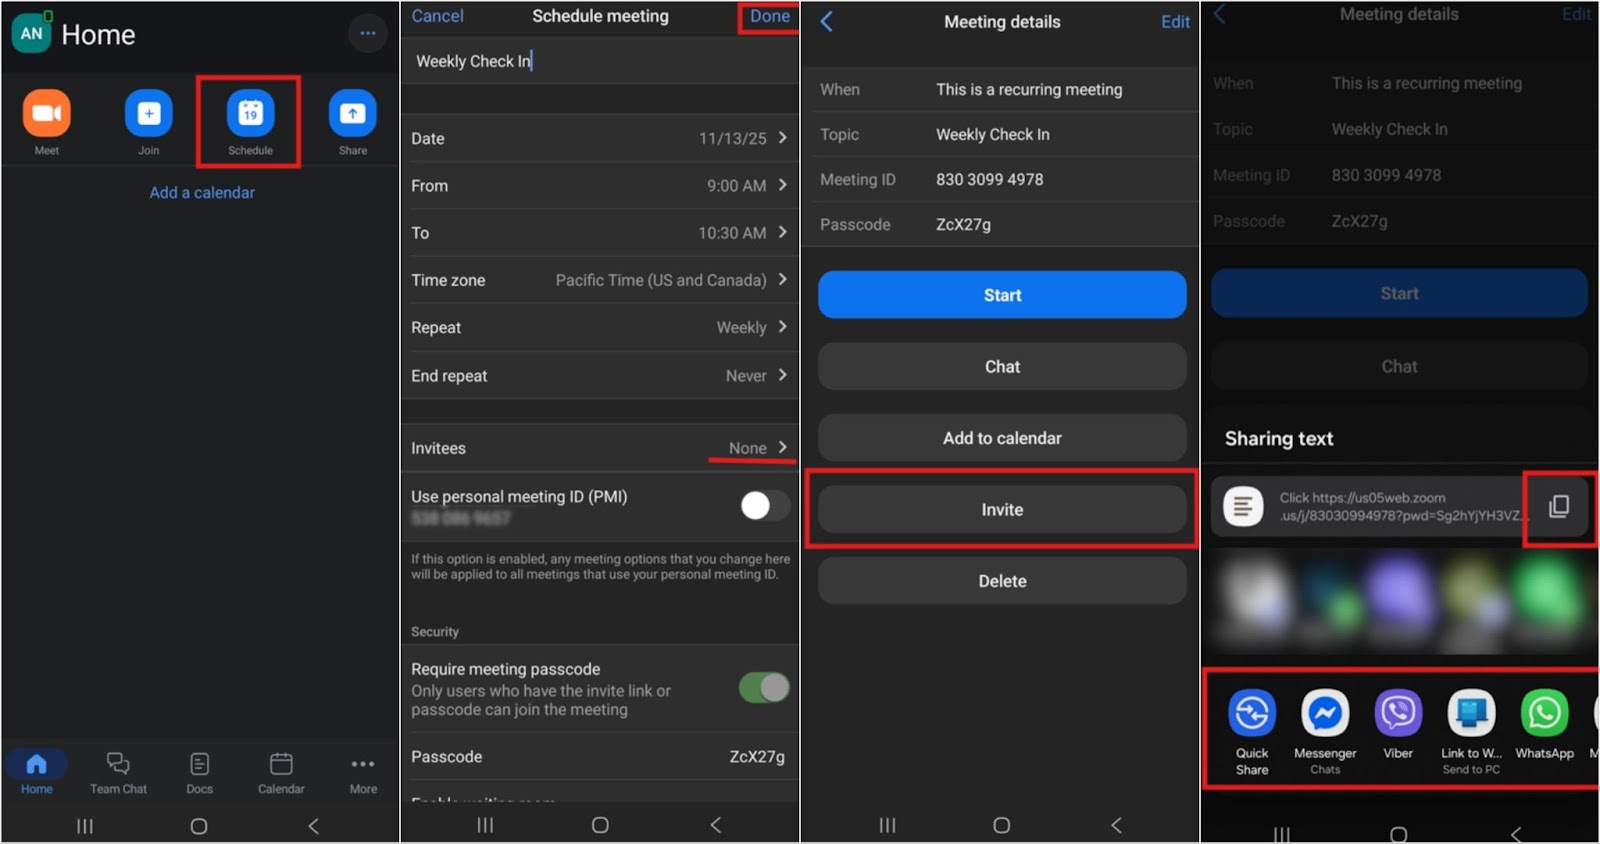
After you create the meeting, Zoom takes you to the ‘Meeting details’ screen. Tap ‘Invite’ to share the link. You can copy the link and send it through your messaging apps, email, or tap ‘Add to calendar’ to place it in your phone’s calendar.
Starting an Instant Meeting from Your Mobile Device
You can also start an instant meeting from your phone. Open the Zoom app and tap ‘Meet’ on the Home screen. Turn your camera on or off, then tap ‘Start a Meeting’.
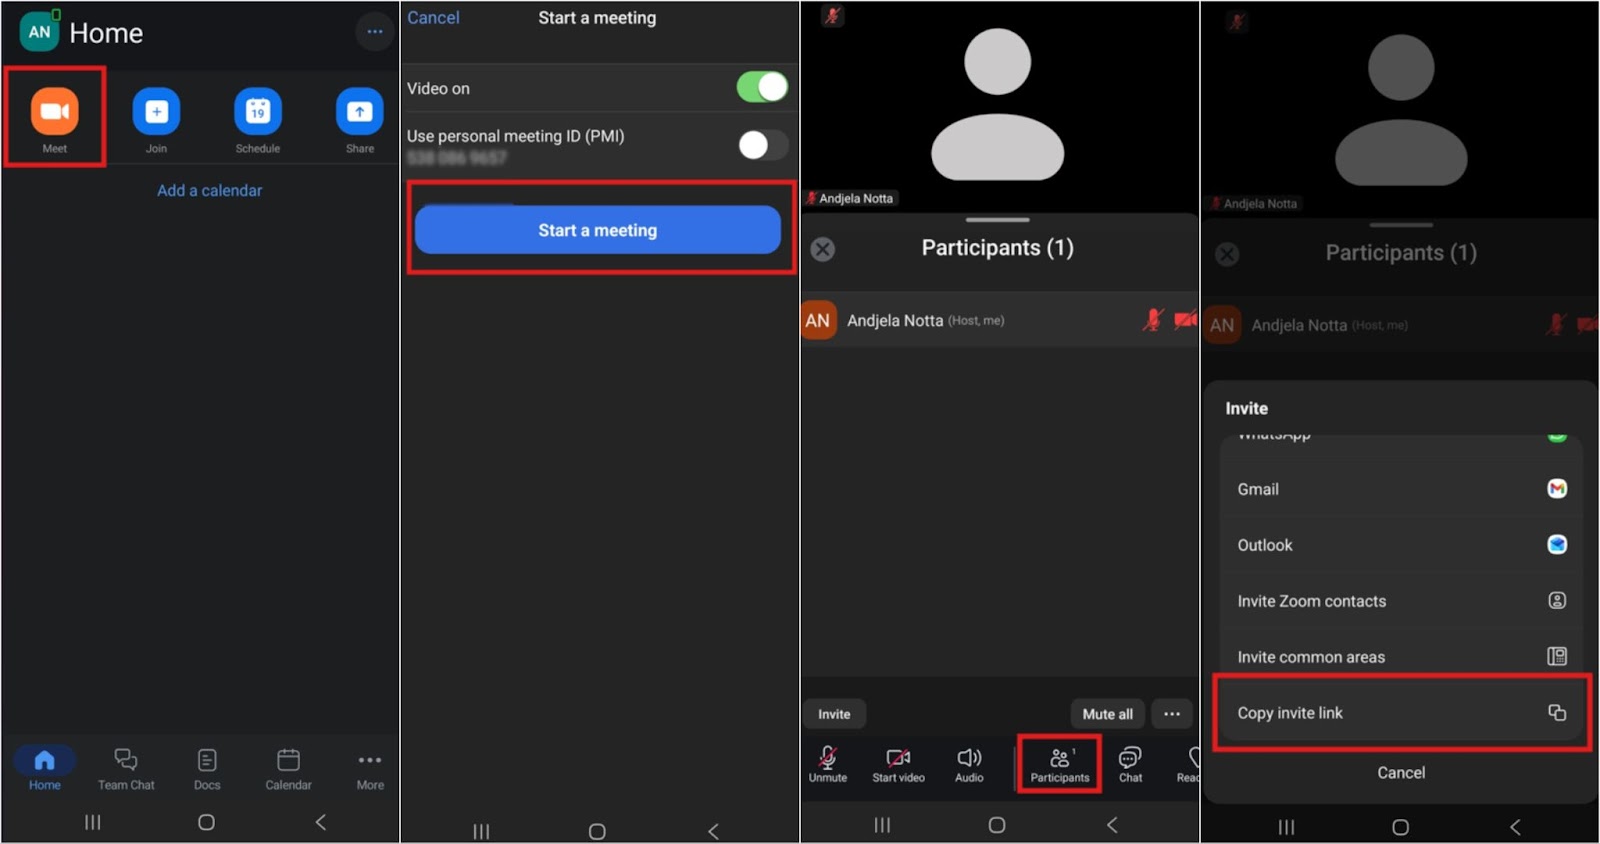
Tap ‘Participants’ at the bottom of the screen when the meeting opens. Tap ‘Invite’. Choose how you want to share the meeting, or tap ‘Copy invite link’ to paste it into a message or email.
Sharing the link right away makes it easy for others to attend, even on short notice.
Pro Tip: Use the ‘Participants’ panel to monitor who has joined, who is muted, and who is waiting in the lobby, which helps you keep the meeting organized.
How Do I Invite Notta Bot to my Zoom Meeting on Mobile?
Inviting the Notta Bot to take notes and transcribe is just as easy as setting up the meeting.
Open the Notta app and tap ‘Online meetings’. Paste your Zoom meeting link into the meeting URL field. Choose your transcription language, then tap ‘Transcribe Now’.
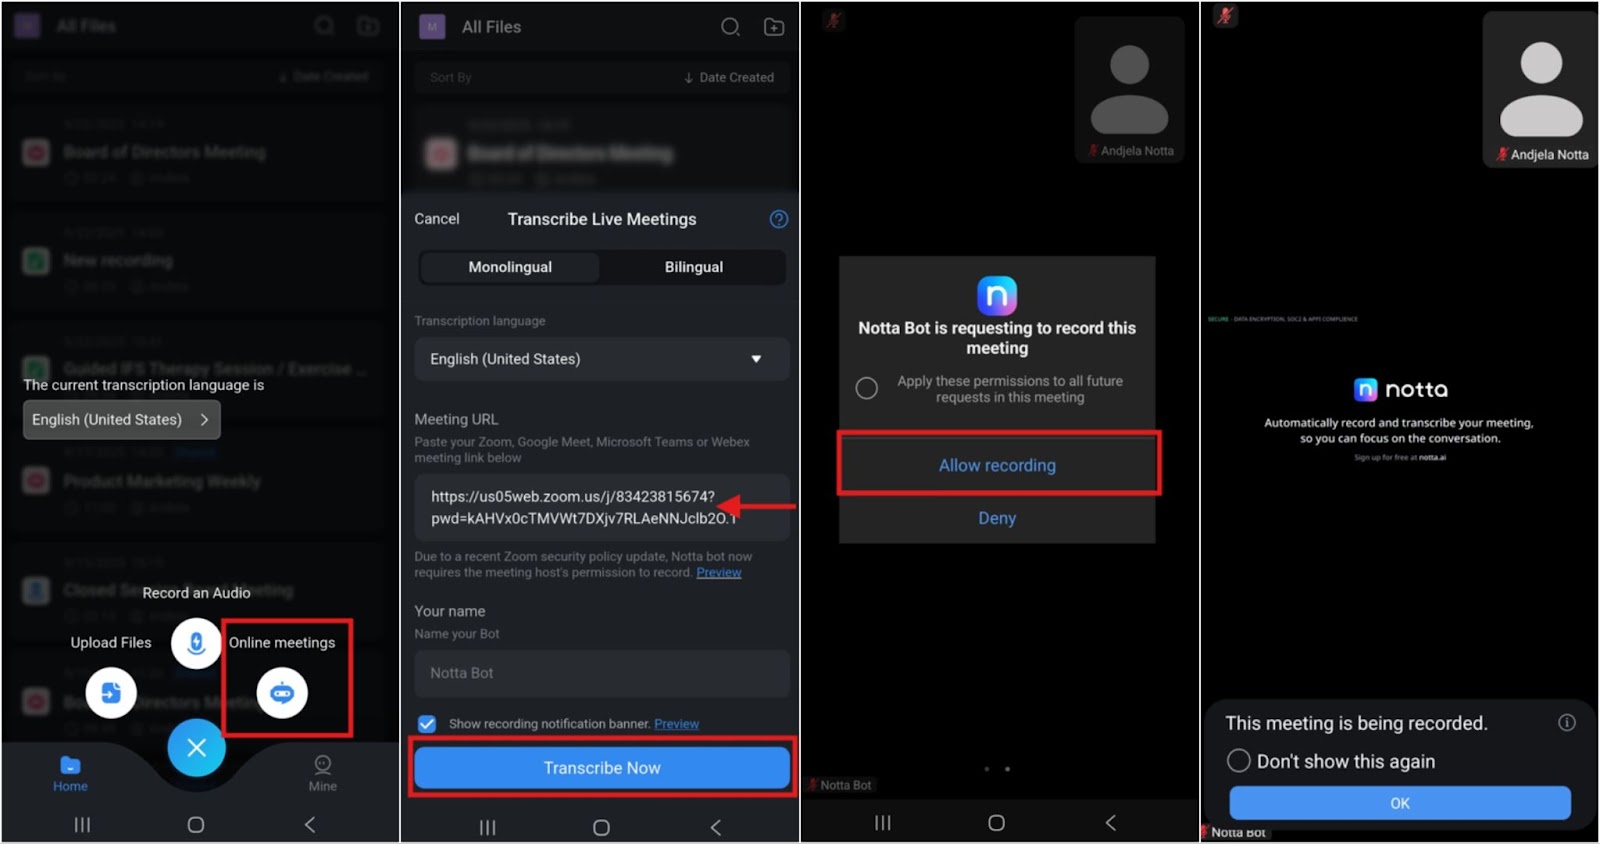
Notta Bot joins your meeting as a participant. When Zoom asks for permission, tap ‘Allow recording.’ Notta begins automatically recording and transcribing the meeting.
How Do You Set Up a Recurring Zoom Meeting?
Recurring meetings create a single meeting link that works for multiple sessions. The recurring link stores your security settings and video preferences across new events.
Open Zoom in your browser and select ‘Schedule a Meeting’. Choose how often the meeting repeats and save to create the recurring link.
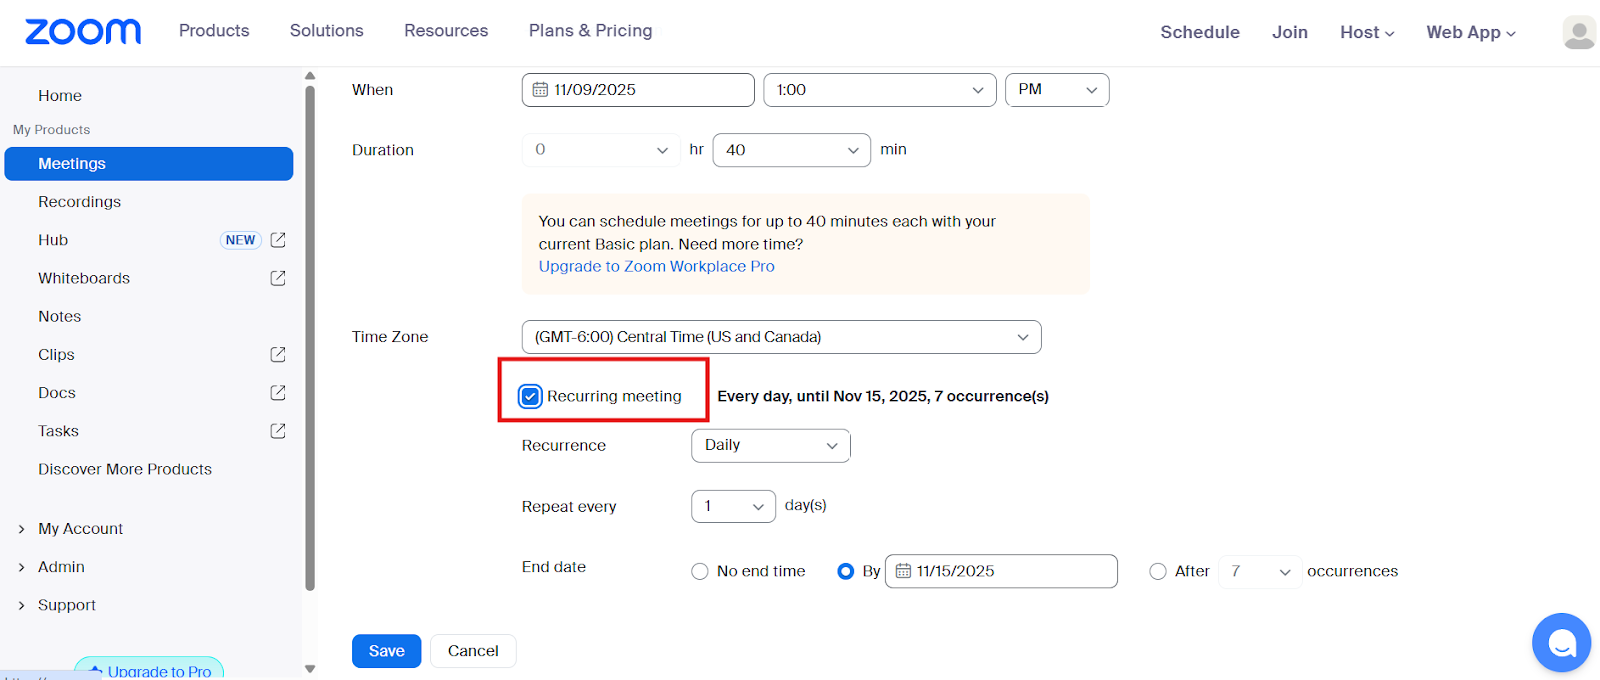
Enter the meeting name, date, and time, then enable the ‘Recurring Meeting’ setting.
Setting a Daily, Weekly, or Monthly Recurrence
Open the ‘Recurrence’ dropdown to choose how often the meeting repeats. Select ‘Daily’, ‘Weekly’, or ‘Monthly’, depending on your schedule. Adjust how often it repeats (for example, every week or every 2 weeks) if you need to. Set the ‘End date’ or choose how many total occurrences you want.

What is the "No Fixed Time" Meeting Option?
The 'No Fixed Time' option creates a meeting link that can be used at any time, without a set schedule. It works well for ongoing check-ins or flexible team availability.
To enable it, open Zoom in your browser, turn on ‘Recurring Meeting’, and choose ‘No Fixed Time’ in the recurrence dropdown, then save.
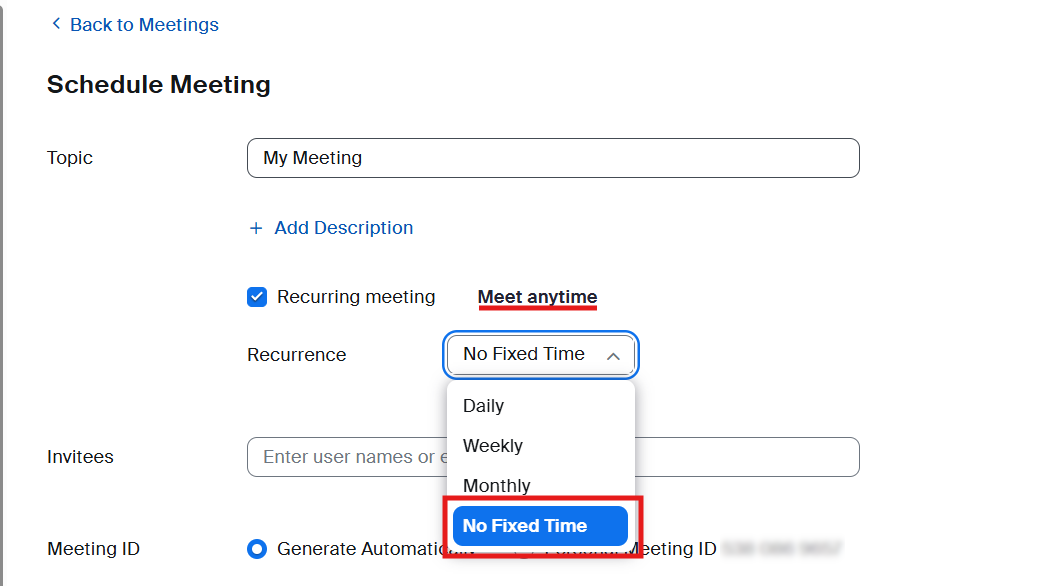
Note: The ‘No Fixed Time’ option only appears in the Zoom Web scheduler. The desktop app does not show this option consistently.
How Do You Invite Participants After You Set Up a Meeting?
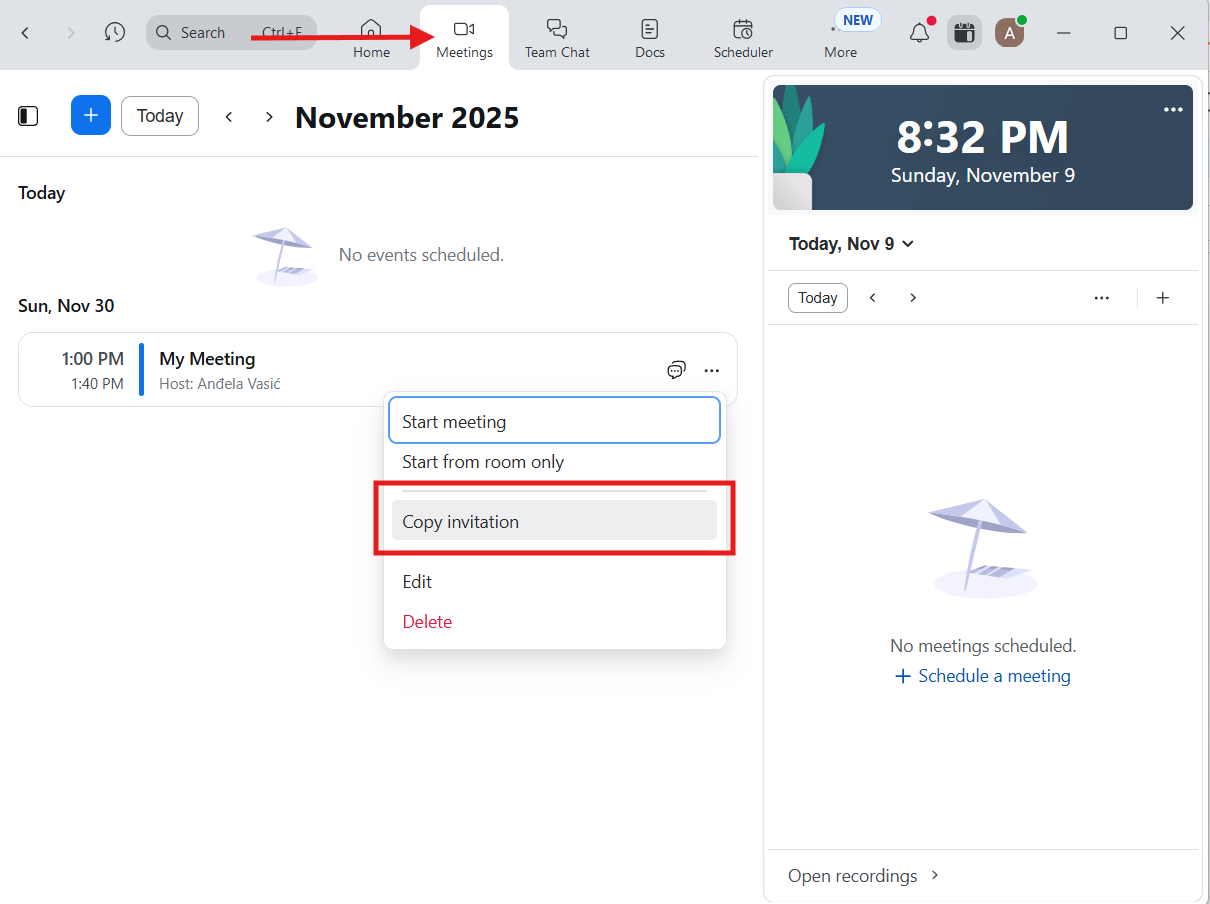
In the Zoom app, open the ‘Meetings’ tab and select your scheduled meeting. Choose ‘Copy Invitation’ or ‘Copy Link’, then send it to participants through email, chat, or your preferred team platform.
If you're using Zoom in your web browser, open ‘Upcoming’ under the ‘Meetings’ tab and open the meeting details, where you’ll find the meeting link.
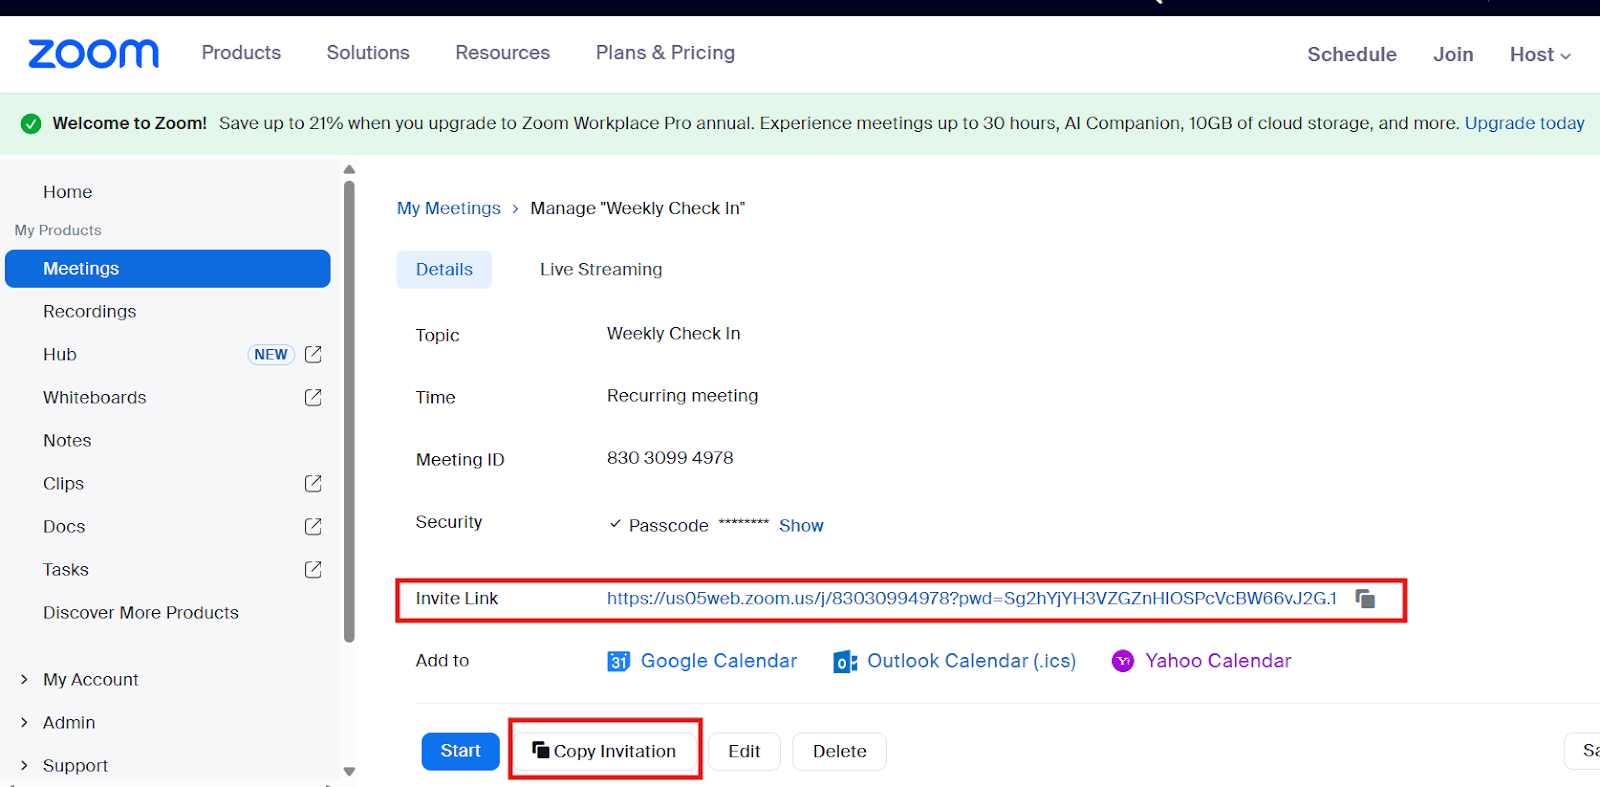
Where Do I Find My Zoom Invitation?
Go to the ‘Meetings’ tab in Zoom and select the meeting. You will see all the meeting invitation details, including the join link, meeting ID, and passcode. Use the ‘Copy Invitation’ button to copy the full URL.
How Do I Send My Zoom Invites?
You can send Zoom invitations by email, link, or calendar event. Just copy and paste the meeting invitation text into an email or chat message and send it like any other message.
If you schedule a meeting in Google Calendar or Outlook, Zoom sends invites automatically when you add participants to the calendar event.
What are the Best Practices for Zoom Meetings?
Running a smooth Zoom meeting comes down to preparation and a few simple habits. Good audio, clear visuals, and basic security settings help everyone stay active in the conversation instead of stopping to troubleshoot. Taking a minute to check these settings before the call will help prevent the most common issues.
Always Test Your Audio and Video Beforehand
Audio and camera problems are the number one reason virtual meetings start late. A recent virtual meeting report from Zebracat found that 49% of users experience audio issues at least once per week during video calls. Small issues like selecting the wrong microphone, muting input, or disconnecting your headphones can stall a meeting before it even gets going.
A quick test in Zoom before joining helps you catch those problems ahead of time. Open Zoom, check your microphone level, confirm your speaker output, and glance at your camera preview. Taking one minute to do this reduces the chance of interruptions and sets a smooth tone for the rest of the call.
Pro Tip: Turn on Zoom virtual backgrounds to reduce any visual clutter behind you. They’re helpful when working from home or shared spaces, and they keep the focus on you rather than your environment.
Why Use a Waiting Room or Passcode?
A waiting room lets you control who enters the meeting, and a passcode stops uninvited strangers from joining your meeting just by guessing your meeting ID.
These settings protect client calls, job interviews, internal updates, and anything involving personal or sensitive details. Turn them on to create a safer, more controlled meeting environment.
Transcribe and Summarize Your Zoom Meeting with Notta
Taking notes while running a meeting splits your attention. Notta joins your Zoom meeting, records the conversation, and transcribes everything in real time with up to 98.86% accuracy.
It supports 58 languages, which makes it great for international teams. After the call, Notta produces organized summaries that make it easy to track decisions, action items, and follow-ups across your team.
It integrates with the communication productivity apps your team already uses, such as Slack, Microsoft Teams, Notion, Google Drive, and Google Docs, helping improve team effectiveness without changing your workflow.
Try Notta for free today, and see how much easier it is to stay focused in your meeting when the notes take care of themselves!
Frequently Asked Questions (FAQs)
Can I set up a Zoom meeting if I don't have an account?
You cannot set up a Zoom meeting without a Zoom account. Hosting requires an account because meeting links include your Zoom profile. However, you can join someone else's meeting as a guest without creating an account.
How do I set up a Zoom meeting for someone else?
You set up a Zoom meeting for someone else by scheduling the meeting in your own account and sharing the meeting link with them. When the meeting starts, make them a co-host so they can manage participants and screen sharing. If they already have a Zoom account, you can also assign them as an ‘Alternative Host’ during scheduling so they can start and run the meeting without you.
How do I find my scheduled meeting after I set it up?
To find your scheduled Zoom meeting, open Zoom and click the ‘Meetings’ tab at the top of your desktop app or browser. Your upcoming meetings appear in a list showing the date, time, and meeting ID. Click any meeting to view full details or copy the join link.
What happens when you reach the 40-minute Zoom meeting limit?
When your Free Zoom meeting reaches 40 minutes, the call ends automatically and disconnects all participants. Zoom displays warnings at 10 minutes and 1 minute before the time limit. To continue your meeting, start a new session immediately using the same meeting link or create a fresh meeting. The Pro plan removes this interruption entirely.

