
How to Use Whiteboard in Zoom Meetings
Unlock the power of AI — Notta's meeting assistant records, transcribes and summarizes meeting minutes with one click.
Imagine you are in a Zoom meeting discussing a new marketing campaign with your remote team. You want to show your ideas in the virtual meeting but are not sure how to explain them without drawing them out. If this seems similar, you should try the Zoom whiteboard feature.
With Zoom whiteboard, you can draw, write, and annotate on the shared canvas. For example, I recently tried the Zoom whiteboard feature in a meeting to show ideas for the campaign. I could quickly draw a sketch of the campaign and help my team visualize ideas.
But what if you are not sure how to use the whiteboard in Zoom meetings? Fret not; this tutorial has got covered. In this guide, I'll reveal how to use the whiteboard in Zoom meetings.
Prerequisites for using Zoom whiteboard
Before we dive deep into how to use the feature, let us understand what is a Zoom whiteboard. In simple words, it is a powerful tool that allows remote or hybrid teams to collaborate and capture ideas during Zoom meetings.
With its easy-to-use tools, teams can brainstorm, sketch, and draw together in real time. However, you must meet a few prerequisites before using the Zoom whiteboard in virtual sessions.
You must have a Basic, Pro, Business, Education, or Enterprise account.
You should install a Zoom desktop client of Global minimum version or higher for Windows, macOS, or Linux.
A Global minimum version or higher Zoom mobile app is a must for Android or iOS users.
Zoom PWA (Progressive Web App).
How to enable the Zoom whiteboard feature
You can access it directly through the Zoom meeting or desktop client. However, if you're unable to use the Zoom whiteboard while in a session, it's likely that you have disabled the feature in the web portal.
Follow the below-mentioned steps to enable the whiteboard feature and collaborate in real-time.
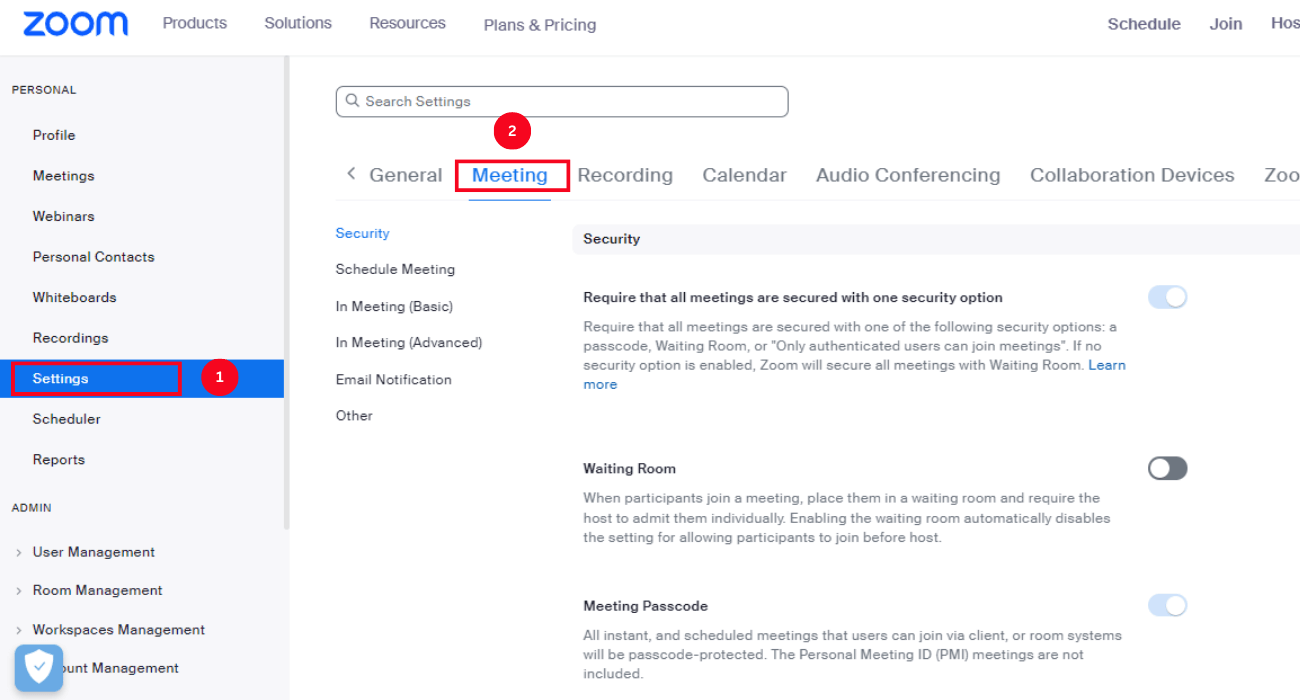
Step 1: First, go to the Zoom web portal and sign in. In the navigation panel, locate and select 'Settings.' Click the 'Meeting' tab.
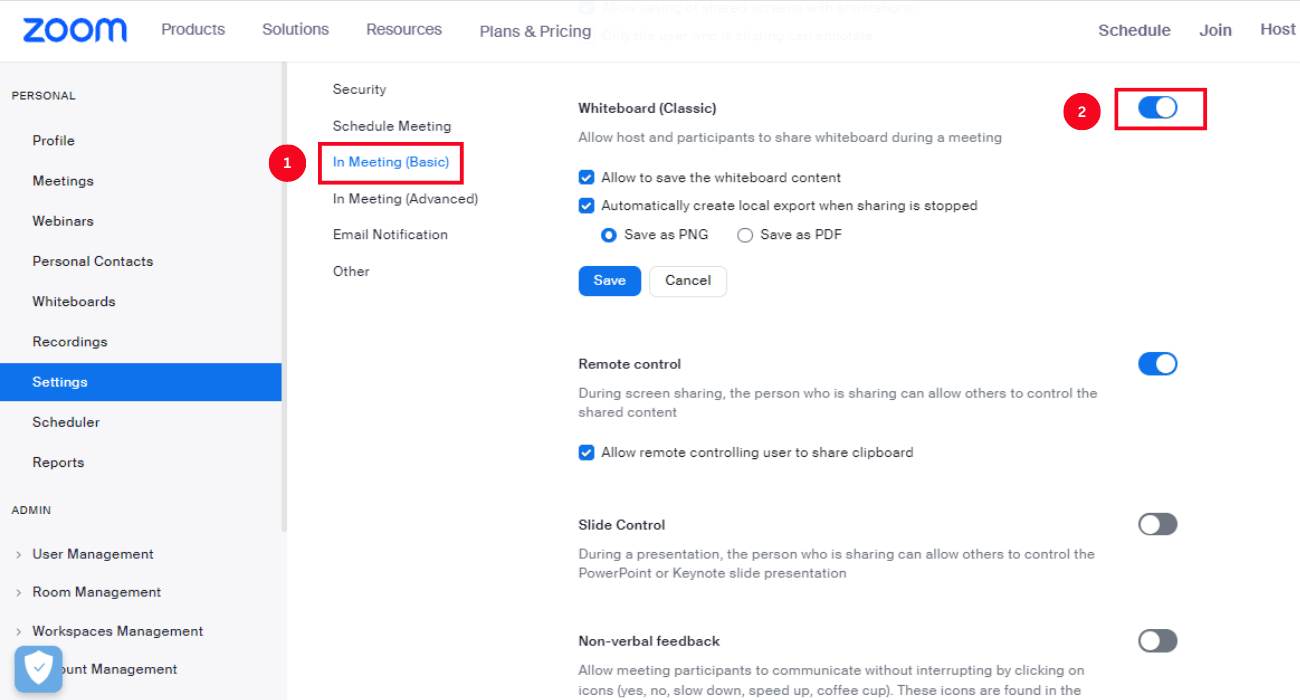
Step 2: Select 'In Meeting (Basic)' and scroll to find 'Whiteboard (Classic).' Click the toggle to enable the Zoom whiteboard feature. Enabling the feature lets the host and participants share a whiteboard during Zoom meetings.
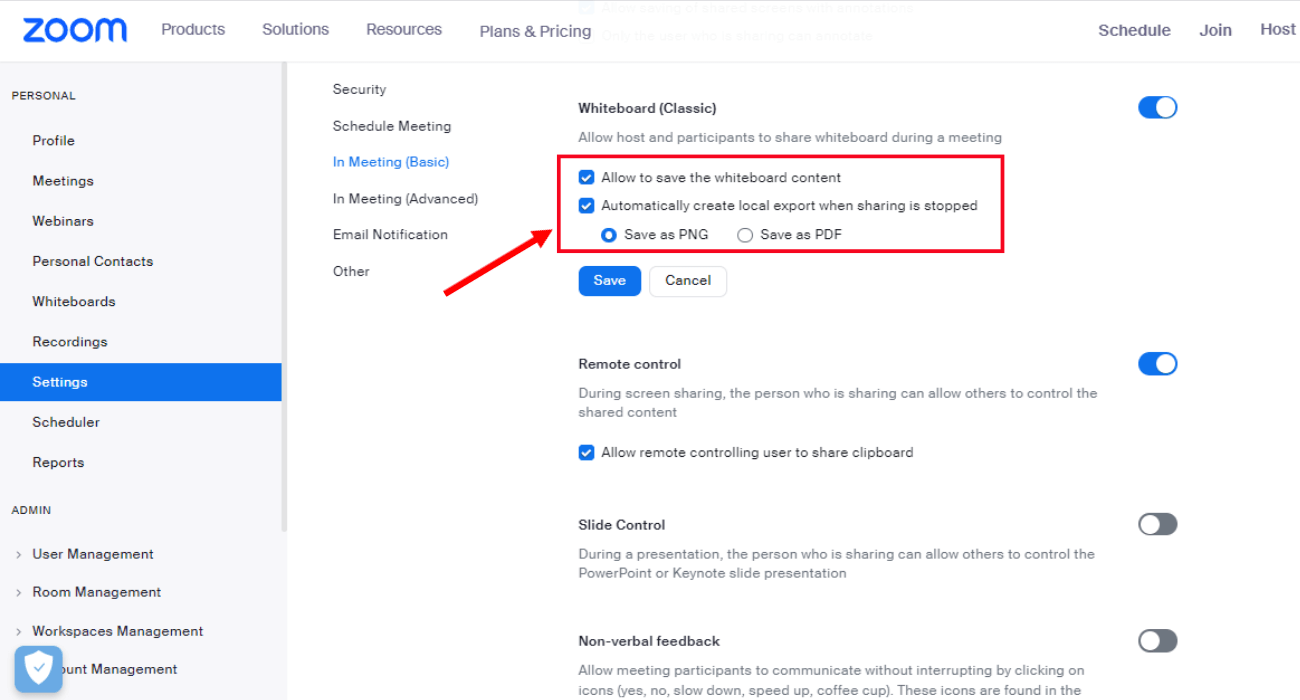
Check the box next to 'Allow to save the whiteboard content' to enable everyone to save the whiteboard. Click 'Save.'
Step 3: If you see the pop-up, select 'Enable' to confirm the change.
Want the convenience of automated note-taking and AI summaries? Try Notta for your upcoming meetings.
How to create a whiteboard on Zoom
The meeting host can create a Zoom whiteboard on the Zoom desktop client or during the virtual meeting. To create a Zoom whiteboard, you first need to download the Zoom desktop client.
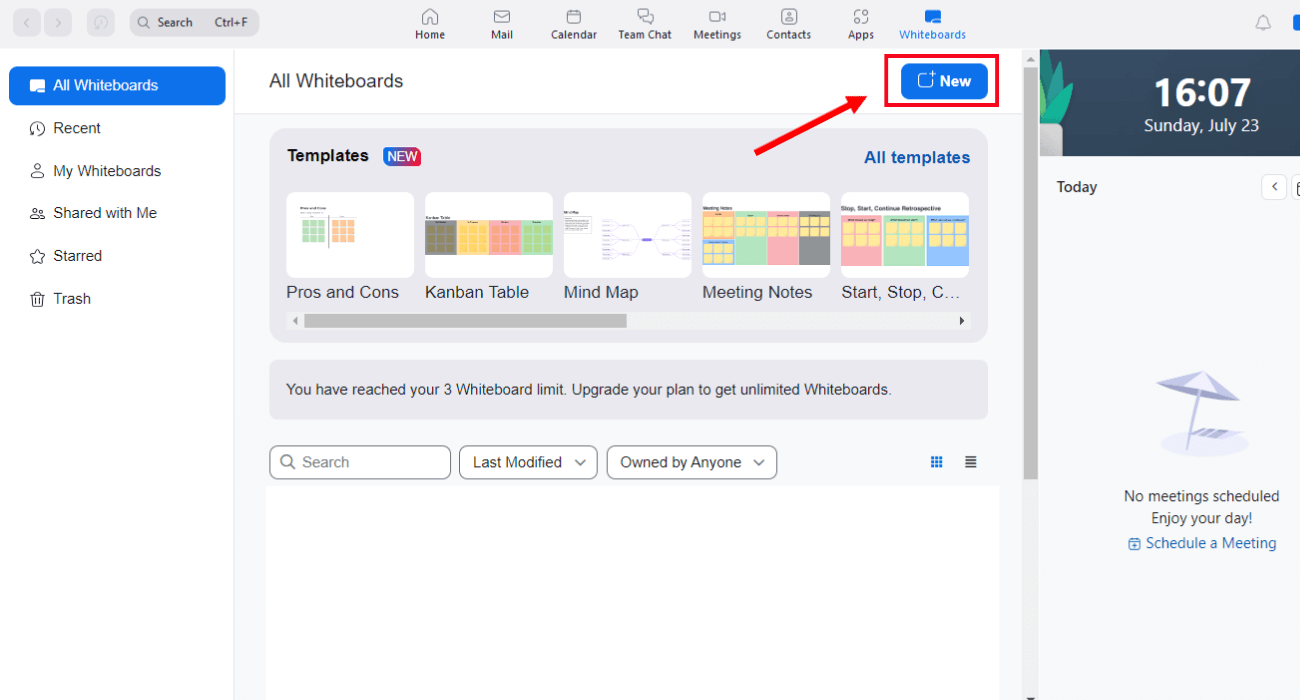
In the top toolbar, locate 'Whiteboard,' and all the whiteboards will be visible.
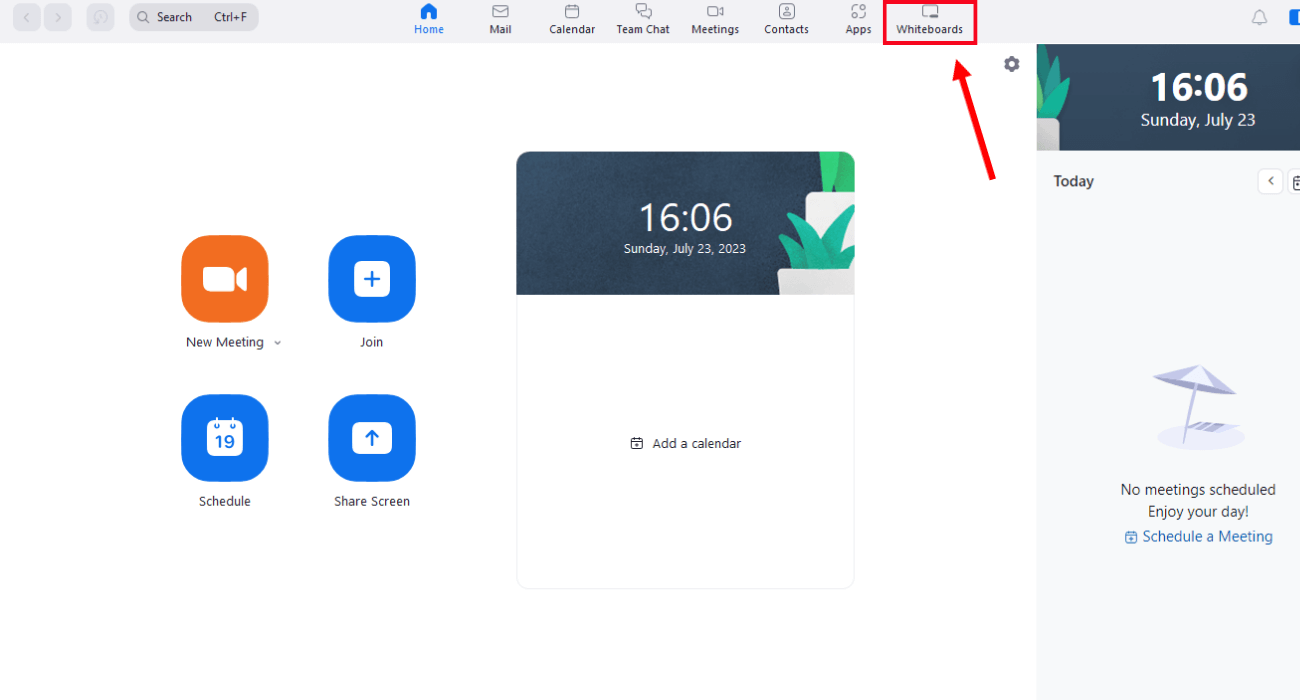
If you've already created a whiteboard, you can select it from the list of available whiteboards. Otherwise, you can create a new whiteboard by clicking on the 'New' option.
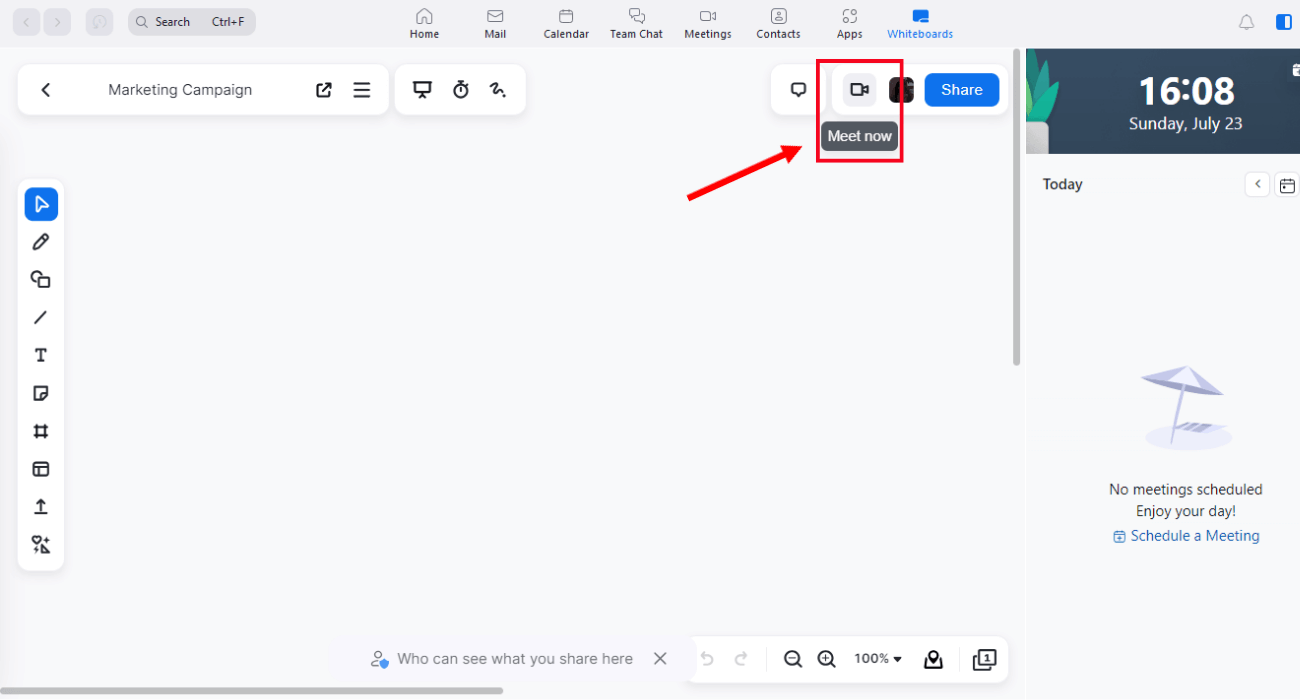
Next, select the video icon to open the Zoom meeting and invite participants.
If you are facing any issues using Zoom whiteboard directly from the desktop app, follow the below steps.
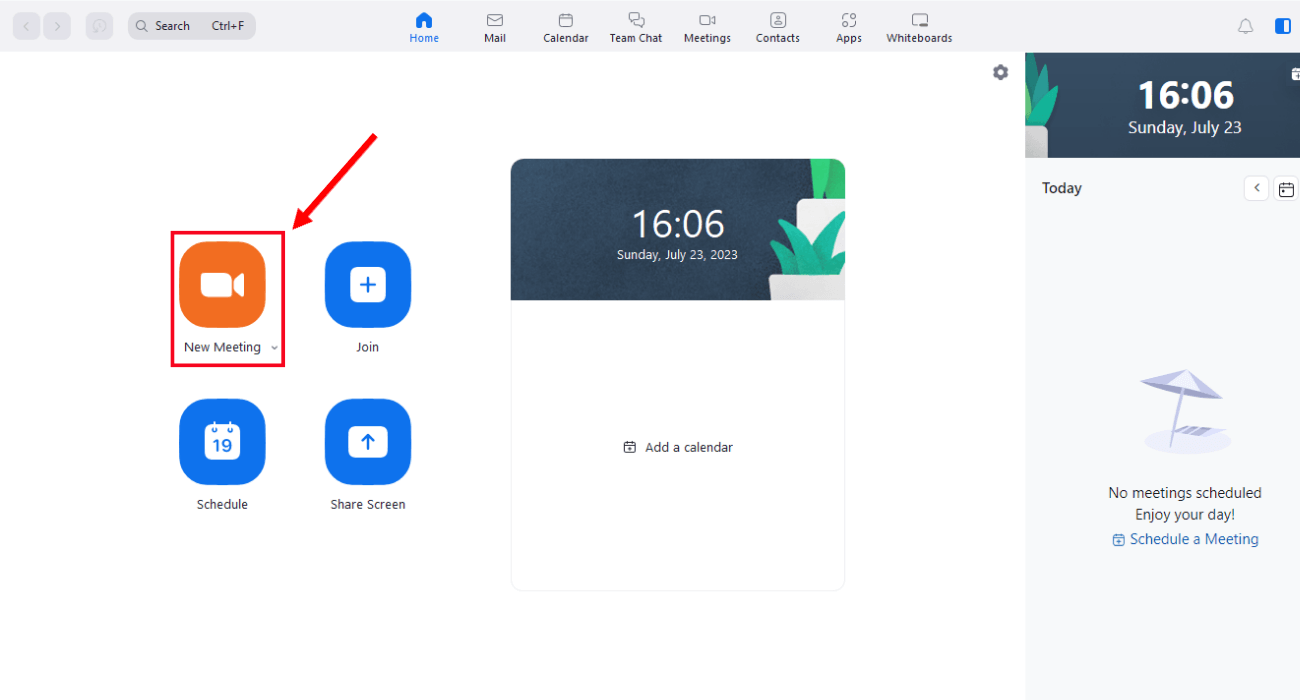
Step 1: Head to the Zoom desktop client or web portal and start a new meeting or webinar.
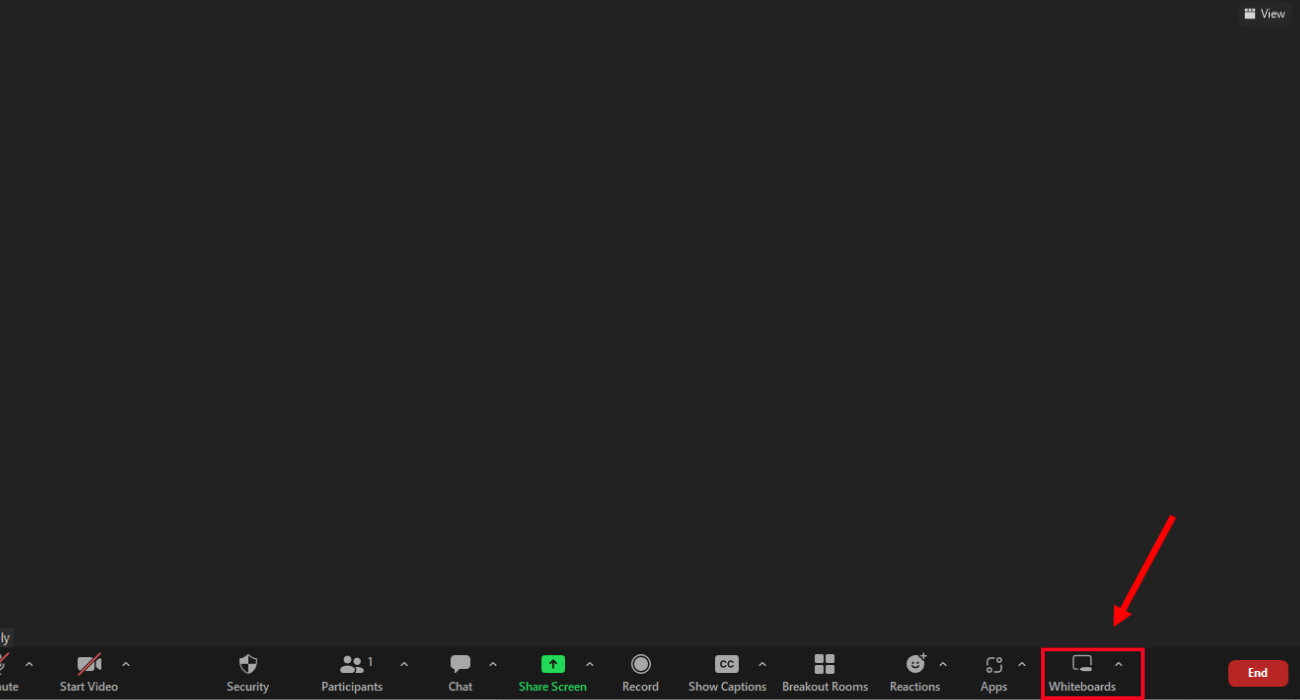
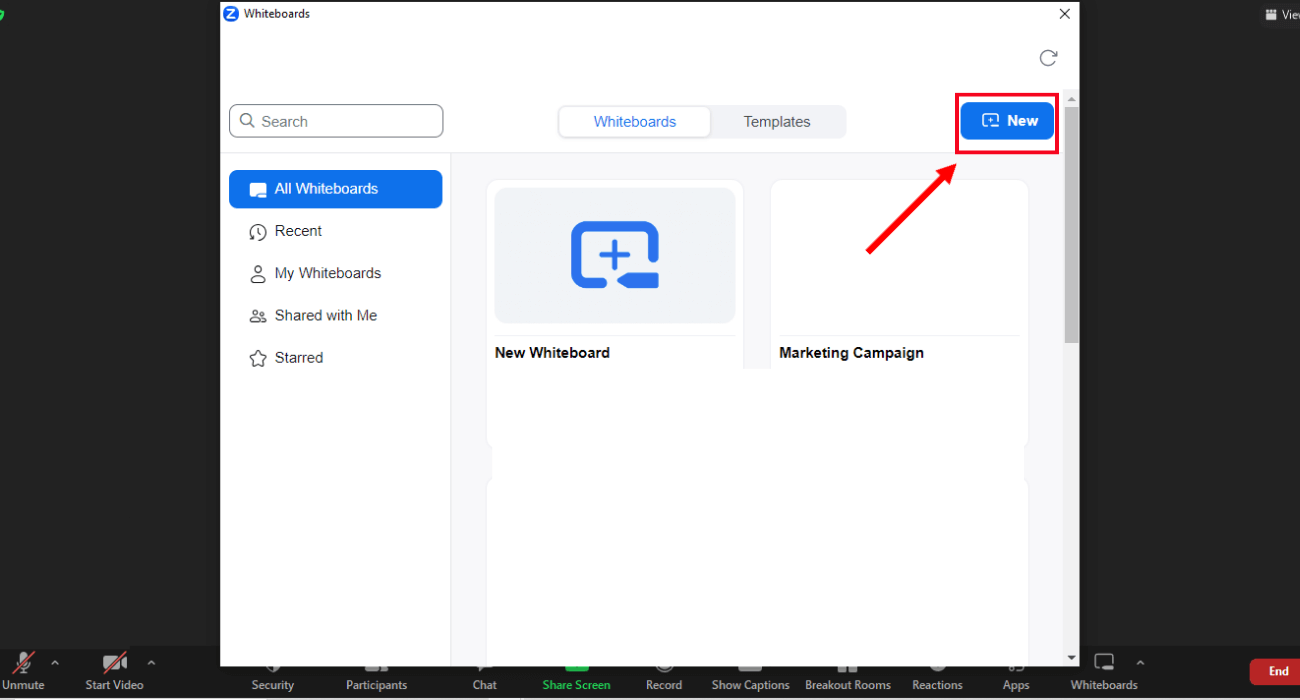
Step 2: In the below in-meeting controls, locate and select the 'Whiteboards' option.
Step 3: At the top-right corner of the 'Whiteboards' window, click 'New.'
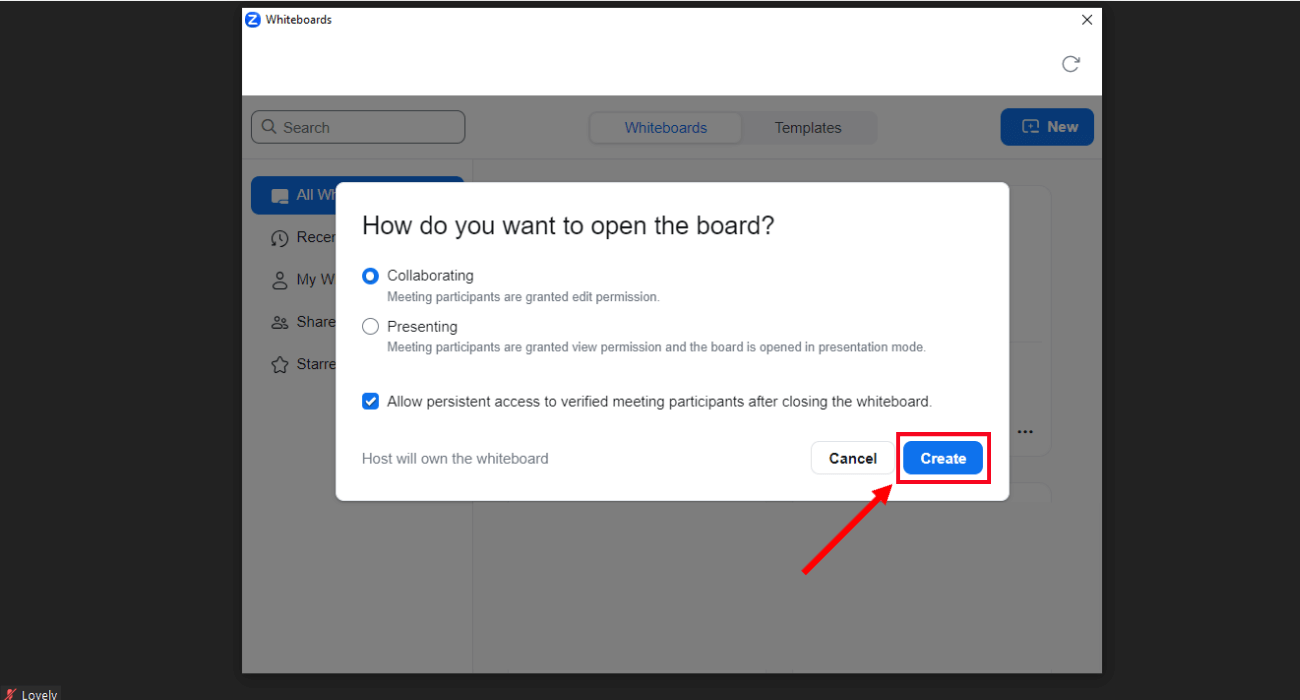
Step 4: Now, you can edit the whiteboard sharing feature. If you want the participants to view the whiteboard, select 'Presenting.' Otherwise, you can choose 'Collaborating' to let attendees edit the whiteboard during the meeting. Once selected, click 'Create.'
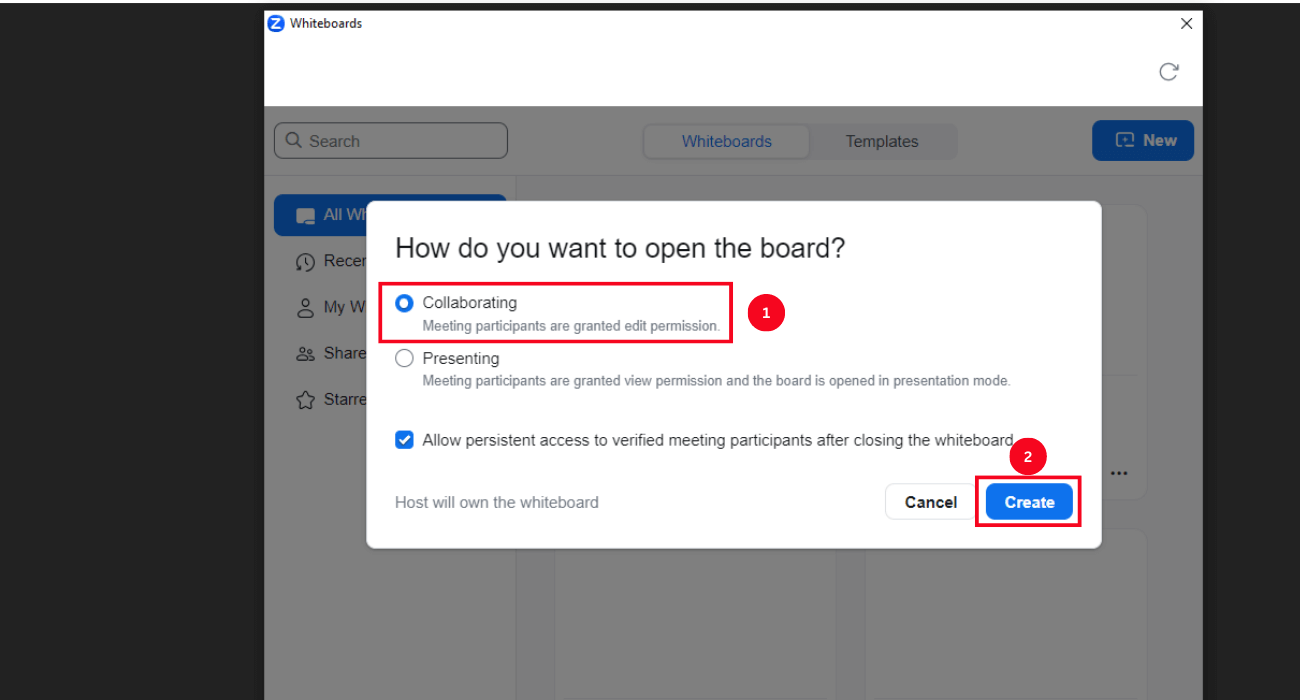
That's it! The host and participants can now access the Zoom whiteboard.
Note: If you use a basic Zoom plan, you can edit only three recently created whiteboards. You'll have to upgrade your plan to get unlimited editing access.
How to draw on a Zoom whiteboard
If you are giving a presentation, explaining a concept, or brainstorming with your virtual team, drawing on a whiteboard can help you collaborate effectively. Zoom whiteboard lets you use different tools to create shapes. Here's how to draw on Zoom whiteboards.
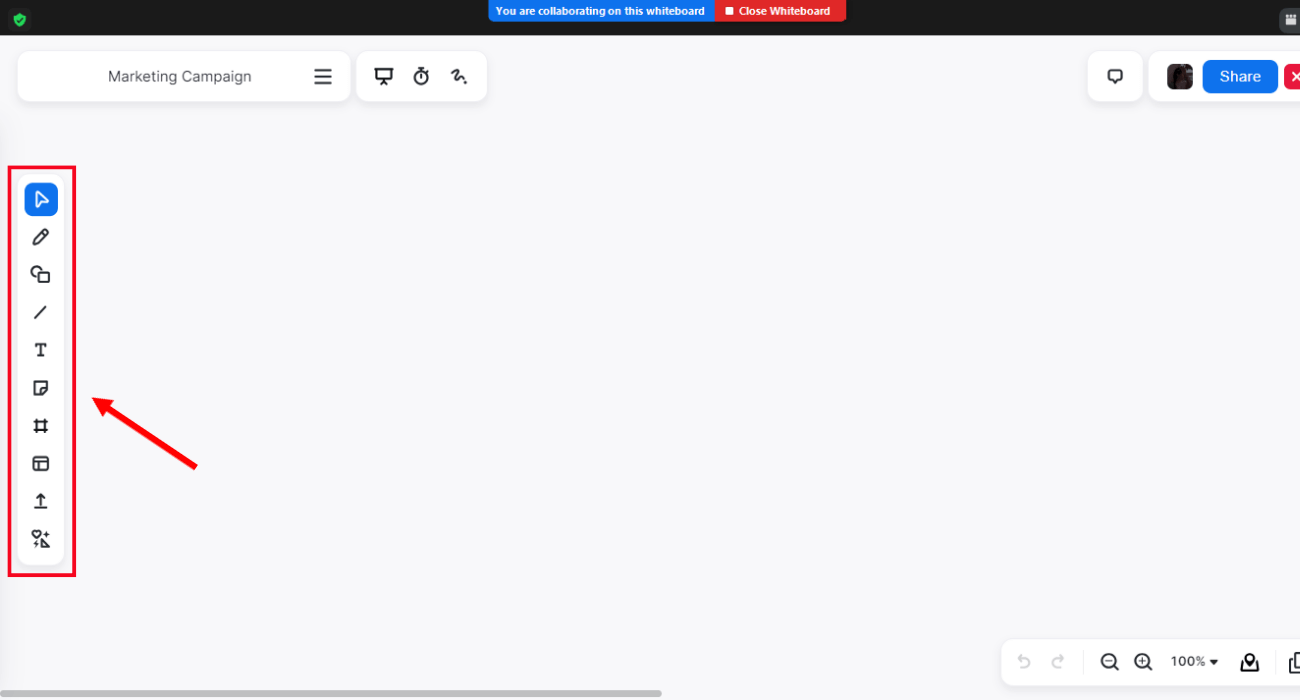
Step 1: Launch the Zoom meeting and create a whiteboard. In the left sidebar, you can find the drawing and editing tools like select, draw, shape, line, text, sticky notes, etc.
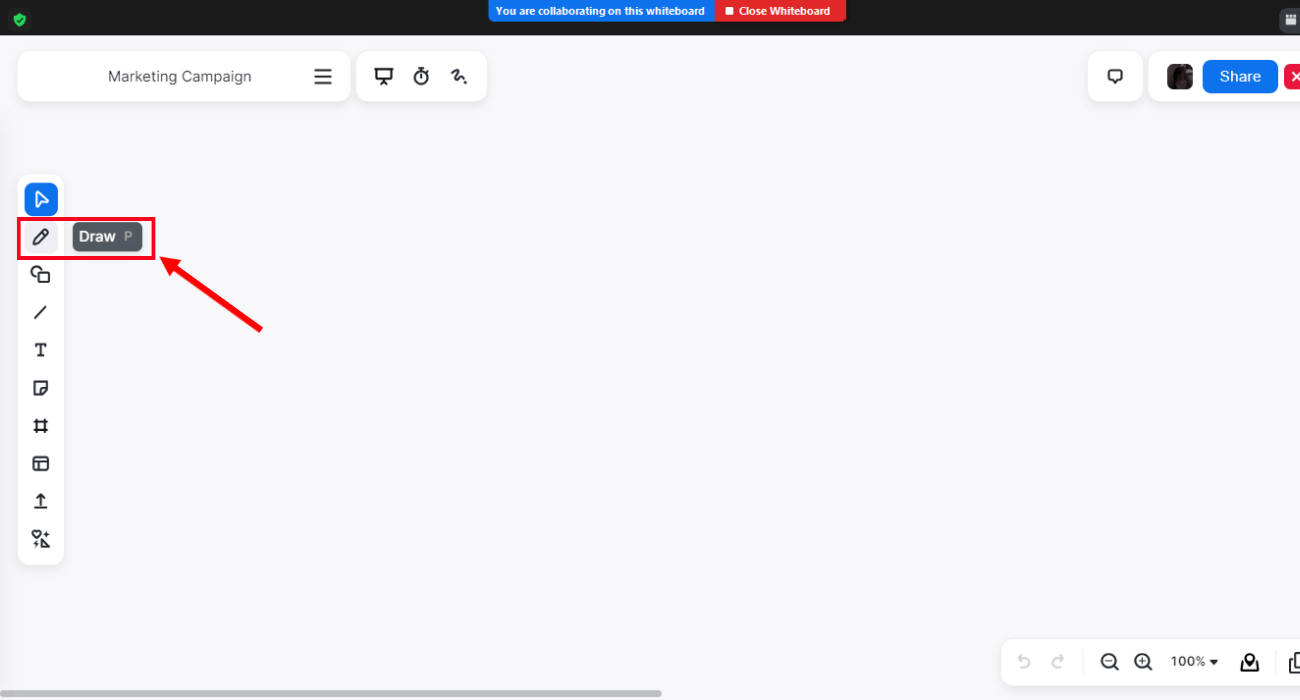
Step 2: Select the 'Draw' icon, and you'll see the options such as pen, highlighter, eraser, line thickness, and color.
Step 3: In the bottom-right corner, you can find undo and redo icons.
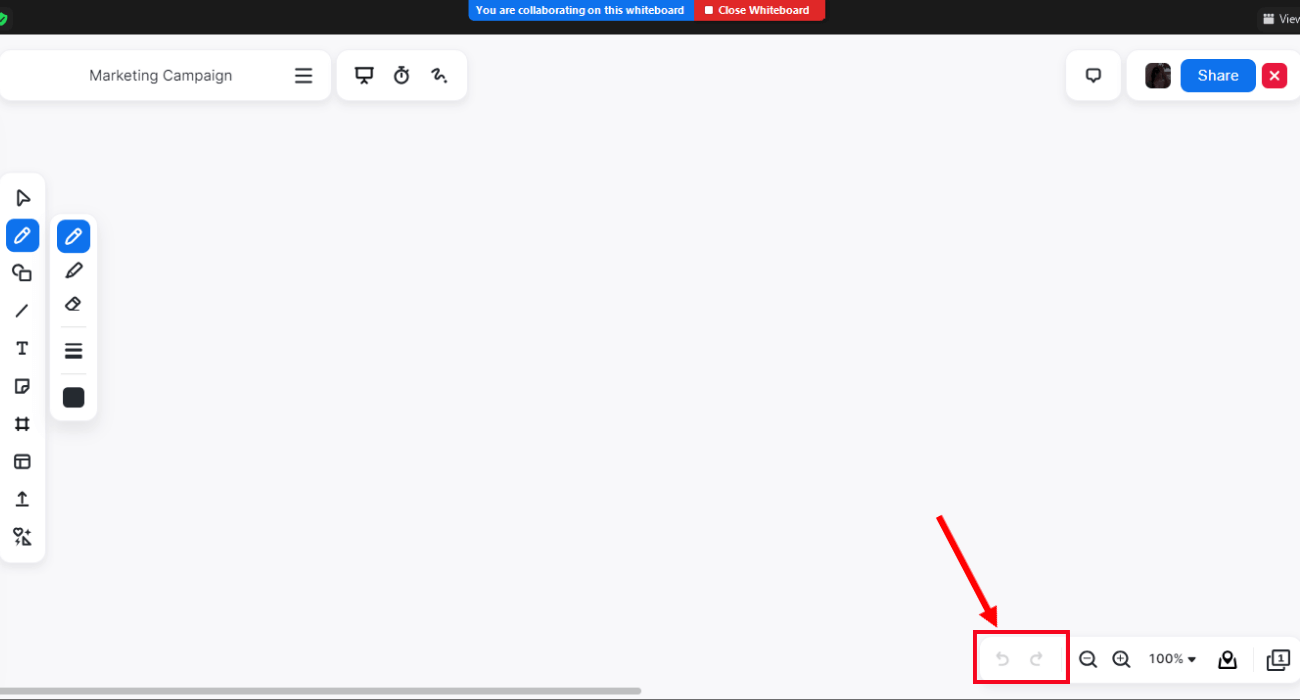
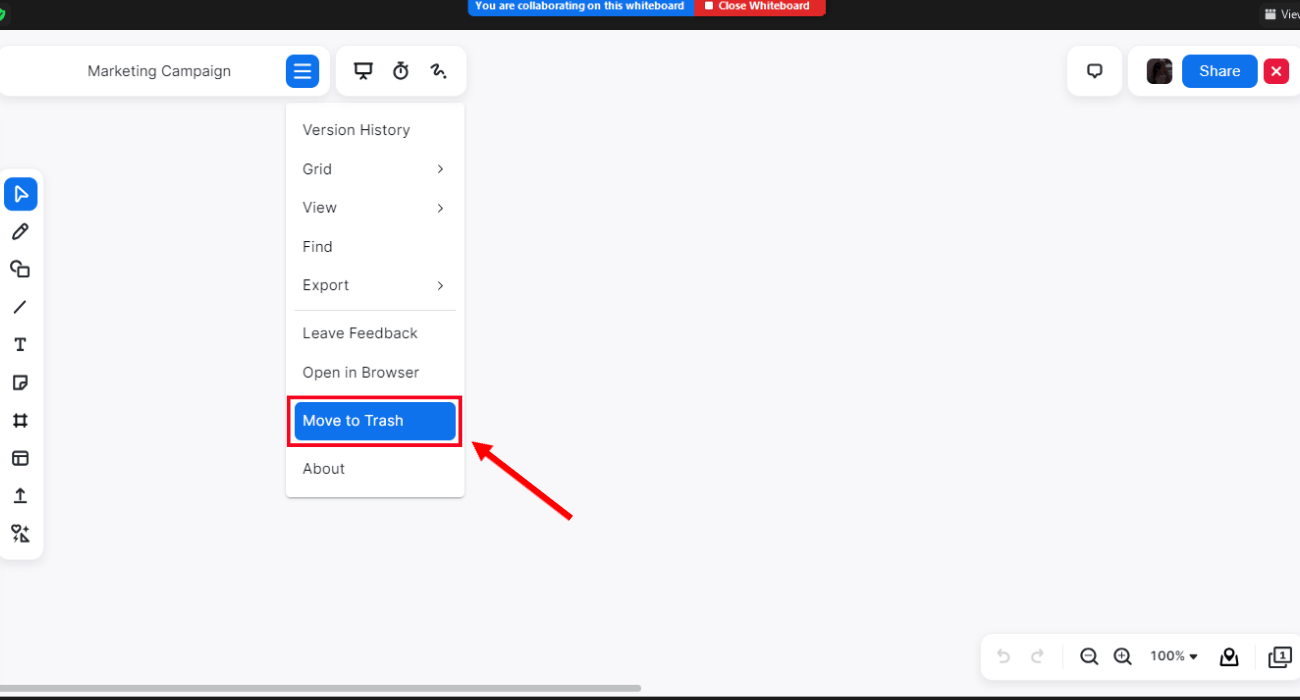
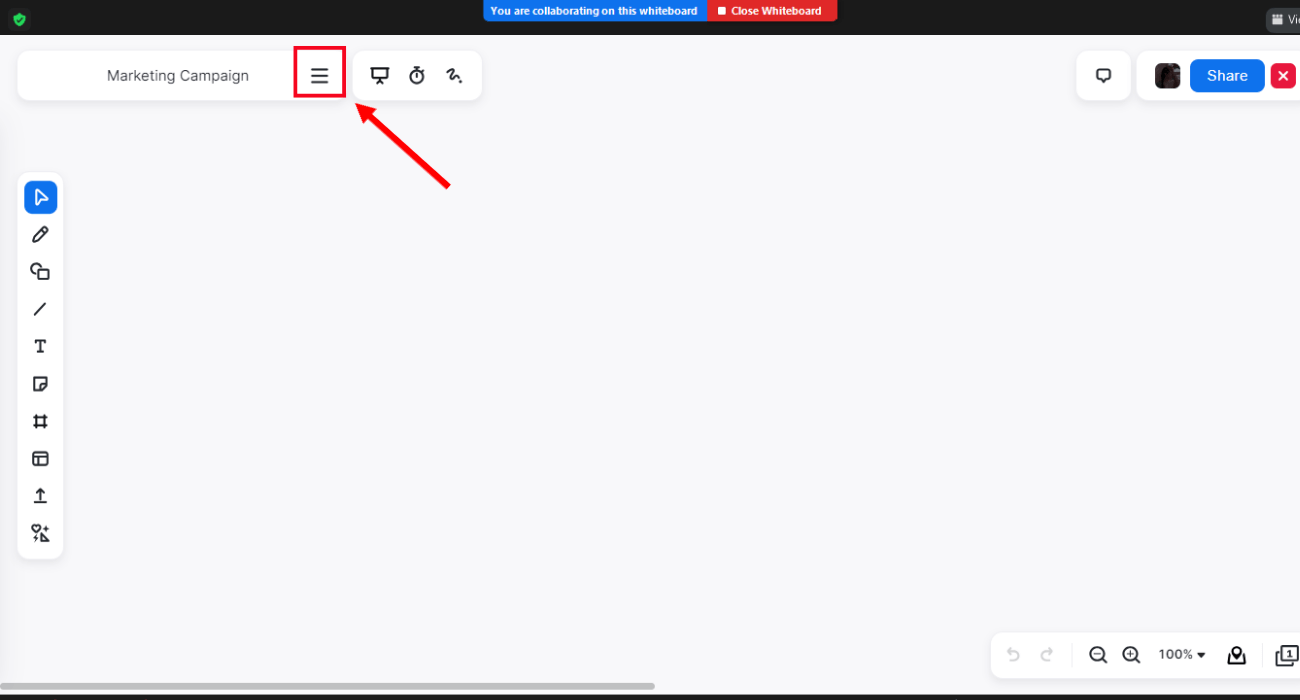
Step 4: Finally, click on the more option or three horizontal lines next to the name of the Zoom whiteboard.
If you do not want to save the drawing, select 'Move to Trash' to delete your whiteboard.
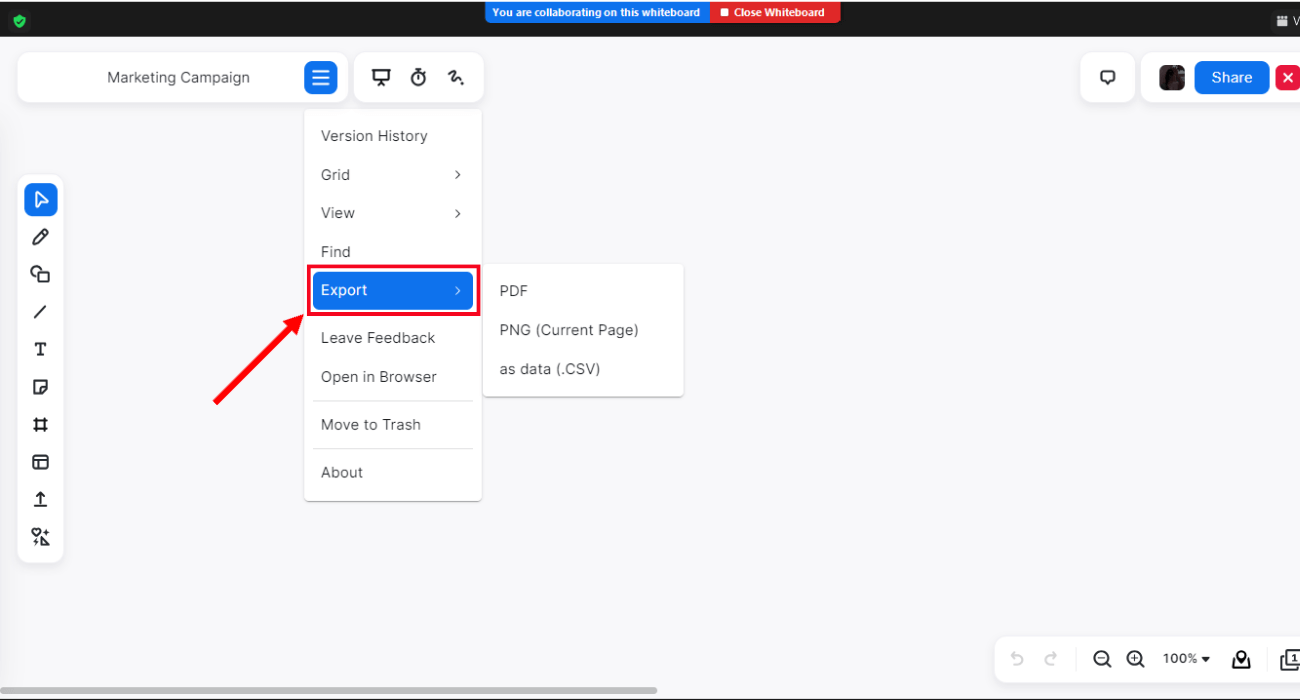
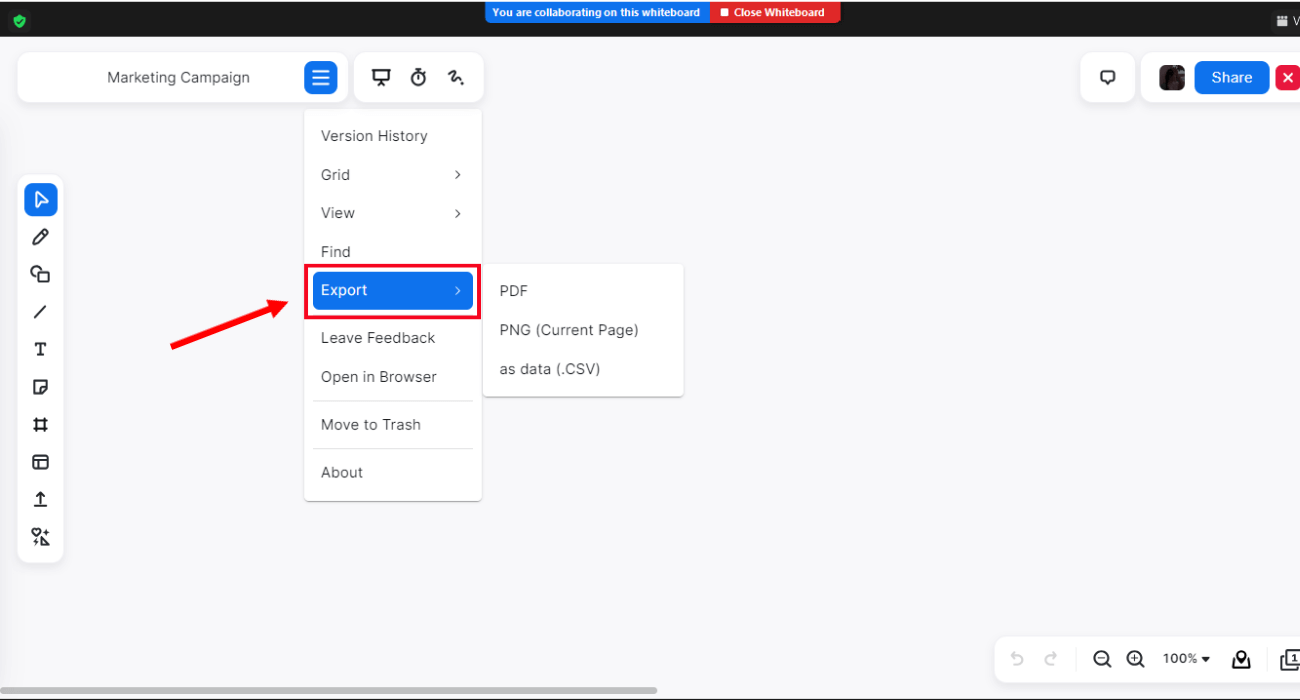
If you want to save your drawing, click 'Export.' You can save the Zoom whiteboard as PDF, PNG, or as data (.CSV).
Notta offers the most integrated AI meeting notes, summaries, and action items so nothing gets missed.
How to share a whiteboard
Zoom whiteboards are a great way to collaborate and brainstorm with others in real-time. But what if you want to share your whiteboard with someone who wasn't in the meeting? Fortunately, Zoom makes it easy to share whiteboards with others.
You can either email the whiteboard or copy a link to it. This way, anyone with the whiteboard link can access the whiteboard even after the meeting ends. Here are the simple steps the meeting host must follow to share whiteboards.
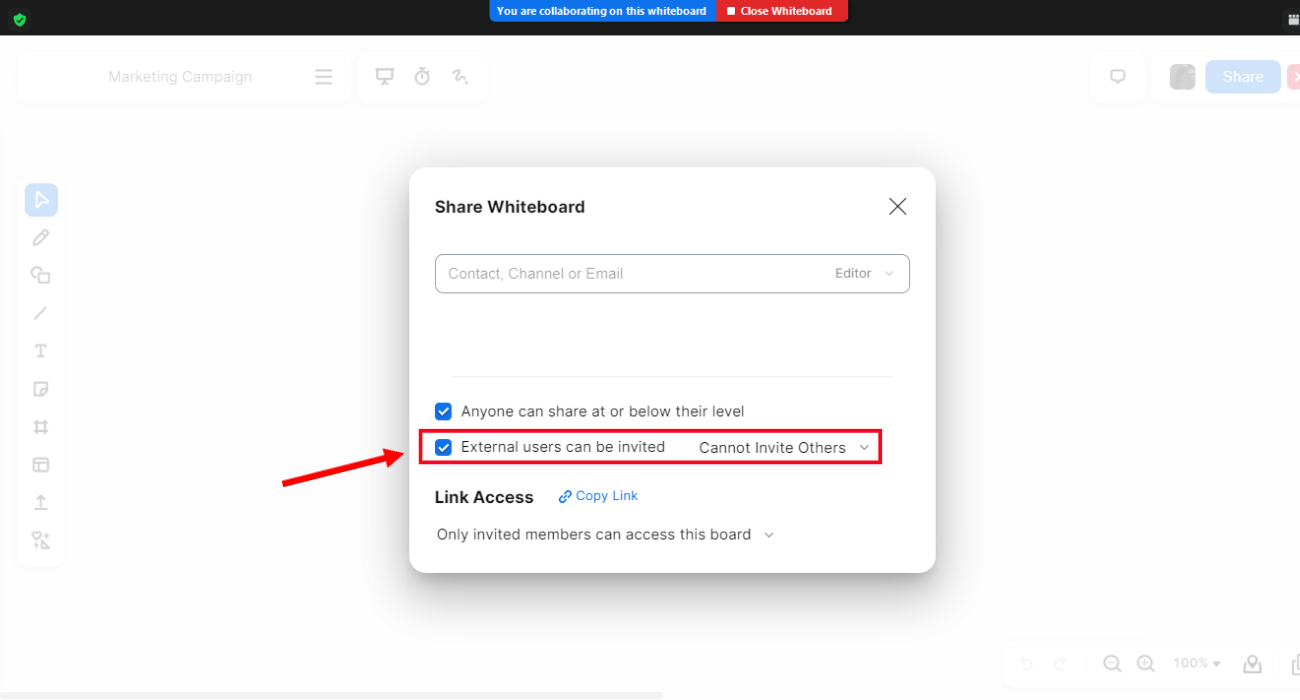
Step 1: At the top-right of your Zoom whiteboard, select 'Share.'
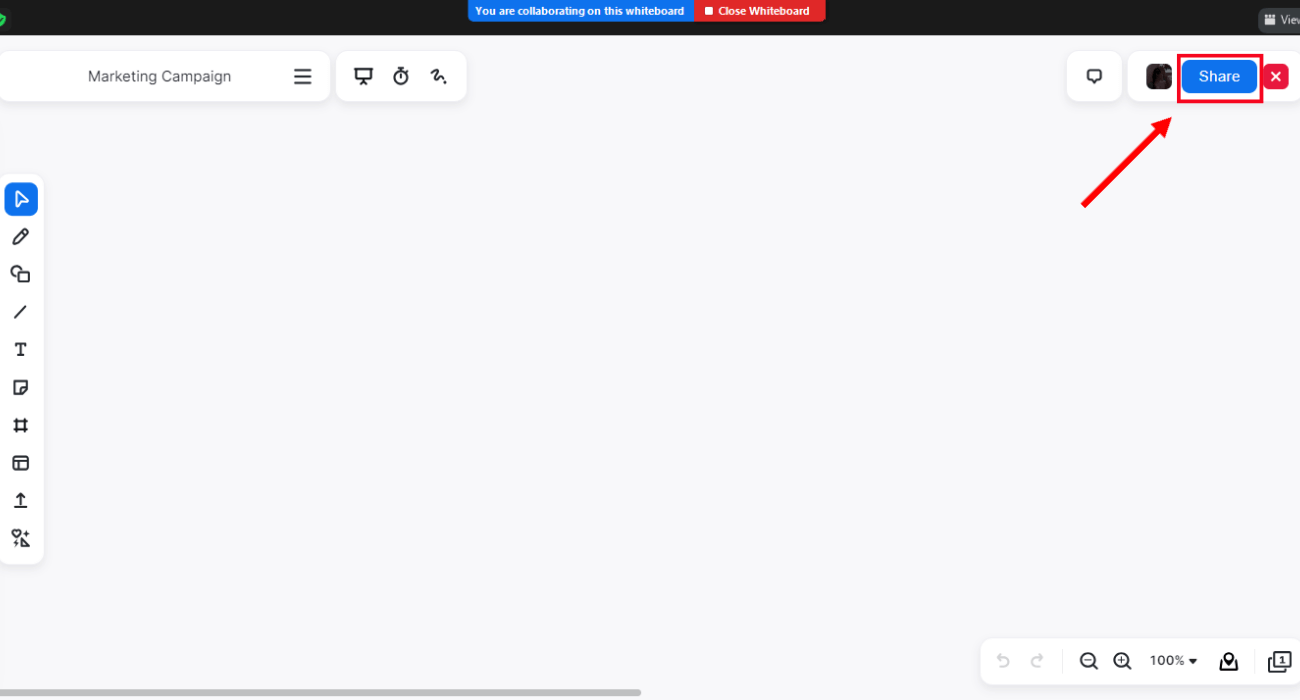
Step 2: The 'Share Whiteboard' window will open, where you can add the email address or copy the link by selecting 'Copy Link.'
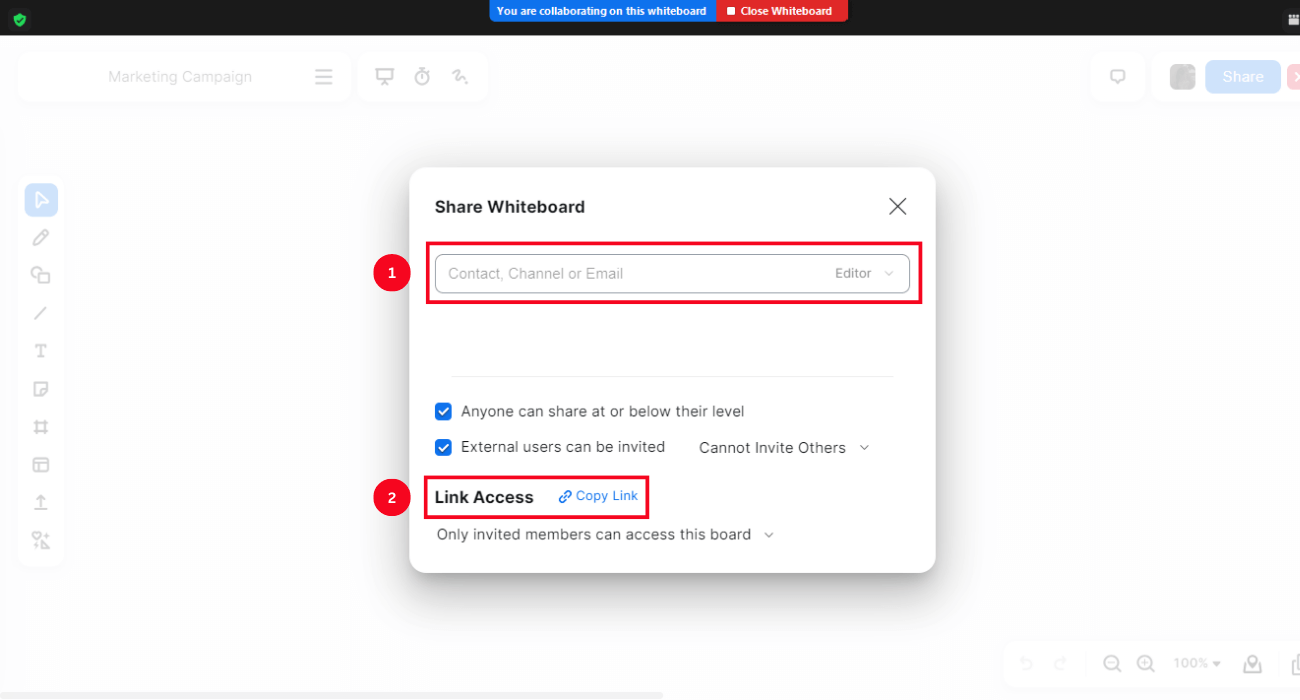
Method 1: Share Whiteboard via Email Address
Type the email address in the box. Now, click the arrow next to 'Editor,' and a drop-down menu will appear. You can select one of the options: co-owner, editor, commenter, or viewer. Once you've modified the settings, select the 'Share Whiteboard' option.
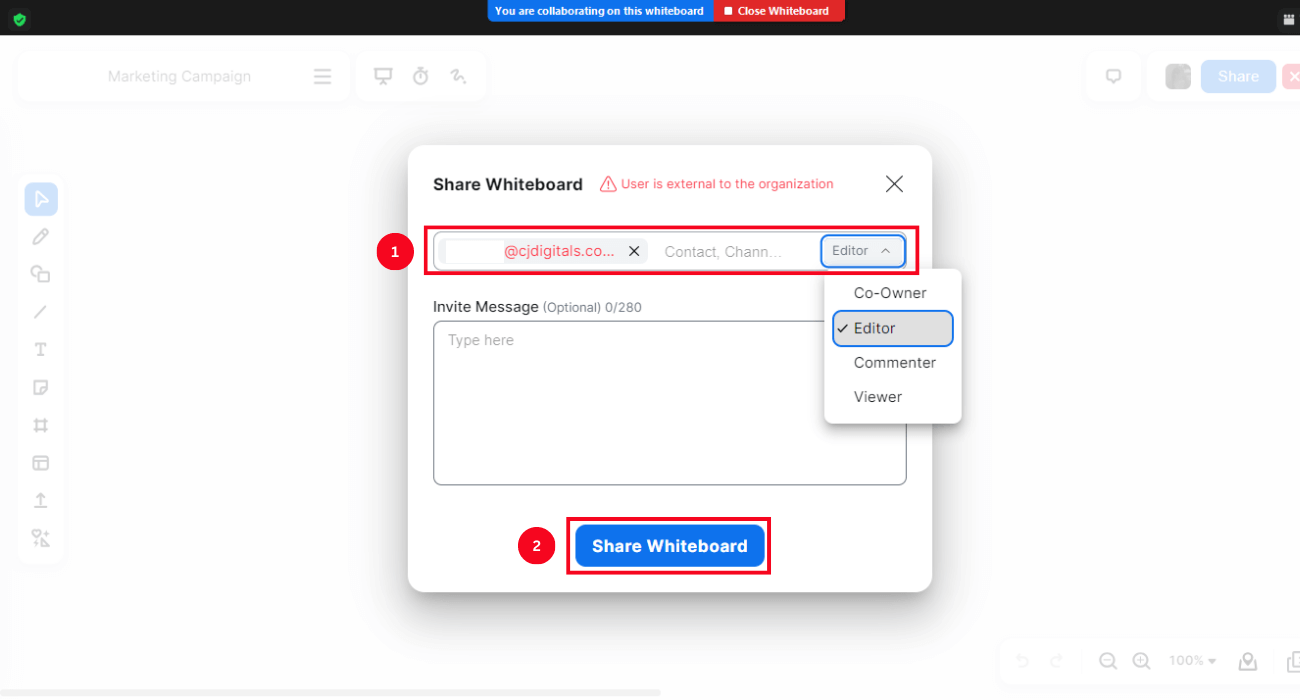
Method 2: Share Whiteboard via Link
Under the 'Link Access' section, locate 'Only invited members can access this board.'
In the menu, choose from the three options: 'Only invited members can access this board, Anyone at my company, or Anyone with the link can view this board.'
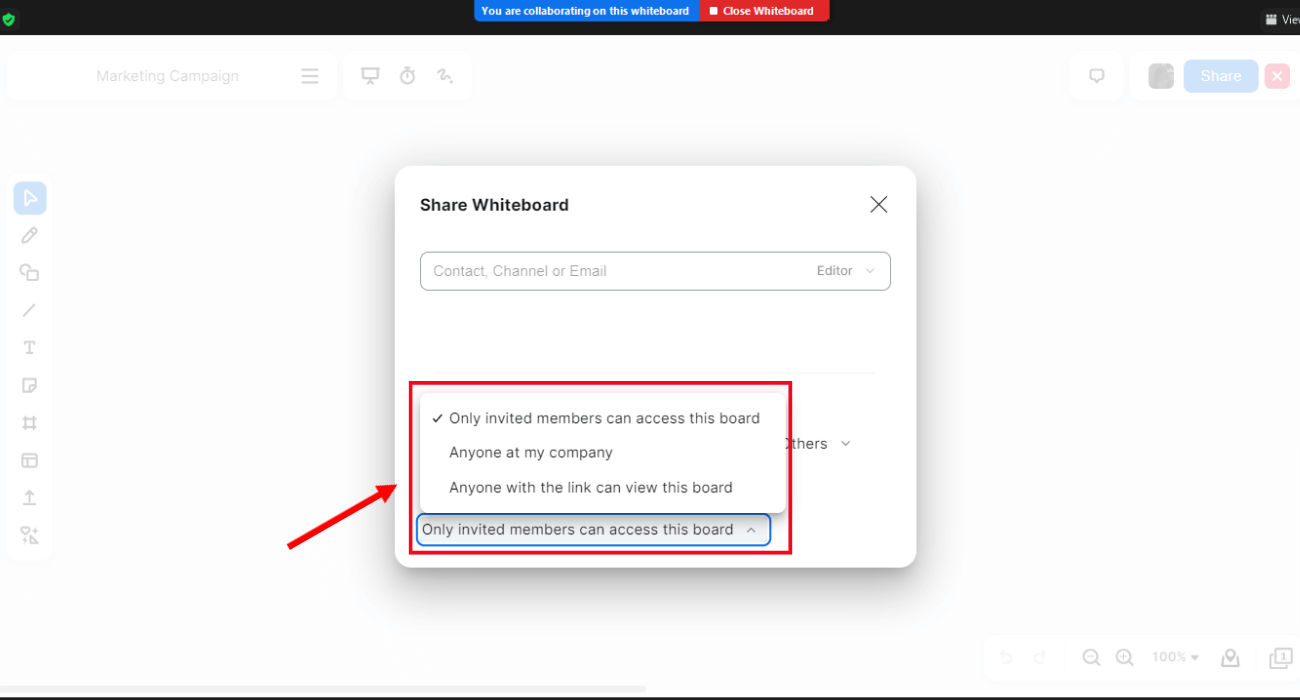
Select one of these options and finally click 'Copy Link.'
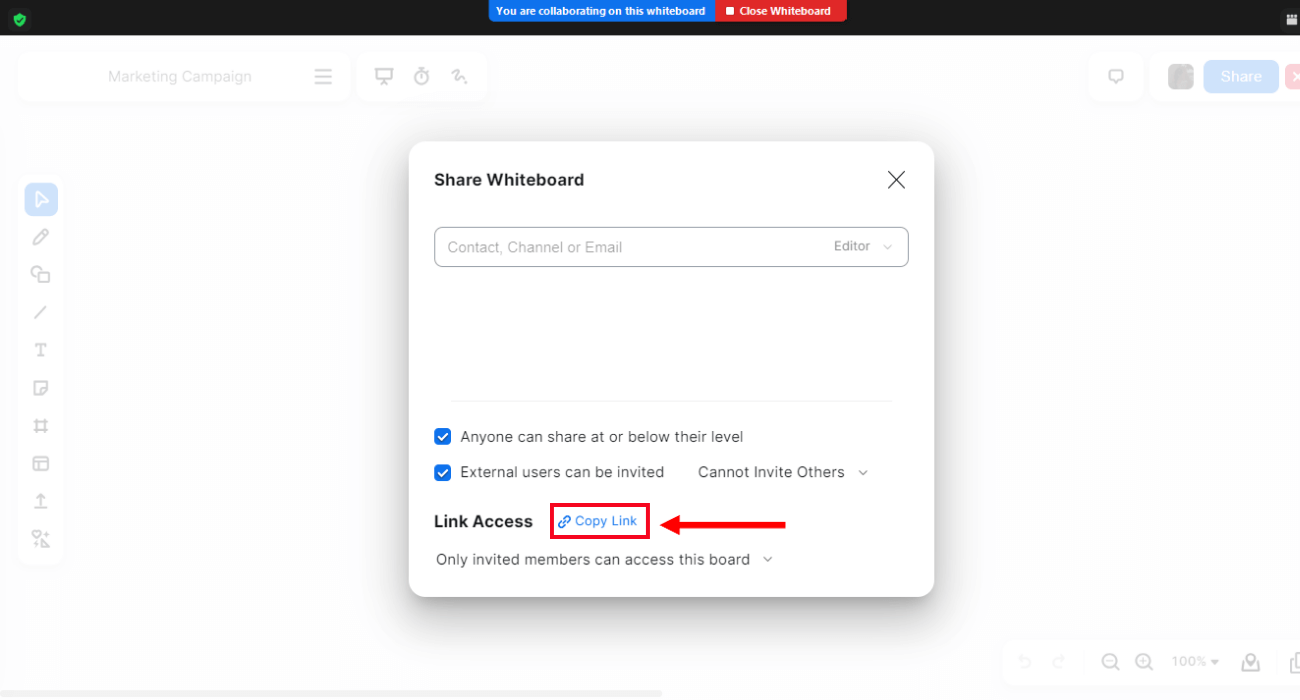
Note: If you want to share the whiteboard with users outside your organization, check the box next to 'External users can be invited.' This option lets you send the whiteboard to the users who are not a part of the organization.
How to collaborate on a Zoom whiteboard
A Zoom whiteboard is an interactive feature of the video conferencing platform that fosters collaborative group discussions. If you are the host of the Zoom meeting and want to grant collaboration permission to the participants, here are the steps you'll need to follow.
Step 1: Launch the Zoom meeting and select 'Whiteboards' in the meeting controls.

Step 2: Click 'New,' and a pop-up will appear. Instead of 'Presenting,' select 'Collaborating' to grant editing permission to the meeting participants. Click 'Create.'
If you are a participant in the Zoom meeting, here's how to collaborate on a Zoom whiteboard.
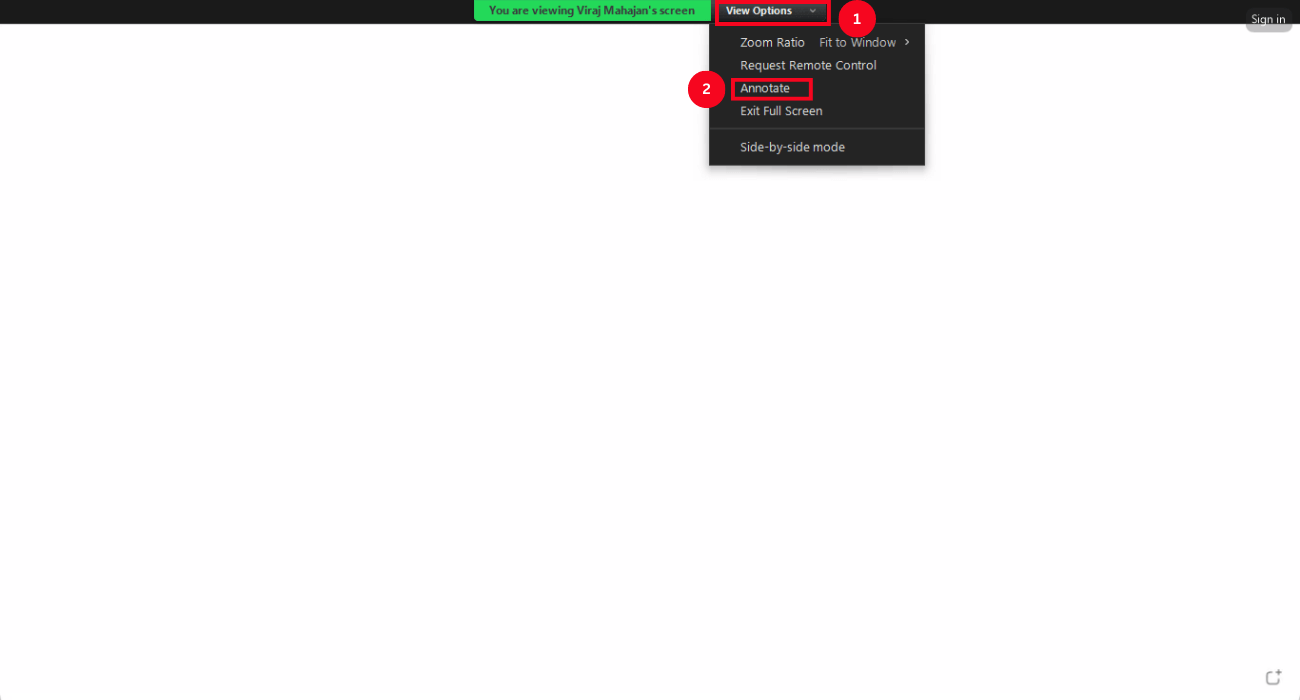
Step 1: Select the 'View Options' icon on the screen during the Zoom meeting. You can find the option in the share screen menu. In the drop-down menu, locate and select 'Annotate' to draw on the shared whiteboard.
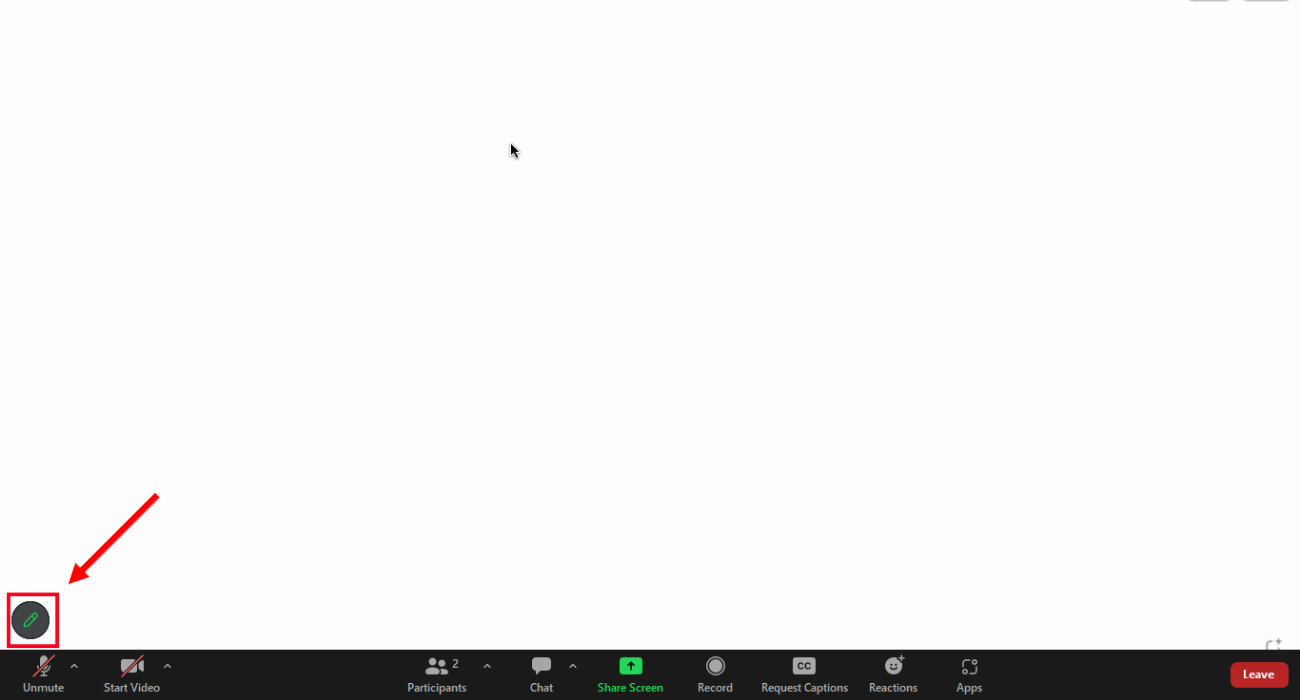
Step 2: At the screen's bottom-left corner, select the 'Pen' icon and start annotating on the whiteboard.
FAQs
Can participants write on whiteboards in Zoom?
Yes, the meeting attendees can write on Zoom whiteboards if the host grants annotation and collaboration permission to them. While creating the whiteboard, you will get two main options: collaborating and presenting.
Collaborating: This option enables the meeting host and participants to collaborate in real time and create a more engaging video conferencing environment.
Presenting: This option lets the host grant viewing permissions to the meeting attendees. The whiteboard will only be opened in presentation mode using this feature.
The meeting participants can write on the shared whiteboard only if the host chooses 'Collaborating' instead of 'Presenting.'
How do I use whiteboards in Zoom breakout rooms?
The virtual teams can also use Zoom's breakout room feature and the whiteboard for improved collaboration. The meeting host can split participants into separate breakout rooms and use whiteboards to brainstorm ideas. Here's how to use the whiteboard in Zoom Rooms.
Step 1: Start a new Zoom meeting in the Zoom Room. On your screen, locate and select the 'Whiteboard' option.
Step 2: Click 'Whiteboard NEW.'
Step 3: Configure the participant permissions and select 'Open and Collaborate.'
How to save whiteboards in Zoom?
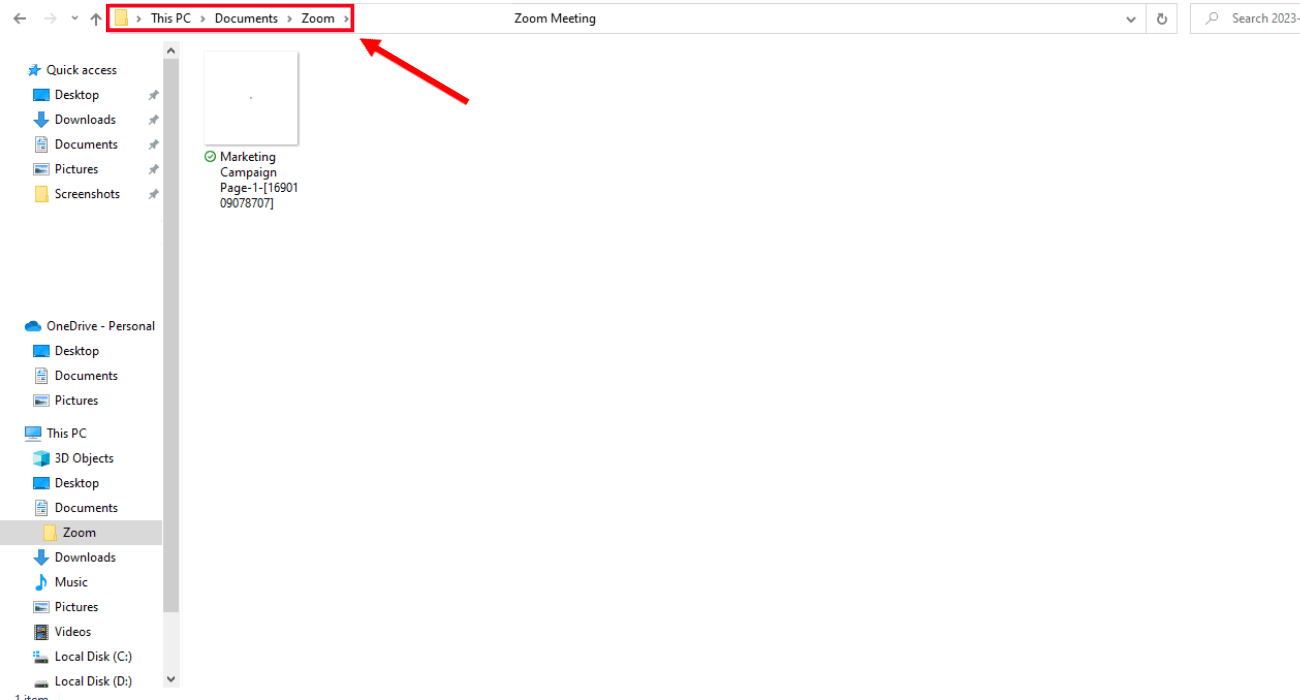
Zoom whiteboards are saved automatically, so you can access them anytime, even after the meeting ends. By default, Zoom whiteboards are exported to the Zoom folder on your desktop. If the whiteboard is not saved automatically, you can manually export it to your desktop by following the below steps.
Step 1: Click the three horizontal lines or more options next to the name of the Zoom whiteboard.
Step 2: In the drop-down menu, locate and select 'Export' to save the Whiteboard as PDF, PNG (current page), or as data (.CSV).
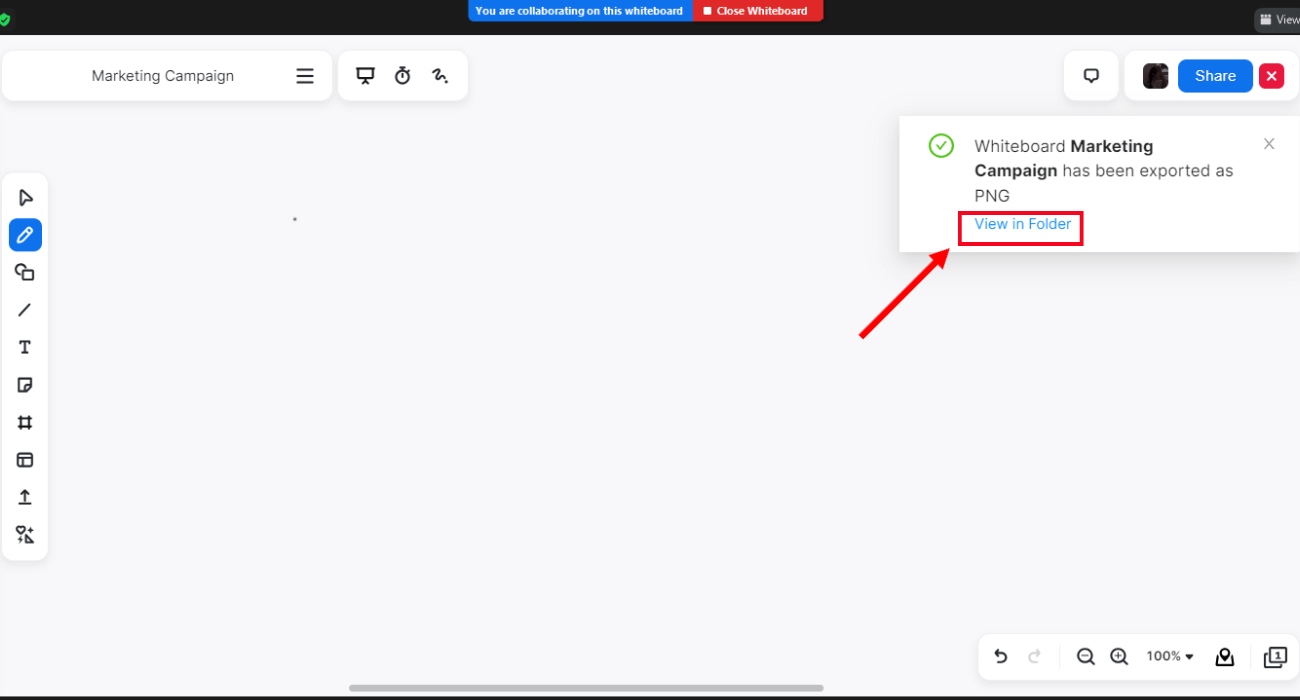
Step 3: The Zoom whiteboard will be locally saved to your system. Click 'View in folder' to locate the downloaded whiteboard.
If you cannot find the 'View in folder' option on the screen, navigate to desktop files and select Documents > Zoom.
Notta: Accurate meeting transcription software
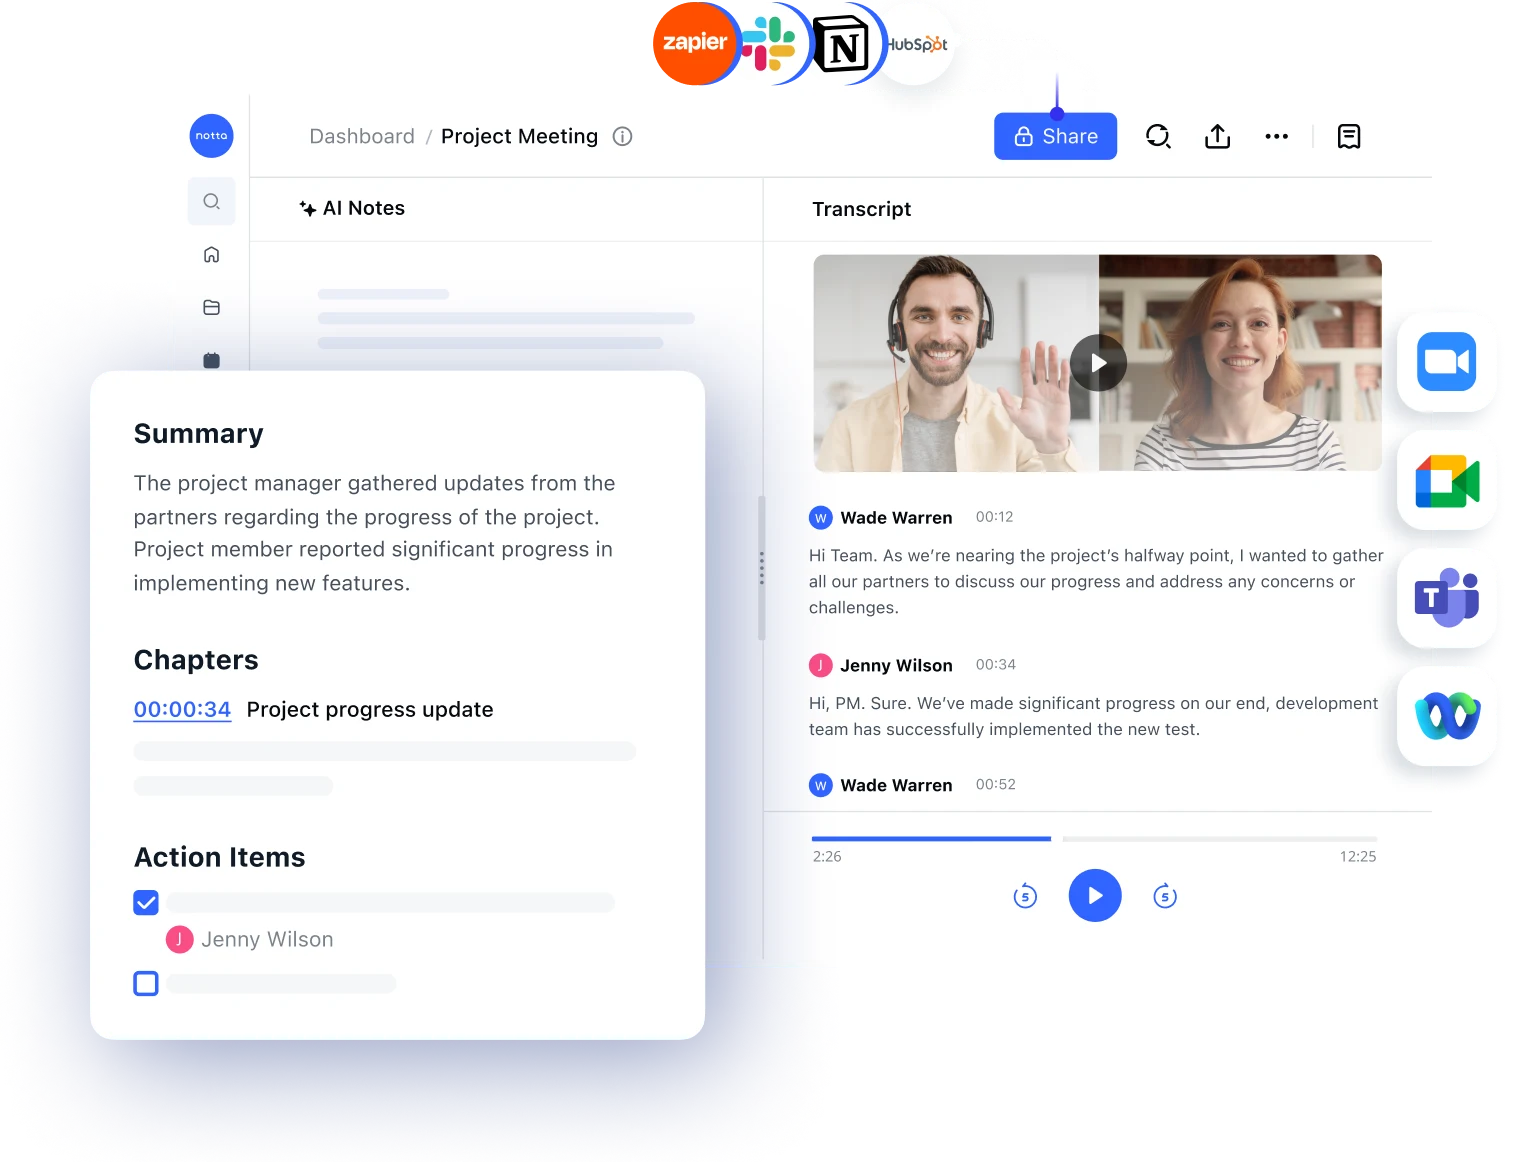
Zoom offers multiple features, such as screen sharing, annotation, whiteboards, etc., to enhance virtual collaboration. You can record Zoom meetings to ensure everyone in the session can later access and analyze the information. However, manually recording and transcribing Zoom meetings can be arduous and time-consuming.
But not more! Notta is a powerful and feature-rich AI recording and transcribing tool. Not only can you record high-quality Zoom meetings with Notta, but it also lets you generate transcripts in real-time. You can also edit/mark transcripts to effortlessly find critical points of the Zoom session. This helps you save time and improve your productivity.
Notta can convert your spoken interviews and conversations into text with 98.86% accuracy in minutes. Focus on conversations, not manual note-taking.
Key takeaways
Zoom's whiteboard feature lets virtual teams make meetings more productive and collaborative. Following the steps in the 'How to use Zoom whiteboard in a meeting' tutorial, you can quickly create, draw, save, and share Zoom whiteboards.
Additionally, you can harness the power of Notta recording and transcribing tools to generate AI-powered transcripts in a minute. It can seamlessly integrate with Zoom to schedule, record, and transcribe meetings. Sign up for a free Notta account to record Zoom meetings and get real-time transcripts.