How to Test Teams Audio in Microsoft Teams: A Complete Guide
Saving time and effort with Notta, starting from today!
Audio is an essential part of any Teams meeting, but it’s often the first thing to break. Teams gives you several built-in tools to check your mic and speakers before you join a call, whether you’re on desktop, web, or mobile.
This guide shows you how to test Teams audio in Microsoft Teams, troubleshoot common issues, and use Notta to make the most out of your meetings, even if your audio setup doesn’t want to cooperate.
How Do You Make a Test Call in Microsoft Teams?
Running a test call is the most reliable way to check your audio in Teams. The desktop app lets you record your voice, hear the playback, and confirm your mic and speaker work before you join a real meeting. Follow these steps to run a full test call through the Echo Test Bot.
Note: A test call is only available in the Teams desktop app on work/school accounts.
Step 1: Open Device Settings in Microsoft Teams
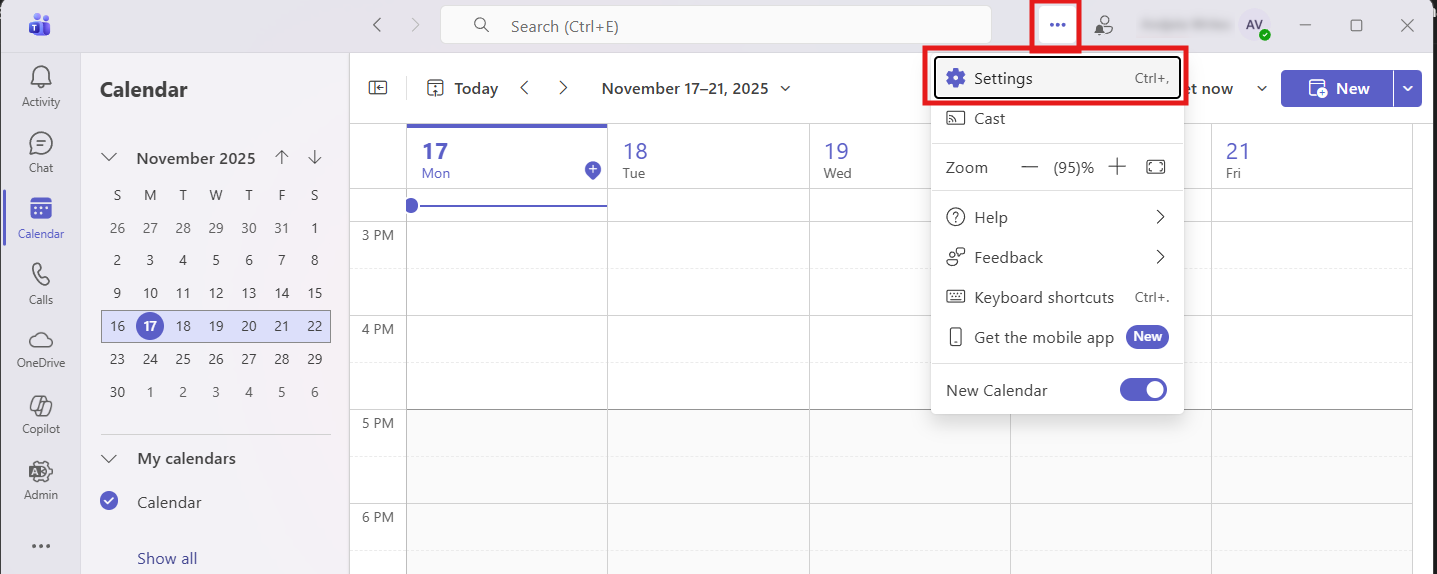
Open Microsoft Teams on your desktop and click the three-dot menu in the top right corner of the window. Select ‘Settings’ from the menu.
In the Settings panel, look at the left sidebar and click ‘Devices.’
Step 2: Choose Your Audio Devices
In the ‘Devices’ section, use the ‘Speaker’ dropdown to choose the speakers or headphones you want to use. Use the ‘Microphone’ dropdown to pick the correct mic.
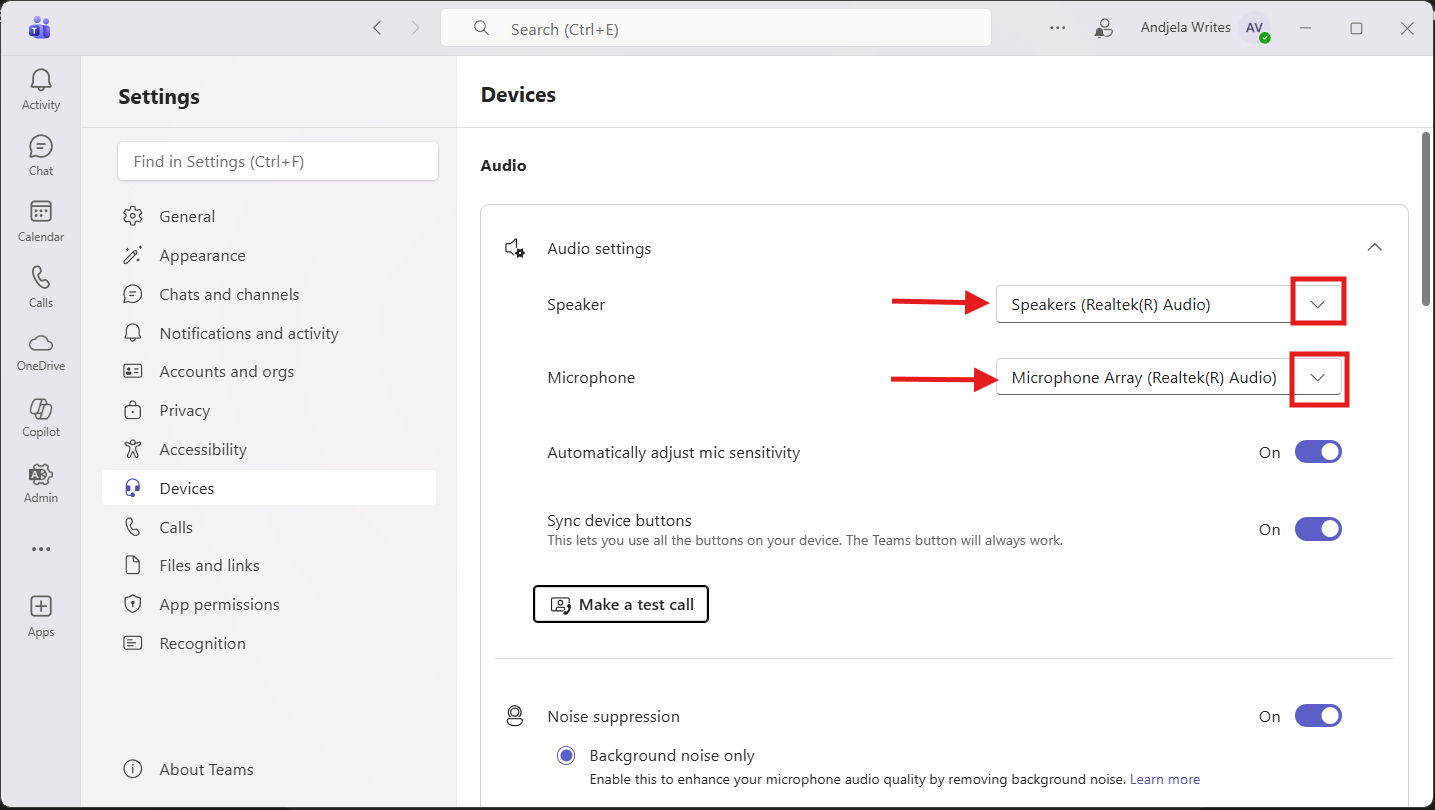
This section also includes the ‘Automatically adjust mic sensitivity’ toggle. Turn it on if you want Teams to raise or lower your microphone level in real time to keep your voice clear, even if you speak quietly or background noise gets louder.
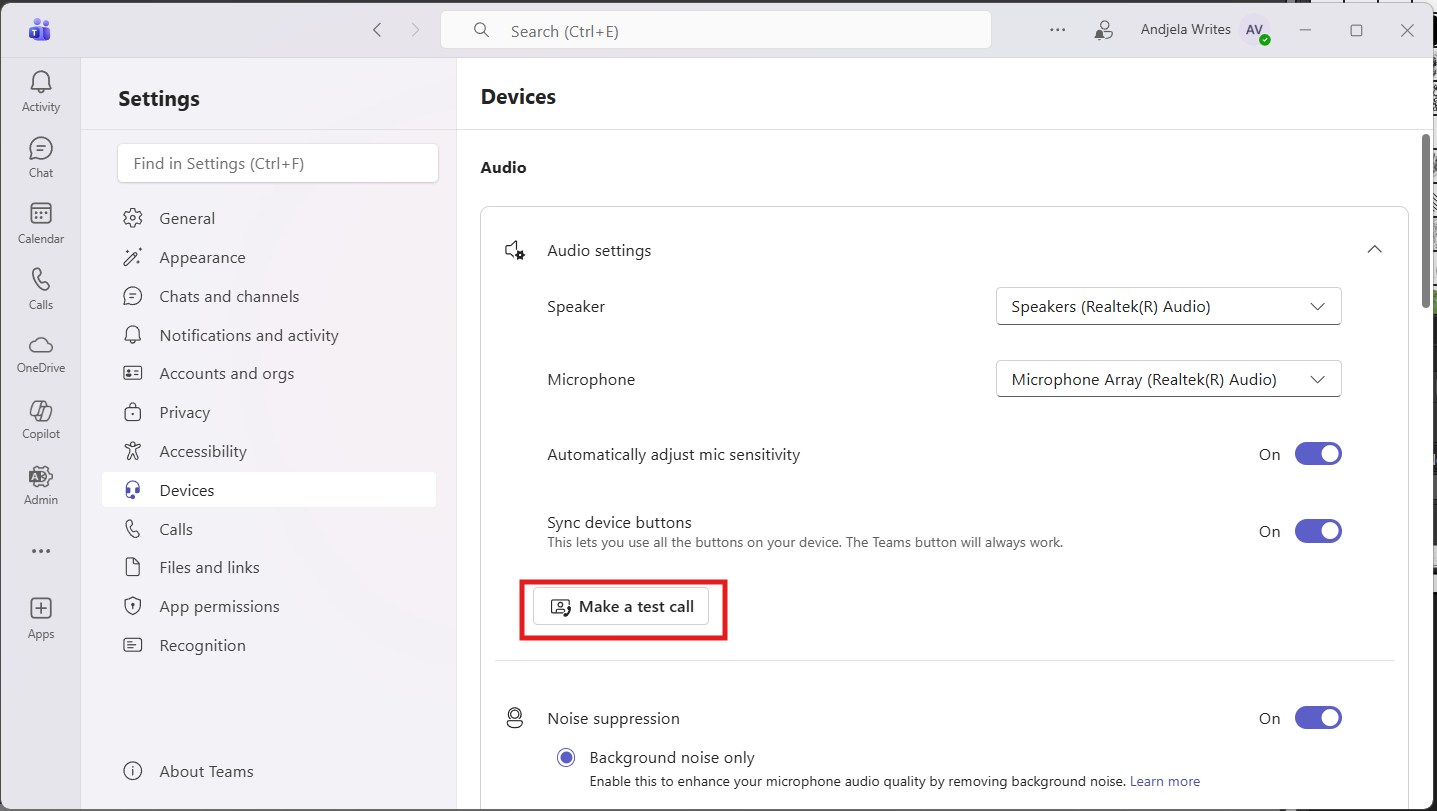
Once you have selected the correct audio devices, click ‘Make a test call.’
Step 3: Listen to the Playback and Adjust
Speak for a few seconds, listen while Teams replays your recording. Your mic and speakers are set correctly when your voice sounds clear at a comfortable volume.
Any distortion, echo, or very low volume means the devices or levels need adjusting.
Analyzing Your Test Call Results: What Do They Mean?
Teams shows your test call results as soon as the call ends. Each section tells you how your setup performed:
Microphone: Teams shows the mic it used during the test and confirms it stayed connected.
Speaker: Teams lists the output device that played the test audio, so you know exactly where the sound came from.
Camera: Teams confirms it can access your camera, even if you only checked audio.
Network: Teams checks your internet connection and shows whether it’s stable enough for calls.
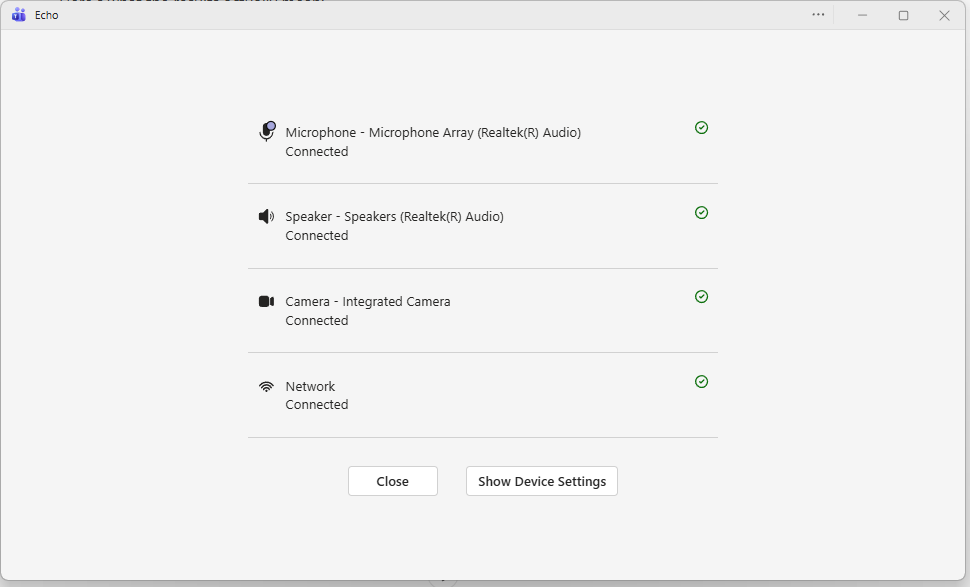
All four items display a green check mark when everything works correctly. If any of them display a warning symbol or appear disconnected, you can pinpoint the issue and fix it before running another test call.
Can You Test Teams Audio Manually Through Device Settings?
Teams uses your computer’s system settings, so you can check your audio directly in Windows to confirm everything works. This method helps you spot issues that don’t appear in Teams, especially when your mic or speakers aren’t working.
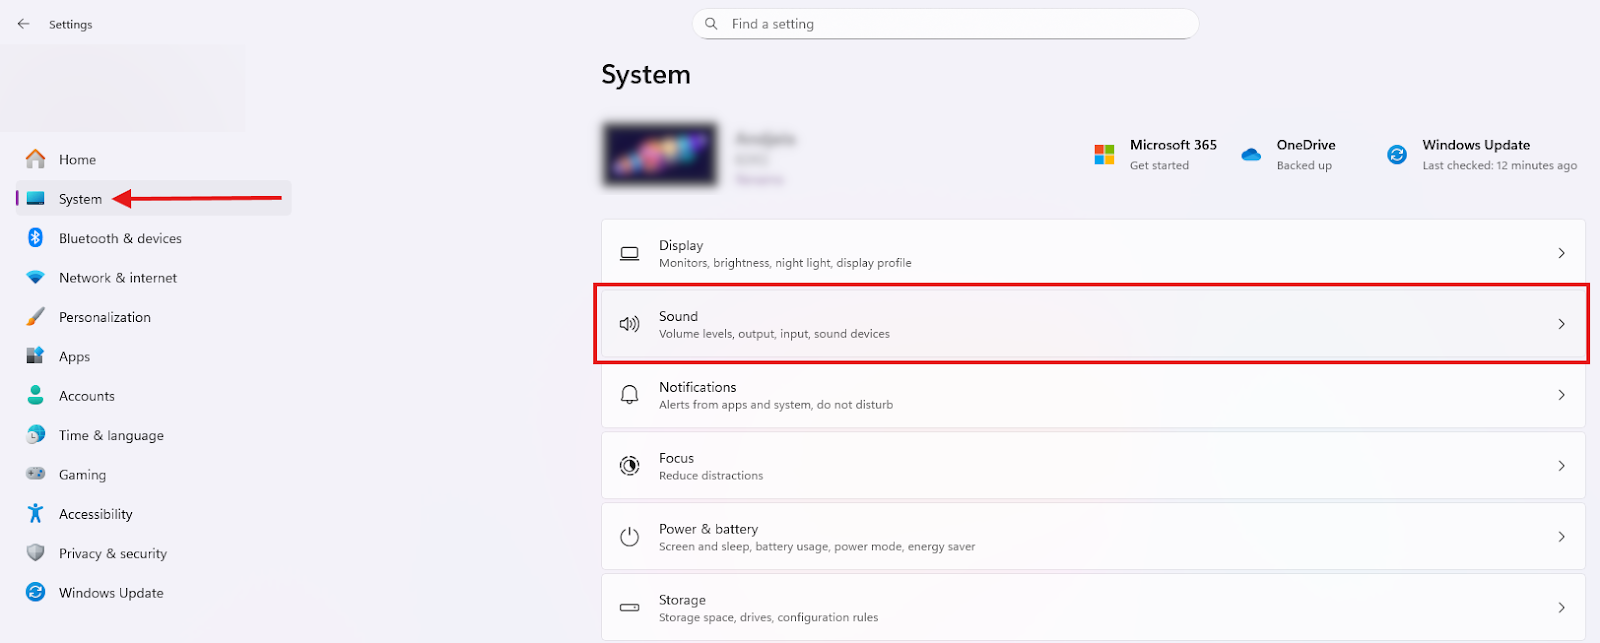
Open the ‘Start’ menu and click ‘Settings’. In the left-hand sidebar, select ‘System’. On the System page, click ‘Sound’. This opens the main sound control panel, where you can adjust output and input devices.
How Do You Select the Correct Speaker and Microphone?
Look for the ‘Output’ section. Open the ‘Choose where to play sound’ dropdown. Select the speakers, headphones, or monitor that you want Windows to use. This sets your main audio output device.

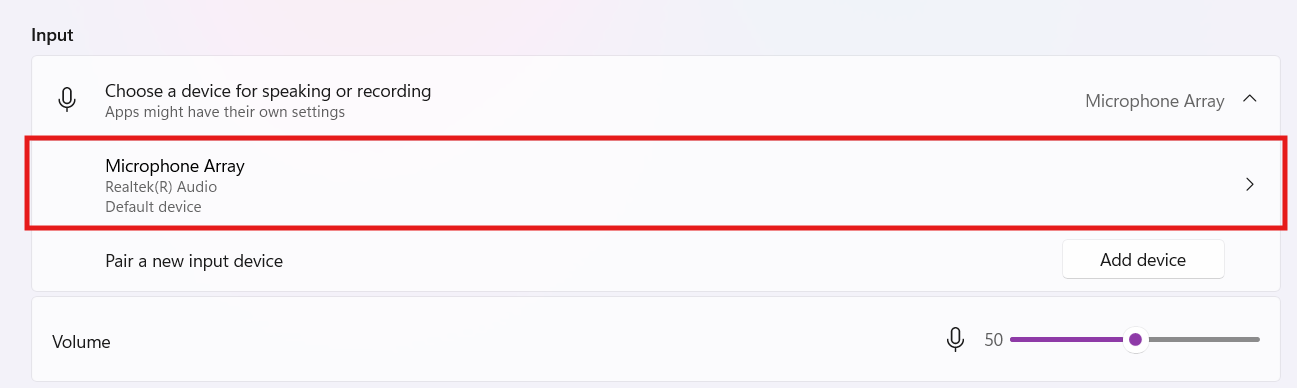
Similarly, scroll down to the ‘Input’ section to select the microphone you want to use. Open the ‘Choose a device for speaking or recording’ dropdown. Windows will route all voice input through this device.
Can You Play a Test Sound to Check Teams Audio?
Click the device name to open its ‘Properties’ page.
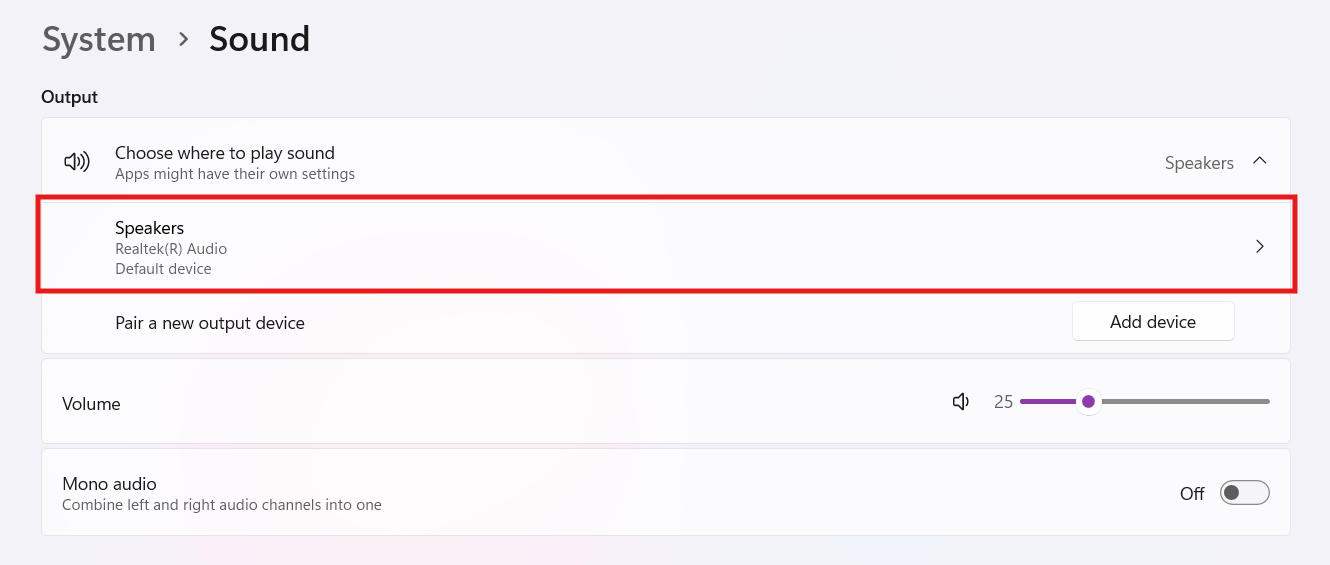
You’ll see the volume controls, spatial audio settings, and the ‘Test’ button. Click ‘Test’ to play a short tone.
Checking Your Microphone: How to Read the Input Level Meter
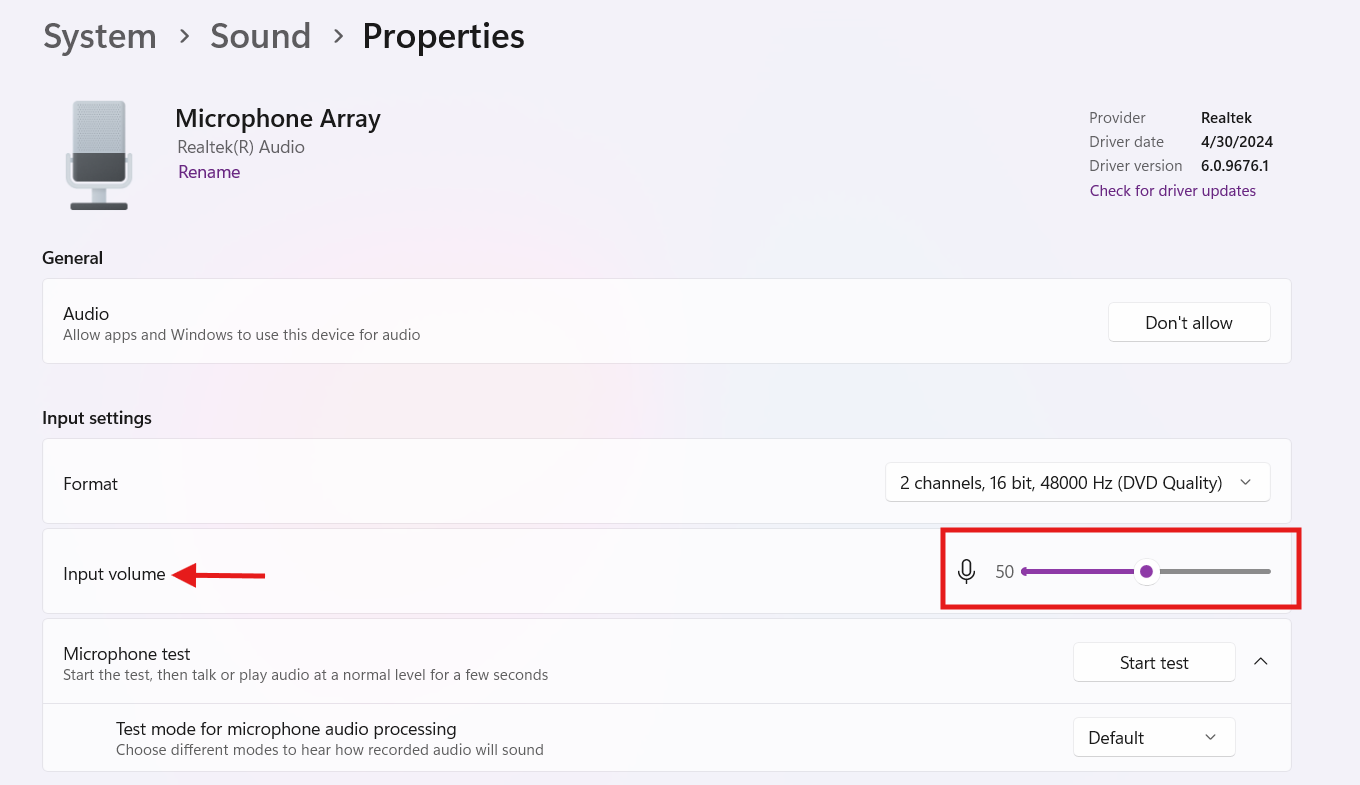
Click your microphone under the ‘Input’ section to open its ‘Properties’ page. You’ll see controls for input volume, format, and any processing options your device supports.
Speak normally and watch the ‘Input volume’ meter move as you talk.
Strong movement means the microphone is capturing your voice clearly. Little or no movement usually means the input level is too low, or you chose the wrong device.
What if My Teams Test Call Fails? (Troubleshooting Tips)
Teams test calls can fail for several different reasons, from missing devices to blocked permissions or outdated drivers. These quick troubleshooting checks help you find out what went wrong and fix the issue before your next meeting.
Problem 1: The "Make a test call" Button is Missing or Grayed Out
The “Make a test call” button doesn’t appear for personal Microsoft accounts or anyone using the free version of Teams, because Microsoft only makes the Echo Test Bot available for work and school accounts. If you’re signed in with a personal Outlook, Hotmail, or Microsoft account, the test call feature simply won’t show up.
If you’re using a work or school account and the button still appears grayed out, Teams isn’t detecting a working microphone or speaker. Open ‘Settings’ and go to ‘Devices’ to check that both dropdowns show an actual device instead of ‘No device.’ The test call button only activates when Teams can see at least one input and one output device.
Restarting the app can also help if Teams cached outdated hardware information and failed to refresh your device list.
Problem 2: You Can't Hear the Test Call (Speaker/Headphone Issues)
The Echo bot plays audio, but you can’t hear anything when Teams sends sound to the wrong output device. Open ‘Settings’ and go to ‘Devices’, then switch your ‘Speaker’ dropdown to your wired headset, Bluetooth device, or external speakers.
If you’re already using the correct one, adjust your system volume and check whether your headset has a physical volume dial or mute toggle. Test again and watch for the volume meter to move while the bot plays audio.
Problem 3: The Test Bot Can't Hear You (Microphone Issues)
The bot plays back silence when Teams fails to detect your microphone. Open ‘Settings’ and go to ‘Devices,’ then choose the microphone you want from the ‘Microphone’ dropdown. Speak into the mic and watch the input bar to confirm it reacts to your voice.
If it doesn’t, raise your input volume in your system settings or check your headset for a physical mute switch. USB mics often require you to reselect them after reconnecting, so unplug and reconnect the device if nothing changes.
How Do You Check Your Windows Audio Settings?
Windows controls your input and output devices at the system level, so Teams follows whatever you set here. Open ‘Settings,’ select ‘System,’ and choose ‘Sound.’
In the ‘Output’ section, click the speaker or headphones you want to use to open the device page, then click ‘Play a test sound’ to confirm the audio plays correctly. In the ‘Input’ section, select your microphone to open its properties and check whether the input meter moves when you speak.
How Do You Check Your Mac's Audio Settings?
macOS manages audio through the ‘Sound panel’ in ‘System Settings,’ and Teams uses the devices you select there. Open ‘System Settings,’ choose ‘Sound,’ and select the correct devices in the 'Output and Input' section.
Test your speakers by playing music or a system alert, then speak into the microphone and make sure the input level bars move. If Teams still can’t detect your mic, open ‘Privacy & Security,’ select ‘Microphone,’ and confirm the app has permission to use your audio input.
Is Your Headset Muted or Unplugged?
Check both ends of your headphone cable, make sure Bluetooth devices are fully connected, and check the mute switch on your headset. After fixing the hardware, reopen Teams’ device settings to refresh.
Can I Record Teams Audio with Notta?
You can record Teams audio with Notta even if your microphone or speakers aren’t working. The Notta Bot joins the call directly through your calendar invite and captures the audio inside Teams itself, so it doesn’t rely on your computer’s input or output devices.
During your meeting, Notta automatically generates a full transcript with up to 98.86% accuracy and creates notes you can review and share in Teams. You'll still get all the key points, even when your own audio setup isn’t cooperating.
How Do You Test Teams Audio in a Web Browser? (Teams for Web)
You don’t need the full desktop app to check your Teams audio. The web version includes basic mic and speaker controls, so you can make sure your devices work before joining a meeting.
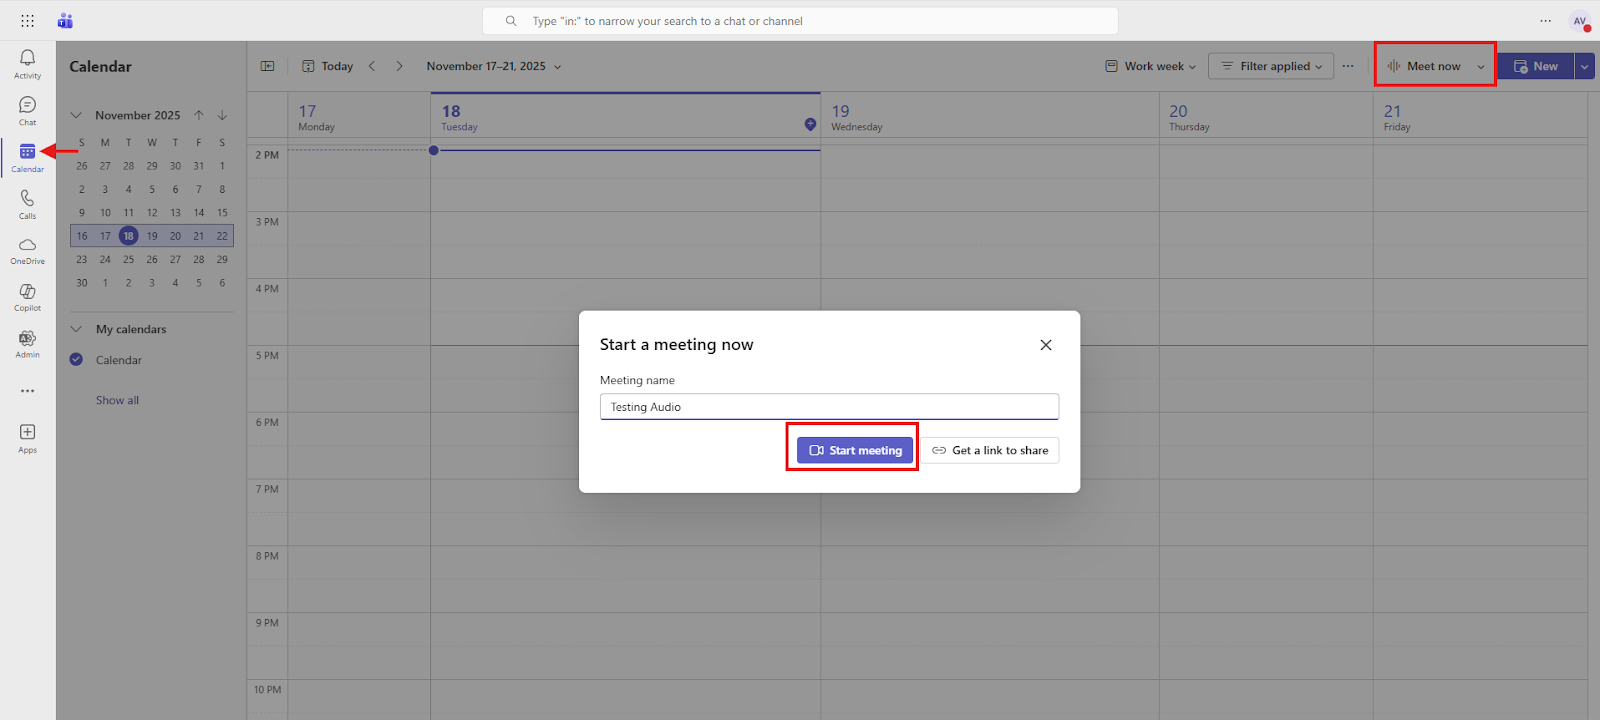
Open Teams in your browser and go to your ‘Calendar.’ Click ‘Meet now’ in the top right corner to start an instant meeting.
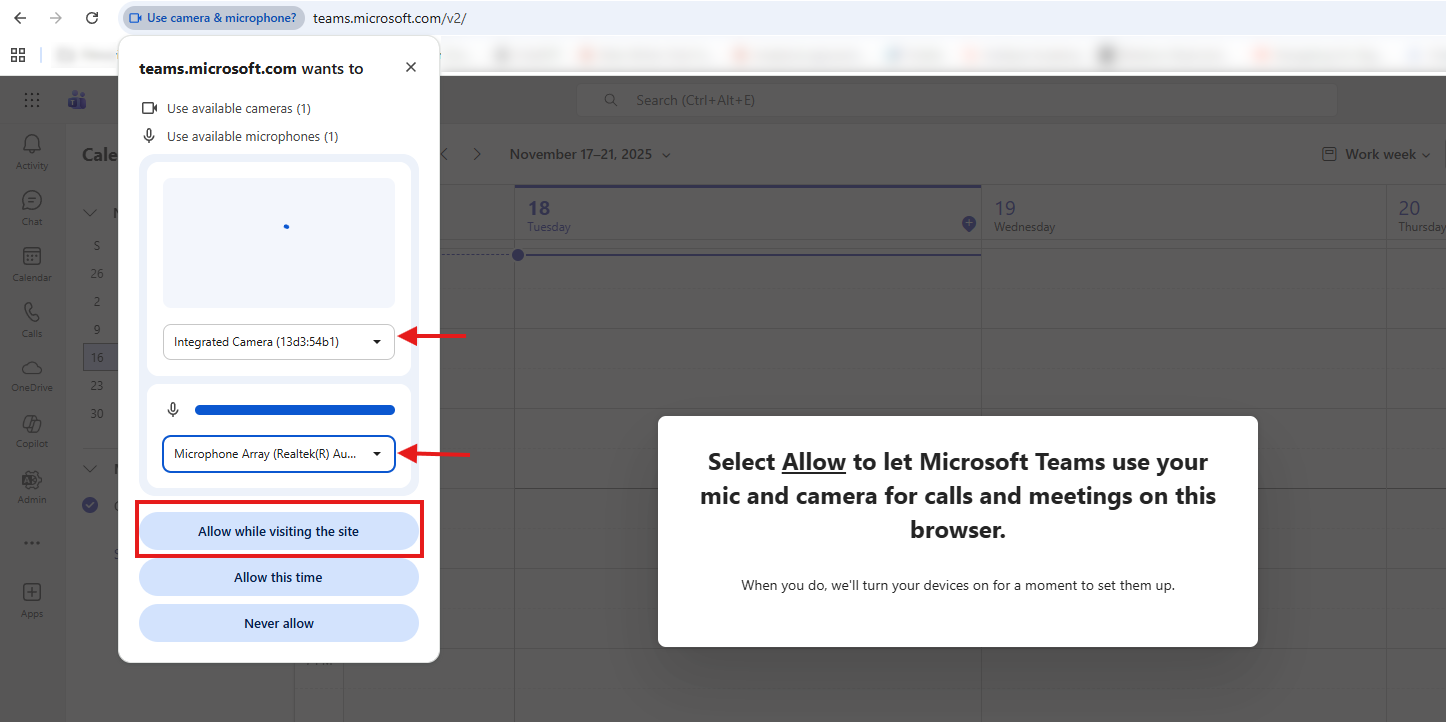
A small pop-up appears showing your camera, microphone, and speaker dropdown menus. Choose your camera and mic here, then click ‘Allow’ so the browser can access your devices.
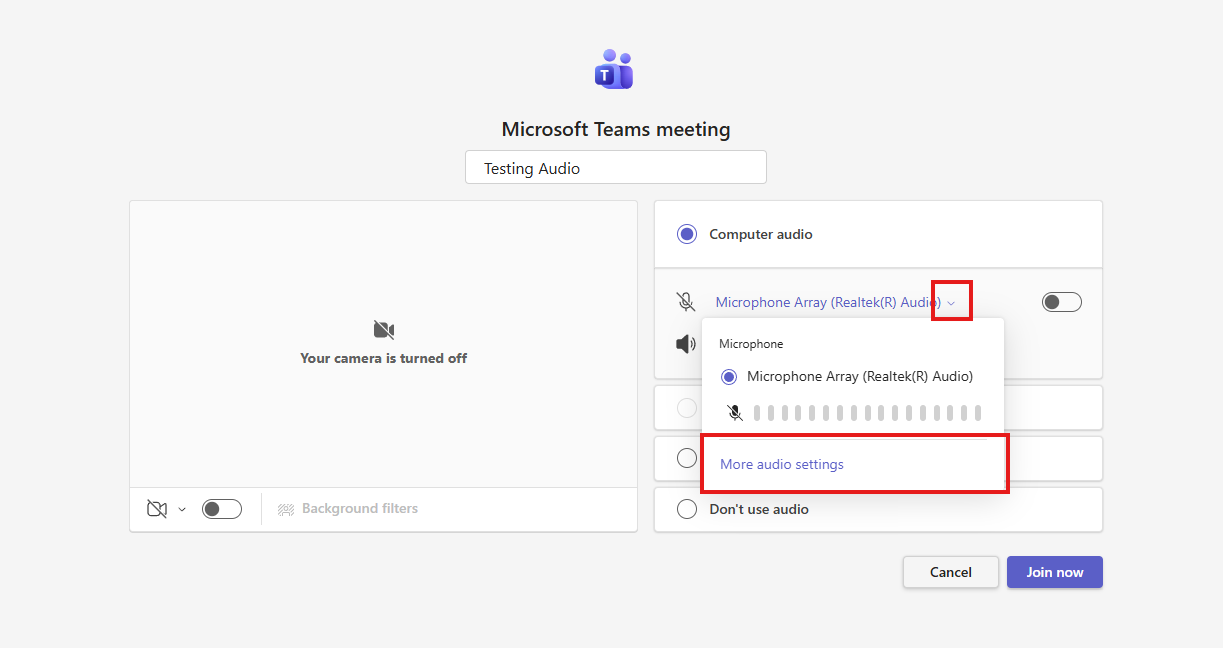
This brings you to the Microsoft Teams meeting pre-join screen. On the right, under ‘Computer audio,’ pick your microphone from the dropdown. Speak normally and watch the input bar under the mic name; it moves when Teams hears you. If the bar’s empty, your mic isn’t working yet.
Click ‘More audio settings’ to open the full audio panel.
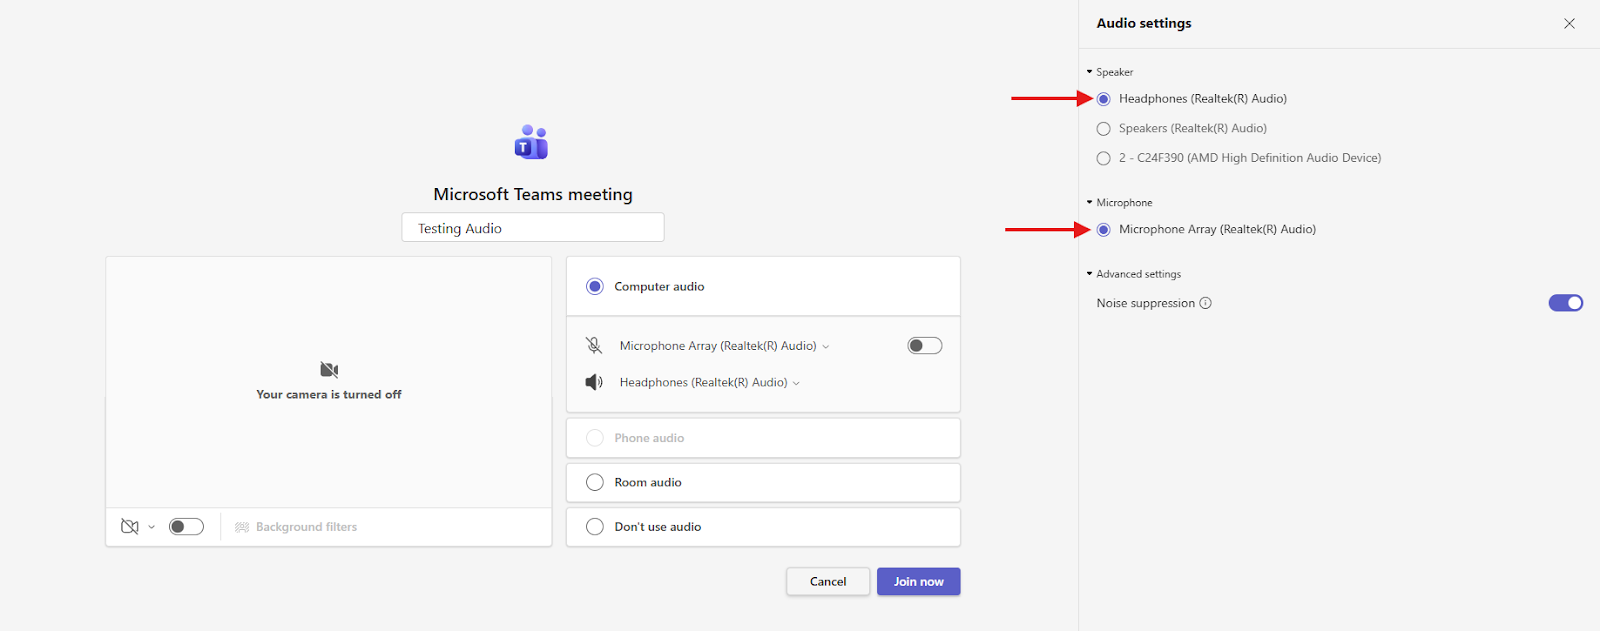
This panel lets you pick your speaker and your microphone from dedicated dropdown lists. You can switch between headphones, speakers, Bluetooth devices, or your built-in mic.
Scroll through the microphone list if you have multiple inputs, then speak again to confirm the bar moves.
Note: Teams for Web does not include the full ‘Make a test call’ feature. You can only test sound by switching devices and watching the input bar.
How Do You Check Browser Permissions for Teams Audio?
Teams for Web needs microphone and camera access before it can use your audio devices, and each browser controls these permissions from its address bar.
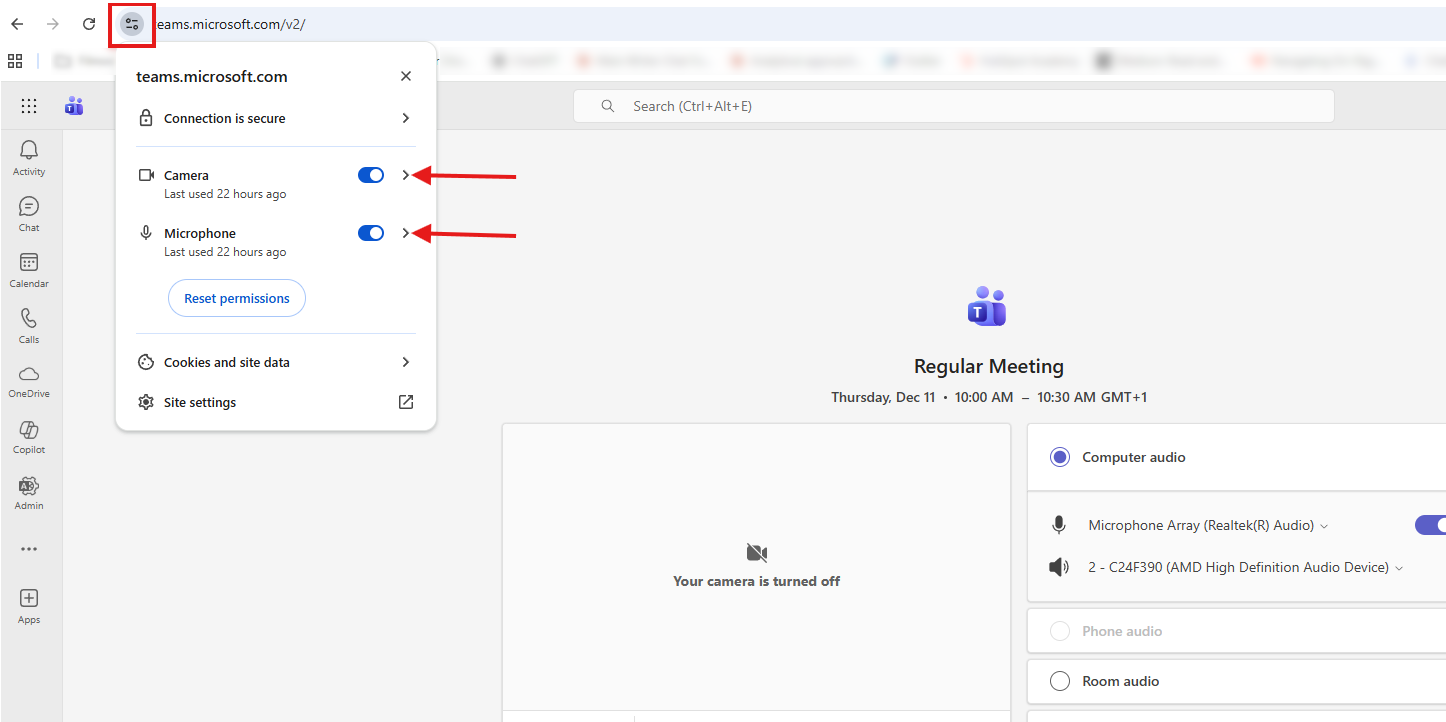
In Chrome, click the ‘Settings slider’ next to the URL to open the site permissions panel. Find ‘Camera’ and ‘Microphone’ in the list, then switch both to ‘Allow’ so Teams can use your devices. You can also click ‘Reset permissions’ if you recently changed something and want Chrome to ask again.
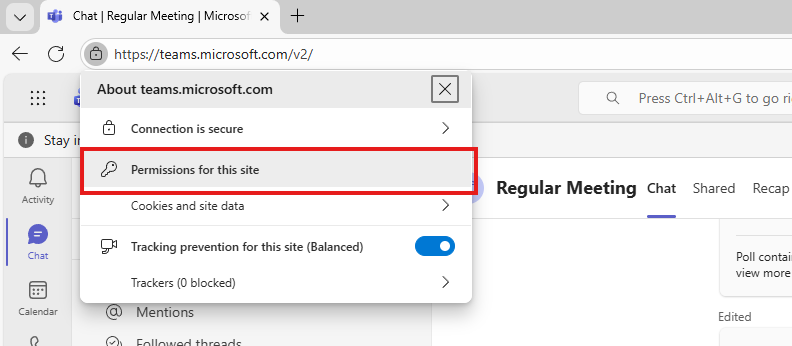
In Edge, click the ‘lock’ icon in the address bar to open the permissions menu. Select ‘Permissions for this site,’ then choose ‘Allow’ for both ‘Camera’ and ‘Microphone.’ Edge saves these permissions immediately, so Teams can access your audio as soon as you reload the page.
Safari works differently because macOS manages microphone access at the system level. When Teams can’t detect your mic in Safari, open ‘System Settings,’ select ‘Privacy & Security,’ and enable microphone access for Safari.
Recording Your Teams Audio with Notta

Audio problems are frustrating, but they’re just one issue that can slow down your Teams meetings. Even when your audio works, it’s easy to miss details, lose track of decisions, or juggle scattered notes while trying to stay present in the conversation.
Notta steps in to handle all of that for you. The Notta Bot joins your Teams meetings and records the discussion directly from the call, so you never rely on your own audio setup. It transcribes your meetings in 58 languages with up to 98.86% accuracy and generates practical notes you can share straight into a Teams chat.
A lot can go wrong in a meeting, but Notta gives you one less thing to stress about. Try Notta for free today to experience your most productive meeting ever.
Frequently Asked Questions About Teams Audio
Can I test my Teams audio before a meeting starts?
Yes, you can test your Teams audio before a meeting starts. On the desktop app, open ‘Settings,’ go to ‘Devices,’ and use ‘Make a test call’ to check your mic and speaker. You should also test your system audio in Windows Sound Settings or macOS Sound Preferences to confirm the correct devices are active.
How do I know if my microphone is working in Teams?
You know your microphone is working in Teams through the input bar next to your microphone name. The bar moves when Teams hears your voice, so normal movement means the mic is active. If the bar stays still, switch microphones or check your system input settings.
Why can't I hear anyone in my Teams meeting, even after a successful test?
You can’t hear anyone in your Teams meeting, even after a successful test, because Teams is sending audio to the wrong output device, or your system volume is too low. Open the ‘Speaker’ dropdown during the meeting and choose the correct device, then raise your Windows or macOS volume. Bluetooth issues, monitor speakers, or muted headsets can also cause silence until you switch back to the right output.

