
How to Record GoTo Meeting on Any Device [Ultimate Guide]
Unlock the power of AI — Notta's meeting assistant records, transcribes and summarizes meeting minutes with one click.
Video conferencing platforms are not just about video calls anymore. In fact, they now come with many features that make remote collaboration an absolute breeze. I've been using Zoom for work meetings, discovery calls, and everything in between, and I've also been invited to some meetings powered by GoTo Meeting.
Just like Zoom, GoTo Meeting comes with a built-in recorder to record a GoTo Meeting session and save it on your device or on the cloud. However, there are cases where GoTo Meeting falls short — the meeting attendees cannot record GoToMeeting calls using the built-in feature.
In this comprehensive guide, I'll reveal the simple steps to record GoToMeeting sessions on iPhone/iPad, Android, and PC.
How to record a GoTo Meeting session on iPhone/iPad?
GoTo Meeting has improved a lot, and it's no longer just the obvious choice for video calls. In fact, GoTo Meeting has been building some extras to help teams collaborate and improve productivity.
The first — and most helpful — is the recording feature. It's so easy to use, and the 'Record' option is available right after you start the session. However, only the host can record the video conferencing calls with the built-in GoTo Meeting recorder.
Here's how to record GoToMeeting on an iPhone as an attendee.
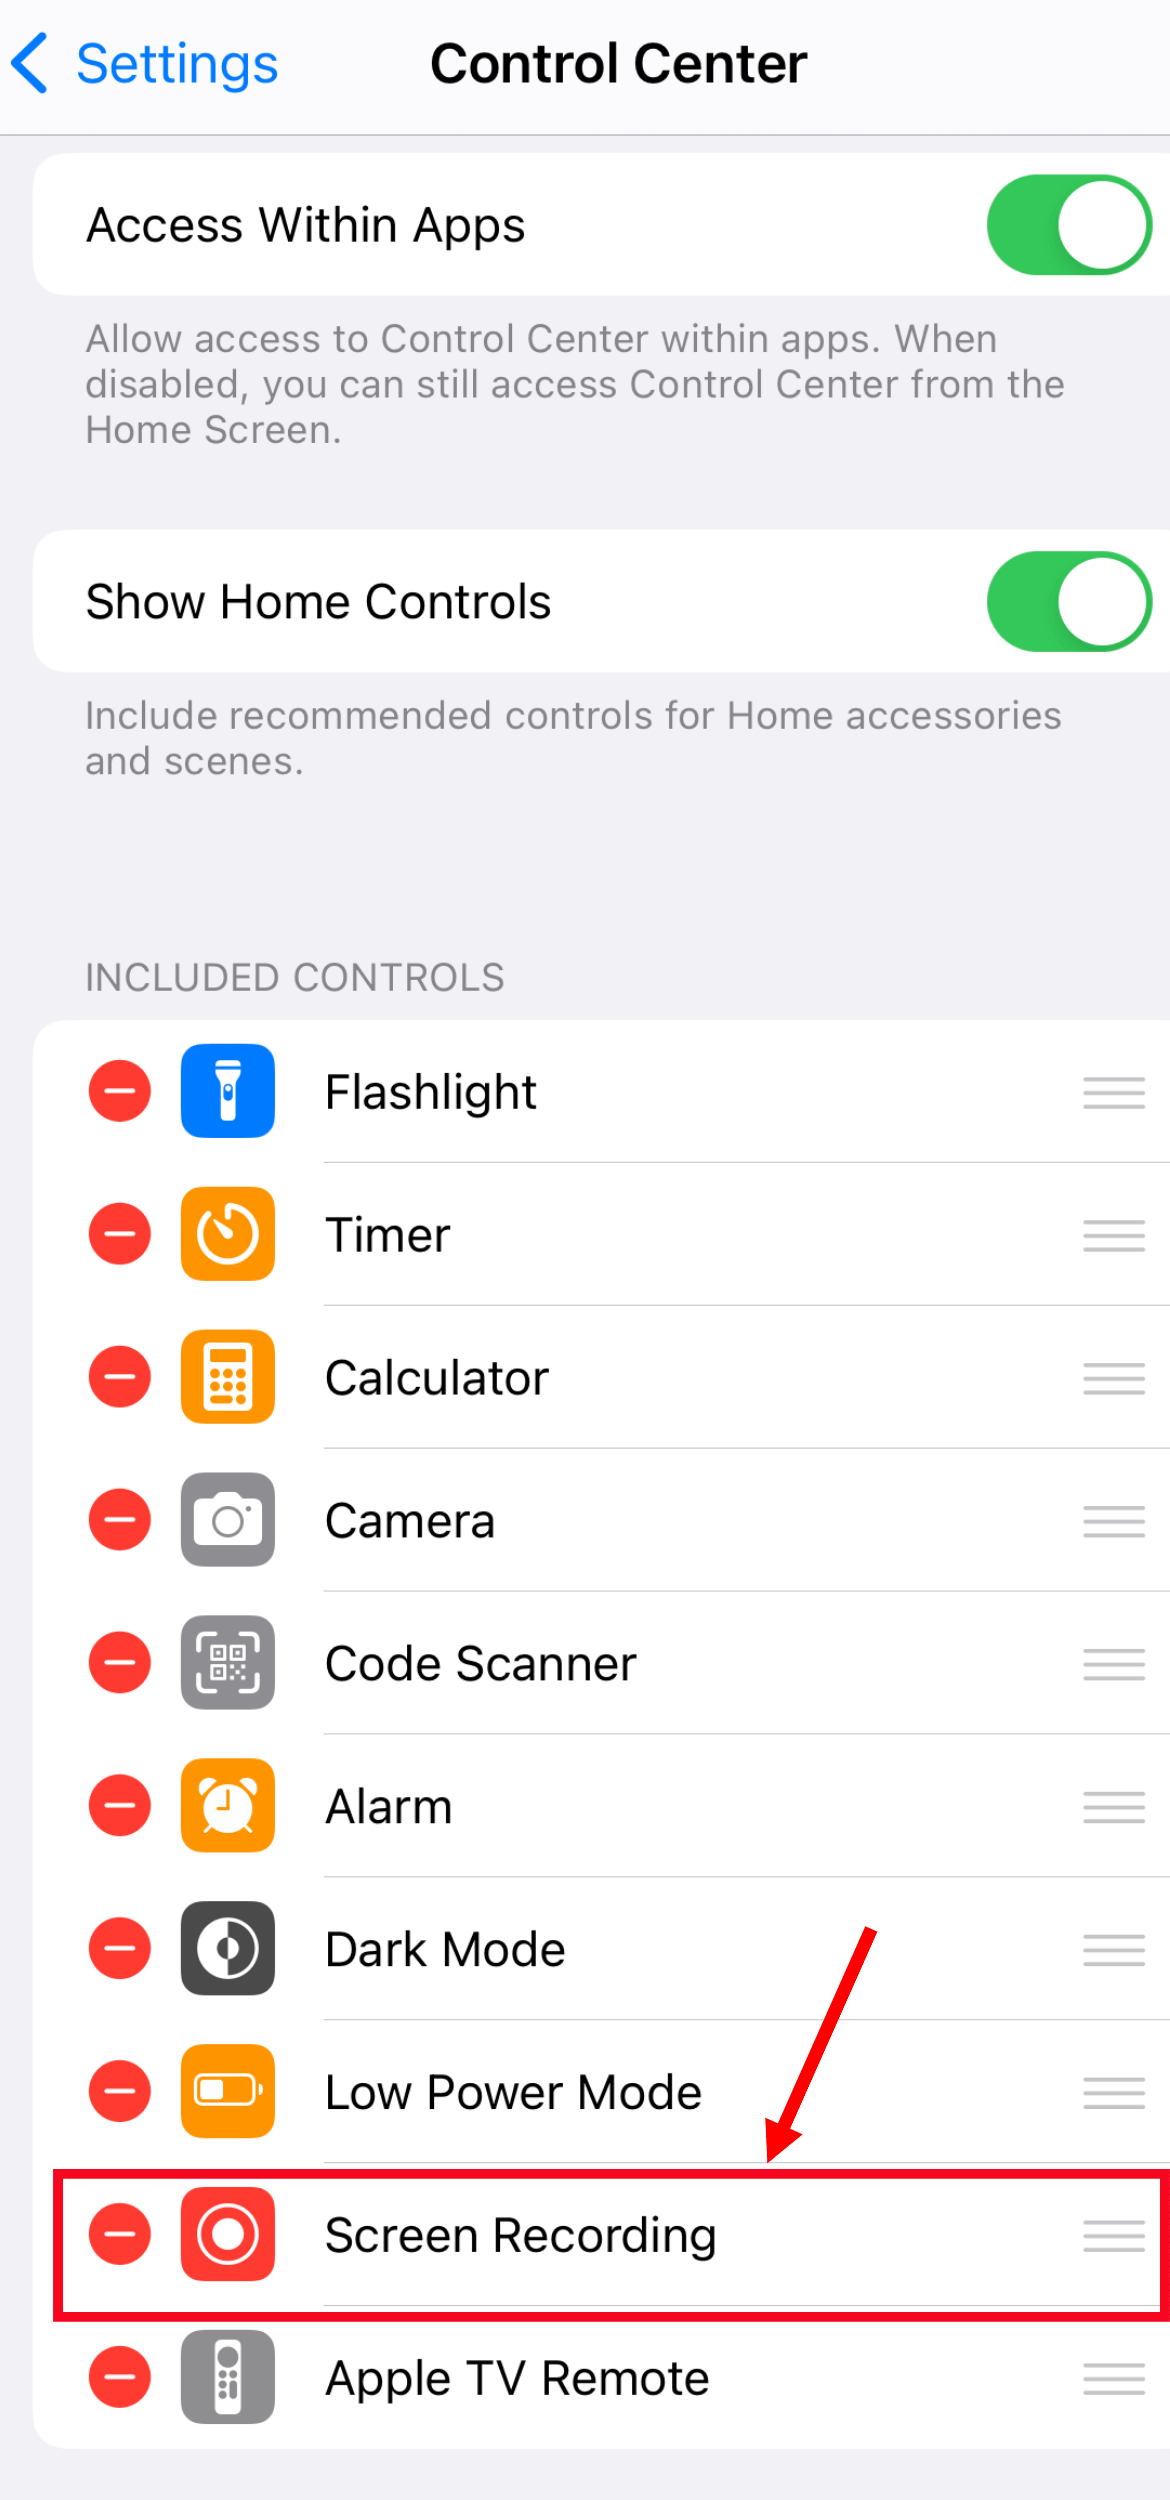
Step 1: Open the iPhone settings and select the 'Control Center.' Then, tap the '+' icon located next to 'Screen Recording' to enable the feature.
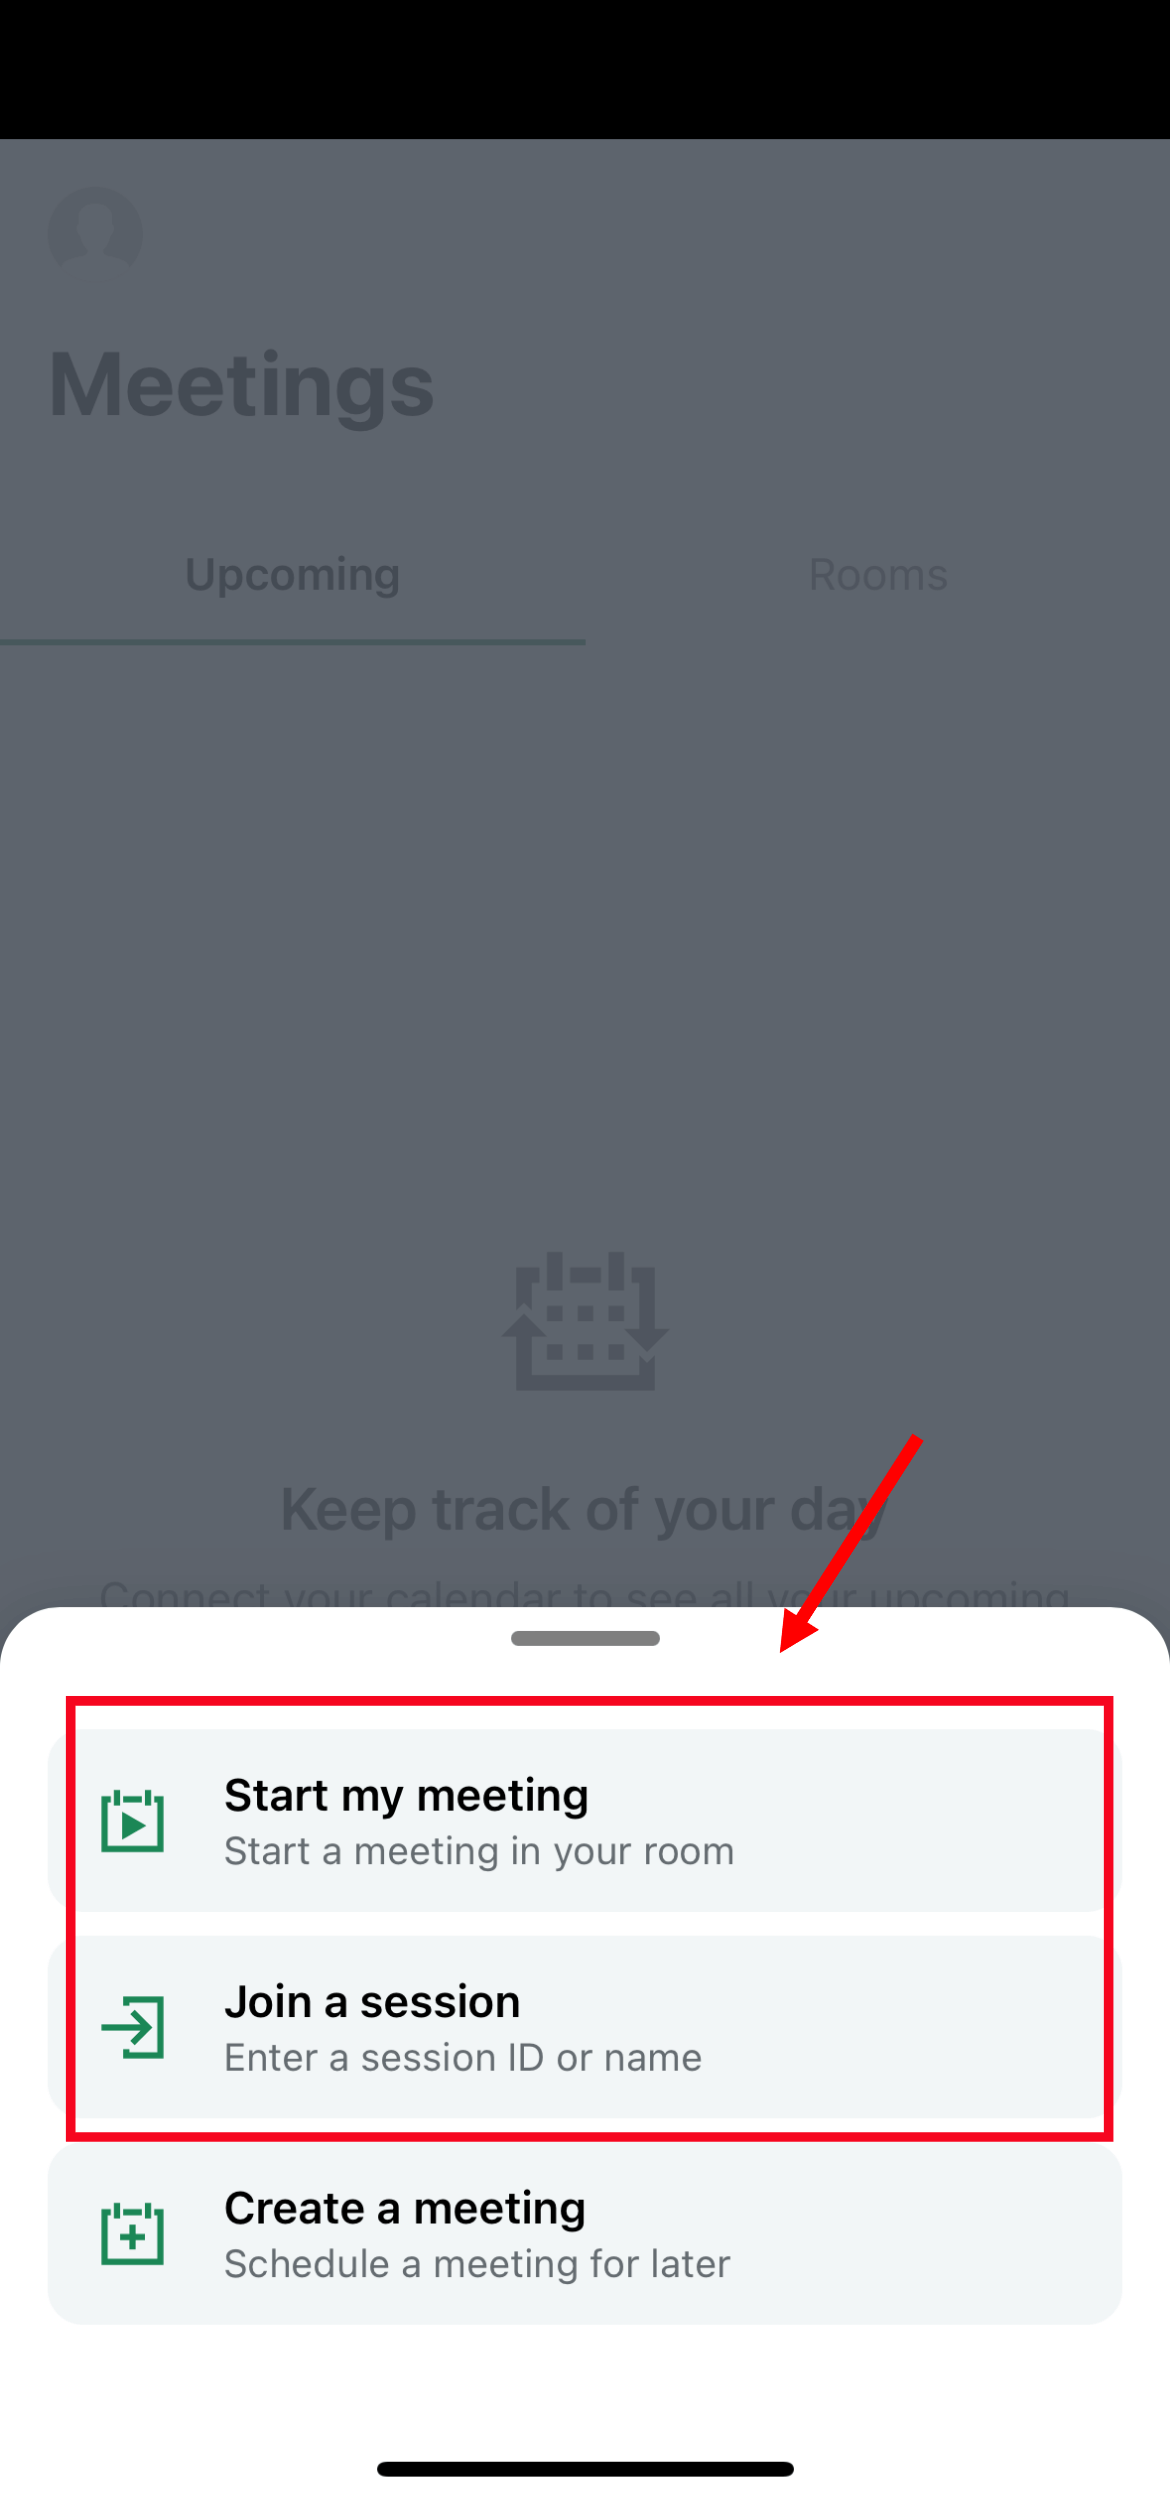
Step 2: Now, open the GoTo Meeting app on your iPhone or iPad. Start — or join — the GoTo Meeting session that you want to record.
Step 3: Next, swipe up from the bottom of the screen and find the 'white dot.' Press and hold the button for a few seconds and turn on the microphone audio.
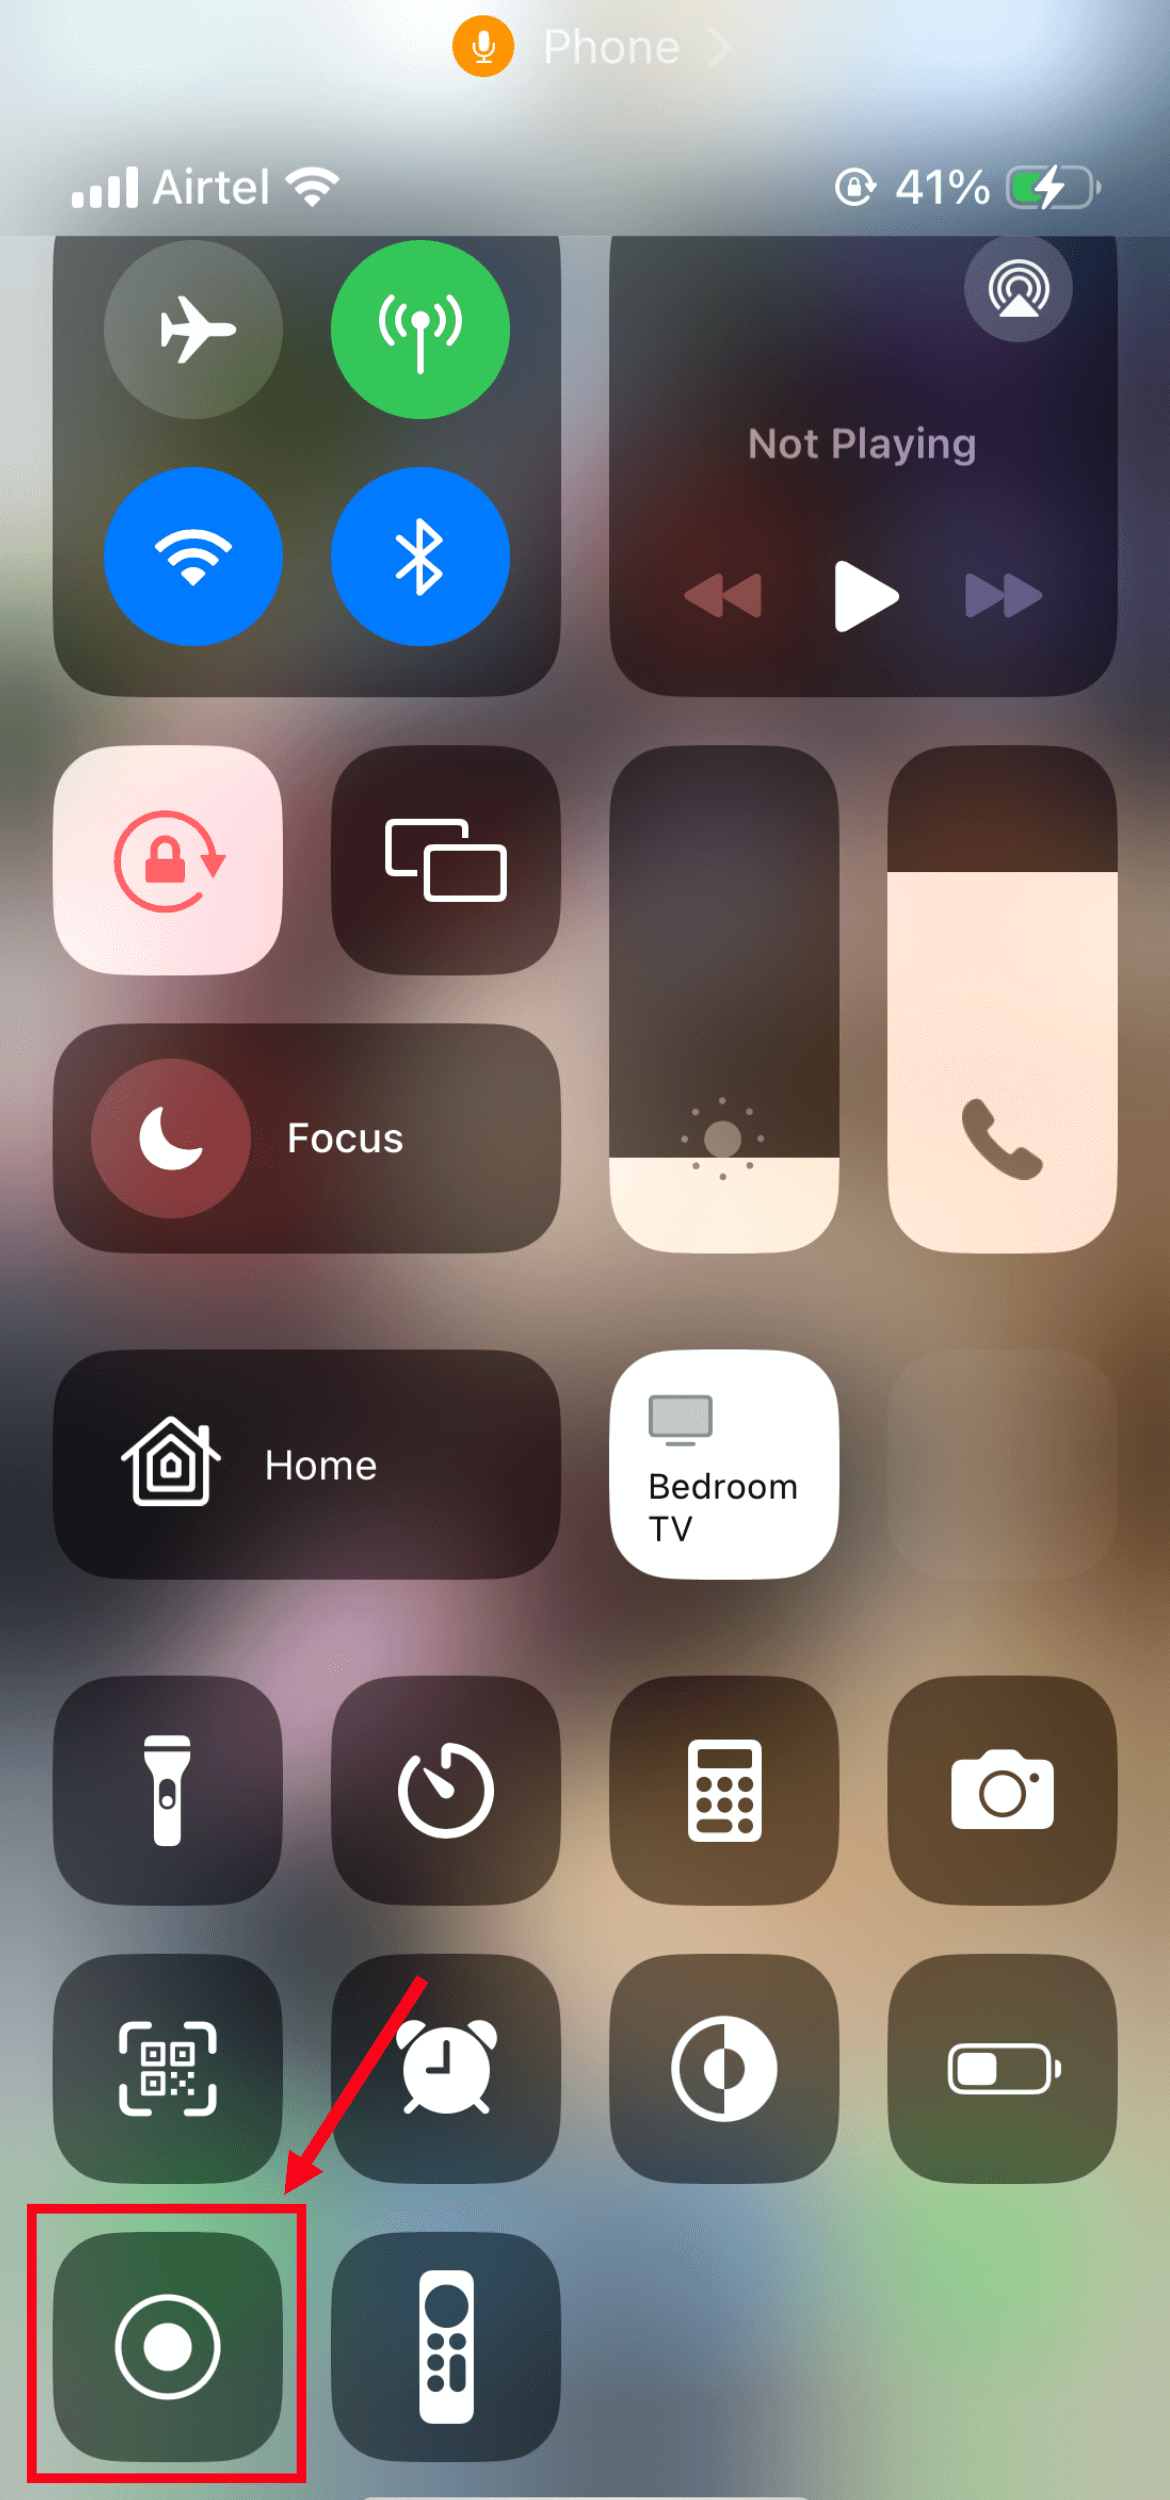
The screen recording of your GoTo Meeting with audio will start, which will be automatically saved in the 'Photos' app. You can even share the recording with your team members or generate the transcript using the Notta Web App.
How to record a GoTo Meeting session on Android devices?
If you want to record a GoTo Meeting and share it with the participants, you can use the built-in screen recorder. Most — if not all — Android devices come with the recording feature, and it isn't overly complicated to use. Here is how to record a GoToMeeting session on Android.
Step 1: Start or join the GoTo Meeting on your Android device. Next, swipe down the screen and select 'Screen Recorder.' (Note: If you can't find the option, select 'Edit' and then drag the 'Screen Recorder' icon to the quick panel.)
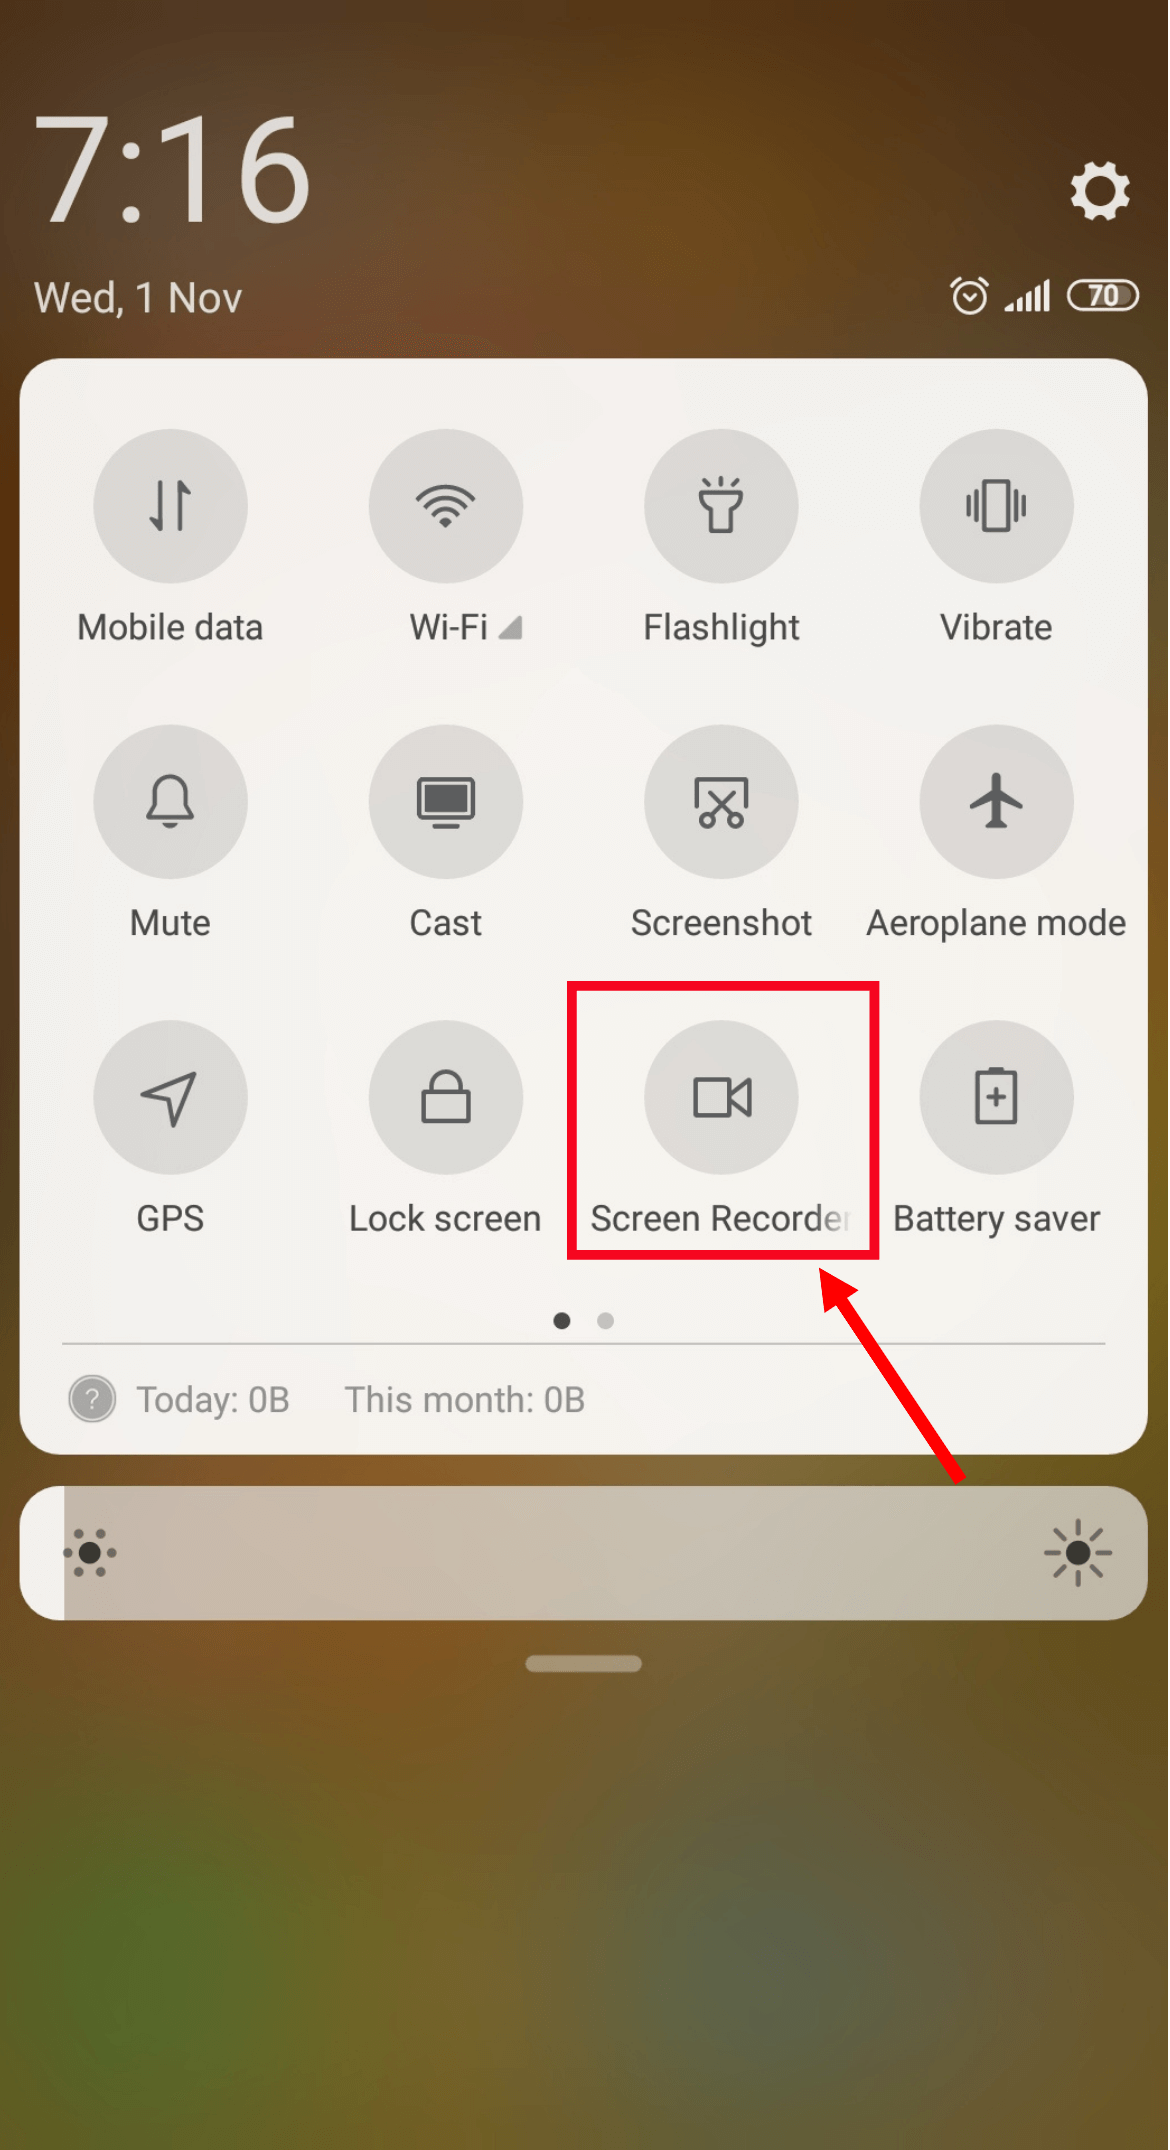
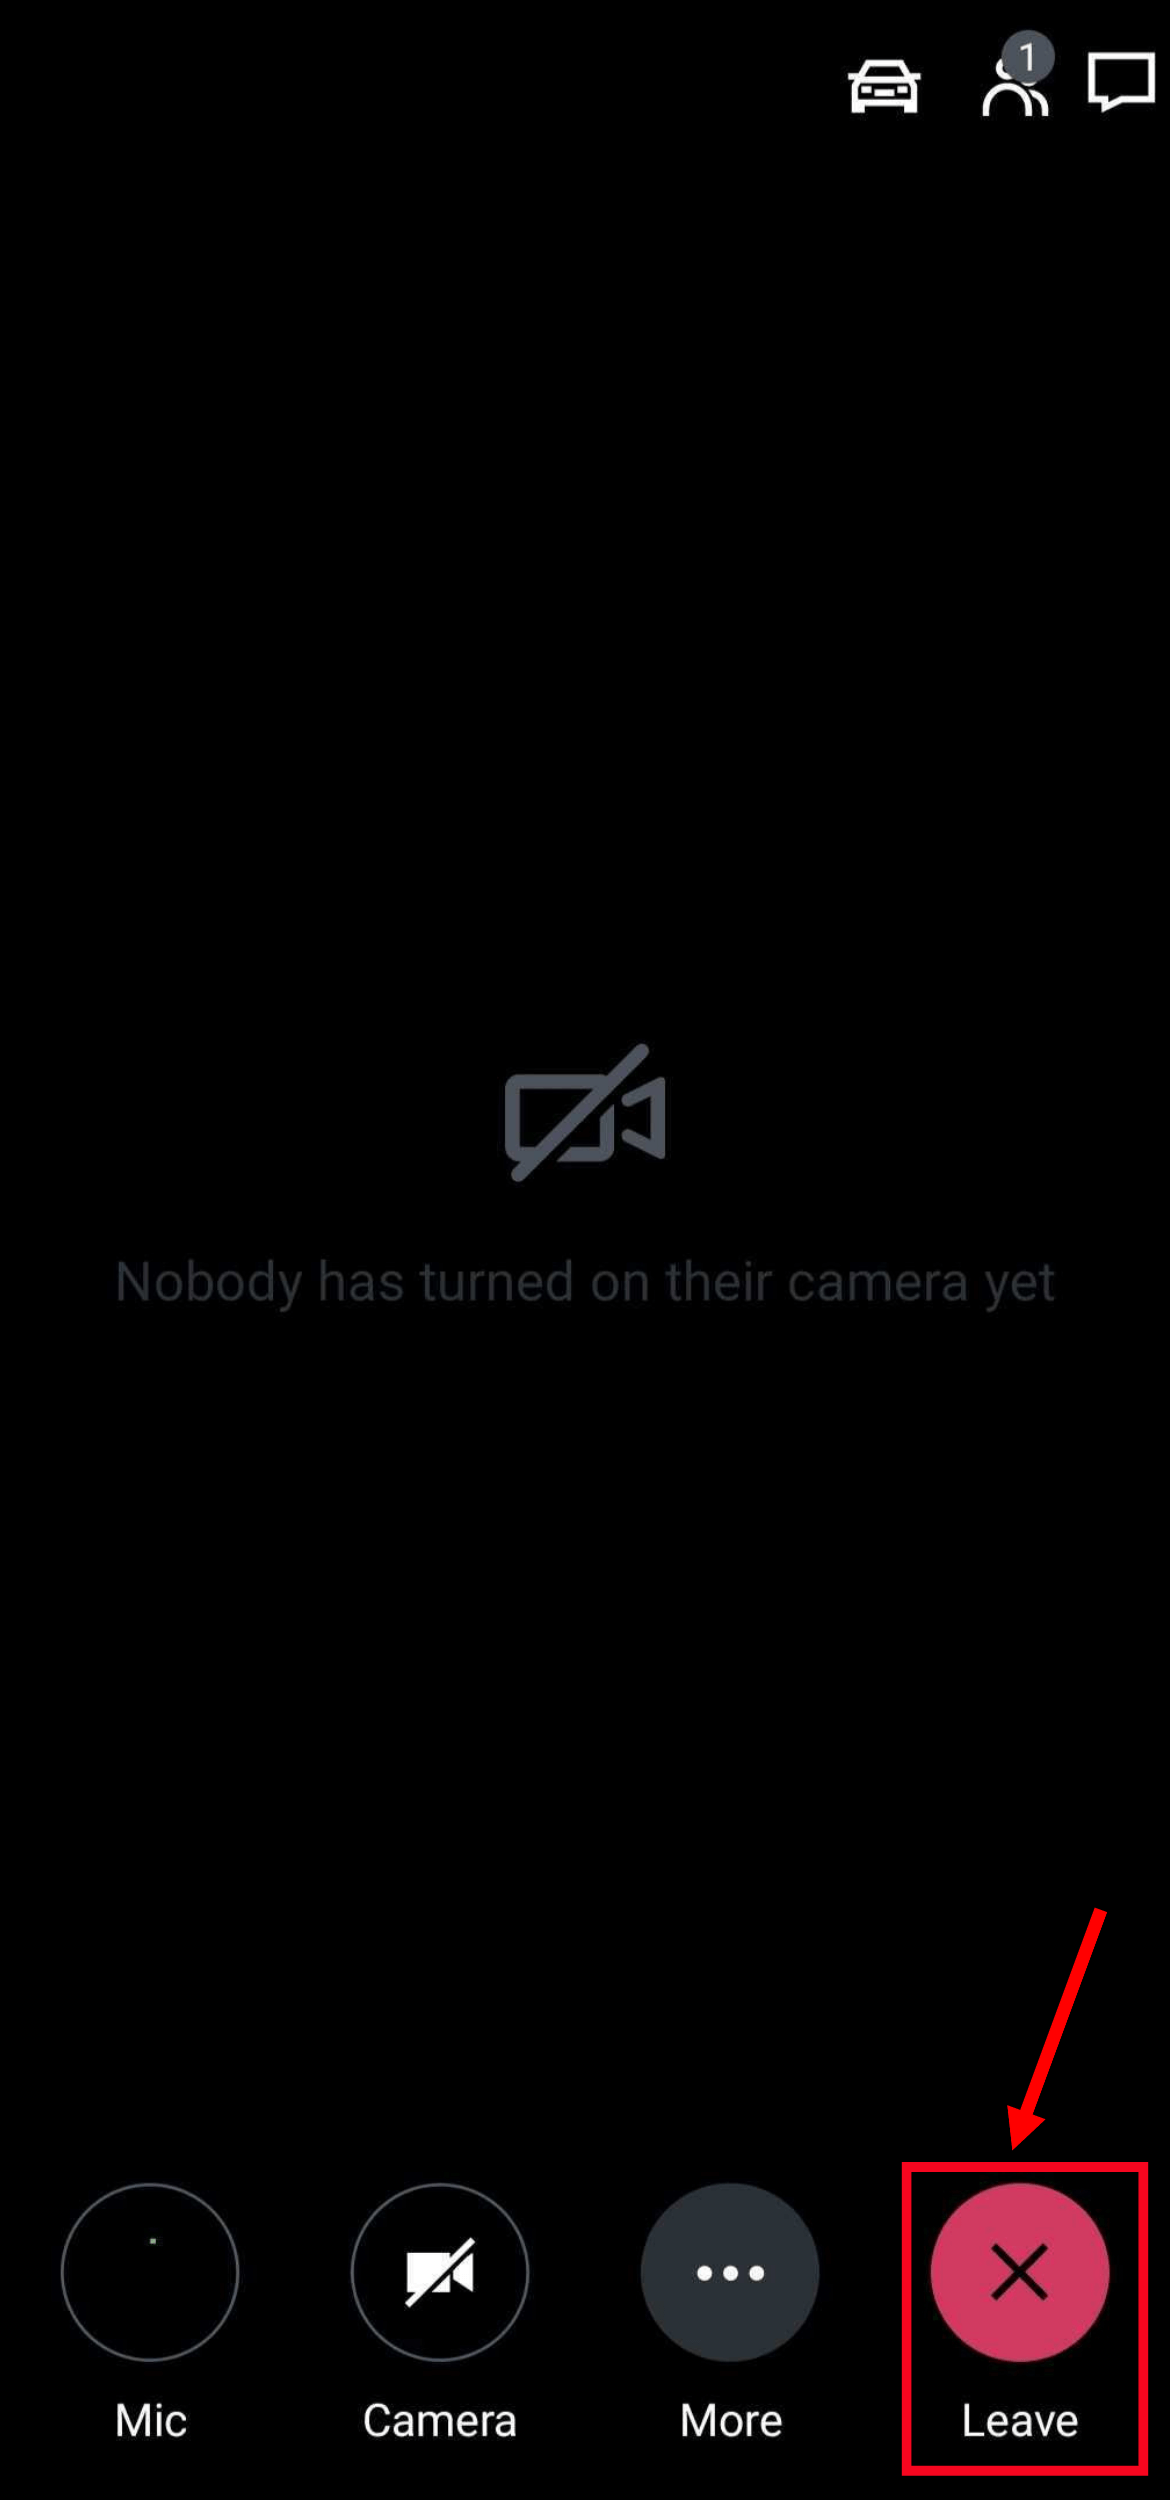
Step 2: The built-in screen recorder of your Android phone will start recording the GoTo Meeting. When the discussion ends, select the 'Leave' icon and then ‘Stop’ the screen recorder to automatically save the recording to the 'Gallery' app.
How to record a GoTo Meeting session on Windows/Mac?
GoTo Meeting's built-in recorder can help you record all your sessions and save them for future reference — but there are certain limitations that make it a less ideal choice for most people.
First, the built-in recorder works only if you're hosting the meeting. Secondly, you'll need a Pro or Plus tier account to enable the recording feature. This makes the GoTo Meeting app limited, especially for the team members attending the session.
Notta is a great audio recorder and transcriber — and a nice alternative to GoToMeeting's built-in recorder. This tool lets you record meetings or webinars and even transcribe them with 98.86% accuracy. Here's how to record a GoToMeeting session on Windows or Mac using Notta.
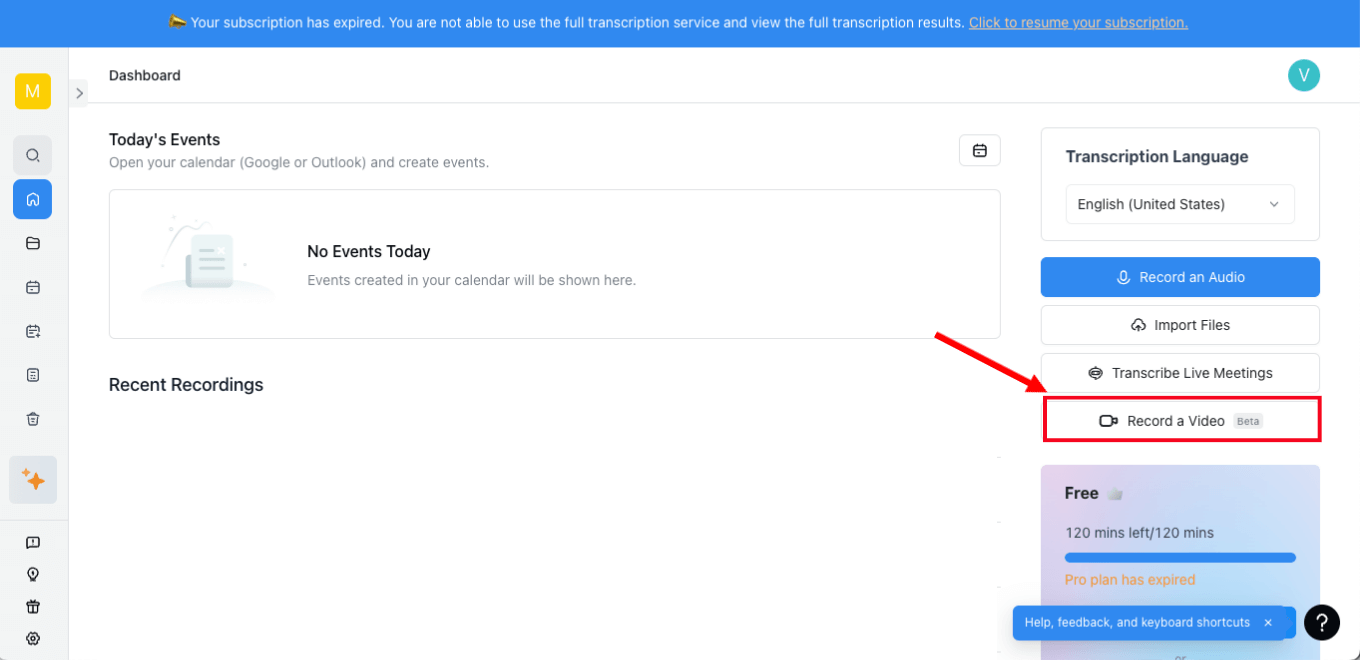
Step 1: Start or join the GoTo Meeting. Open the Notta Web App on Windows or Mac and select 'Record a Video' on the dashboard. If you don’t have an account yet, sign up for a free Notta account first.
Step 2: Choose how you want to record: Screen Only, Camera Only, or Screen & Camera, followed by 'Start Recording.'
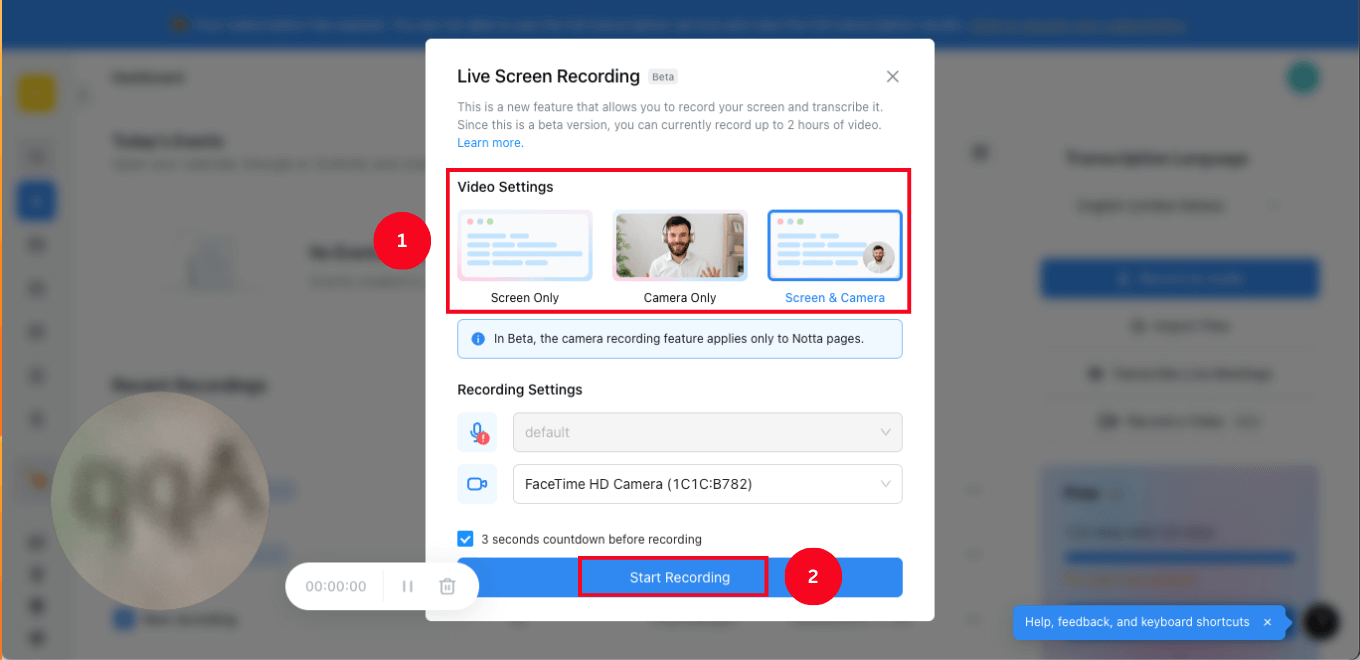
Next, select the GoTo Meeting tab, and Notta will start recording — and at the same time transcribing — everything you talk about.
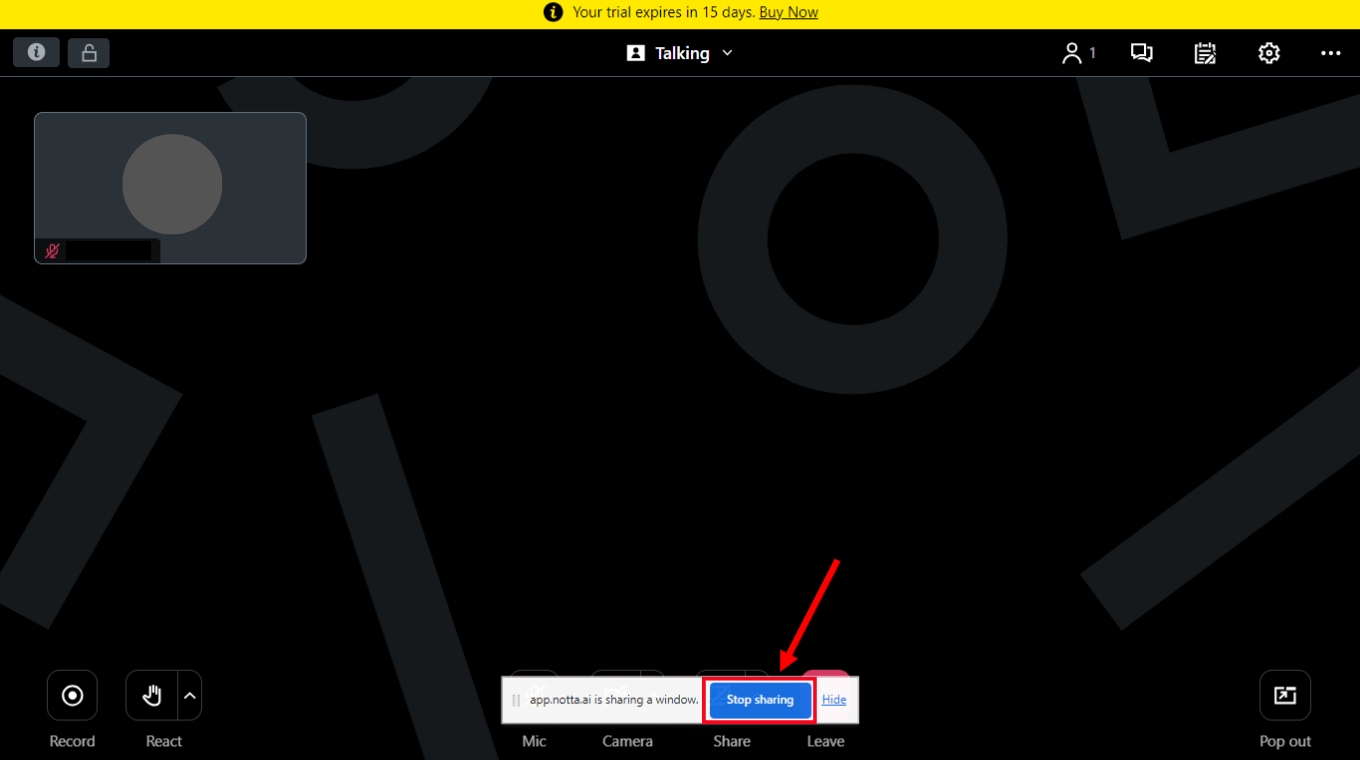
Step 3: Click 'Stop Sharing' to end the GoTo Meeting recording, and Notta will automatically save the recording and transcript of the entire conversation on its dashboard.
Step 4: You can also download or share the transcript or summary with anyone and in popular formats like XLSX, MP3, SRT, TXT, DOCX, and even PDF. This makes Notta especially useful for someone who wants to save the important information that was discussed in the meeting.
![]()
Note: The 'Live Screen Recording' feature of Notta is still in its beta version, and you can currently record up to 2 hours of video.
Notta AI meeting assistant records, transcribes, and summarizes meetings so everyone can stay engaged without missing important details.
FAQs
Can GoTo Meetings be recorded?
Yes, GoTo Meeting sessions can be recorded via a built-in recorder and third-party apps. Notta is a recorder and transcriber application that can record your meetings, transcribe the audio, and safely store it for later use. You can then use the Notta AI Summary generator to summarize the transcript, gather the key insights, and even generate action items.
How do I get GoTo Meeting recordings?
If you are using the built-in recorder, GoTo Meeting recordings are stored locally on the computer and even in the GoTo app. If you have recorded locally, go to the 'Documents' folder to access the recorded file. (Note: All local recordings are saved in WEBM format — and you'll need to use any third-party app to convert the file into other popular formats.)
Can I record GoTo Meeting if I'm not the host?
GoTo Meeting is a great video conferencing platform, but it falls short when it comes to recording sessions. If you are not the meeting host organizer, there's no use of the built-in recorder of the GoTo Meeting app.
Notta is a reliable third-party recorder and transcriber that can help you record GoToMeeting as an attendee without permission. In addition, it can help you turn every bit of sound into written text and keep it saved once the meeting is over.
How do I record a webinar on GoTo?
You'll need GoTo Webinar (another product of the GoTo app) to record your next webinar with both audio and audio — though it comes at an expense. You can choose any GoTo paid plan that starts from $12 with a payment of $20 extra for a GoTo Webinar add-on. Once you've paid the price, start the webinar and select 'Start Recording' on Windows or 'Record' on Mac.
If you don't want to spend nearly $22 per month, give Notta a chance. It's an AI tool that can record your GoTo Meeting — and even live transcribe Zoom, GMeet, Webex, or Microsoft Teams. Notta's great advantage is the highly accurate transcription feature, generous free plan, and many integrations with popular third-party apps like Google Drive, Notion, and more.
Key takeaways
GoTo Meeting is a great video conferencing platform with unlimited cloud storage, recording and transcribing options, and even robust security controls. While you can record GoToMeeting sessions with a built-in recorder, the feature is only available to the meeting hosts or organizers.
Notta is a great choice if you constantly schedule or attend meetings on video conferencing platforms like GoTo Meeting, Zoom, Microsoft Teams, Google Meet, and even Webex. It is packed with AI features like transcription and summarization to help you extract important points from meetings — without extra work.